Advertisement
Quick Links
K-1 Combination Auger Instructions
WARNING
Read and understand these instructions, the battery drill instruc-
tions and the warnings and instructions for all equipment being
used before operating this tool to reduce the risk of serious per-
sonal injury.
• Do not wear loose clothing or jewelry. Keep your hair and clothing away from moving parts. Loose
clothing, jewelry or hair can be caught in moving parts.
• Always use safety glasses and leather work gloves in good condition while handling or using. Use
latex or rubber gloves, face shields, protective clothing, respirators or other appropriate protective equip-
ment when chemicals, bacteria or other toxic or infectious substances are suspected to be present to re-
duce the risk of infections, burns or other serious personal injury. Wear latex gloves or rubber gloves under
leather gloves.
• Practice good hygiene. Use hot, soapy water to wash hands and other body parts exposed to drain con-
tents after handling or using drain cleaning equipment. Do not eat or smoke while operating or handling
drain cleaning equipment. This will help prevent contamination with toxic or infectious material.
• Do not use with a corded drill. Operating with a corded drill increases the risk of electrical shock.
If you have any question concerning this RIDGID
®
product:
– Contact your local RIDGID distributor.
– Visit www.RIDGID.com to find your local RIDGID contact point.
– Contact Ridge Tool Technical Service Department at rtctechservices@emerson.com, or in the U.S. and
Canada call (800) 519-3456.
Description and Specifications
Description
The RIDGID
®
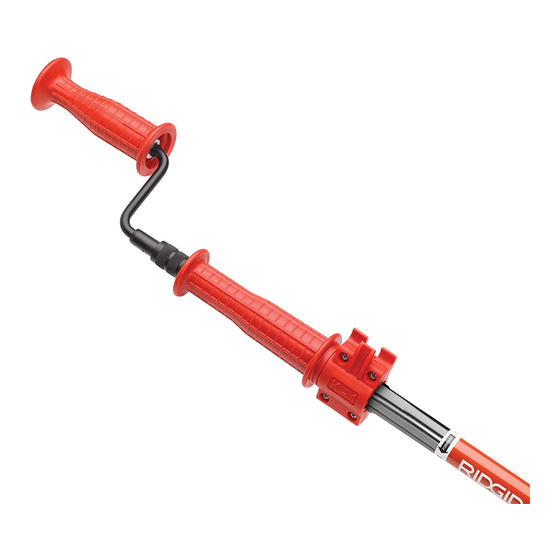
Model K-1 Combination Auger is specifically designed to clean urinal drains through the urinal trap.
It will clean drain lines up to 2" in diameter and up to 4' in length and may also be used on shower drains and
clean outs.
The Auger can be operated either manually or driven with a battery powered drill with a maximum speed of 500
rpm. The K-1 Combination Auger may not be able to pass through all urinal traps, depending on the design.
Specifications
Cable Size.................3/8" (10 mm) Hollow Core
Cable Length.............4' (1.2 m)
Max. Pipe Capacity...2" (50 mm)
Min. Pipe Capacity ....1
1
/
" (32 mm)
4
Crank
Head Type................."C" Cutter
Figure 1 – K-1 Urinal Auger
Maximum RPM .........500
NOTICE
This machine is made to clean drains. Properly used, it will not damage a drain that is in good con-
dition and properly designed, constructed and maintained. If the drain is in poor condition, or has not been prop-
erly designed, constructed and maintained, the drain cleaning process may not be effective or could cause
damage to the drain. The best way to determine the condition of a drain before cleaning is through visual in-
spection with a camera. Improper use of this drain cleaner can damage the drain cleaner and the drain. This ma-
chine may not clear all blockages.
Inspection/Maintenance
Clean equipment, including handle to aid inspection and improve control. Clean any debris from the cable.
Inspect the Combination Auger for proper assembly, completeness, binding, wear or damage (such as flats,
kinks, stretching or corrosion). If any problems are found, do not use until corrected.
If using a battery powered drill, inspect per its instructions. Confirm that the drill is in good operating condi-
tion, the switch controls operation and that the drill turns at less than 500 rpm.
Set Up/Operation
1. Inspect the drain. Confirm the K-1 Combination Auger is appropriate for the job. Determine if chemicals
are present. If chemicals are present in the drain, it is important to understand the specific safety meas-
ures required to work around those chemicals. Contact the chemical manufacturer for required informa-
tion. Take appropriate steps to access the drain.
2. Make sure all equipment is inspected and set up per its instructions.
3. Manual operation - make sure that the crank handle is securely attached.
4. Powered Operation
• Set battery powered drill to low speed (less than 500 rpm) and with dry
hands insert the battery.
• Set drill to turn the auger in the FORWARD direction (see the label on the guide tube).
• Remove the crank handle from the combination auger. Securely attach the chuck of the drill to the drive
shaft. (See Figure 3).
©2014, 2020 RIDGID, Inc.
3/20
The Emerson logo and RIDGID logo are registered trademarks of Emerson Electric Co. or RIDGID, Inc. in the U.S. and other countries.
EC44827
All other trademarks belong to their respective holders.
Loosening Collar
Figures 3A, B, C
5. Pull the Crank handle or drill up to retract the cable into the
guide tube (Figure 4). Carefully insert the guide tube into the
urinal/drain. Tilt the auger for easy entry. The end of the guide
tube must be in the drain to properly support the cable and pre-
vent cable whipping. The cable and cutter can damage the
porcelain.
6. Rotate the cable in the Forward (clockwise) direction while
pushing the crank handle or drill toward the guide tube to ad-
vance the cable into the drain (Figure 5). To negotiate urinal
traps and other tight bends:
• Use sharp thrusts of the cable in and out, both with and
without the cable rotating.
• Turn the auger in reverse for several seconds while advancing
the cable. Do this only long enough to advance through the
trap. Running the cable in reverse can damage the cable.
Do not force the cable – if the cable stops turning, it is not
cleaning the drain. It may be necessary to spin the cable with-
out advancing it, or advancing the cable very slowly. This will
help to break up the blockage.
7. If the cable becomes stuck in the blockage, do not continue
turning it. Continuing to turn the cable may cause it to twist,
kink and break. It may be necessary to back the cable out of
the blockage by pulling back on the crank handle.
If the cable will not come free from the blockage, rotate the
cable in Reverse direction, and pull on the cable until it is free
of the blockage. Do not operate the machine in the reverse di-
rection any longer than required to free the cable end from the
blockage or cable damage can occur.
8. To extend cable beyond the initial 2' (.6 m), press button (Fig-
ure 6). Pull crank handle/drill up until button locks into second
hole.
Warning/Direction Label
9. Continue to rotate the cable in the Forward (clockwise) direc-
tion while pushing the crank handle or drill toward the guide
tube to advance the cable into the drain.
Handle
Guide Tube
10. Reverse procedure to retrieve cable. Continue rotating handle
in Forward (clockwise) direction.
11. Do not remove guide tube from urinal/drain until the cable is
fully retracted into the handle and rotation has completely
stopped.
Cleaning
Cable should be thoroughly flushed with water to prevent damaging effects of sediment and drain cleaning
compounds. Clean exterior as needed with hot soapy water and/or disinfectants.
Tourniquet hybride K-1 : Mode d'emploi
cheveux et vos vêtements des éléments rotatifs de l'appareil. Les accessoires vestimentaires, les bi-
joux et les cheveux risquent d'être entraînés par les éléments rotatifs de l'appareil.
• Portez systématiquement des lunettes de sécurité et des gants de travail en cuir lors de la manip-
ulation de l'appareil. Prévoyez des gants en latex ou caoutchouc, une visière intégrale, une combinaison
chimique, un respirateur et/ou autres moyens de protection appropriés en présence (ou présence soupçon-
née) de produits chimiques, bactériologiques, toxiques ou infectieux afin de limiter les risques d'infection,
Figure 2 – Direction Label
de brûlures ou autres graves lésions corporelles. Le cas échéant, portez les gants en latex ou caoutchouc
sous les gants en cuir.
999-995-016.10
REV. B
Removing the Handle
Installing Drill
Figure 4 – Retracting the Cable
Figure 5 – Operating the Auger
Figure 6 – Extending the Cable
AVERTISSEMENT
Afin de limiter les risques d'accident grave, familiarisez-vous avec
ce mode d'emploi, ainsi que celui de la perceuse à piles et de
l'ensemble du matériel accessoire avant d'utiliser cet appareil.
• Ne portez ni accessoires vestimentaires ni bijoux. Eloignez vos
• Respectez les règles d'hygiène. Lavez vos mains et autres membres exposés à l'eau chaude savonneuse
après toute manipulation de matériel de curage. Ne jamais fumer ou manger pendant l'utilisation de ce type
de matériel. Cela limitera les risques de contamination ou d'infection potentiels.
• Ne pas utiliser de perceuse sur secteur pour mouvoir cet appareil. L'utilisation d'une perceuse sur
secteur augmenterait les risques de choc électrique.
Pour toutes questions visant ce produit RIDGID
®
:
– Consultez le revendeur RIDGID le plus proche
– Visitez le site ww.RIDGID.com pour localiser le revendeur RIDGID le plus proche
– Contactez les services techniques de Ridge Tool par mail adressé à rtctechservices@emerson.com, ou,
depuis les Etats-Unis et le Canada, en composant le 800-519-3456.
Description et caractéristiques techniques
Description
Le tourniquet hybride RIDGID
®
K-1 est prévu pour le curage des siphons d'urinoir. Il peut également servir à curer
les conduites d'évacuation d'un diamètre maximale de 2 pouces sur une distance de 4 pieds, ainsi que les
siphons de douche et les tampons de dégorgement.
Le tourniquet peut être utilisé soit manuellement, soit à l'aide d'une perceuse à piles d'un régime de rotation
maximal de 500 t/min. A noter que certaines configurations de siphons d'urinoir ne permettront pas le passage
du tourniquet hybride K-1.
Caractéristiques techniques
Etiquette de sécurité et de sens directionnel
Section de câble .......3/8" (10 mm) à âme creuse
Longueur de câble....4 pieds (120 cm)
ø maxi de conduite ...2 pouces (50 mm)
ø mini de conduite ....1
1
/
pouces (32 mm)
4
Manivelle
Tête de curage ..........Couteau demi-lune
Figure 1 – Tourniquet pour urinoirs K-1
Régime de rotation ...500 t/min maxi
VERTISSEMENT
Cet appareil est prévu pour le curage des conduites d'évacuation. Utilisé comme prévu,
l'appareil n'endommagera pas une conduite correctement conçue, assemblée et entretenue. En présence d'une
conduite mal conçue, assemblée ou entretenue, l'appareil risque de manquer d'efficacité ou même d'endom-
mager la conduite. Le meilleur moyen d'établir l'état d'une conduite avant son curage est d'effectuer une in-
spection visuelle de celle-ci à l'aide d'une caméra d'inspection. Toute utilisation inappropriée de cet appareil
risque d'endommager l'appareil lui-même, ainsi que la conduite d'évacuation. A noter que certains blocages
peuvent s'avérer au-delà des capacités de curage de l'appareil.
Inspection et entretien de l'appareil
Nettoyez l'appareil, et notamment sa manivelle, afin de faciliter son inspection et assurer une meilleure
prise en main. Nettoyez le câble soigneusement.
Examinez le tourniquet hybride K-1 afin de confirmer son intégralité et montage approprié, ainsi que l'ab-
sence de grippage, d'usure ou de détérioration (notamment l'aplatissement, le plissage ou l'étirement du
câble). Réparez toute anomalie éventuelle avant d'utiliser l'appareil.
Lors de l'utilisation d'une perceuse à piles, examinez celle-ci selon les consignes du fabricant. Vérifiez le
bon état de marche de la perceuse et de ses commandes, et assurez-vous que sa vitesse de rotation est
inférieure à 500 t/min.
Préparation et utilisation de l'appareil
1. Examinez la conduite d'évacuation afin d'assurer que le tourniquet hybride K-1 est l'appareil de choix
pour ce type d'intervention. Si le réseau renferme des produits chimiques, il est important d'en connaitre
la nature afin de prévoir les mesures de protection nécessaires. Consultez le fournisseur du produit chim-
ique en question afin de prévoir les mesures de protection correspondantes avant d'accéder au réseau.
2. Vérifiez et préparez l'ensemble du matériel selon les consignes applicables.
3. Utilisation manuelle du tourniquet – Assurez-vous que la manivelle est
montée correctement.
4. Utilisation d'une perceuse à piles
• Mettez la perceuse à bas régime (moins de 500 t/min.), puis, avec les
mains sèches, engagez son bloc-piles.
• Vérifiez que le sens de rotation de la perceuse correspond à celui indiqué
par la flèche du tube de guidage.
• Retirez la manivelle du tourniquet, puis engagez et serrez le mandrin de la perceuse à sa place (Figure
3).
Dévisser le collier
Retirer la manivelle
Figures 3A, B et C
Manche
Manchon
Figure 2 – Etiquette
directionnelle
Monter la perceuse
Advertisement

Related Manuals for RIDGID K-1


Summary of Contents for RIDGID K-1
- Page 1 (See Figure 3). ©2014, 2020 RIDGID, Inc. 3/20 999-995-016.10 The Emerson logo and RIDGID logo are registered trademarks of Emerson Electric Co. or RIDGID, Inc. in the U.S. and other countries. EC44827 REV. B All other trademarks belong to their respective holders.
- Page 2 : 500 rpm. Es posible que la barrena combinada K-1 no sea capaz de introducirse en todas las trampas de uri- Hacer girar el cable al revés puede dañarlo.