Table of Contents
Advertisement
Quick Links
Advertisement
Table of Contents

Subscribe to Our Youtube Channel
Related Manuals for ARA Smart 6

Summary of Contents for ARA Smart 6
- Page 1 ARA Smart 6...
- Page 2 ARA Smart 6 Research Use Only Copyrightⓒ 2019 Hanil Scientific Inc. All rights reserved. Contact Us If you have any questions, contact Hanil Scientific Inc. techsupport@ihanil.com / info@ihanil.com...
-
Page 3: Table Of Contents
CONTENTS 1. Safety ----------------------- 4 1-1. Caution: Installation----- 4 1-2. Caution: Use ------------- 5 2. Intended Use ------------------ 5 3. Product overview --------------- 6 4. Technical specifications ------- 7 5. Installaion/Operation --------- 8 5-1. Power connection ------ 8 5-2. Operation -------------- 9 6. -
Page 4: Safety
USER MANUAL MINI CENTRIFUGE 1. Safety Follow precautions and all the safety requirements described on this user manual to prevent any damages and failure of equipment. 1-1. Caution: Installation 1. The device must be kept in a dry and well-ventilated room. 2. -
Page 5: Caution: Use
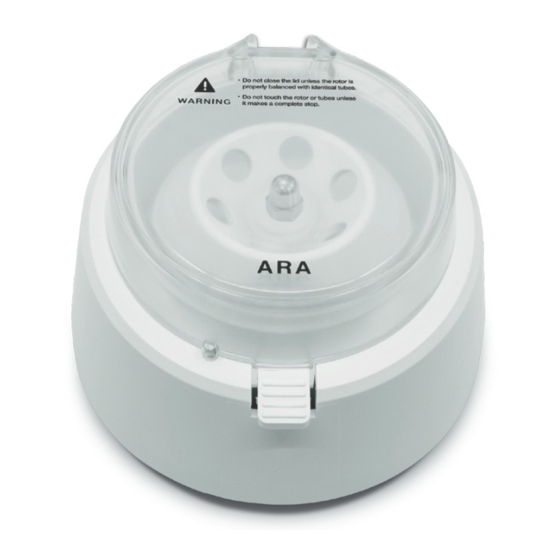
USER MANUAL MINI CENTRIFUGE 1-2. Caution: Use - Do not close the lid unless the rotor is properly balanced with identical tubes. - Do not touch the rotor or tubes untill it makes a complete stop. 1. The device should be installed on flat surface to maintain level. 2. -
Page 6: Product Overview
USER MANUAL MINI CENTRIFUGE 3. Product overview Closing the lid: Start the centrifugation Opening the lid: Stop the centrifugation Power Connector Lid open button Running Mode Selection Switch Operation mode switch Short Mode (S) Stop the centrifugation after 12 sec. of centrifugation Continuous Mode(C) Stop the centrifugation after 15 min. -
Page 7: Technical Specifications
MINI CENTRIFUGE * Delivery package Angle Rotor Rotor Main body Rotor Fixing Nut (1.5/2.0 mL x 6-hole) (2-PCR Strips) USER MANUAL ARA SmarT 6 0.2 mL, 0.5 mL Wrench AC/DC adaptor Manual Adaptor (For rotor locking) (Optional) 4. Technical Specifications Max. -
Page 8: Installaion/Operation
USER MANUAL MINI CENTRIFUGE 5. Installtion / Operation Check the delivery for completeness. The device should be installed on flat surface to maintain level. Do not bend or pull the AC/DC adaptor. Keep this manual near the device at all times. 5-1. -
Page 9: Operation
USER MANUAL MINI CENTRIFUGE 5-2. Operation 1. Changing the rotor - Remove the rotor nut using the wrench. (Turn the wrench counterclockwise ) - Put the rotor that you want to change onto the shaft. - Turn the wrench clockwise untill it secured. 2. -
Page 10: Troubleshooting
USER MANUAL MINI CENTRIFUGE 6. Troubleshooting The device can not be started 1. Power failure → Check the mains connection. 2. AC adaptor defect → Check the output DC volt of the adapter using a multimeter 3. Lid sensor failure →... -
Page 11: Rotor
7. Rotor Rotor Tube Required Bore Ø Max. Capacity Adaptor Radius RPM(rpm) (mL) (mm) Max. RCF (xg) /2.0 6,500 47.3 2,234 Hole angle : ∠40° 8 x 31 6,500 Max. Capacity : TR0.5(2) 36.2 1,710 6 x 1.5/2.0 mL A2.0-6 Size (ø... - Page 12 OMM7PDEN1902-C im-ara.com...
Need help?
Do you have a question about the Smart 6 and is the answer not in the manual?
Questions and answers