Table of Contents
Advertisement
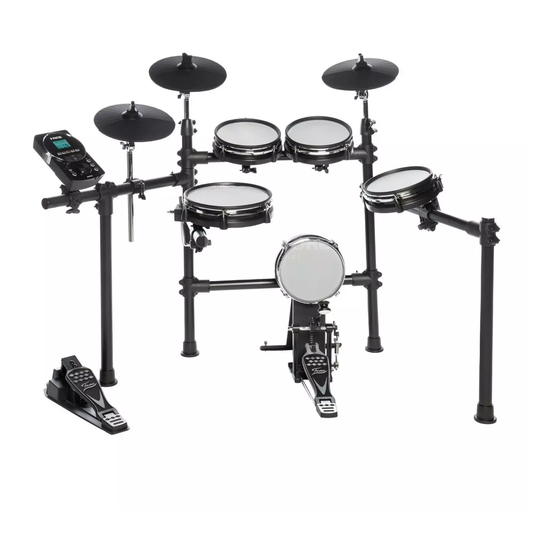
Congratulations on your new FAME Digital Drum DD6600!
Thank you for choosing a FAME product. Thanks to effi cient development and economical produc-
tion, FAME makes high-quality products at a fantastic price possible.
Please read these operating instructions carefully to be informed about all functions of this product
and keep them for future reference
Have fun with your new product!
Your FAME Team
Guarantee:
The current general terms and conditions and guarantee
conditions of Music Store professional GmbH apply.
Can be viewed under: www.musicstore.de
If you have any questions or suggestions,
please contact us:
Music Store professional GmbH
Istanbulstr. 22-26
51103 Köln
Managing Director: Michael Sauer
WEEE-Reg.-Nr. DE 41617453
Tel: +49 221 8884-0
Fax: +49 221 8884-2500
info@musicstore.de
Intended use:
The product FAME DD6600 was designed for use as an electronic drum set. By striking the pads, an
electronic module simulates an artifi cial drum sound in various forms and can optionally be played via
headphones or external speakers. Incorrect use of the product is considered improper and can lead to
physical injury or property damage.
Damage resulted by improper use is not liable.
It must be ensured that the device is operated exclusively by trained and expert users who are in full
possession of their mental, physical and sensory abilities. Use of other persons is expressly permitted
only at the request of a person responsible for their safety who instructs or supervises the use.
Attention!
Please tighten the mesh heads properly after assembly!
42
Scope of delivery:
Quantity
Content
1x
Digital Drum Set
1x
Manual
Advertisement
Table of Contents

Related Manuals for FAME DD6600


Summary of Contents for FAME DD6600
- Page 1 Intended use: The product FAME DD6600 was designed for use as an electronic drum set. By striking the pads, an electronic module simulates an artifi cial drum sound in various forms and can optionally be played via headphones or external speakers. Incorrect use of the product is considered improper and can lead to physical injury or property damage.
- Page 2 Important safety instructions! Please read before connection! CAUTION! (Electro Magnetic Interference) The normal function of the product may be disturbed by Strong Electro Magnetic Interference. If so, simply reset the product to resume normal operation by follo wing the owner‘s manual. In case the function could not resume, please use the product in other location.
- Page 3 Hint! (Operating conditions) Due to its structural characteristics, the device is designed for indoor operation (IP20). Never expose the device to rain, moisture or liquids as this may cause damage. Vibrations, dust or solar radiation can also lead to damage, avoid them! Do not apply excessive force to the switches or controls.
- Page 4 THE FCC REGULATION WARNING (for USA) This equipment has been tested and found to comply with the limits for a Class B digital device, pursuant to Part 15 of the FCC Rules. These limits are designed to provide reasonable protection against harmful interfe- rence in a residential installation.
-
Page 5: Table Of Contents
Contents: MAIN FEATURES...........49 TEMPO............61 PANEL & DISPLAY DESCRIPTION UTILITY MODE (UTILITY)......62 Front Panel.............47 The Drum Pad Trigger Settings......62 Side Panel (Connecting)........49 The Drum Module Settings......64 LCD Display.............49 SETUP MANUAL..........65 SETUP Connecting the Pads and Pedals.....50 SPECIFICATIONS..........69 GETTING READY TO PLAY TROUBLESHOOTING........70 Setting up the Power Supply......51 Turning on the Power........51... -
Page 6: Main Features
Main Features: Bring the Professional Experience to Your Performance Natural and Realistic Voices This digital drum has equipped with all new voices, which vastly improved sound quality and will reach a super natural and realistic sense for your ears. No matter playing the stroke roll or striking pads with velocity dynamic, all of these let you enjoy delicate nuances and natural voice, capture the unique characteristics of acoustic drum kit. - Page 7 1. [VOLUME] Knob 11. [DRUM OFF] Button Adjust the output volume level. Mute the drum part of the pattern. Note: Rotate the [VOLUME] knob anticlockwise to the 12. [UTILITY] Button minimum position before power on. Enter the utility mode. 2. [POWER] Button 13.
-
Page 8: Side Panel (Connecting)
Side Panel: 17. DC IN jack 21. MIDI OUT Terminal Connect the AC adaptor here. Plug the AC adap- Use this to connect extra MIDI sequencer. tor cable into the DC IN jack. you can send MIDI data to an extra MIDI device or a PC/laptop. -
Page 9: Setup
Setup: Caution! To prevent electric shock and damage to the device, make sure the power is switched OFF on the drum and all related device before making any connection. Connecting the Pads and the Pedals Standard configuration: KICK, SNARE (Double trigger), TOM 1~3, CRASH 1 (Choke), RIDE (Choke), HI-HAT, PEDAL (HI-HAT). -
Page 10: Getting Ready To Play
Getting ready to play: Setting up the power supply Connect the DC plug of the AC power adaptor to the DC IN jack on the side panel. Connect the other end of the power cord to the AC outlet. Notes: Only use the voltage specifi ed as correct for the drum module. -
Page 11: Quick Play
Quick Play: Drum Kits and Voices An acoustic drum has only a fi xed kit, but the digital has a lot. It is a particular characteristic of digital drum. The structure of a drum kit is shown on the right: Shortly press the [KIT/ VOICE] button, enter the drum kit menu. -
Page 12: Playing Techniques
Playing Techniques: This section introduces various performance functions to make your performance professional. Similar to an acoustic drum kit, the digital drum responds differently to various playing techni- ques and dynamics. All the pads are velocity sensitive. And some voices change timbre depending on the striking force. Only the snare drum can detect both head shot and rim shot. -
Page 13: Select A Preset Drum Kit And Create Auser Drum Kit About The Preset And User Drum Kit
Select a Preset Drum Kit and Create a User Drum Kit About the Preset and User Drum Kit From No.1 to 30 are preset drum kits, and the drum kits from No.31 to 40 are user drum kits. You can edit the parameters of drum kit (from No.1-30), and save them into user drum kits (from No.31-40). -
Page 14: Saving A User Kit
Press the []/[] button or turn the [DIAL] to adjust parameter value. Save User Drum Kit While in the drum kit and voice edit menu, press the [SAVE/ ENTER] button to save all changes. Use the []/[] button or turn the [DIAL] to select a user drum kit (From NO.31 to 40). -
Page 15: Muting The Drums In Songs
Use the []/[] button or turn the [DIAL] to adjust the parameter value. Press the []/[] buttons simulta neously to mute songs. Press the [START/STOP] button to play/stop songs. Muting the Drums in Songs Press the [DRUM OFF] button to enable and disenable the drum mute function. -
Page 16: Record
Record This digital drum offers you easily record your own performance. Maximize 2500 notes could be recorded in one user song. Preparing and starting record, refer to the details bellow: Preparing Record Press the [SONG/REC] button for 2 seconds to enter the Recordprepare mode, the light of the [SONG/REC] button start fl ashing, please select which user songs(81-85) you want to record. -
Page 17: Coach
Coach The Coach mode is a unique set of exercises. Specifi cally designed for those learners who want to build a better tempo, accuracy and stamina, as well as developing a better drum playing skills. About Coach Mode There are three types of exercises in Coach Mode: Quiet Count, Change Up and Beat Check. -
Page 18: Qut Cnt (Quiet Count)
QUT CNT (QUIET COUNT) Practice with auto metronome on/ off circularly with several measures to help you develop a good sense of time and tempo. Repeatedly press the [PAGE] button to select quiet count mode. Press the [SAVE/ ENTER] button to enter quiet count mode. -
Page 19: Beat Check
Change Up Range Display Description CHG XXX Use the []/[] button or turn the [DIAL] to select a suitable rhythm type. ON / OFF SCO XXX ON: The score setting is on. OFF: The score setting is off. Press the [ST/SP] button to start practicing. There will play a length of one measure count-in before starting. -
Page 20: Dbt (Double Bass Trigger)
5. Press the [ST/SP] button to start practicing. There will play a length of one measure count-in before starting. 6. If the score setting is “ON”: Auto stops practicing and displays your score after circularly playing several times. Or, Press the [ST/SP] button to stop practicing and back to the main page of beat check without display your score. -
Page 21: Utility Mode (Utility)
Utility Mode (UTILITY) This mode contains two parts: the drum pad trigger settings and drum module settings. The Drum Pad Trigger Settings As a professional drummer, you may be very pleased to set your drum triggers carefully corresponding to your playing habits and feelings, making your performance more interesting and professional. - Page 22 3. Striking the specifi ed pad, select the pad that you want to edit. 4. Use the []/[] button or the [DIAL] to adjust the parameter value. Note: The Curve descriptions are shown below: Curve 1: The standard setting. This produces the most natural correspondence between playing dynamics and volume change.
-
Page 23: The Drum Module Settings
The Drum Module Settings You can go further set the drum module function, do as the procedures shown below: Press the [UTILITY] button, the LCD will display the UTILITY menu. You can repeatedly press the [PAGE] button to se- lect the function menu and use the []/[] button or the [DIAL] to adjust the parameter value. -
Page 24: Setup Manual
Setup Manual: WARNING! Drum key can be pinched when adjusting clamps with drum key. Operate carefully. Be careful around pipe ends, inside the pipe, screw ends and metal shavings ... etc. May injure your fi ngers. -
Page 28: Specifications
Specifications: Drum Kits Kit: 40 (30 Presets + 10 Users) GM Drum Kit: 11 GM Drum Kits Instruments Instrument: 408 + 10 Hi-hat Combination Sequencer Preset Pattern: 80 User Song: 5 Tick: 192 ticks per beat Record: Real-time recording Data Capacity: About 2500 notes per song. Tempo 30~280 Display... -
Page 29: Troubleshooting
Troubleshooting: The following overview is intended as an aid to rapid troubleshooting. If you are unsure, contact the manufacturer, the dealer or appropriate specialist personnel. Never open the device by yourself! Symptom Troubleshooting Cannot power on Make sure the power adaptor is connected properly. Make sure the batteries are installed correctly. -
Page 30: Cleaning
Cleaning: A regular cleaning of the device from impurities and dust increases the durability of the product. Always disconnect the device from the power supply before cleaning it! Never clean the appliance wet! Optical lenses should be cleaned with a dry microfiber cloth to optimize light output. Ventilation grilles and openings should always be cleaned of dust and dirt. -
Page 31: Prompt Messages
Prompt Messages: Drum Kit List:... -
Page 32: Drum Voice List
Drum Voice List:... -
Page 35: Song List
Song List:... -
Page 36: Gm Drum Kit List
GM Drum Kit List:... -
Page 38: Gm Backing Instrument List
GM Backing Instrument List:... -
Page 39: Midi Implementation Chart
MIDI Implementation Chart: Function Transmitted Recognized Remarks Basic Default 10ch 1 -16 Channel Changed Deafult Mode Messages Altered ********** ********** Note 0-127 0-127 Number True Voice ********** 0-127 Note on O 99H, V=1-127 Velocity Note off O 99 H, V=0 After Keys Touch... - Page 40 Notes Dokument-ID: MS-DRU0038849-000 (09/2019)
Need help?
Do you have a question about the DD6600 and is the answer not in the manual?
Questions and answers