
Related Manuals for La Crosse Technology VA1


Summary of Contents for La Crosse Technology VA1
- Page 1 Wi-Fi PROJECTION ALARM CLOCK with Outdoor Temperature & Humidity SET UP GUIDE MODEL NUMBER VA1...
-
Page 2: Table Of Contents
Table of Contents BASICS LA CROSSE VIEW ALARM Initial Setup Connecting to the App Setting Your Alarm Alarm Clock Settings Connecting Your Alarm Activating/Deactivating Clock Your Alarm Buttons & Ports Snooze Duration LCD Display Brightness Countdown Auto-Dim Settings Mounting Your Sensor WEATHER EXTRA SENSORS PROJECTION... -
Page 3: Basics
BASICS Initial Setup Power Up Thermo-Hygro Sensor Back of Alarm Clock Alarm Clock Insert the 5V Power Adapter into an outlet, and then plug it into the Power Jack on the back of the Alarm Clock. Next, remove the Insulation Tab from the Battery Compartment located on the bottom of the Alarm Clock. - Page 4 LA CROSSE VIEW Connecting to the App Stay Connected to Your Home Stay connected to your home anytime, anywhere Anytime, Anywhere. with the La Crosse View app. Monitor home conditions and set alerts so your home can get ahold of you when something seems off. Connecting your alarm clock is optional and the display will function as a standalone unit without the Wi-Fi connection.
- Page 5 LA CROSSE VIEW Connecting Your Alarm Clock Now that you’ve created your La Crosse View account, it’s time to connect your Alarm Clock to your home router using the La Crosse View app. Connecting to Your Wi-Fi Network The La Crosse View app is required to connect the Alarm Clock to your Wi-Fi network. Download, install, and log into your La Crosse View account first.
-
Page 6: Alarm Clock Settings
BASICS Alarm Clock Settings When the Alarm Clock is first powered on, it will begin searching for your outdoor sensor, which should connect shortly. To manually set your time, date, and other settings, hold the button to enter the Settings Menu. Settings Menu Order Greeting •... -
Page 7: Buttons & Ports
BASICS Buttons & Ports Back of Alarm Clock 1. ALARM 2. EXTRA SENSOR 3. PROJECTION ( ) Press to activate/deactivate Press to toggle between alarm Press to adjust projection alarm. Hold to enter Alarm time, nap timer duration, internet intensity. Settings Menu. -
Page 8: Lcd Display Brightness
BASICS LCD Display Brightness Adjusting the LCD Display Brightness Press the SNOOZE/LIGHT button to adjust the backlight intensity. There are 4 brightness levels, plus an off option. Auto-Dim Settings Program your Alarm Clock to automatically dim during preselected times. Hold the SNOOZE/LIGHT button to enter the Auto-Dim Settings Menu. - Page 9 ALARM Time Alarm Setting the Alarm Hold the ALARM button on the top of the alarm clock to enter the Alarm Settings Menu. Use the buttons to set your desired time. Press ALARM confirm. Next, use the buttons to set your desired snooze duration (5 to 120 minutes).
-
Page 10: Weather
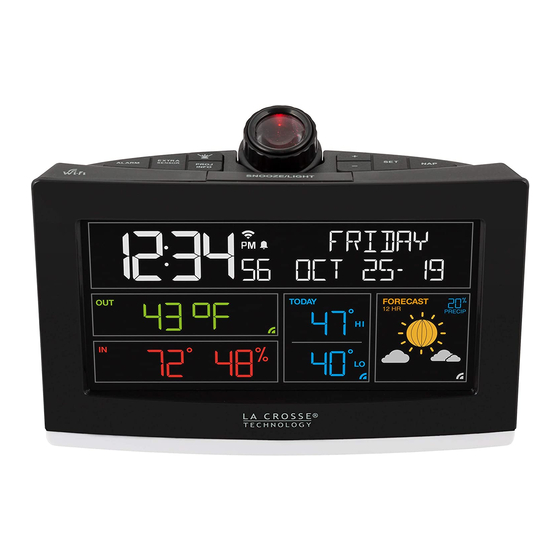
WEATHER Viewing Your Data 1. FORECAST ICONS (or Moon Phase) 4. SENSOR RECEPTION INDICATOR Represent a future prediction of the weather Indicates if the alarm clock is receiving data to come over the next 12 hours* from the sensor 2. CHANCE OF PRECIPITATION 5. - Page 11 WEATHER Moon Phases on Standalone Alarm Clock Viewing Your Data New Moon Small Waxing Large Waxing First Quarter Moon Phase and Forecast Icons Crescent Crescent When using the clock without Wi-Fi connection, or if you choose to Opt-Out of internet weather and time services, your Moon Phase will appear.
- Page 12 WEATHER Viewing Your Data Forecasted HIs & Los and Indoor Comfort Level When connected to Wi-Fi, the Alarm Clock will show forecasted daily HI and LO temperatures, powered by AccuWeather. Without Wi-Fi, Example Forecasted HIs & LOs or if you chose to opt-out of internet weather and time services, this Your display must be connected to section will show your current indoor comfort level.
-
Page 13: Extra Sensors
EXTRA SENSORS Add-On Sensors Whether you choose to connect with the La Crosse View app or not, this alarm clock can display data for up to 4 extra sensors. This data will appear in the green section on the LCD, in your projection image, and in your La Crosse View app if connected. - Page 14 PROJECTION Adjusting the Projection Image Adjusting the Projection Brightness Tilting the Projection Tube The Projection Tube tilts forwards and Tap the button to adjust the projection’s backwards to adjust the location of the brightness. There are 3 levels, plus an off projection image.
- Page 15 Wi-Fi service. If swallowed, it could cause severe injury or death in just 2 hours. Seek medical attention immediately. ALARM CLOCK SPECIFICATIONS (VA1) WARNING: KEEP BATTERIES OUT OF REACH OF CHILDREN • Indoor Temp. Range: 32°F to 99°F (0°C to 37°C) Swallowing may lead to serious injury in as little as 2 hours or death, •...
- Page 16 APPENDIX Warranty La Crosse Technology, Ltd. provides a 1-year limited time warranty (from date of purchase) on this product, relating to manufacturing defects in materials and workmanship. For full warranty details, you can visit: www.lacrossetechnology.com/pages/warranty La Crosse Technology, Ltd. 2830 S. 26...
- Page 17 APPENDIX FCC Statement This equipment has been tested and found to comply with the limits for a Class B digital device, pursuant to part 15 of the FCC Rules. These limits are designed to provide reasonable protection against harmful interference in a residential installation. This equipment generates, uses and can radiate radio frequency energy and, if not installed and used in accordance with the instructions, may cause harmful interference to radio communications.
-
Page 18: Patents
Having Trouble? We’re here to help. For detailed product videos, manuals, and more, visit our support website: www.lacrossetechnology.com/lacrosseviewsupport Make sure you have your product’s model number handy (VA1) If you need additional support, get in touch with our friendly customer support team: Online: bit.ly/contact_techsupport...
Need help?
Do you have a question about the VA1 and is the answer not in the manual?
Questions and answers