
Summary of Contents for Making Memories Slice
-
Page 1: Table Of Contents
Additional tips Frequently Asked Questions Troubleshooting Issue: The Slice™ unit is not cutting all the way through paper Issue: The design cut is distorted Issue: The Slice™ unit does not turn on Issue: The paper gets wrinkled during cutting process Français... -
Page 2: License Agreement
MAKING MEMORIES WHOLESALE, INC. (“OWNER”) IS WILLING TO LICENSE THE HARDWARE, FIRMWARE, SOFTWARE (IN MACHINE READABLE FORM ONLY) AND ANY EMBEDDED CONTENT OF THE SLICE™ HANDHELD CUTTING SYSTEM (THE “LICENSED PRODUCTS”) TO YOU ONLY UPON THE CONDITION THAT YOU ACCEPT ALL OF THE TERMS AND CONDITIONS CONTAINED IN THIS END USER LICENSE AGREEMENT (THE “AGREEMENT”). - Page 3 ENGLISH END USER LICENSE AGREEMENT 3.2 All right, title and interest in the Licensed Products, including any updates or revisions thereto, is and shall remain the sole and exclusive property of Owner, its licensors, and their successors and assigns. Other than the limited license explicitly set forth in this Agreement, no interest in or rights or licenses to the Licensed Products are granted to you, and no interest in or rights or licenses to the Licensed Products shall inure in or accrue to you, whether by implication, estoppel, or otherwise.
- Page 4 ENGLISH END USER LICENSE AGREEMENT 9. General. 9.1 Waiver. No waiver of any violation or nonperformance of this Agreement in one instance shall be deemed to be a waiver of any subsequent violation or nonperformance. All waivers must be in writing. 9.2 Severability.
-
Page 5: Safety Information
10. If you have trouble operating the unit, see “Troubleshooting.” 11. Do not remove battery cover. WARNING Use only authorized Making Memories Slice™ Design Cards. ® Use of unauthorized cards may disable Slice™ unit. -
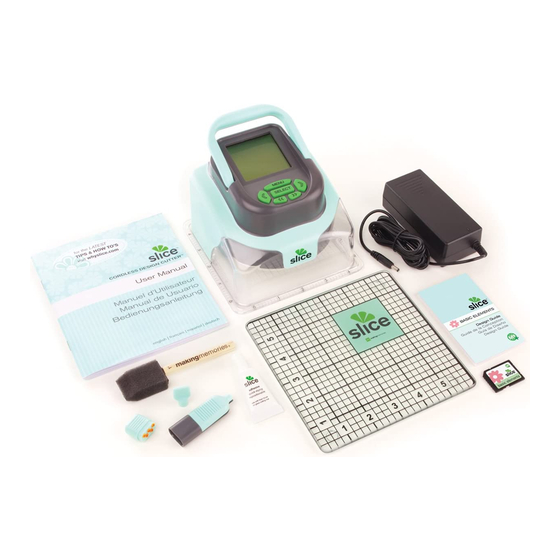
Page 6: Package Contents
ENGLISH PACKAGE CONTENTS 1 Slice™ Cordless Design Cutter™ 2 6 x 6 tempered glass cutting mat 3 Power cord 4 Repositionable adhesive 5 Foam brush 6 5 replacement blades w/ blade replacement tool 7 Blade adjustment wrench 8 Basics 1 Design Card... -
Page 7: Slice™ Unit Diagram
ENGLISH SLICE™ UNIT DIAGRAM FRONT handle screen keypad start button ruled base BACK design card slot power cord port power button battery cover (do not remove) base cover... -
Page 8: Basic Operations
1. Plug the power adapter into the Slice™, as shown below. 2. Plug the power cord into a grounded electrical outlet. 3. Leave the Slice™ plugged in for approximately 1 hour to fully charge it. Note: You can also use the Slice™ while it is plugged in, if desired. -
Page 9: Positioning The Paper
To turn on the Slice™ design cutter: 1. Push small button on back panel as shown below. 2. The Slice™ screen illuminates on the top of the unit as shown below. 3. Remove the protective cover from the base. Note: The unit shuts off automatically after approximately 15 minutes when not in use, whether it is plugged in or not. -
Page 10: Inserting The Design Card
2. The card clicks when inserted properly. The menu screen also changes to display the Slice™ logo, as shown below. 3. To remove the design card, push it in and allow it to pop out automatically. -
Page 11: Homing The Blade (For Initial Use)
2. Press the SELECT button. The screen asks you to press SELECT again to complete the homing of the Slice™ blade. The homing procedure positions the cutting blade panel in the correct starting position, as shown below. -
Page 12: Selecting The Design
ENGLISH BASIC OPERATIONS STEP 7 Selecting the design To select the design: 1. Press the MENU button until the menu screen appears. The screen displays the design card icon and the Settings option. The design card icon on the screen displays the name of the design card, as shown below. -
Page 13: Cutting The Design
1. Ensure the protective base is removed before placing the Slice™ unit on paper. 2. Position the Slice™ on the paper. Use the ruled guides on the base of the unit and the cutting mat to determine the proper location of the cut. -
Page 14: Basic Care
To remove a used blade from Slice™ unit: 1. Unplug and turn off Slice™ unit. 2. Place Slice™ design cutter on its side or upside-down. 3. Guide the pinching ends of the blade replacement tool to the small, orange blade inside the round blade encasement, as shown below. - Page 15 Note: To ensure proper cutting, always home the blade after replacing blade. See “Homing the Blade” in Basic Operations. Choking hazard: keep Slice™ unit and replacement blades out of reach of children. Do not insert or remove Slice™ blades with your fingers.
-
Page 16: Cleaning The Slice™ Unit
Additional tips • Turn the Slice™ off when not in use. • If Slice™ unit becomes warm while using, turn it off to let it cool. • Do not touch the blade while the unit is on. • Store upright with protective cover on base. - Page 17 Q: Do you hold the Start button while cutting? A: No. Press the Start button only once to begin cutting. Q: Do you hold the Slice™ unit in place during the entire cutting process? A: Yes. Hold it lightly with both hands as described in “Basic Operations. ”...
-
Page 18: Frequently Asked Questions
ENGLISH TROUBLESHOOTING Issue: The Slice™ unit is not cutting all the way through the paper. Solutions: • You may need to adjust the blade pressure or replace the blade. See “Replacing the blade” in “Basic Care. ” • You may be cutting on the wrong type of material.
Need help?
Do you have a question about the Slice and is the answer not in the manual?
Questions and answers
I asked for help about slice machine earlier today and was told I had to speak to "The Expert" because the "Expert Assistant" could not help me. I was told that I would be billed $2 for the help. I just checked my credit card and $66 was charged to me. I'm very upset and confused. Why did I get billed such a huge amount?