Table of Contents
Advertisement
Quick Links
®
Vacuum Regulator, Push-To-Set
F
H
M
L
MEDICAL VACUUM
®
®
Two Mode
ANSI
Analog
Adult (Standard) - (1225)
Adult (High) - (1330)
C.A.S.S. - (1227)
Neonatal - (1231)
Pediatric - (1234)
Digital
Adult (Standard) - (1325)
Adult (High) - (1430)
C.A.S.S. - (1327)
Neonatal - (1331)
Pediatric - (1334)
Continuous (PTS-CVR)
Adult | Pediatric | Neonatal | C.A.S.S.
400
300
®
500
50
60
40
200
70
30
F
High Flow
H
High Vacuum
600
20
80
M
100
L
90
10
100
700
®
ISO
Analog
Adult (High) - (1230)
Neonatal - (1232)
Pediatric - (1235)
Digital
Adult (High) - (1337)
Neonatal - (1332)
Pediatric - (1335)
Service Manual
400
300
500
50
60
40
200
70
30
High Flow
F
High Vacuum
H
600
80
20
M
100
90
10
L
700
100
MEDICAL VACUUM
®
®
Three Mode
ANSI
Analog
Adult (Standard) - (1224)
Adult (High) - (1226)
Digital
Adult (Standard) - (1324)
Adult (High) - (1326)
8700-0006-000 (Rev. 12) 08/2020
®
F
H
M
L
®
ISO
Analog
Adult (High) - (1229)
Digital
Adult (High) - (1329)
™
Advertisement
Table of Contents

Related Manuals for Ohio Medical Push-To-Set PTS-CVR


Summary of Contents for Ohio Medical Push-To-Set PTS-CVR
- Page 1 ® Vacuum Regulator, Push-To-Set ™ Continuous (PTS-CVR) Service Manual Adult | Pediatric | Neonatal | C.A.S.S. ® High Flow High Vacuum MEDICAL VACUUM ® ® ® ® High Flow High Vacuum Two Mode MEDICAL VACUUM ® ® ® ANSI Analog Analog Adult (Standard) - (1225) Adult (High) - (1230)
- Page 2 This product and any of its parts should only be repaired using written instructions provided by Ohio Medical or by Ohio Medical trained personnel. Product must not be altered without the prior written approval of Ohio Medical’s Quality Assurance Department.
-
Page 3: Table Of Contents
Table of Contents 1/Precautions 7.1 Set-up ..............15 7.2 Push-To-Set Test..........15 1.1 Definitions .............. 4 7.3 Gauge Test ............15 1.2 Warnings ..............5 7.3.1 High Vacuum Gauges ONLY ...... 15 1.3 Cautions ..............5 7.3.2 Standard and PED/NEO/C.A.S.S. Vacuum Gauges ONLY .......... -
Page 4: 1/Precautions
1/Precautions 1.1 Definitions Note: A Note provides additional information to clarify a point in the text. Important: An Important statement is similar to a note but of greater emphasis. CAUTION: A CAUTION statement is used when the possibility of damage to the equipment exists. WARNING: A WARNING statement is used when the possibility of injury to the patient or the operator exists. -
Page 5: Warnings
Only use chemical recommended are risks associated with using anything other in this manual. than Ohio Medical parts. Ohio Medical will assume If any evidence of damage is found, repair as no responsibility for incidents which may occur if... -
Page 6: 2/Scope
2/Scope This service manual contains service, maintenance and parts information on all models of the Push-To-Set Continuous Vacuum Regulator. 2.1 ANSI Vacuum Regulators (North American) ® ® ® ® Low Vacuum -mm Hg mm Hg MEDICAL VACUUM MEDICAL VACUUM MEDICAL VACUUM MEDICAL VACUUM ®... -
Page 7: 3/Description And Specifications
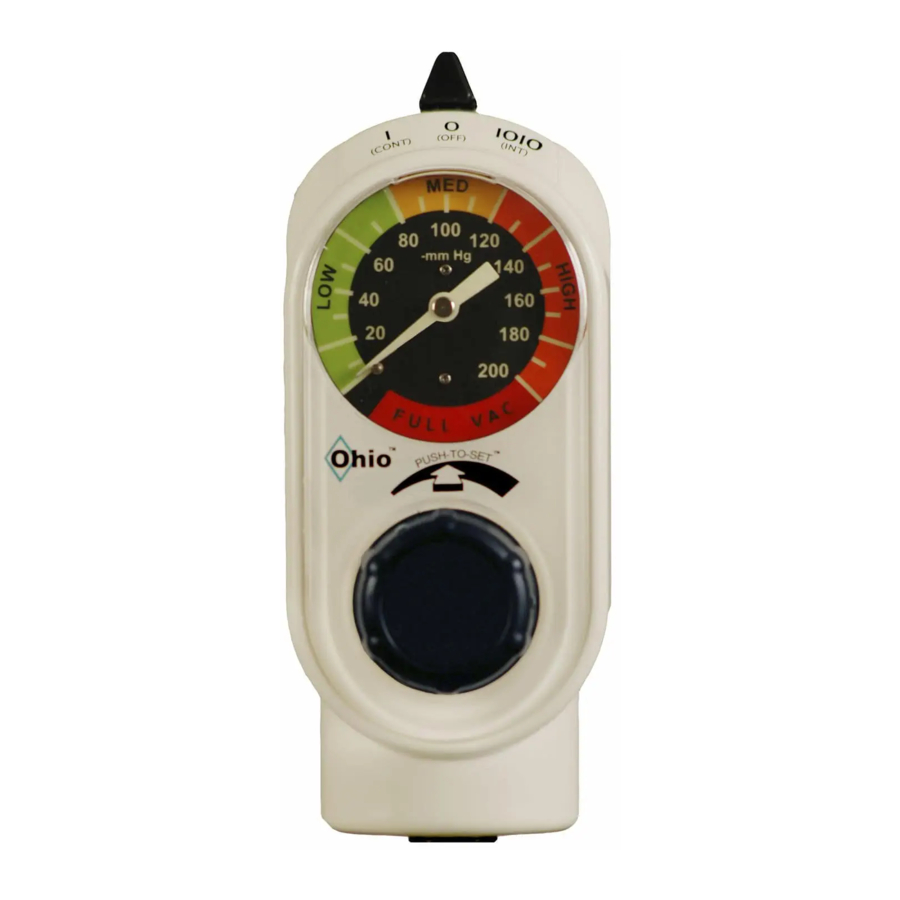
3/Description and Specifications 3.1 Description The PTS-CVR is a lightweight, compact unit used throughout the hospital primarily for pharyngeal/tracheal suctioning (airway management). Various models provide regulated or full-line vacuum for hospital suction procedures. There are several models of the PTS-CVR. All models contain a vacuum gauge which indicates suction supplied by the regulator. -
Page 8: Specifications
3/Description and Specifications 3.2 Specifications Performance Standard High Pediatric Neonatal C.A.S.S. Flow rate 80 L/min 80 L/min 80 L/min 80 L/min 80 L/min Located in the vacuum supply line to prevent pressurization of Positive Pressure the patient connection by failed injector vacuum (Venturi) units, or Safety Relief Valve: inadvertent cross connection to pressured gases. -
Page 9: 4/Cleaning And Disinfection
4/Cleaning and Disinfection 4.1 Cleaning and Disinfection WARNING: After patient use, regulators may be contaminated. Handle in accordance with your hospital’s infection control policy. CAUTION: Suctioned fluids drawn into a vacuum regulator do not stop in the regulator. They proceed through it into the wall outlet and pipeline system. -
Page 10: 5/Troubleshooting
5/Troubleshooting SYMPTOM POSSIBLE CAUSES POSSIBLE SOLUTION Mode Selector Switch is at O(OFF) position Move mode selector switch [34] to desired mode. No Supply Vacuum Check Hospital vacuum level (should be at least 500 mmHg (66.7 KPA). Damaged/Clogged Supply side or Patient Replace fittings if damaged/clogged side fittings Retighten/Torque if found loose... - Page 11 5/Troubleshooting SYMPTOM POSSIBLE CAUSES POSSIBLE SOLUTION Damaged Diaphragm inside regulator Replace Diaphragm [30] or regulator module module assembly [12] Erratic gauge movement Damaged/Missing O-ring, Quad-ring on Replace O-ring [35] and/or Quad-ring [36] resulting from regulator regulator module adjustment Gauge assembly is damaged Replace gauge assembly [6] Excessive force applied Rotate the knob [2] to free the Regulator...
-
Page 12: 6/Service - Disassembly And Assembly
(101.3 kPa) Full Scale • High Vacuum Calibration Gauge, 760 mmHg (101.3 5. To remove the regulator module from the manifold kPa) Full Scale*(Ohio Medical P/N 6700-0352-800) assembly, rotate the regulator module clockwise. • 80 L/min Flowmeter 6. Using tweezers, remove the filter. Replace with a •... -
Page 13: Suction Level Limit Setting
6/Service - Disassembly and Assembly 9. Set actuator in brackets of the actuator support valve and may allow suction to exceed the bracket and rest the loop on the top of the PTS preset limit. assembly. CAUTION: When Loctite is used on the vacuum relief 10. -
Page 14: Disassembly
6/Service - Disassembly and Assembly 6.4.1 Disassembly 6.5.2 Inserting Batteries 1. Remove the quad-ring from the piston stem and 1. Place negative side of battery into battery slot first the O-ring from the housing. Lubricate or replace if (battery will be at an angle). needed. -
Page 15: 7/Service Checkout Procedure
7/Service Checkout Procedure 7.3 Gauge Test Important: This entire Service Checkout Procedure must be performed in numerical order. Note: Analog gauges are supplied with an accuracy 7.1 Set-up of ±5% of full scale deflection throughout their range. See step 4 of Section 7.4 Regulation Test. 1. -
Page 16: Regulation Test
7/Service Checkout Procedure 7.6 Bleed Test test points are 40 and 80 mmHg (5.3 and 10.7 kPa) for the standard/PED/NEO/C.A.S.S. models and 140 mmHg (18.7 kPa) for standard model only. 1. Occlude the fitting/patient port and set the vacuum level to 100 mmHg (13.3 kPa). 4. -
Page 17: Patient Side
7/Service Checkout Procedure 7.7.2 Patient Side • The unit is set to 100 mmHg ± 5 mmHg (12.7 kPa ± 0.7 kPa) in | (ON) mode. 1. Connect the supply vacuum tubing to the adapter/ • Adult/High models ONLY: the unit should probe port. -
Page 18: 8/Maintenance
Do not use malfunctioning equipment. Make all necessary repairs. Have the equipment repaired by qualified service personnel or by Ohio Medical. After repair, perform the Service Checkout Procedure to ensure that the product is functioning properly, and complies with the manufacturer’s published specifications. -
Page 19: Technical Assistance
8/Maintenance 8.4 Technical Assistance If technical assistance is required, contact Ohio Medical technical support at +1 857-855-0500 or toll free at 866-549-6446. 8.5 Return Instructions 1. Clean and disinfect the vacuum regulator. 2. Package securely for protection, preferably in the original container. -
Page 20: 9/Ordering Information
9/Ordering Information 9.1 Illustrated Parts Item Part Number Description Item Part Number Description 6700-0078-400 Screw, PHH PNH, 4-20 Plastite 0206-5159-300 Plug, Filter 8700-0017-500 Knob 6700-0121-400 Orifice, Continuous Vacuum Regulator See Table Case, Regulator 8700-0009-700 Manifold Assembly 8700-0041-500 Gauge Lens 6700-0151-400 Screw, Self Tap, #6 Pan Head 8700-0021-500 Drive Gear, Occlude-To-Set... - Page 21 9/Ordering Information 8700-0006-000 (Rev. 12) 08/2020...
-
Page 22: Accessories
9/Ordering Information ACCESSORIES Suction Filters and Tubing Description Part Number 6730-0350-800 6730-0351-800 Disposable Hydrophilic Filter 20 Pack 200 Pack Disposable Hydrophobic Filter 6730-0570-800 6730-0571-800 6730-0572-800 Tubing x Tubing nipple 3 Pack 10 Pack 50 Pack Disposable Hydrophobic Filter 6730-0580-800 6730-0581-800 6730-0582-800 1/8 NPT x Tubing nipple 3 Pack... -
Page 23: 10/Electromagnetic Compatibility Declarations For Pts Digital
10/Electromagnetic Compatibility Declarations for PTS Digital 10.1 Guidance and Manufacturer's Declaration - Electromagnetic Emissions The PTS Digital is intended for use in the electromagnetic environment specified below. The user of the PTS Digital should assure that it is used in such an environment. Emissions Test Compliance Electromagnetic Environment - Guidance... -
Page 24: Immunity To Proximity Fields
10/Electromagnetic Compatibility Declarations for PTS Digital 10.2 IMMUNITY to Proximity Fields from Radio Frequency Wireless Communication Equipment In addition to the Radiated RF IEC 6100-4-3 as shown in the table above, the PTS Digital has been tested as specified in the table below. Test Immunity Band... - Page 25 Any use other than that authorized by Ohio Medical LLC is prohibited. Ohio Medical and the Ohio Medical logos are registered trademarks and Push-to-Set is a trademark of Ohio Medical LLC ANSI is a registered trademark of American National Standards Institute ISO is a registered trademark of International Organization for Standardization NFPA is a registered trademark of National Fire Protection Association Inc.
Need help?
Do you have a question about the Push-To-Set PTS-CVR and is the answer not in the manual?
Questions and answers