Advertisement
Quick Links
Advertisement

Subscribe to Our Youtube Channel
Related Manuals for Deagostini MODEL SPACE Robi


Summary of Contents for Deagostini MODEL SPACE Robi
- Page 1 Build your own Pack...
- Page 2 Build your own All rights reserved © 2016 Published in the UK by De Agostini UK Ltd, Battersea Studios 2, 82 Silverthorne Road, London SW8 3HE CONTENTS Published in the USA by De Agostini Publishing USA, Inc., 121 E. Calhoun Street Woodstock, IL 60098 Packaged by Continuo Creative, 39-41 North Road, London N7 9DP...
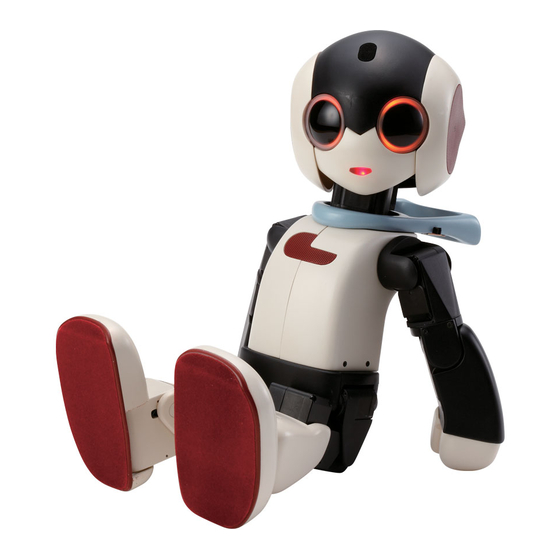
- Page 3 ASSEMBLY GUIDE STAGE 59: TEST ROBI’S NECK, BACK AND ARMS Use the CPU board to test Robi’s neck, body and arms, before fitting the velvet pads supplied in this stage to his feet. assembly via the servo itself. Finally, you This stage begins with you testing all the will attach the velvet pads supplied in servos of Robi’...
- Page 4 FASTEN THE NECK PLATE Position the circled end of the neck plate fitted in the Use an M2 x 6.2mm pan-head screw to secure the part, previous stage over the hole in the scarf beneath. but do not tighten it too much, as the plate needs to be able to move.
- Page 5 Slide the battery into the space next to the back servo, making sure all the Still holding the battery in place, connectors stay in their sockets. Hold the battery in place. turn the switch ON. Note: Robi’s arms will move as soon as the power is switched on! STARTING ELBOWS...
- Page 6 IF THE ARMS DO NOT ATTENTION! STARTING MOVE Each of the white plastic POSITION connectors has a small barb Both arms were tested in on one side, which holds the Stages 43 and 44, so if they connector securely in its do not work now it is most socket.
- Page 7 FIT THE HEAD LEVER Take the head lever and fit the ring nut into the hole in its longer arm, Holding the ring nut in its hole, line up the from the angle shown. The ring nut should fit perfectly. lever to the head servo frame, oriented as shown above.
- Page 8 If the test does not run, check the servo cable’s connector, and ensure that the battery is charged. Press the TEST/SET switch: Robi’ s head should rotate 45° to the left, stop, then move back across to 45° to the right, before returning to its original position. The next step is to set the servo’...
- Page 9 FITTING THE FOOT PADS Make sure that the pad fits exactly: if it doesn’t, peel it away Match the right foot pad to the sole of Robi’ s right foot, then, and reset it. Once you are happy with it, repeat the process when you are sure that they align, peel the backing away to for the left foot and pad.
- Page 10 TROUBLESHOOTING In this section, we look again at what to do if the movement test carried out in this stage does not go as described. As the arms have been tested previously, we will focus on the operation of the neck and back servos, as well as the speaker, from which Robi says ‘OK!’ Along with the Phillips screwdriver supplied with Stage 2, you will need Neck stand (Stage 53)
- Page 11 ASSEMBLY GUIDE STAGE 60: PREPARE AND FIT ROBI’S HEAD SERVOS PARTS TO BE ASSEMBLED Prepare Robi’s second head servo then fit it, along with the one from the previous stage, to his head servo frame. There are two servos inside the upper head base to make Robi’...
- Page 12 TIP! THE SERVO AND CABLE As ever, it is very important that the electronic parts exposed by removing the servo’s cover are not touched in any way. Make sure to hold the open servo by its sides, and if you put it down on your work surface during the assembly, do this with...
- Page 13 TESTING THE SERVO Take the neck stand and make sure the power pack is turned OFF. Carefully unplug the black servo cable from With the servo connected, switch the power to ON. After the socket on the left of the test board, and attach the the LEDs blink twice, only the 1 LED should light up.
- Page 14 TEST/SET To set the head servo to ID=14, press UP 13 Once the numbers are correct, times, so that the 10 and 4 LEDs are lit. press and hold TEST/SET for a few Pressing DOWN will adjust this if you seconds.
- Page 15 ATTACH THE FIRST HEAD SERVO Remove all four screws again from the servo prepared in this stage Line up the servo to the left-hand side of Robi’ s (ID=14) and remove its cover. You will not be using the cover again. neck base.
- Page 16 Join the servo to the frame – checking again as you do so that none of the cables are trapped, and Use all four screws removed in Step 15 to secure the servo to the that the connectors stay in place. head frame.
- Page 17 ATTACH THE SECOND HEAD SERVO Connect this servo cable to one of the sockets. The other Position servo ID=15 next to the free side of the head will not be used. frame, on the right side of Robi’ s neck base. Line up the servo cable leading to servo ID=14, fitted in this stage, to its open face.
- Page 18 ROBI’S HEAD, NECK STAND AND TEST BOARD Although you have disassembled the neck stand in recent stages, you will be using it and the test board that it holds again, so keep it safely until then! Robi’s head Robi’s head contains a number of his most vital electronic components, which you will begin to add in the coming stages.
- Page 19 TEST THE NECK AND HEAD SERVOS Connect the battery to the power Push the switch on the scarf Now connect the power/switch cable to distribution board, in socket CN1. to the OFF position. socket CN3. ATTENTION! STARTING Each of the white plastic POSITION connectors has a small barb on one side, which holds the...
- Page 20 TROUBLESHOOTING In this section, we look again at what to do if the movement test carried out in this stage does not go as described. As the arms have been tested previously, we will focus on the operation of the neck and back servos, as well as the speaker, from which Robi says ‘OK!’ Along with the Phillips screwdriver supplied with Stage 2, you will need Neck stand (Stage 53)
- Page 21 ASSEMBLY GUIDE STAGE 61: BUILD UP ROBI’S HEAD PARTS TO BE ASSEMBLED Add two servo horns to the head servos fitted over the previous stages, then combine these with the base that will hold the electronic components enclosed in Robi’s head. The two servo horns supplied in this hole in the horn, in the case of servo stage link up with the head base, using...
- Page 22 FITTING THE SERVO HORNS D-CUT There are two servo horns supplied in this stage: part 2, with the elongated body, will tilt Robi’ s head from side to side, and will fit onto the servo shaft of servo ID=14, on the Fix the servo horn to the shaft, making sure the D-cuts left side of Robi’...
- Page 23 ADDING THE HEAD BASE Lower the base, running the VR cable through the wide hole in its Fetch the head base and line it up to the top of centre. The hole and corner in the centre of the base’ s backward- Robi’...
- Page 24 Level the head base so that the circled hole (inset) on its Fit an M2 x 12mm pan-head screw through the slot and into rear left edge lines up with the elongated slot in the left- the hole marked in the previous step. Turn this into the head hand servo horn.
- Page 25 ASSEMBLY GUIDE STAGE 62: FIT ROBI’S FIRST INFRARED EYE SENSOR In this session, you will dismantle Robi’s head, then fit the first of the infrared sensors into the socket of one of his eyes. This stage sees you fit the first of the Before doing this, you will need to dismantle the previously built head to electronic components that will be...
- Page 26 FITTING THE SERVO HORNS ATTENTION! The M2 x 4.5mm screw used to hold the ear panel in place is very slightly smaller those used for the ear base (M2 x 6mm). The difference is so small it may be difficult to see with the naked eye, so it is a good idea to keep these separately once removed, and make a note of...
- Page 27 Turn the head and remove the two circled screws. You will now be able to remove Robi’ s face. Now lift away the top of Robi’ s head. Remove the three circled screws. Lift the back of Robi’ s head away from the assembly. Remove the two circled screws, this time at the rear of Robi’...
- Page 28 Carefully remove the eye. You can now go back and remove the two screws holding the left eye in place. Turn the head and remove the screws holding the right eye Remove the right eye. in place. WILL NOT BE USED Now look into the head frame assembly from You have now fully dismantled Robi’...
- Page 29 FITTING THE SILVER STICKERS Look inside the eye socket and locate the two screw holes, outlined Take one of the eyes (they are both the same, so it in red above. The silver stickers supplied in this stage will go over doesn’t matter which), and gently push its black iris these areas, to ensure that a solid ring of silver lines the eye socket.
- Page 30 Your assembly should now look like this. Add a frame B to the assembly as shown, with its locating pins fitting into the corresponding holes of frame A. Press the parts firmly together. FIT THE EYE SENSOR Replace the iris removed from its socket in Step 21. Line up the back of the socket with the eye sensor, orienting the parts exactly as shown above.
- Page 31 FITTING THE HEAD FRAMES LONGER SHORTER Fetch the head frames removed in Step 17 and line Use two of the M2 x 4.5mm countersunk screws removed in Step them up to the head base, facing away from you as 15 to attach the left frame to the head base. shown.
- Page 32 COMING IN PACK 17 Your next FOUR complete Stages, as Robi starts to come to life! Stage 63 Fit Robi’ s second eye sensor PARTS PROVIDED Robi’s second infrared eye sensor. Stage 64 Wire Robi’ s eye sensors PARTS PROVIDED Eye sensor cables and mouth light housing.
Need help?
Do you have a question about the MODEL SPACE Robi and is the answer not in the manual?
Questions and answers