Advertisement
Quick Links
HEAD OFFICE
FM Environmental Ltd
Greenbank Industrial Estate
Newry, BT34 2QX, N, Ireland
Telephone: +44 [0] 28 302 66616
From ROI Call: 048 302 66616
Fax: +44 [0] 28 302 63233
Email: gg@fmenvironmental.com
www.fmenvironmental.com
www.greaseguardian.com
MALTA OFFICE
FM Environmental [Malta] Ltd
Water Technology House
A15B Industrial Estate Marsa, Malta
Telephone: +356 2122 6172/3
Fax: +356 2122 6171
Email: fmmalta@fmenvironmental.com
Scan for electronic version
Automatic Grease
Removal Unit
I N S T A L L A T I O N , O P E R A T I O N S
A N D M A I N T E N A N C E M A N U A L
Models D1, D2, D3, D4, D5
MANUFACTURED BY FM ENVIRONMENTAL
www.greaseguardian.com
GGPLC / REV 1
Advertisement

Related Manuals for Grease Guardian D1


Summary of Contents for Grease Guardian D1
- Page 1 I N S T A L L A T I O N , O P E R A T I O N S A N D M A I N T E N A N C E M A N U A L Models D1, D2, D3, D4, D5 HEAD OFFICE...
- Page 2 FM Environmental Ltd Greenbank Industrial Estate Newry, BT34 2QX, N, Ireland Telephone: +44 [0] 28 302 66616 From ROI Call: 048 302 66616 Fax: +44 [0] 28 302 63233 Email: gg@fmenvironmental.com www.fmenvironmental.com www.greaseguardian.com...
- Page 3 Contents Product Overview ........2 How it Works ..........3 Dimension & Specification ......4 Installation ..........5 Time Control Setting ........7 User Maintenance ........14 Tri-Monthly Servicing ........15 Troubleshooting ........16 Warranty ..........18 Appendices: ..........1. Application Specific Controller Setting ..20 2.
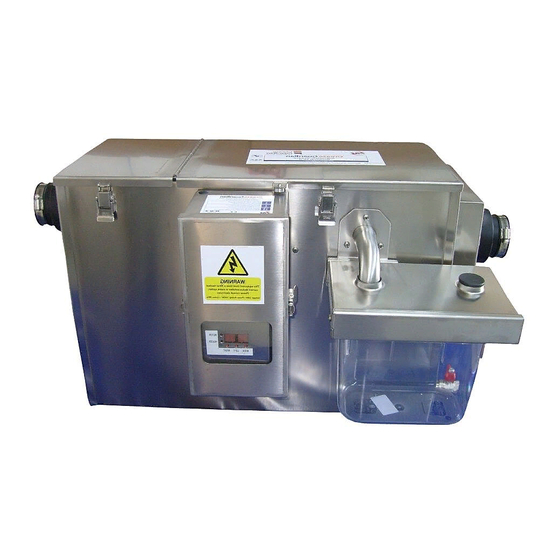
- Page 4 Use of the Grease Guardian assures that costly sewer surcharges and fines are minimised or eliminated through efficient separation and removal of the grease and oil. In addition, rapidly escalating pumping and disposal costs, which are associated with conventional grease traps or interceptors are also reduced or eliminated.
- Page 5 Pipework between fixture and Grease Guardian to be minimally 1:100 (all units) 304 stainless steel; gravity fall bright finish Connect Grease Guardian inlet and outlet to piping using 2 x rubber clamp Motor 25 Watt, 230v, 50 Hz couplers as supplied (all units) 1.3 µF capacitor...
- Page 6 - keys for 1 second to fine tune the cycle duration. coarse solid food waste build installing the Grease Guardian The display will indicate the adjustment made from up. To help ensure the highest...
- Page 7 Scheduled Service Reminder To re-engage the heater simply hold in the B button again for 10 seconds until The “HEATR OFF MODE” is The Grease Guardian unit requires periodic service cleared. inspection and pump out by qualified personnel. To assist, the controller is pre-set to display a service due reminder as shown on the due date.
- Page 8 7 day ON/OFF Control CONTROLLER ADDITIONAL SETTINGS: From the main display access the above display by TIME RESET AND 7 DAY SETTING pressing OK and ESC together. Choose “Parameter” using - or + keys then press OK Time of day Set From the main display access the above display by pressing OK and ESC together.
- Page 9 ENGINEER SETTINGS: COMMISSIONING AND SERVICE To Change: In the “serviced (last)” display select the day, month or year by pressing either + or - keys to move the “Commissioned on” date Logger flashing bar through these fields. To lock onto a specific field, press OK.
- Page 10 External Service Partner ATTENTION! In addition to the daily and weekly housekeeping, all Grease Guardian units must receive one service inspection every 3 months to be completed by an approved FM Environmental service provider only. Failure to implement this service could result in impairment of unit performance or system failure.
- Page 11 A safety magnetic switch is found on the control panel whilst the magnet itself is path of the flow underneath the outlet baffle. Ensure the unit is pumped out as per attached to the main lid of the Grease Guardian. Make sure that the lid magnet has maintenance instructions.
- Page 12 Any and all items which may be returned shall FM Environmental warrants, to the original user, that The Grease Guardian main tank (location include the serial number of the unit from which the item was removed, and a return in which grease is trapped) supplied and used in the service and in the manner for which it goods authorization number issued by FM Environmental.
- Page 13 Example setting 1 Based on grocery hot serve (no fryer) serving 35 covers. Product installed Grease Guardian with a single skimmer wheel. Setting required: 1 x medium setting. Set 1 time slot per day (eg: 8:00-1200) and set main display to MEDIUM MODE. Refer to controller settings in this manual for steps.
- Page 14 Appendix 3: D1 to D4 wiring diagram D1-D2: 5A D3-D4: 8A Br or Wh D1-D2: 5A D3-D4: 8A Br or Wh...
Need help?
Do you have a question about the D1 and is the answer not in the manual?
Questions and answers