Table of Contents
Advertisement
Quick Links
Advertisement
Table of Contents

Subscribe to Our Youtube Channel
Related Manuals for Soliom S90


Summary of Contents for Soliom S90
- Page 1 Outdoor Wireless Solar Camera Model: S90...
-
Page 2: Warranty Service
Thanks for purchasing from Soliom. Having issues with your Soliom cameras? Please contact us through either ways below. Soliom care team staffs would offer you a best 24 hours solution to solve any problems within Register via below link to get 2 Years Extended Warranty https://soliom.net/pages/product-registration... - Page 3 5-14 15-18 19-26 Part 5: How to Save and Delete Videos....27 Part 6: More Settings.............28...
-
Page 4: Very Important Tips
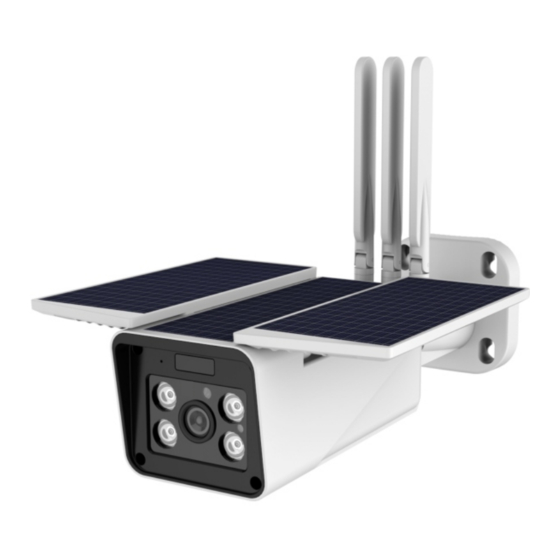
Very Important Tips 1. Soliom S90 can only be set up with 2.4g Wi-Fi network. (It's ok to use Cell phone 4G data to live viewing it after the camera was set up with 2.4g Wi-Fi network firstly.) 2. When the battery runs out, the camera can only turn on automatically after the camera is charged more than 4 hours. - Page 5 Bracket Solar Panel USB port Micro-SD USB Port Reset Power Reset Power Cable for connecting external solar panel...
-
Page 6: Before Installation
Before Installation Charging Please charge the camera about 10-12 hours by plugging it into a power source using the provided USB cable. After connecting the camera with App, the App will indicate the battery status. (There's no indicator to show charging status from the camera) Micro-SD USB Port... -
Page 7: Package Content
4 x Expansion Screws 1 x Allen key 1 x Allen key 1 x USB Cable Outdoor Wireless Solar Camera Model: S90 Stick the position paper on the wall where you want to install the camera,and drill hole on the red circle... - Page 8 Tips:Please Allow below 2 permissions when use this App at first time. 1. Allow"SOLIOM+" use mobile cellular data and wireless LAN, otherwise it may be failed to add S90 camera. 2. Allow "SOLIOM+" to get system push message and location...
- Page 9 (1)Please set a password for your account and make note to remember it. (2)Please click "Allow" or "Agree" on all access when you download soliom+ and during the process of setting up soliom+ your account so that the can have full access to your camera and phone.
-
Page 10: Turn On The Camera
In-App Setup 4. Turn on the camera Press the power button to turn on the camera, after 3 seconds, LED flashes blue. Then you will hear the following voice “The camera is now ready to begin pairing”. Micro-SD USB Port Power Reset Flashes blue... - Page 11 Otherwise please check your wi-fi list from your devices and you have to turn on the location services for the Soliom+.
- Page 12 Click the icon to double confirm the password you entered correct Method 1: QR code configuration 1.1 Click the “QR code configuration”, hold the QR code in front of the S90 camera, and then you will hear the following voice “Pairing Information Received”.
- Page 13 In-App Setup Method 2: Sound wave configuration 2.1 Enter into the “search device” page, make sure to turn up you phone’s volume to the Maximum, you will hear the following voice : “Pairing Information Received”. 3) You have connected the device to the App successfully. Choose a name of the devices from the drop-down choice, or you can modify one that you want.
- Page 14 In-App Setup Congratulations! You have connected your camera to the App successfully, now you can live view the camera on your phone anytime and anywhere. If you're unable to pair the camera, Please check below suggestions: 1. Please reset the camera to default after you fully charged the camera.
- Page 15 In-App Setup 7.How to Share Your Camera with More Users When you can use your camera properly. You can start to share your camera to your friends or family members. click“ ”and choose "share permissions". input the account that you want to share with.
- Page 16 In-App Setup 8.How to unbind your camera Please do not forget to unbind your camera from your App when you plan to return the camera, to avoid any personal information disclosure risk. And unbind your camera as following steps, click" "...
-
Page 17: Push Mode
The video clips will be saved in the Cloud. Cloud video length is 8 seconds defaulted and free for 30 days. And you have to pay for the service per month or other cloud service. You can choose a service from the soliom+ provided to purchase. -
Page 18: Physical Installation
Physical Installation Check your camera signal strength If not satisfied with video smoothness, Check in App and signal strength in App is not strong, we would suggest adding wifi extender between the Router and the camera. Camera WiFi extender Router Recommended height to install the camera We suggest installing the camera about 8ft. - Page 19 Physical Installation Stick the position paper on the wall where you want to install the camera. drilling the 4 holes according to the 4 red dots on the paper and then fix the bracket using the expansion screws. Stick the position paper on the Stick the position paper on the wall where you want to install wall where you want to install...
-
Page 20: Technical Specifications
Technical Specifications Image Quality Resolution 1080P Specifications Lens angle FOV 160° Lens H.264 Video format Frames per Video 15fps second Specifications SD card 8GB-Max 64GB support Built-in speaker Output Audio Intput Built-in microphone Communications 2.4GHz WiFi Battery capacity 10000mAh Standby time Max 8-12 months Battery Power... -
Page 21: Led Status
Technical Specifications System Android 2.3 above/ iOS 7.0 above Suppport PIR angle FOV 120° PIR range 24ft Range Up to 32ft Night Vision Continuously daytime Max 36 hours recording time Working time for Continuously night vision fully charged Max 14 hours recording time Waterproof IP grade... - Page 22 Detailed App Instructions 1.click , you could live viewing videos. 2019-12-27 15:00:36 2019-12-27 15:00:36 2019-12-27 15:00:36 Online Online Online...
- Page 23 Wifi signal strength contact Soliom support team for a replacement Tips: Please make sure your camera at care@soliom.net All friendly customer has a full bar of wifi strength to service staffs are ready to assist you.
- Page 24 Detailed App Instructions Setting: Click to enter into device settings. ( Check page 21 for more details) This icon “ ” is to turn on the spot light during 2019-12-27 15:00:36 night. The spot light will turn on to record a starlight color video clip when there's motion detected by the camera.
-
Page 25: Image Flip
Detailed App Instructions SD Card Setting 1) Please turn on the cloud storage so that you can sync the camera time with your phone. 2019-12-27 15:00:36 Online Image flip You can choose Normal Rotate, Mirror or Mirror and rotate depends on your hardware installation way. The default is Normal. - Page 26 Detailed App Instructions Scene mode You can choose to set it as Normal, back light compensation, night IR, High light compensation or Dynamic according to your actual light environment of installation place. 2019-12-27 15:00:36 Online PIR Detection Sensitivity You can set the PIR sensitivity as Disabled, Low, Medium or High.
-
Page 27: Active Time
Detailed App Instructions 2019-12-27 15:00:36 Online Active time 1) This is the time you could set for the video length recorded to micro sd card. 2) Always: If you choose this option,you will not allow the camera enter into standby mode,the camera will keep recording all the time until battery drains out. -
Page 28: Led Indicator
Detailed App Instructions LED indicator When you choose Enable,the Blue LED will light up to indicate when you operate the camera as it should be.When you choose Disabled,the Blue LED will not light up to indicate the operations or trigger motions.It is recommended to set it as the default 2019-12-27 15:00:36 Online Power frequency... - Page 29 Detailed App Instructions Device Name You can set a desired name for your camera. 2019-12-27 15:00:36 Online...
- Page 30 How to save and delete videos 1. Videos can be saved in Cloud Storage: (1). The videos of PIR activity You could save the videos of PIR activities in cloud storage, which can be used 30 days for free and then you have to pay for the services.
-
Page 31: More Settings
More Settings Common Settings Click the common setting, you can choose the resolution to SD(720P) or HD(1080P) by clicking ”Default resolution”. You can turn on/off the notification alarm ring tone and vibration for Andriod devices,this is not workable for iOS devices currently. 2019-12-27 15:00:36 Online Frequently Asked Questions... - Page 32 Customer Care Email: care@soliom.net www.soliom.net www.facebook.com/soliomcam...
Need help?
Do you have a question about the S90 and is the answer not in the manual?
Questions and answers