Table of Contents
Advertisement
Quick Links
Advertisement
Table of Contents

Related Manuals for Open Air Cinema CINEBOX HOME SYSTEM

Summary of Contents for Open Air Cinema CINEBOX HOME SYSTEM
- Page 1 CINEBOX™ HOME SYSTEM USER GUIDE www.openaircinema.us...
- Page 2 866-802-8202 or send us an email at support@openaircinema.us. Have fun using your new outdoor movie system, we know that you’ll love it! The Open Air Cinema Team...
-
Page 3: Table Of Contents
TABLE OF CONTENTS System Components Inflatable Screen Setup Speaker Setup CineBox™ Home A/V Console Setup Video Image Alignment System Takedown Connecting Other Devices Care and Maintenance Troubleshooting Upgrades + Accessories Warnings + Warranty... -
Page 4: System Components
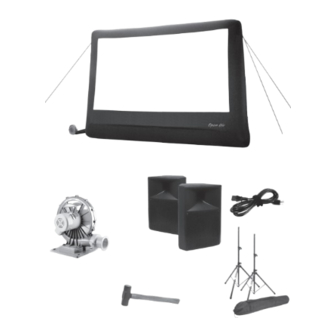
SYSTEM COMPONENTS ( 1 ) Open Air Home Inflatable Movie Screen with screen storage bag ( 8 ) Tie down tethers ( 2 ) Speaker (attached to screen) cables ( 2 ) Powered Speakers ( 1 ) Air Blower (model may vary ( 1 ) Mallet with screen size) (20’... - Page 5 ( 1 ) CineBox™ Home Console with protective carrying case ( 1 ) Audio Mixer ( 1 ) Blu-Ray Player, or DVD Player, or Playstation (Depending on system definition) ( 1 ) Projector power cable (pre-plugged into console) ( 1 ) 3.5mm (headphone) cable ( 1 ) Video Projector...
-
Page 6: Inflatable Screen Setup
INFLATABLE SCREEN SETUP STEP 1: UNROLL SCREEN AND UNCOIL TETHERS Unroll screen on grass or tarp. Unfold the screen so it sits like a clamshell with the white projection surface on the inside (so it doesn’t touch the ground). Identify the top and bottom of the screen. - Page 7 INFLATABLE SCREEN SETUP STEP 2: SECURE STAKES AND TETHERS Place stakes in ground roughly 10 feet from the corners of screen at 135 degree angles. For 9’, 12’, and 16’ screens, clip the tethers from the corners of the screen to the stakes. For the 20’ screen, tie ends of tethers to stake, preferrably using a clove hitch knot.
- Page 8 INFLATABLE SCREEN SETUP STEP 3: ATTACH AIR BLOWER TO SCREEN Attach the air blower to the intake sleeve on the side of the inflatable frame using the cinch cord. Plug in the air blower using an extension cord (not provided with Home systems). Be sure the cinch cord is secured tightly around the coupling of the air blower.
-
Page 9: Speaker Setup
SPEAKER SETUP STEP 1: SETUP SPEAKER STANDS This step is only for 16’ and 20’ systems. 9’ and 12’ systems do not include speaker stands. So if you have a 9’ or 12’ system, skip to next step. Remove speaker stands from protective bags and pace about five feet to each side of the Open Air Home Screen. - Page 10 SPEAKER SETUP STEP 3: ATTACH POWER AND AUDIO XLR CABLES Connect speaker power cord to each speaker. Plug in speaker power cord to an extension cord or power source. Plug in 50’ (or 100’ for 20’ system) XLR audio cables in to the XLR input (middle jack) on the back of each speaker.
- Page 11 CINEBOX™ CONSOLE SETUP STEP 1: CINEBOX™ AND PROJECTOR PLACEMENT Center the video projector and CineBox™ Console in front of the Open Air Home Screen at approximately the distance listed on the chart below for your specific system size. Place on small table. The projector’s zoom function will allow for image size adjustment after the projector has been placed.
- Page 12 CINEBOX™ CONSOLE SETUP STEP 2: OPEN CINEBOX™ CONSOLE Unzip the front and back covers of the CineBox Console. Loosen the bundle of cords in the back of the case and identify the main console power cord, the left and right XLR audio cords, the HDMI video cord (for HD and gaming systems), the RCA cable (for standard def systems), and the projector power cord.
- Page 13 CINEBOX™ CONSOLE SETUP STEP 3: CONNECT CORDS Connect the XLR cords running from each speaker to the left (white) and right (red) audio XLR cables from the CineBox. Plug in the projector power cord to the back of the projector. Plug in the HDMI video cord to the back of the projector for HD and gaming systems.
- Page 14 CINEBOX™ CONSOLE SETUP STEP 4: POWER ON MEDIA PLAYER Power on the Blu-ray, DVD, or Playstation gaming system. The audio mixer should power on automatically when the main power is plugged in. ATTENTION: The audio mixer power light will illuminate when powered on.
-
Page 15: Video Image Alignment
IMAGE ALIGNMENT STEP 1: ALIGNING THE IMAGE When it begins to become dark, turn on the projector (and CineBox if needed). Use the projectors adjustable feet as well as the zoom, focus, and keystone features on the projector to fill the projection surface with the image. -
Page 16: System Takedown
WATCH YOUR MOVIE You’re all ready to watch your movie, so sit back, relax, and enjoy! For troubleshooting steps, see next page. SYSTEM TAKEDOWN Power down projector by pushing power button on top of projector or by using remote. Make sure projector cools down completely before unplugging or turning off power source. -
Page 17: Connecting Other Devices
CONNECTING OTHER DEVICES CONNECTING COMPUTERS To send the video image from a laptop computer to the projector connect the “monitor out” of the laptop to the appropriate “computer in” of the projector. Connect the audio out (or head- phone jack) from the computer to the “IN 4” channel on the front of the audio mixer or one of the available input channels on the back of the audio mixer. -
Page 18: Troubleshooting
SCREEN REPAIR If the inflatable frame develops a hole, repair is possible with a special nylon tape available from Open Air Cinema. Clean and dry the area before application. When possible it is best to patch from the inside and outside of the tube. -
Page 19: Upgrades + Accessories
UGRADES AND ACCESSORIES FOR YOUR CINEBOX™ HOME SYSTEM Honda Generators FM Transmitters for Drive-In Style Events Subwoofers and Additional Speakers Microphones: Wired or Wireless 3D Projectors and Video Kits Brighter Projectors Projector case: Foam encased, water resistant, air tight. Projector Replacement Lamps Short Throw or Long Throw Projector Lenses (compatible with upgraded projector) Backup DVD/BluRay Player, Extra Cables, Extension Cords... -
Page 20: Warnings + Warranty
See quick setup guide for proper screen anchoring. Open Air Cinema is not responsible for damage arising from failure to follow instructions relating to the product’s use. Warranty does not cover damage to screen caused by winds over 20 mph, use of screen in close proximity to trees, buildings, poles, wires, cars, water and other potentially damaging objects. - Page 21 www.openaircinema.us...
Need help?
Do you have a question about the CINEBOX HOME SYSTEM and is the answer not in the manual?
Questions and answers