Advertisement
ELEMENT RACK INSTRUCTIONS
Important
This rack is designed for use with a 2" or 1.25" receiver hitch (model 26044 or 26045). The rack is designed to
hold 4 bikes or a maximum of 120 pounds. Do not use it for anything other than carrying bikes. This rack is not
recommended for use on the back of a trailer.
Warning
Check the tightness of bolts and nuts periodically as they may loosen during regular use, especially the hitch
receiver bolt if the rack is left attached to the vehicle for extended periods of time.
Warning
Do not drive with the bike rack in the lowered position.
Warning
Remove the rack from the vehicle when driving through a car wash.
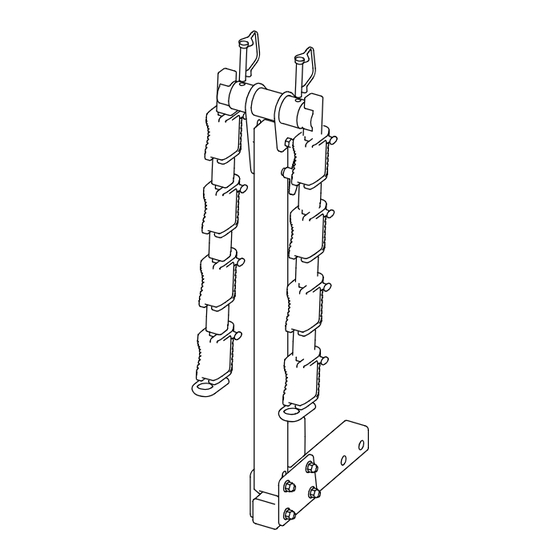
PARTS INCLUDED
(A) Main rack assembly
(B) Bike rack arms (2)
(C) Arm straps (8)
(D) Hitch bolt with lock washer (5/8" for 2" rack, 1/2" for 1.25" rack)
(E) Soft wraps (4)
(F) Detent pins (2)
For 1.25" racks only
(G) 1.25" hitch bar
(H) Fasteners for 1.25" hitch assembly 3 each 10mm bolts,
washers and lock nuts (2 – 100mm and 1 – 50mm long)
(A)
(F)
(C)
(B)
(D)
(E)
TOOLS REQUIRED
Adjustable wrench (2)
Screw driver
1 1/4" HITCH COMPONENTS
(G)
(H)
Advertisement
Table of Contents

Subscribe to Our Youtube Channel
Related Manuals for Softride Element Rack


Summary of Contents for Softride Element Rack
- Page 1 ELEMENT RACK INSTRUCTIONS Important This rack is designed for use with a 2" or 1.25" receiver hitch (model 26044 or 26045). The rack is designed to hold 4 bikes or a maximum of 120 pounds. Do not use it for anything other than carrying bikes. This rack is not recommended for use on the back of a trailer.
- Page 2 ELEMENT RACK INSTRUCTIONS pg.2 Assembly of Rack Begin assembly of your Element rack by remov- ing the main rack assembly and the 2 arms from the box. Attach the arms to the main rack assembly so that the yellow bails on the ends of the arms are pointing up.
- Page 3 ELEMENT RACK INSTRUCTIONS pg.3 Installation of the rack For 2" racks only. Check to make sure that the nut inside the rack hitch bar is aligned with the hole in the hitch bar. Adjust with a screw driver if necessary.
- Page 4 ELEMENT RACK INSTRUCTIONS pg.4 Use of Rack Place bicycles onto the rack starting at the point closest to the vehicle. Alternate the direction the bikes are facing when mounted on the rack. When not carrying bikes, remove the detent pins, lower the arms to the vertical position and re-secure the arms with the detent pins.
Need help?
Do you have a question about the Element Rack and is the answer not in the manual?
Questions and answers