Advertisement
3
ALUMINA
RACK INSTRUCTIONS
Model #26428
Important
This bike rack is designed for use in a 2" or 1.25" receiver and designed to hold a maximum of three bikes. Do not
use this rack for anything other than carrying bicycles. Do not exceed your vehicle's receiver load ratings for any
reason. Reference the instruction manual for proper use of this rack. 90 lb maximum carrying capacity. Save these
instructions.
Warning
Check the tightness of bolts and nuts periodically as they may loosen slightly during normal use.
DO NOT drive the vehicle with the bike rack in the lowered position.
This rack CANNOT be used on a Class 1 (200 lb tongue weight) receiver hitch.
Not intended for off-road use.
This rack MUST be removed from the vehicle before going through a car wash.
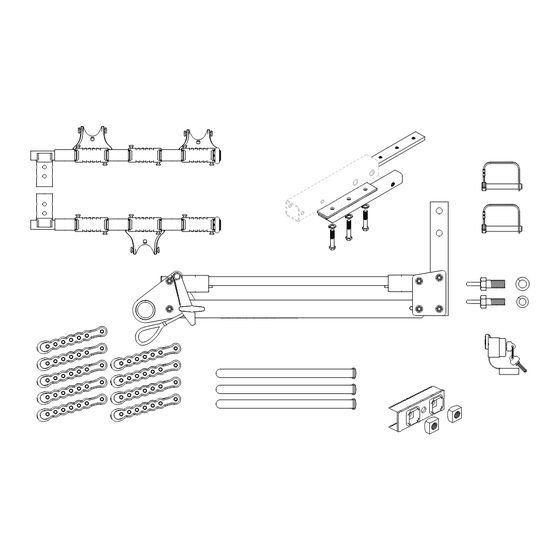
PARTS INCLUDED
(A)
Main rack assembly with Cable Lock
(B)
Bike rack arms (2)
(C)
Arm straps (9)
(D)
Hitch bolt with lock washer (5/8" for 2" rack & 1/2" for 1.25" rack)
(E)
Soft wraps (3)
(F)
Detent pins (2)
(G)
1.25" Hitch Bar
(H)
Lock & Keys
(I)
Anti-sway (3)
(J)
Hitch Bar Nut Holder
(B)
(C)
(I)
(G)
(A)
(E)
TOOLS REQUIRED
Torque wrench
Screw driver
(J)
(F)
(D)
(H)
Advertisement
Table of Contents

Related Manuals for Softride 26428


Summary of Contents for Softride 26428
- Page 1 ALUMINA RACK INSTRUCTIONS Model #26428 Important This bike rack is designed for use in a 2” or 1.25” receiver and designed to hold a maximum of three bikes. Do not use this rack for anything other than carrying bicycles. Do not exceed your vehicle’s receiver load ratings for any reason.
- Page 2 Recommended Accessories Top Tube Adapters (26373) Gooseneck Adapter (25748) Extended Hitch Bar (26033) Replacement Straps (25869) Softwrap Kits (26260) Bike Bumper (26442) www.softride.com...
- Page 3 ALUMINA RACK INSTRUCTIONS Installation of the Rack For 2” racks only. Check to make sure that the nut inside the rack hitch bar is aligned with the hole in the hitch bar. Adjust with a screw driver if necessary. Place the lock washer on the hitch bolt and thread it into the nut in the hitch bar.
- Page 4 ALUMINA RACK INSTRUCTIONS Use of Rack Place bicycles onto the rack starting at the point closest to the vehicle. Alternate the direction the bikes are facing when mounted on the rack. When not carrying bikes, remove the detent pins, lower the arms to the vertical position and re-secure the arms with the detent pins or remove arms and store in a secure place.
Need help?
Do you have a question about the 26428 and is the answer not in the manual?
Questions and answers