Advertisement
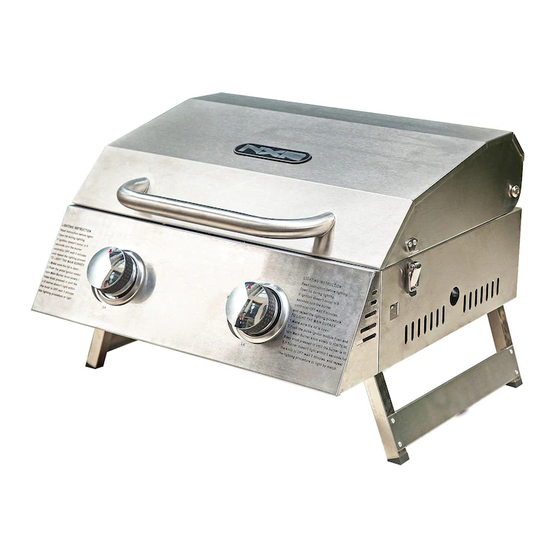
2 BURNER STAINLESS STEEL TABLE TOP GAS GRILL
Gas Grill Manual for Installation, Care and Maintenance
IMPORTANT, RETAIN FOR FUTURE REFERENCE: READ CAREFULLY
Model: 880-0011
Warning:
For outdoor use only.
This instruction manual contains important information necessary for the proper assembly
and safe use of the appliance.
Do not leave the appliance unattended. Keep young children and pets away.
Do not move the device during use.
Not intended to be installed in or on boats and should never be used as a heater.
Close the valve of the gas cylinder after use.
Questions, problems, missing parts? Before returning to your retailer, call our customer
service department at 1-888-909-8818, 9 a.m.-5 p.m., PST, Monday-Friday. English, French, and
Spanish representatives are available. Send email to: nxrcs@duro-global.com
1
ITM./ART. 853265
Advertisement

Related Manuals for NXR 880-0011


Summary of Contents for NXR 880-0011
- Page 1 2 BURNER STAINLESS STEEL TABLE TOP GAS GRILL Gas Grill Manual for Installation, Care and Maintenance IMPORTANT, RETAIN FOR FUTURE REFERENCE: READ CAREFULLY Model: 880-0011 Warning: For outdoor use only. This instruction manual contains important information necessary for the proper assembly and safe use of the appliance.
-
Page 2: Table Of Contents
TABLE OF CONTENTS Care and Maintenance....…..……………………………………..…………..3 Parts List………..……………………..…..............7 Assembly Instructions..………………………………………………………...……….…..8 Lighting Instruction......................13 Warranty..……………………..…….…...............15 CALIFORNIA PROPOSITION 65 WARNING WARNING: This product contains a chemical known to the State of California to cause cancer, birth defects, or other reproductive harm. The burning of gas fuel generates some by-products and chemicals that are known to the State of California to cause cancer, birth defects, or other reproductive harm. -
Page 3: Care And Maintenance
CARE AND MAINTENANCE Precautions WHEN USING THE GRILL, DO NOT TOUCH THE GRILL RACK, BURNER GRATE OR IMMEDIATE SURROUNDINGS WHICH BECOME EXTREMLY HOT DURING USE AND CAN CAUSE BURNS. AVOID ALLOWING EXCESS GREASE TO COLLECT IN THE GREASE TRAY AT THE BOTTOM OF THE GRILL FIREBOX. CLEAN THE GREASE TRAY OFTEN. - Page 4 PROPER PLACEMENT AND CLEARANCE OF GRILL •Never use your gas grill in a garage, porch, shed, breezeway or any other enclosed area. Your gas grill is to be used outdoors only. •DO NOT install this unit into combustible enclosures. •Minimum clearance from sides and back of unit to combustible construction, 61 cm (24 inches) from both sides and 61 cm (24 inches) from the back.
- Page 5 WARNING 1. Always operate the grill on a tabletop, no higher than 81 cm (32 inches). 2. Place the propane tank on the ground immediately adjacent to the tabletop, no further than 61 cm (24 inches) from the grill. 3. Failure to follow these instructions could cause the propane tank to overheat and vent propane which could ignite causing serious personal juries or property damage and/or a tripping hazard over the gas hose or propane tank, pulling the grill off the tabletop causing serious personal injuries or property damage.
- Page 6 TECHNICAL DESCRIPTION PREPARATION Before beginning assembly, make sure all parts are present. Compare parts with package contents list and diagram on page 7. If any part is missing or damaged, do not attempt to assemble the product. Contact customer service for replacement parts. ...
-
Page 7: Parts List
PARTS LIST Part Description QTY. Part Description QTY. Logo Foot Stand Leg, Left Main Lid Hinge Bolt Cooking Grid Lid Nut Cap Flame Tamer Lid “R” Pin Snap Joint Main Lid Main Burner Lid handle Insulating Spacer Grease Tray Lid Handle Regulator and Hose Main Firebox Foot Stand Leg, Right... -
Page 8: Assembly Instructions
ASSEMBLY INSTRUCTIONS Fig1: Remove all the packing materials and move grill colse to a desired location. Fig2: Install the foot stand legs as shown below:... - Page 9 Fig3: Install the grease tray under the firebox as shown below: Fig4: Install the flame tamers on the burners then install the grid on the firebox as shown below: Note: When not in use, please place the regulator on grill handle. This will protect the regulator.
- Page 10 Tank Installation If the outdoor cooking gas appliance is not in use, the gas must be turned off at the supply cylinders. Storage of an outdoor cooking gas appliance indoors is permissible only if the cylinder(s) is/are Cylinder disconnected and removed from the outdoor Regulator cooking gas appliance.
- Page 11 TESTING FOR LEAKS Only those parts included by the manufacturer GENERAL Although all gas connections on the grill are leak should be used on the grill. tested at the factory prior to shipment, a complete Substitution will void the warranty. Do not use the gas tightness check must be performed at the grill until all connections have been checked and do installation site due to possible mishandling in...
- Page 12 STATEMENT 1. The LP gas supply cylinder(s) to be used must be: a) Constructed and marked in accordance with the Specifications for LP-Gas Cylinders of the U.S. Department of Transportation (D.O.T) or the National Standard of Canada, CAN/CSA-B339, Cylinders, Spheres and Tubes for Transportation of Dangerous Goods; and Commission, as applicable; b) Provided with a listed overfilling prevention device.
-
Page 13: Lighting Instruction
e) Check and clean the burner tubes for insects and insect nests. A clogged tube can lead to a fire beneath the grill. LIGHTING INSTRUCTIONS Before Lighting Inspect the gas supply hose prior to turning on the gas. If there is evidence of cuts, wear, or abrasion, it must be replaced prior to use. - Page 14 If you have already attempted to light the main burner with the igniter, allow 5 minutes for any accumulated gas to dissipate. Insert a match into the lighting rod. Ignite the match and insert through the cooking grids to the burner. If the burner does not light within seconds turn the knob to the “OFF”...
-
Page 15: Warranty
LIMITED WARRANTY DURO warrants to the original consumer-purchaser only that this product (Model #880-0011) shall be free from defects in workmanship and materials after correct assembly and under normal and reasonable home use for the periods indicated below beginning on the date of purchase. - Page 16 ITEMS MANUFACTURER WILL NOT PAY FOR: ■ Service calls to your home. ■ Repairs when your product is used for other than normal, single-family household or residential use. ■ Damage resulting from accident, alteration, misuse, lack of maintenance/cleaning, abuse, fire, flood, acts of God, improper installation, and installation not in accordance with electrical or plumbing codes or use of products not approved by the manufacturer.
- Page 17 vary from state to state. If you wish to obtain performance of any obligation under this limited warranty, you should write DURO CORPORATION 17018 Evergreen Place City of Industry, CA 91745 All consumer returns, parts orders, general questions, and troubleshooting assistance can be acquired by calling call our customer service department at 1-888-909-8818, 9 a.m.-5 p.m., PST, Monday-Friday (English/French/Spanish).
Need help?
Do you have a question about the 880-0011 and is the answer not in the manual?
Questions and answers