Table of Contents
Advertisement
Quick Links
Advertisement
Table of Contents

Related Manuals for Microcanner MC202


Summary of Contents for Microcanner MC202
- Page 1 MC202 OPERATING INSTRUCTION MANUAL Version 1.0 Date 9/22/16...
- Page 2 MC202 WARNING! OPERATING AUTOMATED EQUIPMENT IS DANGEROUS. DO NOT OPERATE THE MC202 CANNING SYSTEM UNTIL YOU HAVE READ THIS MANUAL AND HAVE RECEIVED PROPER TRAINING. PRECAUTIONS MUST BE TAKEN TO SAFEGUARD OPERATORS. OPERATORS MUST BE TRAINED AND AWARE OF DANGER POINTS, IF SOMEONE FAILS TO FOLLOW SAFETY RULES, INJURY OR DEATH COULD RESULT.
-
Page 3: Table Of Contents
6.3 ADJUSTING THE CAP HOLD DOWN 6.4 ADJUSTING THE SEAM LIFT DECK 6.5 ADJUSTING THE TRANSFER STAR 6.6 ADJUSTING THE SEAM STATION 7 HMI OPERATIONS 7.1 HMI BASIC OPPERATIONS 7.2 F1: MAIN SCREEN 7.3 F2: SEAM SETUP DIMENSIONS MC202 OIM (V1.0) Page 3 of 30... - Page 4 MC202 7.4 F3: FILL STATION SETUP 7.5 F4: TOP OFF MODE 7.6 F5: SEAM SETUP CONTROLS 8 TIPS FOR A SUCCESSFUL RUN MC202 OIM (V1.0) Page 4 of 30...
-
Page 5: Introduction
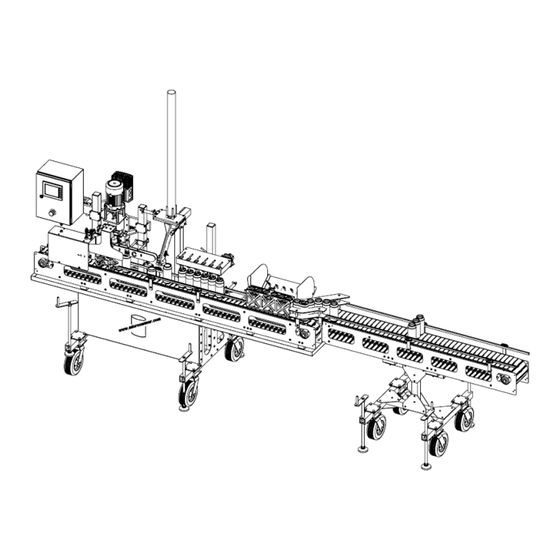
With proper operation and service your machine will offer you years of service. • The MC202 canning system is designed to run 12 or 16oz cans with a few simple changeover steps. The machine will run up to 60 cases per hour, this will vary from product to product based on carbonation and/or specific gravity. -
Page 6: General Machine Service
• After cleaning a food grade zero weight grease (http://www.mcmaster.com/#1242k11/=125v2xd) needs to be applied to all conveyor bearing zerk fittings. There are 3 conveyor bearings on the main line, and 4 on the add-on conveyor. Zerk location showed circle red below. MC202 OIM (V1.0) Page 6 of 30... - Page 7 To empty the catch bowl, push down on the grey thumb slide, then turn and pull down to take the bowl off. Empty the bowl of any water. MC202 OIM (V1.0) Page 7 of 30...
-
Page 8: Start Up Procedure
2. With a bubble level on the bed of the conveyor, raise the machine by lowering the threaded foot pads by hand until the machine is completely level. 3. Connect and level add-on rinse conveyor, if applicable. If not, skip to step 4 MC202 OIM (V1.0) Page 8 of 30... - Page 9 Now fully level the add-on conveyor with the level placed on the bed of the conveyor. While leveling the add-on conveyor keep watch for the alignment of the mounting holes through the T-shaped transition plate, and insert the mounting screws when possible. MC202 OIM (V1.0) Page 9 of 30...
- Page 10 5. Verify that the cap shedder is at the appropriate running height. Run a can by hand under the shedder to verify the end catches and falls on top of the can. MC202 OIM (V1.0) Page 10 of 30...
- Page 11 Remove the 6 cans filled with sanitizer. h. Fully purge system with product. 8. Hook up water supply to rinse station(s). Turn on water supply 9. Load ends into cap feeder station. 10. Turn machine to automatic mode. MC202 OIM (V1.0) Page 11 of 30...
-
Page 12: Seam Setup Guide
2. It is recommended that any step in this section 5.3 be done with the air powered down, turned off, and the seaming arms moved manually to verify fit MC202 OIM (V1.0) Page 12 of 30... - Page 13 Once in position, retighten the 2 set screws, and jam nuts. Take care to make sure the form tools do not move while retightening the clamp screws. MC202 OIM (V1.0) Page 13 of 30...
- Page 14 Then put a wrench on the rod of the cylinder and turn the wrench clockwise to increase depth, and counter-clockwise to reduce depth. Retighten the jam nut once in desired position. MC202 OIM (V1.0) Page 14 of 30...
-
Page 15: How To Test And Measure Seams
3. Take a can and fill it with water to give it structural rigidity. The can will get crushed without fluid in it running through the seaming station. 4. Place an end on the can, and place it on the conveyor prior to the seaming station MC202 OIM (V1.0) Page 15 of 30... - Page 16 2 op form tooling until within spec. 21. Repeat steps 3-19 as necessary to get a seam within spec. You can skip steps 9-13 after the first operation seam is satisfactory. MC202 OIM (V1.0) Page 16 of 30...
-
Page 17: Change Over Procedure
HMI screen. Then tighten the set screw. Repeat for each can/station. 4. Use the HMI screen to raise the fill station. 5. Remove setup cans so the machine will be ready to run. MC202 OIM (V1.0) Page 17 of 30... -
Page 18: Adjusting The Cap Feeder
3. Use an unseamed can without an end on the conveyor and raise or lower the feeder until caps catch on the can. 4. Retighten the 4 red bolts. 5. Run can through by hand to verify height. Repeat as necessary. MC202 OIM (V1.0) Page 18 of 30... -
Page 19: Adjusting The Cap Hold Down
3. Raise or lower the cap hold down bar until the can slides under the bar. The can end should only touch the hold down rail with the end fully seated on the can, and only raise the rail if foam is present. 4. Retighten the 4 red bolts. MC202 OIM (V1.0) Page 19 of 30... - Page 20 6. With a can and end directly under the cap in place sensor press and hold the teach button until it turns solid yellow. From time to time this sensor will need to be retaught its position. Repeat this step whenever necessary. See image below. MC202 OIM (V1.0) Page 20 of 30...
-
Page 21: Adjusting The Seam Lift Deck
Lower the lower assembly and use the lower set of mounting holes. 4. From 16oz to 12oz cans, remove the 4 bolts shown green. o Raise the lower assembly and use upper set of mounting holes MC202 OIM (V1.0) Page 21 of 30... -
Page 22: Adjusting The Transfer Star
2. Loosen the 16 bolts shown red. 3. Raise or lower the seam station until the seaming bed (shown highlighted blue) is even with the surface of the conveyor. 4. Retighten all 16 bolts. MC202 OIM (V1.0) Page 22 of 30... - Page 23 MC202 MC202 OIM (V1.0) Page 23 of 30...
-
Page 24: Hmi Operations
• Below the touch panel, you will see a red emergency stop button. This E-stop button will shut the entire machine off, and is a vital piece of safety equipment. Familiarize yourself with this button and its operations prior to running the machine. MC202 OIM (V1.0) Page 24 of 30... -
Page 25: F1: Main Screen
4. Missing Cap Pause (II): This button should be used when a can with a missing end has made it under the cap in place sensor. If this button is not pushed before placing an end on the can, the machine may actuate early and MC202 OIM (V1.0) Page 25 of 30... -
Page 26: F2: Seam Setup Dimensions
7.4 F3: FILL STATION SETUP • This screen is to be used for the sanitation of the machine before and after running product through the machine, and also to set the float valves on the MC202 OIM (V1.0) Page 26 of 30... - Page 27 7.5 F4: TOP OFF MODE • This screen can be used if at any time an additional amount of product needs to be added to any individual can. MC202 OIM (V1.0) Page 27 of 30...
- Page 28 • Reference the seam setup guide (5) on how to test and measure seams. • Below is a quick over of the buttons and how they function. 1. Lift Can: Either lifts or lowers the lift puck depending on the position it is already in. MC202 OIM (V1.0) Page 28 of 30...
- Page 29 • We have noticed that temperature probes in brite tanks do not always show the true temperature of all of the product being delivered to the canning machine. MC202 OIM (V1.0) Page 29 of 30...
- Page 30 Leaving supply lines uninsulated, laying on a warm floor, or being exposed to sunlight will greatly affect the temperature of product being delivered to the machine. MC202 OIM (V1.0) Page 30 of 30...
Need help?
Do you have a question about the MC202 and is the answer not in the manual?
Questions and answers