
Related Manuals for HP PSR750-A


Summary of Contents for HP PSR750-A
- Page 1 HP PSR750-A Power Supply User Guide Part number: 5998-1606 Document version: 5PW100-20110311...
- Page 2 The only warranties for HP products and services are set forth in the express warranty statements accompanying such products and services. Nothing herein should be construed as constituting an additional warranty.
- Page 3 Operating system type and revision level • Detailed questions • Subscription service HP recommends that you register your product at the Subscriber's Choice for Business website: http://www.hp.com/go/e-updates After registering, you will receive e-mail notification of product enhancements, new driver versions, firmware updates, and other product resources.
- Page 4 HP-authorized network reseller can provide you with assistance, both with services that they offer and with services offered by HP. Documentation For the latest documentation, visit the HP website, www.hp.com, and select the Support & Troubleshooting link. Choose See support and troubleshooting information radio •...
-
Page 5: Table Of Contents
Contents Introduction to the power supply ····························································1 Introduction ·························································································1 Specifications······················································································3 Panel····································································································4 Status LEDs ··························································································4 Installing and removing the power supply ············································6 Precautions··························································································6 Tools ····································································································7 Installing and removing the power supply ·······································7 Installing the power supply ··························································7 Removing the power supply·························································9 Connecting the power cord····························································... -
Page 6: Introduction To The Power Supply
Introduction to the power supply Introduction The PSR750-A (JC089A) is an AC-input and DC-output power supply. It can convert the input voltage to 12 V and –54 V as required, and its maximum output power is 750 W. Table 1 Features supported by the PSR750-A... - Page 7 Table 2 Protection functions of the PSR 750-A Auto-recovery Protection function Status support No power supply Over-voltage with the power Not supported protection supply deadly locked Short-circuit No power supply Supported protection Current-limiting No power supply Supported protection Overheat protection No power supply Supported NOTE:...
-
Page 8: Specifications
Specifications Table 3 PSR750-A specifications Item Specifications 100 VAC to 240 VAC; 50 Hz or Rated voltage range 60 Hz 90 VAC to 264 VAC; 47 Hz or Max voltage range 63 Hz Output voltage (dual output) 12 V and –54 V 25 A for 12 V output voltage •... -
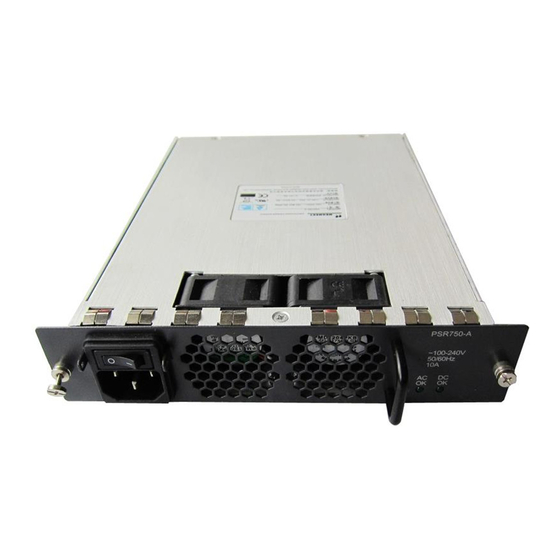
Page 9: Panel
(5) Status LED for DC output (6) Status LED for AC input (7) Captive screw Status LEDs The PSR750-A has two LEDs, which indicate the input status (AC OK) and output status (DC OK) of the power supply. Table 4 describes the... - Page 10 DC OK The power output is normal. In normal cases, the input LED of the PSR750-A power supply turns on while the output LED is still off after you connect the power cord but leave the power supply in the off state; the input and output LEDs both turn on after you power on and switch on the power supply.
-
Page 11: Installing And Removing The Power Supply
Installing and removing the power supply This chapter describes how to install and remove the power supply and the power cord. To prevent damage to the device and personal injury, follow the power-on and power-off procedures illustrated in the following figures respectively. Figure 2 Power-on procedure Figure 3 Power-off procedure Precautions... -
Page 12: Tools
Do not touch any naked wire or terminal. Doing so may result in a • personal injury. Never place the power supply in wet locations and prevent fluid • from leaking into the power supply. Do not often open the shell of the power supply to prevent damage •... - Page 13 Step3 Face the slot and plug in the power supply. Step4 Insert the power supply with the upside up. Grasping the handle of the power supply with one hand and supporting the power supply bottom with the other, slide the power supply slowly along the guide rails into the slot (see callout 1 in Figure Step5...
-
Page 14: Removing The Power Supply
Remove the filler module before installing the power supply on an • HP A5800-48G-PoE+ Switch with 2 Interface Slots or HP A5800-48G-PoE+ TAA Switch with 2 Interface Slots. For more information, see the related installation guide. To prevent damage to the power supply or the connector in the •... -
Page 15: Connecting The Power Cord
Connecting the power cord After you insert the power supply into the device, you can connect the power cord. For a device using the PSR750-A power supply, use an AC power cord to connect the power source. Follow these steps to connect the power cord for the PSR750-A power... - Page 16 Figure 5 Connect an AC power cord NOTE: The PSR750-A is equipped with two built-in fans for heat dissipation. The fans rotate at a low speed after the power cord is connected (AC OK is on) but with the power supply in the off state.
Need help?
Do you have a question about the PSR750-A and is the answer not in the manual?
Questions and answers