Table of Contents
Advertisement
Quick Links
Advertisement
Table of Contents

Related Manuals for Evinci KEA


Summary of Contents for Evinci KEA
- Page 1 USER MANUAL KEA Step-Through Trekking ebike PLEASE READ CAREFULLY...
-
Page 2: Table Of Contents
Table of Contents Safety Instructions..................3 Symbols.......................3 Introduction....................4 Mode of operation and extent of electronic power assistance..........4 Modes of support......................4 What comes with the bike?................4 Optional accessories..................4 Components....................5 Basic Safety Tips...................6 For your road safety.....................6 How to use your charger................6 Safety notes concerning the battery...............8 Charging your battery...................9 How to remove and insert the battery................9 Before starting to ride.................10... -
Page 3: Safety Instructions
Your frame serial number is stamped into the front of the headset tube below the handlebar. To register just go to our evinci website (evinci.nz) and click on “Login” to create an account with your details. You may register up to two bikes within the same account. -
Page 4: Introduction
Introduction You have decided in favour of a Pedelec (Pedal Electric Cycle) - a bicycle that is equipped with an electric motor to give you additional assistance when riding. With this bicycle, you can make better progress in headwinds, when transporting heavy loads or on steep slopes. -
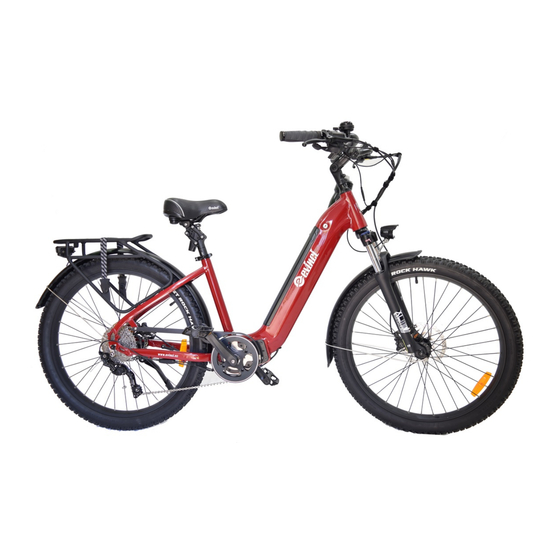
Page 5: Components
Components Colour Display Battery Charge Port Control Buttons Battery Lock Throttle Suspension Lockout Control Mid-Drive Motor Rebound Control... -
Page 6: Basic Safety Tips
Ref (1) How to use your charger Your KEA comes with a 3Ah quick charger to charge your battery. Please do not use any other charger. The typical time to charge the standard 13Ah battery if it is empty is about 5 hours. - Page 7 as damage to other equipment • Using this charger for batteries not supplied by Volto could risk catching fire, provoke electric shock and/or cause serious injury • Please make sure that the charger is always kept dry and does not get wet at any time. Should there be an incidence of contact with water or any other liquid, make sure to unplug the charger immediately from the power socket and have it inspected by your dealer.
-
Page 8: Safety Notes Concerning The Battery
Before using your battery the first time, it has to be charged once overnight for at least 12 hours. Safety notes concerning the battery • Keep the battery out of reach for children • Never try to open the battery. Apart from this being dangerous, all warranty will be void •... -
Page 9: Charging Your Battery
The discharging of the battery is due to chemical processes that are taking place within the battery cells. How much a battery discharges depends on the time it has not been used and the temperature it has been exposed to. Thus, a re- charge every 3 months, when not in use, is essential. -
Page 10: Before Starting To Ride
Before starting to ride Mount or dismount front wheel For easy transport, you may remove the front wheel using the quick release at the front wheel axle. To remove the wheel open the lever to release the pressure. Now hold the lever and turn the nut on the other side about 8-9 times –... -
Page 11: Adjusting The Saddle Angle
Adjusting the saddle angle Best riding comfort is found when the saddle is horizontal, some riders prefer a slight forward angled seat. Never angle a seat backwards as it can quickly lead to back pain or physical injuries 1. Loosen the clamping screw anti-clockwise 2. -
Page 12: Suspension Seat Post
(replaceable spare part). Suspension fork Your KEA mountain bike is equipped with a high-performance air suspension. This fork allows the rider to adjust the suspension to their riding style and terrain. The pressure of the air-cartridge can be adjusted on the left side by adding or releasing air pressure. -
Page 13: Operation
Operation • Turn the display on by pushing the (l) button • Select the desired assistance level with the UP or DOWN keys. Start riding. • Use the throttle as desired to add additional power to the selected assistance • To change the riding mode (torque/cadence) push the set key once •... -
Page 14: Throttle
SET again. Move down to ' 4. Save & Exit' . Push SET to exit. Please do not change other settings. ODO: the total distance you have travelled with this bike (can't be reset) Lights: to turn the LED lights of your bike on or off push the ON/OFF (I) button (<1sec). -
Page 15: Gears
Gears Only change gears while pedalling otherwise the derailleur might get damaged Your KEA ebike is equipped with a high performance Shimano 10-gear system. Since this ebike uses a mid drive motor which supports the crank, it is essential to choose the right gear depending on your riding situation. -
Page 16: Brakes
To engage the motor cut-out a certain amount of brake force is required. Maintenance Your KEA e-bike needs regular maintenance as any other normal pushbike. All bike shops can help you with these maintenance steps. There is no maintenance of the electrical components necessary. -
Page 17: Safety Points
Safety points We recommend a 12-month interval service or every 1000 km. Important checkpoints are: ▪ Quick-release front and rear ▪ seat post clamp axle ▪ brake caliper screws ▪ headset ▪ spoke tension ▪ stem clamp Spoke tension has to be checked on a regular interval. Failing can cause spoke breakage and will void the warranty Repairing a puncture in the rear wheel Since the rear wheel comes with a quick release axle it is very easy to remove... -
Page 18: Troubleshooting
Troubleshooting Problem Resolution The Battery is charged but the 1. Check plug going from display to frame display won't turn on harness, unplug once and plug back together. 2. If possible measure voltage at the battery socket (left and right pin). If no voltage can be measured, take the battery to your retailer. -
Page 19: Display
handlebar. The microprocessor runs the firmware, which is the piece of software telling the controller what to do. Firmware updates can be applied to improve or add functions. Display The display is usually mounted to the handlebar and allows the rider to readout vital information about the e-bike system and control the functions in the controller. - Page 20 NZEBIKES 2016 Ltd 19 Esk Street Tauranga evinci.nz Ph: 022 675 2699 evinci™ is a registered trademark of NZEBIKES 2016 Ltd TDF04E - Rev 1/20...
Need help?
Do you have a question about the KEA and is the answer not in the manual?
Questions and answers