Advertisement
Quick Links
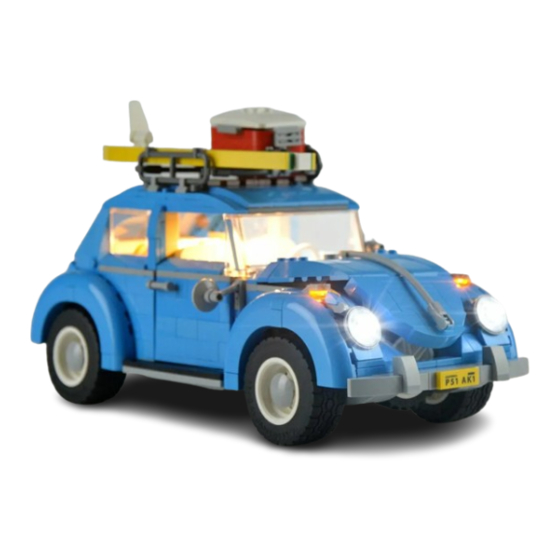
Light My Bricks : Volkswagen Beetle LED
Lighting Kit
The following page is the instructions for the Light My Bricks Volkswagen
Beetle (10252) LED light kit.
To ensure a trouble-free installation of your light kit, please read and
follow each step carefully.
If you run into any issues, please refer to the online troubleshooting guide.
Please note: This page lists instructions for the
LED light kit only.
Package contents:
4x White 30cm Bit Lights
•
2x White 15cm Bit Lights
•
1x 8-port Expansion Board
•
1x Flat Battery Pack (2x CR2032 Batteries Required)
•
Extra Pieces
2x LEGO Trans Red 1x1 plates
•
. . .
. . .
Advertisement

Subscribe to Our Youtube Channel
Related Manuals for LIGHT MY BRICKS Volkswagen Beetle LED Lighting Kit


Summary of Contents for LIGHT MY BRICKS Volkswagen Beetle LED Lighting Kit
- Page 1 Light My Bricks : Volkswagen Beetle LED Lighting Kit The following page is the instructions for the Light My Bricks Volkswagen Beetle (10252) LED light kit. To ensure a trouble-free installation of your light kit, please read and follow each step carefully.
- Page 2 Important things to note: Laying cables in between and underneath bricks Cables can t in between and underneath LEGO® bricks, plates, and tiles providing they are laid correctly between the LEGO® studs. Do NOT forcefully join LEGO® together around cables; instead ensure they are laying comfortably in between each stud.
- Page 3 Incorrectly inserting the connector can can result in bent pins inside the port or possible overheating of the expansion board when connected. Connecting cable connectors to Strip Lights Take extra care when inserting connectors to ports on the Strip Lights. Connectors can be inserted only one way.
- Page 4 When installing Bit Lights under LEGO® pieces, ensure they are placed the correct way up (Yellow LED component exposed). You can either place them directly on top of LEGO® studs or in between..OK, Let’s Begin! Instructions for installing this kit 1.) We will start with installation of the headlights.
- Page 5 2.) Take one of the bit lights with 30 cm cable and place the LED component part directly over the stud of the headlight. Ensure it is facing the correct way up and then secure it in place by reconnecting the trans dish piece over the top.
- Page 6 Secure the bit light in place by reconnecting the indicator light piece directly over the top, ensuring the cable is facing toward the inside of the bonnet. Reconnect the blue piece we removed earlier ensuring the cable underneath is laid in between studs. 4.) Remove the spare tyre from the inside and then thread the 2 cablesdown underneath the car.
- Page 7 6.) Repeat the above process to install another 2 bit lights with 30cm cables to the left section of the front of the car. 7.) Place the tyre back inside and then close the bonnet.
- Page 8 8.) Take all 4 cables from underneath of the car and then connect themto the ports on the 8-port expansion board. To eliminate excess cables, wind the cables around the expansion board. 9.) We will now install the tail lights. Start by removing the wheel, the blue LEGO piece on the right of the wheel, followed by the tail light section as per below.
- Page 9 10.) Remove the original trans red tile and discard. We are unable toinstall a bit light underneath this particular tile as it is at. Take one bit light with 15cm cable and place the LED component directly over the top of the grey stud. Ensure the LED component is facing the correct way up and then secure it in place by connecting the trans red 1x1 plate (provided in this kit) directly over the top.
- Page 10 12.) Thread the cable across and then inside the spacing between theblack and grey bricks. Lift the grey bricks where the wheel axle is and then secure the cable in place by reconnecting the grey bricks back over the top. 13.) Ensure the cable is laid between studs before then reconnectingthe wheel and blue piece on the right of the wheel.
- Page 11 15.) Turn the car over and then follow the previous steps to installanother bit light to the right tail light. 16.) Thread the cable underneath the wheel axle like we did for the taillight on the other side, and then connect the cable into the next available port on the expansion board.
- Page 12 17.) Before we reconnect the wheel, remove the following pieces whichmake up the right back door. 18.) Take the at battery pack and insert 2x CR2032 batteries to it. Place it behind the back seat in the following position, with the cable facing the same way.
- Page 13 19.) Thread the cable down the side and then underneath the carthrough the same spacing where we threaded the tail light. Connect the cable to the next available port on the expansion board. 20.) Reconnect the pieces we removed which make up the right backdoor and then reconnect the wheel and surrounding pieces.
- Page 14 . . . This nally completes installation of the VW Beetle Light Kit. We hope you enjoy your light kit. We Thank YOU for purchasing this Light Kit!
Need help?
Do you have a question about the Volkswagen Beetle LED Lighting Kit and is the answer not in the manual?
Questions and answers