Table of Contents
Advertisement
Quick Links
Installing the Cisco Catalyst 9800-L Wireless
Controller
This chapter describes how to install the Cisco Catalyst 9800-L Wireless Controller.
Warning
IMPORTANT SAFETY INSTRUCTIONS
This warning symbol means danger. You are in a situation that could cause bodily injury. Before you work
on any equipment, be aware of the hazards involved with electrical circuitry and be familiar with standard
practices for preventing accidents. Use the statement number provided at the end of each warning to locate
its translation in the translated safety warnings that accompanied this device. Statement 1071
SAVE THESE INSTRUCTIONS
•
•
•
•
Mounting the Controller
This section describes the various mounting options for the controller:
Mounting the Controller on Desktop or Shelf
Before mounting the controller on a desktop or shelf, install the rubber feet located in accessory kit shipped
with the controller.
To install the rubber feet to the controller, follow these steps:
Procedure
Step 1
Locate the rubber feet on the black adhesive strip that is shipped with the controller.
Mounting the Controller, on page 1
Connecting the Controller Console Port, on page 12
Management Ethernet Port Cable Connection, on page 12
Installing a Security Lock, on page 13
Installing the Cisco Catalyst 9800-L Wireless Controller
1
Advertisement
Table of Contents

Subscribe to Our Youtube Channel
Related Manuals for Cisco Catalyst 9800-L


Summary of Contents for Cisco Catalyst 9800-L
- Page 1 Installing the Cisco Catalyst 9800-L Wireless Controller This chapter describes how to install the Cisco Catalyst 9800-L Wireless Controller. Warning IMPORTANT SAFETY INSTRUCTIONS This warning symbol means danger. You are in a situation that could cause bodily injury. Before you work on any equipment, be aware of the hazards involved with electrical circuitry and be familiar with standard practices for preventing accidents.
- Page 2 Installing the Cisco Catalyst 9800-L Wireless Controller Mounting the Controller on Desktop or Shelf Figure 1: Identifying the Rubber Feet Rubber feet Black adhesive strip Step 2 Place the controller upside down, on a smooth, flat surface. Step 3 Peel off the rubber feet from the black adhesive strip and press them adhesive-side down onto the bottom four...
-
Page 3: Mounting The Controller On A Wall (Mounting Screws)
Installing the Cisco Catalyst 9800-L Wireless Controller Mounting the Controller on a Wall (Mounting Screws) Step 5 Connect the interface cables. Mounting the Controller on a Wall (Mounting Screws) Note Do not wall-mount the device with its front panel facing up. Following safety regulations, wall-mount the device with its front panel facing down or to the side to prevent airflow restriction and to provide easier access to the cables. - Page 4 Installing the Cisco Catalyst 9800-L Wireless Controller Mounting the Controller on a Wall (Mounting Screws) Figure 3: Place the Controller on the Mounting Screws Step 5 After the controller is mounted on the wall, perform the following tasks to complete the installation •...
-
Page 5: Rack Mounting The Controller
Slide the Cisco Catalyst 9800-L Wireless Controller in position such that the 4-tray tabs align and latch into the bottom of the unit as it is pushed in place. The front of the Cisco Catalyst 9800-L Wireless Controller should be flush against the front edge of the tray. A nylon latch in the center of the tray snaps into and locks the Cisco Catalyst 9800-L Wireless Controller in place. - Page 6 Installing the Cisco Catalyst 9800-L Wireless Controller Rack Mounting the Controller Figure 4: Placing the Controller on the Rack Mount Tray Installing the Cisco Catalyst 9800-L Wireless Controller...
- Page 7 Installing the Cisco Catalyst 9800-L Wireless Controller Rack Mounting the Controller Figure 5: Close-up View of Center Latch Securing Controllers in a Rack Step 3 Remove power supply baffle in rear tray. Baffles secure with tabs circled. Installing the Cisco Catalyst 9800-L Wireless Controller...
- Page 8 Installing the Cisco Catalyst 9800-L Wireless Controller Rack Mounting the Controller Figure 6: Power Supply Baffle Step 4 Place the power adapters between either of the two tabs in the rear of the tray and use the provided velcro straps to secure them.
- Page 9 Installing the Cisco Catalyst 9800-L Wireless Controller Rack Mounting the Controller Figure 7: Attaching the Rack Mount Tray to a Front Post Rack Installing the Cisco Catalyst 9800-L Wireless Controller...
- Page 10 Installing the Cisco Catalyst 9800-L Wireless Controller Rack Mounting the Controller Figure 8: Installing the Rack Mount Tray to a Center Post Rack Install the center mount brackets to both sides of the tray. Note Installing the Cisco Catalyst 9800-L Wireless Controller...
- Page 11 Installing the Cisco Catalyst 9800-L Wireless Controller Rack Mounting the Controller Figure 9: Installing the Rack Mount Tray to a Center Post Rack To remove the chassis from the rack, remove the screws that attach the chassis to the rack, and then remove the chassis.
-
Page 12: Connecting The Controller Console Port
Step 2 If you are using a standard Cisco DB-9 console cable, connect the end of the cable with the DB-9 connector (or USB Type-A) to the terminal or PC. If your terminal or PC has a console port that does not accommodate a DB-9 connector, you must provide an appropriate adapter for that port. -
Page 13: Installing A Security Lock
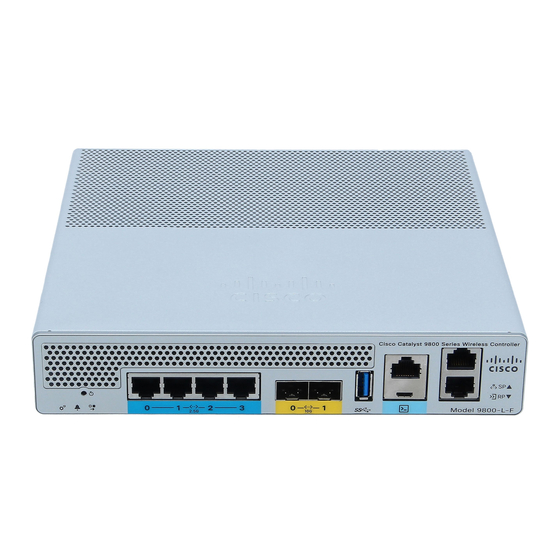
The controller has a security slot on the back panel. You can install an optional customer-supplied Kensington lock, such as the type that is used to secure a laptop computer, to secure the controller. See the "Cisco Catalyst 9800-L Wireless Controller Rear Panel" section for the location of the security lock. - Page 14 Installing the Cisco Catalyst 9800-L Wireless Controller Installing a Security Lock Installing the Cisco Catalyst 9800-L Wireless Controller...
Need help?
Do you have a question about the Catalyst 9800-L and is the answer not in the manual?
Questions and answers