Advertisement
Advertisement
Table of Contents

Related Manuals for Bella BECM01


Summary of Contents for Bella BECM01
- Page 1 ESPRESSO COFFEE MACHINE Instruction Manual...
-
Page 2: Table Of Contents
TABLE OF CONTENTS Introduction ..........................3 Product Safety ......................... 3 Electrical Safety ........................4-5 Before First Use........................5 Features & Controls ........................ 6 Operation ..........................7-8 Troubleshooting ........................9 Care & Cleaning ........................10 Storage ........................... 10 Servicing ..........................10 Guarantee ..........................11 Due to our policy of continuous improvement, the actual product may differ slightly from the one illustrated in this booklet. -
Page 3: Introduction
INTRODUCTION Thank you for purchasing this product. You may already be familiar with using a similar product, but do please take the time to read these instructions – they have been written to ensure you get the very best from your purchases. Safety is Important To ensure your safety and the safety of others, please ensure you read the Product Safety and Electrical Safety Information before you operate this product. -
Page 4: Electrical Safety
ELECTRICAL SAFETY WARNING! Read these instructions thoroughly before using this appliance or connecting it to the mains supply. A 13 amp BS1362 ASTA approved fuse must be fitted. This appliance must be earthed. There are no user-serviceable parts inside this appliance. Always refer servicing to qualified service personnel. -
Page 5: Before First Use
ELECTRICAL SAFETY The wires in the power cable of this product are coloured in accordance with the following code: Blue = Neutral, Brown = Live, Green/Yellow = Earth If the markings on the terminals of your plug do not correspond to the colours of the wires in the power cable, proceed as follows: •... -
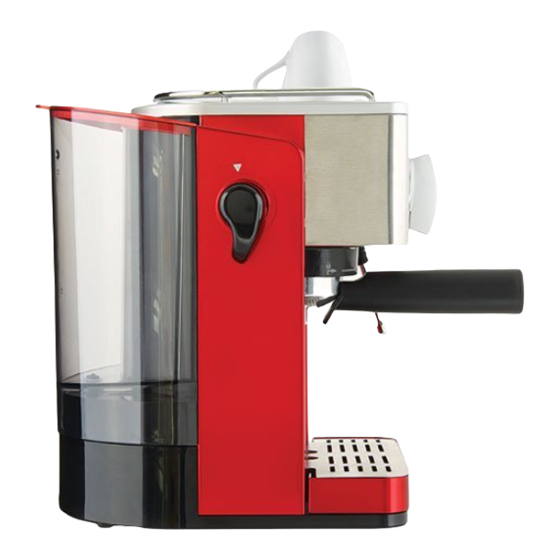
Page 6: Features & Controls
FEATURES & CONTROLS Measuring Scoop with Tamper Two Cup Filter Water Tank Lid One Cup Filter Coffee Nozzle Water Tank Filter Holder Control Dial Steam Nozzle Steam Nozzle Protector Steam Control Dial Boiler Head Drip Tray and Cover Thermostat Indicator Light Steam Production Power Indicator Light Pre-heating... -
Page 7: Operation
OPERATION Getting the right espresso for every user’s taste is dependent upon the type of coffee, the amount and the pressing. We recommend you choose your preferred coffee blend, one with a fine grind, especially for espresso. The result will vary considerably according to the quantity of coffee used. If you want a strong coffee you should use the finest grind possible and fill the coffee holder to the maximum. - Page 8 How to prepare Espresso coffee. After carrying out the pre-heating of the machine as described above, remove the filter holder by turning it clockwise. Make sure any coffee grounds from the previous infusion are removed. Add ground coffee to the filter using the spoon provided (the filters will hold enough coffee for one or two cups), then press the ground coffee tightly with the tamper, the coffee needs to be tampered to achieve a good crema on top of the coffee.
-
Page 9: Troubleshooting
TROUBLESHOOTING Problem Possible Causes Solution Coffee drips from the edges The filter holder has not Remove the filter and of the filter holder, rather been inserted correctly. re-attach the filter again than through the holes. (see Fig. 1) The holes are blocked in the Remove the filter and clean filter holder. -
Page 10: Care & Cleaning
CARE & CLEANING You must clean the steam nozzle and froth attachment immediately after each use, if you do not this can get blocked. After you finish frothing milk, the best solution is to run a small amount of steam through the nozzle to remove any traces of milk. Remove the steam wand protector and place this under running water to remove any excess milk. -
Page 11: Guarantee
GUARANTEE This product is guaranteed for twelve months from the date of original purchase. Any defect that arises due to faulty materials or workmanship will either be replaced or refunded where possible during this period by the dealer from whom you purchased the unit. - Page 12 bellaappliances.co.uk facebook.com/bellalifeuk twitter.com/bellalifeuk MPL Home Ltd, AL2 2EB...
Need help?
Do you have a question about the BECM01 and is the answer not in the manual?
Questions and answers