Advertisement
Parts:
A
4
16
15
17
20
18
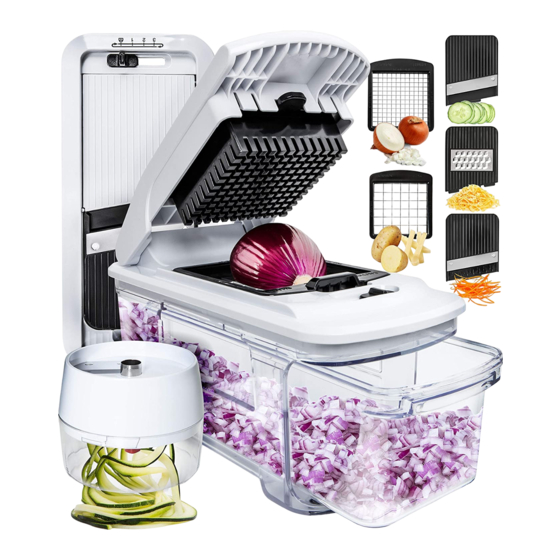
1. Food guard
1. Food guard
2. Pusher
2. Pusher
3. Blade lock button
3. Blade lock button
4. Chopper base
4. Chopper base
5. Top rack
5. Top rack
6. Collecting container
6. Collecting container
7. Blades housing
7. Blades housing
8. Mandoline base
8. Mandoline
9.Rotating dial for the thickness
9.Rotating dial for the thickness
10. Coarse grater blade
10. Coarse grater blade
* The top rack consists of the pusher and chopper base.
New Mandoline/Chopper
Instruction manual
21
13
3
6
12
8
Live Life to the Full
2
10
14
11. Julienne slice blade
12. Slicing blade
13. Medium dicer
14. Fine dicer
15. Spirali slicer lid
16. Spiralizer spiked grip
17. Transparent cylinder for spiral slicer
18. Cleaning scraper
19. Cut resistant glove
20. Dicer cleaning brush
21.Pusher insert
5
7
1
9
11
19
Advertisement
Table of Contents

Related Manuals for Fullstar New Mandoline/Chopper


Summary of Contents for Fullstar New Mandoline/Chopper
- Page 1 Live Life to the Full New Mandoline/Chopper Instruction manual Parts: 1. Food guard 1. Food guard 11. Julienne slice blade 2. Pusher 2. Pusher 12. Slicing blade 3. Blade lock button 3. Blade lock button 13. Medium dicer 4. Chopper base 4.
-
Page 2: Proper Use
Safety Proper use The MANDOLINE/CHOPPER is exclusively designed for cutting fruit and vegetable. It is only intended for private use and not suitable for commercial purposes. Only use the MANDOLINE/CHOPPER as described in this user manual. Any other use is considered improper and may result in personal injury or damage to property. -
Page 3: Risk Of Damage
NOTICE! Risk of damage! Improper handling of the MANDOLINE/CHOPPER may result in damage to the MANDOLINE/CHOPPER. − Do not use the MANDOLINE/CHOPPER for frozen food, meat, fish, fruit or vegetable with pits, nuts or anything other than food stuff. The MANDOLINE/CHOPPER is not suitable to cut hard items. - Page 4 Carrots,zucchinis ,cucumbers 0.53x0.53 in Zucchini,mushrooms,soft cheese,peppers and more. 0.27x0.27 in TWO CHOPPING BLADES INCLUDED Fine chopping blade Medium chopping blade for onions, zucchinis, chillis, for carrots,potatoes, zucchinis, onions, shallots, garlic, mushrooms. shallots, peppers,chillis. soft cheese, bell peppers and more.
- Page 5 1. Place the top rack onto the collecting container 2. Flip the pusher open. 3. Select a cutting blade and insert it into the lower slot (see Fig. B). Ensure correct installation with the text “THIS SIDE UP” facing upward on the cutting blade.
-
Page 6: Using The Spiralizer
Make sure that vegetable to be chopped stays entirely within the blade area,otherwise it might be difficult to chop it (see Fig. D2). Cut an onion or large vegetable into a quarter or much smaller pieces when using the fine chopping blade. Press the pusher down swiftly and firmly with both hands like a hammer. - Page 7 (see Fig. F) (see Fig. G) (see Fig. H) Using the Mandoline WARNING! Risk of injury! Improper handling of the Mandoline slicers may result in injury. − Use extreme care when handling the cutting blades. The blades are very sharp. Keep fingers clear of the blades at all times.
- Page 8 Using the slicer/julienne slicer:...
- Page 9 Using the grater: Cleaning Extremely sharp blades! Keep fingers clear of the blade at all times when cleaning the dicing blades. − Do not use any aggressive cleaners, brushes with metal or nylon bristles, sharp or metallic cleaning utensils such as knives, hard scrapers and the like. They could damage the surfaces. − If necessary, use the cleaning scraper to remove any food (see Fig.
- Page 10 Cleaning the top rack − The pusher and chopper base can be separated for cleaning. To do so, push the pusher locks on the underside of the chopper base towards each other to release the pusher from the chopper base (see Fig. R). To install the pusher , push the two buttons inward to draw back the pivots and slide the Pusher...
-
Page 11: How To Store
How to store: Step 1: Place all blades, cleaners grip inside blades housing (see Fig. S). Step 2: Place food guard and spiralizer inside collecting container (see Fig. T). Step 3: Place mandoline base onto collecting container (see Fig. U). Step 4: Place top rack onto mandoline...
Need help?
Do you have a question about the New Mandoline/Chopper and is the answer not in the manual?
Questions and answers