Table of Contents
Advertisement
Quick Links
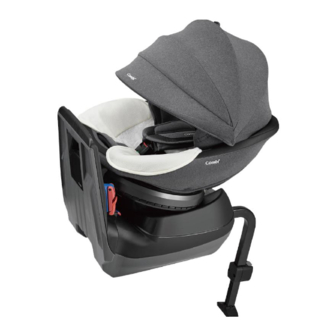
Combi Child Car Seat
THE S ISOFIX EGGSHOCK
User Manual
For the safety of the child, please read this user manual
carefully before use and use the child car seat properly.
●
Store this user manual in the storage pocket of the
base cover.
This product is an ISOFIX child car seat for specific vehicles,
and is certified according to the UN R129/03 standard.
● This product can be installed to vehicle seats approved
for installation of ISOFIX child car seats.
However, this does not mean that this child car seat can
be installed to any vehicle seat equipped with ISOFIX
anchors (bars). When using the child car seat, always
check the vehicle compliance and check the user manual
of the vehicle.
● Applicable child height and weight: Heights up to 105 cm or
weights up to 19.0 kg.
To avoid causing stress to the child, avoid continuous
CAUTION
long-time usage and give the child a break from the
child car seat about once every hour.
DANGER
Do not use forward facing before the child's age exceeds
15 months or before the child's height exceeds 76cm.
Before Use
Using Each Part
Installing to and
Uninstalling from
the Vehicle
Maintenance and
Other
Advertisement
Table of Contents

Related Manuals for Combi EGGSHOCK


Summary of Contents for Combi EGGSHOCK
- Page 1 Combi Child Car Seat Before Use THE S ISOFIX EGGSHOCK User Manual Using Each Part For the safety of the child, please read this user manual carefully before use and use the child car seat properly. Installing to and ●...
-
Page 2: Table Of Contents
Contents Before Use Installing to and Uninstalling from the Vehicle Before Use …………………………………………… 2 Preparation of installation …………………………… 27 Name of parts ………………………………………… 3 Installing to the Vehicle ……………………………… 29 Use conditions ………………………………………… 7 Checklist after installation …………………………… 32 Applicable vehicle seats ……………………………… 9 Uninstalling from the vehicle …………………………... -
Page 3: Before Use
Before Use Thank you for purchasing this Combi child Labels car seat.For the safety of the child, please The descriptions in this manual use the labels DANGER, read this user manual carefully before use WARNING and CAUTION to indicate important items for and use the child car seat properly. -
Page 4: Name Of Parts
Name of parts ※This manual uses simplified illustrations to help Check that all parts are present before use. users easily understand operation and handling, Store the receipt (proof of purchase) together with this manual. and there may be slight differences from the actual product. - Page 5 The terms“ main body,”“ seat,”“ head guard,” “base,” and “supporting leg” refer to the parts shown below. Head guard Seat Main body Base Supporting leg...
- Page 6 Name of parts Front Insert tongue Head guard adjustment lever Buckle Baby belt adjustment button Adjustment belt Revolving release lever Length adjustment button Reclining adjustment Supporting leg base lever...
- Page 7 Side Back Seat release lever Product name/ User manual Lot No. sticker storage pocket Base cover Connector adjustment lever Lock release Connector button release lever Connector...
-
Page 8: Use Conditions
Use conditions This section describes how to determine the installation direction and use the inner cushion according to the child’s height. Rearward Facing (installation facing rearward relative to driving direction) Applicable child height Use conditions for inner cushion Height from Height from 40cm to less than 65cm Height 40cm Height 87cm... - Page 9 Forward facing (installation facing forward relative to driving direction) Applicable child height Use conditions for inner cushion Age 15 months old and Height 105cm or less height 76cm or more or weight 19.0 kg or less Do not use. Baby shoulder belt position Adjust the baby shoulder belt so that it is at or slightly above the child’s shoulder height.
-
Page 10: Applicable Vehicle Seats
Applicable vehicle seats This child car seat can be installed to vehicle seats ISOFIX anchoring system approved for installation of ISOFIX child car seats. ISOFIX anchors are metal fixtures (bars) provided However, this does not mean that the child car seat between the vehicle backrest and seat in order can be installed to any vehicle equipped with ISOFIX to install an ISOFIX child car seat. -
Page 11: Inapplicable Vehicle Seats
Inapplicable vehicle seats Do not install the child car seat to a vehicle seat that meets any of the following conditions. Do not use the child car seat if it cannot be secured firmly to the vehicle seat, even if none of the conditions noted below apply. ●... -
Page 12: For Safe Use Of The Child Car Seat
For safe use of the child car seat DANGER Improper handling will result in imminent risk of death or serious injury. ● ● Do not seat a child who does Do not install the child car seat by not satisfy the use conditions, a method other than described in or install the child car seat to an this user manual and indicated on... - Page 13 Evacuation in case of emergency DANGER ● Do not allow the child to stand, In case of accident crouch or kneel on the child car seat. or other emergency, an accompanying adult should press the buckle button to release the baby belt and evacuate the child from the vehicle immediately.
- Page 14 Improper handling may result in death or serious injury. ● ● Always keep the baby belt fitting Contact Combi’s Customer Service Center for repair if the buckle snugly. A loose belt may become wrapped around the child’s neck becomes jammed with dirt, food crumbs or other objects and and result in suffocation.
- Page 15 WARNING ● Do not modify or improperly repair the child car seat. ● Always secure the child car seat with the connectors even when the child is not seated. Sudden braking or collision may cause an unsecured child car seat to move inside the vehicle and interfere with driving.
- Page 16 Also do not replace become hot and burn the child. these parts with parts not specifically Touch each part and check that it is authorized by Combi for this product. not too hot before seating the child. (This may negatively affect safety ●...
- Page 17 Daily inspection To ensure proper function of the child car seat, check the following items before use. Check that the baby belt is adjusted to the correct position. Check that the connectors are fastened securely to the ISOFIX anchors of the vehicle. Check that the baby belt fits snugly against the child’s body.
-
Page 18: Using The Reclining Function
Using the reclining function The reclining angle can be adjusted in 5 levels according to the condition of the child. ① While pulling forward the reclining adjustment lever, Release the reclining adjustment lever and try to rock ② Adjust the seat reclining angle. (5 levels in both the seat forward and back to make sure that it is forward and rearward facing mode) locked in place. -
Page 19: Rotating The Seat
Rotating the seat The seat can be rotated for easier seating and unseating of the child. While pushing up the revolving release lever, rotate the seat. Rock the seat to the left and right to ① Once the seat starts to rotate, you can release the revolving make sure that it is locked in place. -
Page 20: Installing And Removing The Seat
Installing and removing the seat The seat can be removed for easy installation to the vehicle. Removing the seat ① While pushing up the revolving release lever, ① Grip the seat release lever located on the left and right Rotate the seat so that it face 90° relative to handles, ②... - Page 21 Installing the seat ① Hold the seat so that it face 90° relative to the base. Rotate the seat until it locks in place with a “click” sound ② Align the bottom of the seat with the circular shape of the base and place the seat on the base. in the forward or rearward facing position.
-
Page 22: Adjusting The Baby Shoulder Belt Position
Adjusting the baby shoulder belt position Change the baby shoulder belt position according to the child’s growth,the baby shoulder belt position can be adjusted in 8 levels. Baby shoulder belt position reference ● ● Rearward Facing mode Forward facing mode Adjust the baby shoulder belt so that it is at or slightly below Adjust the baby shoulder belt so that it is at or slightly the child’s shoulder. - Page 23 ① While pressing the back side of the baby belt ① While pulling up the head guard adjustment lever, adjustment button, adjust the height of the head guard. ② Pull both the left and right baby belts forward to ② Release the head guard adjustment lever at the loosen the baby belts.
-
Page 24: Seating The Child
Seating the child While pushing up the revolving release lever, rotate ① While pressing the back side of the baby belt the seat so that the front faces the vehicle door side to adjustment button. make it easier to seat the child. ②... - Page 25 ① Press the buckle button and remove the insert WARNING tongue from the buckle. ● ② Seat the child deeply into the child car seat and pass The child should take off the child’s arms through the left and right baby belts. his/her thick coat before ③...
- Page 26 ① Match the left and right insert tongues and ① Pull down the baby waist belt to firmly hold the pelvis position. insert them into the buckle until they lock The baby shoulder belt should always be located in the center of the child’s shoulder. ②...
-
Page 27: Unseating The Child
Unseating the child ① While pressing the back side of the baby belt Strongly Press the baby adjustment button. pull the belt adjustment ② Pull both the left and right baby belts forward to baby belt. button. loosen the baby belts. ※... -
Page 28: Preparation Of Installation
Preparation of installation ① Remove the vehicle headrest if possible. ●Do not install the child Park the vehicle in a flat location ① where all doors can be opened. ※ Store the removed vehicle headrest in the trunk or car seat by a method other than described in cargo compartment. - Page 29 Fit the ISOFIX insertion guides onto the ISOFIX anchors. ISOFIX insertion guide ● It is not necessary to remove the seat when installing the child car seat to the vehicle, but installation is easier with the seat removed. ISOFIX ● The method of installing the seat to the car anchor without removing the seat is the same as that of installing the base only.
-
Page 30: Installing To The Vehicle
Installing to the vehicle This product can be used in two ways facing forward or rearward, but the installation method is the same in either case. Remove the seat. (Refer to “Installing and removing ① WARNING Be sure to use the base cover. the seat.”) Extend the supporting leg until it stops with a “Click”... - Page 31 ① While pushing up both the left and right connector ① While pressing the length adjustment button of the adjustment levers. supporting leg. ② Push the base firmly until the back of the base contacts ② Extend the supporting leg until the supporting leg the vehicle seat backrest, then release the base.
- Page 32 Installing to the Vehicle If the vehicle seat backrest can be Install the seat. (Refer to “Installing and removing the seat.”) reclined, adjust the reclining angle to make the gap with the back of the base as small as possible.
-
Page 33: Checklist After Installation
③ Hold the base and try to rock the child car seat in all directions to make sure it is installed WARNING securely. ① If you have any questions, please contact Combi’s Customer Service Center. Color indicator (green: locked) ③ ②... -
Page 34: Uninstalling From The Vehicle
Uninstalling from the vehicle ① Remove the seat. ① While pushing up both the left and right connector (Refer to “Installing and removing the seat”. adjustment levers. ② While pressing the length adjustment button of the ② Pull the base forward. supporting leg. - Page 35 ① While pressing both the left and right connector ① While pushing up the connector adjustment levers release buttons, on the sides of the base, ② Pull the connector release lever straight forward until ② Retract the connectors. the connectors release with a “Click” sound. ③...
-
Page 36: Using The Inner Cushion
Using the inner cushion Rearward Facing(installation facing rearward relative to driving direction) Child’s height from 40cm Child’s height between 65cm to less than 65cm and 87cm Always use. Do not use. DANGER Misuse of the inner cushion may affect proper function and endanger the child. - Page 37 Attaching and removing the inner cushion ① Lift up the head guard. ③ Press the buckle button and remove the insert tongue Refer to “Adjusting the baby shoulder belt position.” from the buckle. ② To attach or remove the inner cushion (head part), fasten ④...
-
Page 38: Using The Canopy
Using the canopy The method of use varies according to the seat facing. ● Rearward Facing Forward facing If the canopy is misused, it may contact the child in the event of collision or other accident, which is extremely dangerous to the child. - Page 39 Attaching the canopy ④ While rotating the canopy toward the back around joints A, Lift up the head guard. (Refer to “Adjusting the baby ① shoulder belt position.”) ⑤ Insert the left and right joints B into the attachment holes ②...
- Page 40 Using the canopy Attaching the canopy In forward facing mode ⑥ Fasten the two snaps on the back of the canopy to the ① Pass the belt snap on the back of the canopy through the belt canopy attachment snaps on the head guard cover. loop for forward facing use on top of the canopy, and.
-
Page 41: Attaching And Removing The Covers
Attaching and removing the covers Remove the canopy before removing the covers. Attaching and removing the head guard cover ① Lift up the head guard. (Refer to “Adjusting the baby shoulder belt position”.) ② Fasten or release the two hooks on the upper back of the head guard cover. - Page 42 Attaching and removing the covers Attaching and removing the seat cover ① Fasten or release the two left and right hooks on the ④ Fasten or unfasten the four left and right knobs on the inner side of the seat surface. sides of the seat surface.
- Page 43 Attaching and removing the shoulder belt covers Fasten or unfasten the two snaps. Shoulder belt cover Snap Baby shoulder belt...
-
Page 44: Maintenance Method
Maintenance method Washing the seat cover and other sewn parts Maintenance of the canopy ● Be sure to follow the washing instructions and cautions below. Wipe clean using a sponge moistened with a detergent solution ● Follow the instructions noted on the washing label sewn onto or lukewarm water. -
Page 45: Storage And Disposal
Storage and disposal Storage Standard service life Main body The “standard service life” of this product is “eight years after new purchase”. When the child car seat will not be used for a long period of Once this standard service life has passed, material aging may time, uninstall it and store in a well-ventilated place out of direct prevent the child car seat from functioning properly, which is sunlight and away from children. - Page 46 memo...
- Page 47 memo...
- Page 48 THE S ISOFIX EGGSHOCK 158966170...
Need help?
Do you have a question about the EGGSHOCK and is the answer not in the manual?
Questions and answers