Table of Contents
Advertisement
Advertisement
Table of Contents

Related Manuals for Fujitsu Lifebook U729


Summary of Contents for Fujitsu Lifebook U729
- Page 1 User Manual LIFBOOK U729 LIFBOOK U749 LIFBOOK U759...
- Page 2 Fujitsu Limited. No part of this publication may be stored or transmitted LIFEBOOK is a trademark of Fujitsu Limited. in any electronic form without the written consent of Fujitsu Limited.
- Page 3 IMPORTANT SAFETY If an extension cord is used with this product, make sure that the total ampere rating of the INSTRUCTIONS equipment plugged into the extension cord does not exceed the extension cord ampere rating. Also make sure that the total rating of Read these instructions carefully.
- Page 4 Copyright CAUTION: When replacing the battery, Proper Disposal of Battery be sure to install it with the polarities in Under federal, state or local law, it may be illegal the correct position. There is a danger of to dispose of batteries by putting them in the explosion if the battery is replaced with rubbish bin or trash cans.
- Page 5 Changes or modifications not expressly 1. The telephone number to which the approved by Fujitsu could void this user’s authority to operate the equipment. Tablet PC is connected. 2. The Ringer Equivalence Number (REN) for this equipment.
- Page 6 Copyright This equipment may not be used on telephone provided by your telephone company. Connection to party lines is subject to state tariffs. Contact your state’s public utility commission, public service commission or corporation commission for more information. This equipment includes automatic dialing capability. When programming and/or making test calls to emergency numbers: •...
- Page 7 Television ( T h e f o l l o w i n g i s p e n d i n g certification a time of publication). Your Fujitsu system is an ENERGY STAR ® qualified mobile PC. By choosing a computer with the latest energy saving technology, you’re...
- Page 8 Copyright For Authorized Repair Technicians Only C A U T I O N C A U T I O N For safety, users should ensure that the electrical ground of the power utility, the telephone lines and the metallic water For continued protection against risk of fire, pipes are connected together.
- Page 9 (and update regularly). for general use, household use and ordinary industrial use. If you send this product to Fujitsu, or any of This product is not designed for or intended for its affiliates, suppliers, service providers or use under dangerous (fatal) conditions, unless resellers for repair, Fujitsu does not guarantee extreme safety precautions are implemented.
-
Page 10: Table Of Contents
Connecting the Power Adapter.......20 Front features of LIFEBOOK......Power On............21 Exterior features: Side view of LIFEBOOK..Power Off............21 Exterior features: Bottom view of LIFEBOOK. Warranty Registering for Your Fujitsu LIFEBOOK..21 STATUS INDICATOR LED EXPLICIT SELF-INSTALL Power Indicator..........Battery Charging Indicator......Charging the Battery........22 Battery Level Indicator........ -
Page 11: Getting To Know Your Lifebook
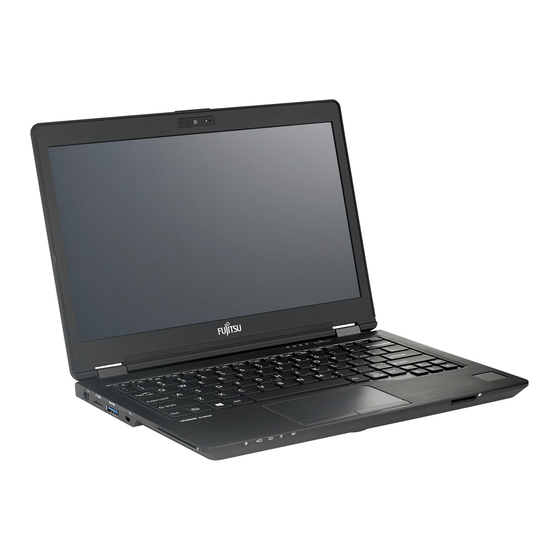
Getting to Know Your LIFEBOOK NAMES OF THE PARTS AND THEIR FUNCTIONS Front features of LIFEBOOK LIFEBOOK U729 (This picture is for illustration purpose only and may look different from the actual unit) Keyboard HD Camera A full-function keyboard with dedicated The location of the high definition camera. - Page 12 LIFEBOOK U749 (This picture is for illustration purpose only and may look different from the actual unit) HD Camera Keyboard The location of the high definition camera. A full-function keyboard with dedicated Windows keys. Display Panel The display screen of the notebook. Fingerprint Sensor/ Palm vein Sensor* The Fingerprint Sensor/ Palm vein Sensor Status Indicator LED...
- Page 13 Getting to Know Your LIFEBOOK LIFEBOOK U759 (This picture is for illustration purpose only and may look different from the actual unit) HD Camera Keyboard The location of the high definition camera. A full-function keyboard with dedicated Windows keys. Display Panel The display screen of the notebook.
-
Page 14: Exterior Features: Side View Of Lifebook
Side view of LIFEBOOK ■ Right view LIFEBOOK U729 (This picture is for illustration purpose only and may look different from the actual unit) USB 3.1 (Gen 1) Connector The USB 3.1 (Gen 1) connector allows you to connect Universal Serial Bus devices and backward compatible with USB 2.0 devices. - Page 15 Getting to Know Your LIFEBOOK LIFEBOOK U749 (This picture is for illustration purpose only and may look different from the actual unit) HD Audio-in/out USB 3.1 (Gen 1) Connector It allows jack sensing of the following audio The USB 3.1 (Gen 1) connector allows you input/output devices.
- Page 16 LIFEBOOK U759 (This picture is for illustration purpose only and may look different from the actual unit) HD Audio-in/out USB 3.1 (Gen 1) Connector It allows jack sensing of the following audio The USB 3.1 (Gen 1) connector allows you input/output devices.
- Page 17 Getting to Know Your LIFEBOOK Side view of LIFEBOOK ■ Left view LIFEBOOK U729 (This picture is for illustration purpose only and may look different from the actual unit) DC-in HD Audio-in/out It allows jack sensing of the following audio...
- Page 18 LIFEBOOK U749 (This picture is for illustration purpose only and may look different from the actual unit) DC-in USB 3.1 (Gen 1) Connector The USB 3.1 (Gen 1) connector with VGA Connector anytime charging function allows you to This port allows you to connect external connect Universal Serial Bus devices and is display devices.
- Page 19 Getting to Know Your LIFEBOOK LIFEBOOK U759 (This picture is for illustration purpose only and may look different from the actual unit) DC-in USB 3.1 (Gen 1) Connector The USB 3.1 (Gen 1) connector with anytime VGA Connector charging function allows you to connect This port allows you to connect external Universal Serial Bus devices and is backward display devices.
-
Page 20: Exterior Features: Bottom View Of Lifebook
Bottom view of LIFEBOOK LIFEBOOK U729 (This picture is for illustration purpose only and may look different from the actual unit) Battery Bay The location of the battery pack. Battery Lock Latch This latch secures the battery pack in the battery bay. - Page 21 Getting to Know Your LIFEBOOK LIFEBOOK U749 (This picture is for illustration purpose only and may look different from the actual unit) Battery Bay The location of the internal battery pack. Battery Lock Latch This latch secures the battery pack in the battery bay.
- Page 22 电源管理 LIFEBOOK U759 (This picture is for illustration purpose only and may look different from the actual unit) Battery Bay The location of the internal battery pack. Battery Lock Latch This latch secures the battery pack in the battery bay. Port Replicator Connector Expansion RAM Slot The location of the expansion memory slot.
-
Page 23: Status Indicator Led
Getting to Know Your LIFEBOOK STATUS INDICATOR LED (This picture is for illustration purpose only and may look different from the actual unit) Power Indicator ( P O I N T This indicator turns on when there is power to the notebook. -
Page 24: Recharging The Battery
RUNNING THE NOTEBOOK P O I N T ON ITS BATTERY When the battery is very hot, for example, immediately after long usage Recharging the battery of the notebook, the battery protection feature may be activated to prevent 1. Connect the AC adapter to your notebook the battery from being recharged. -
Page 25: Running Lifebook On Its Battery
Getting to Know Your LIFEBOOK Checking the power level Running LIFEBOOK on its Battery of the battery This section describes the steps to run the notebook on its internal standard battery. When the notebook is turned on or when the battery is being charged, the Battery Level indicators turns on with different color to... -
Page 26: Low Battery Condition
Low battery condition If the battery level indicator on the status indicator LED turns red. If it turns red, connect the AC adapter to your notebook immediately to recharge the battery. P O I N T The use of a weak battery may result in lost of data you are currently working on. -
Page 27: Power Management
Using Your LIFEBOOK POWER MANAGEMENT Your Fujitsu LIFEBOOK has many options and Suspend Mode features for conserving battery power. Some Suspend or Standby mode in Windows saves of these features are automatic and need no the contents of your notebook's system... -
Page 28: Hibernation (Save-To-Disk) Feature
Hibernation (Save-To-Disk) Feature The Hibernation feature saves the contents of your LIFEBOOK notebook’s system memory to the storage drive as a part of the Suspend/ Resume mode. You can enable or disable this feature. Enable or Disable the Hibernation Feature Windows 10: 1. -
Page 29: Windows Power Management
Using Your LIFEBOOK Windows Power Management Power Off T h e P o w e r O p t i o n s i c o n l o c a t e d i n t h e Before turning off power, check that the storage Windows Control Panel allows you to configure drive access indicator is off. -
Page 30: Power Sources
POWER SOURCES DC-in DC Output Cable AC Adapter AC Cable (This picture is for illustration purpose only and may look different from the actual unit) Connecting the AC Adapter The AC adapter provides power for operating your notebook and charging the batteries. Connecting the AC Adapter 1. -
Page 31: Power On
Failure from the list. to do so may damage the notebook. Warranty Registering for Your Fujitsu LIFEBOOK When you power on your notebook, it will How do I register? perform a Power On Self Test (POST) to check... -
Page 32: Charging The Battery
CHANGING THE BATTERY 4. Take the battery from battery bay C A U T I O N Before changing battery bay, remember to power off the notebook and disconnect the AC adapter from it. Keep small objects, such as a cover, caps and screws, out of the reach of babies and children. -
Page 33: Explicit Self-Install
This LIFEBOOK is capable of operating in dual channel memory mode. To realized the full performance benefits, the two memory slots must be installed with two DDR4-2400 memory modules of the same capacity and specification. We strongly recommend you to use only Fujitsu approved memory modules. - Page 34 1. Turn off the notebook and disconnect Installing memory module the AC adapter from it. To install memory, perform these steps. 2. Close the panel and place the notebook upside down. W A R N I N G 3. Remove the screw securing the memory Before installing any memory module, compartment slot cover and remove it.
- Page 35 Explicit Self-instal 5. Attach the memory compartment cover and secure it with screws. Attach the cover removed in step 3. Memory compartment cover...
-
Page 36: Port Replicator
PORT REPLICATOR Mechanical Port Replicator* (Optional) Power Button DisplayPort Audio-in and out USB 3.1 (Gen 1) Connector Port Replicator Lock USB 3.1 Type-C Connector LAN (RJ45) DC-in VGA Connector Cylindrical Keyloack for notebook* (Option) DVI Connector Port Replicator Connector for notebook... - Page 37 Explicit Self-instal Connecting the Port Replicator Disconnecting the Port Replicator Unlock the port replicator. C A U T I O N Pull the slide lock as shown. Before docking or undocking your notebook with the port replicator, be sure to touch a grounded metal object to prevent electrostatic discharge from affecting the computer components.
-
Page 38: Usb Type-Ctm Port Replicator
USB TYPE-C PORT REPLICATOR* (Optional) Your Port Replicator is a device that helps you to quickly connect your notebook to your peripheral devices, such as a monitor, printer, etc. The features offered by the Port Replicator include standard ports for monitor, audio and other USB devices, such as mouse and keyboard. - Page 39 Explicit Self-install (This picture is for illustration purpose only and may look different from the actual unit) Ports on the Port Replicator Right ON/OFF Switch with Power-on Indicator DC Input Connector (DC-in) Input: 19V / 4.74A USB 3.1 Type-C Connector for Data Connection This Connector for data connection and power supply for the notebook.
- Page 40 USB TYPE-C Connecting the Mains Adapter to Setting Up Port Replicator the Port Replicator C A U T I O N Select a suitable location for the Port Replicator before setting it up. Follow the instructions below when doing so: Never please the Port Replicator on a soft surface (e.g.
- Page 41 Explicit Self-install Connecting LIFEBOOK to the Port Replicator (This picture is for illustration purpose only and may look different from the actual unit) Disconnect the mains adapter cable from the DC socket (DC-in) of the notebook. Connect one end of the USB Type-C cable to Thunderbolt 3 Connector with power delivery function on the notebook...
- Page 42 Switching on LIFEBOOK via the Switching off LIFEBOOK via the Port Replicator Port Replicator Press the ON/ OFF button on the port replicator Close all applications and shut down your to switch the notebook on. operating system (please refer to the manual for the operating system).
-
Page 43: Troubleshooting
Troubleshooting Troubleshooting Before you place the call, you should have Your Fujitsu LIFEBOOK is sturdy and subject the following information ready so that the to few problems in the field. However, you may customer support representative can provide encounter simple setup or operating problems...
Need help?
Do you have a question about the Lifebook U729 and is the answer not in the manual?
Questions and answers