
Related Manuals for Well UPS-HEATST-COMMANDER Series


Summary of Contents for Well UPS-HEATST-COMMANDER Series
- Page 1 Operation Manual UPS-HEATST-COMMANDER300-1600W-WL UPS-HEATST-SPRINTEN300-600W-WL UPS-HEATST-EVOLUTION1000W-WL...
-
Page 2: Table Of Contents
Table of Contents 1 Safety Information ................. - 0 - 2 Product Overview ................- 1 - 2.1 Specifications................- 1 - 2.2 Front panel features ..............- 3 - 2.3 Rear panel features ............... - 4 - 3 Installation Instructions ..............- 5 - 3.1 Unpacking inspection .............. -
Page 3: Safety Information
WELL. Please read carefully the following instructions and keep them within reach 1 Safety Information CAUTION Non-qualified electricians are forbidden to open the case due to hazard of electrical shock. Consulting the dealer is required before using for below equipment. Its application, configuration, management and maintenance must be specially considered and designed. -
Page 4: Product Overview
electric shocks or will be on fire. 2 Product Overview 2.1 Specifications MODEL 300 W 600 W 1000 W 1600 W 2500 W 3500 W DC Input (the inverter must be connected to batteries to work properly) Nominal input voltage 12 V 24 V DC input range... - Page 5 Mains mode: 110% 120 s; 125% 60 s; 150% 10 s (switch to bypass) Overload capability Inverter mode: 110% 60 s; 125% 10 s; 150% 10 s (shut down) Battery Default Default 20 A, regulating step 1 A (< 10 A) / 5 A (> 10 A) 10 A Charging current (selectable)
-
Page 6: Front Panel Features
490×290×195 (Wall (W×D×H) mm mounted) Note: Specifications are subject to change without notice. Charging features Three-stage: Charging CC (constant current) CV (constant voltage) Float (floating charge) process Process diagram Constant voltage charging time: 60 S 2.2 Front panel features 300 W ~ 1600 W front panel Tower type Wall mounted type 2500 W ~ 3500 W front panel... -
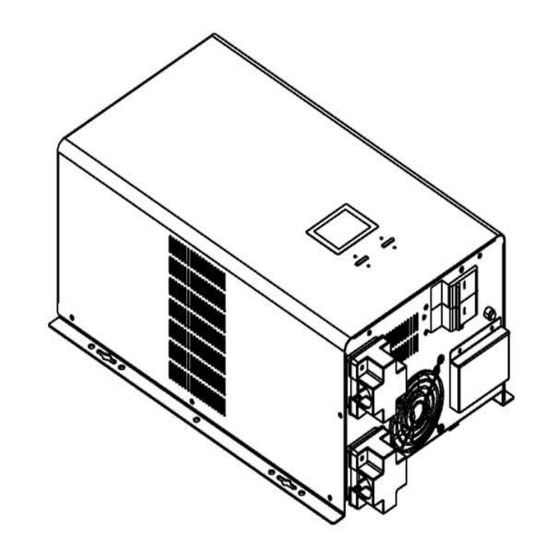
Page 7: Rear Panel Features
2.3 Rear panel features 300 W ~ 1600 W rear panel ① AC input socket ② Output sockets ③ Overcurrent protector ④ Buzzer for battery reverse ⑤ Battery wiring ⑥ Battery breaker ⑦ Fan Tower type Wall mounted type DC output fuse ⑧... -
Page 8: Installation Instructions
3 Installation Instructions 3.1 Unpacking inspection Inspect the contents upon receipt. Notify the carrier and dealer if the unit is damaged. 300 W ~ 1600 W package contents Operation manual AC input power cords 300 W ~ 1600 W Inverter 2500 W ~ 3500 W package contents 2500 W ~ 3500 W Inverter Operation manual... - Page 9 does, check and correct until confirming it is normal, and then connect to the utility power. 3.2.2 Connect external battery 300 W / 600 W / 1000 W inverter battery connection Optional model (with MPPT modules (Note that the red cable is connected to the positive terminal, black cable is connected to the negative terminal) 1600 W inverter battery connection Optional model (with...
-
Page 10: Operations
connected to the negative terminal, and 2500 W battery cable is more than 35 mm 3500 W battery cable is more than 50 mm 4 Operations CAUTION Turn on the inverter in battery mode first. Be sure that the load has no problem (overload, short-circuit ect.) before connecting to utility power. -
Page 11: Mppt & Dc Modules (Optional) Status Indicators
4.3 MPPT & DC modules (Optional) status indicators Modules Status LED Indicators Action Yellow and green indicators Normal PV charging Operating is normal are lit continuously MPPT over- Red indicator is lit MPPT charging is temperature continuously turned off MPPT charging is MPPT PV low voltage Green indicator extinguishes... - Page 12 If there is failure and failure is solved, press “OFF” button first and release it to press “ON” button, and restart the inverter for normal use. 4.4.2 General settings Configure these settings at any time, using the display interface. Default Parameters Options...
- Page 13 (300W ) CUR: Charging current (option) 0 ~ 60A (600W ~3500W) IECO: Inverter no-load ECO mode Note: If select “Y”, check whether the configured load rate in Y / N “ Inverter shutdown load rate” is correct or not, if not, change it. (option) INLS: Inverter no-load shutdown function...
-
Page 14: Troubleshooting
T: DC auto restart time (option) 0.5H ~ 8.0H 200 - 240V ITR: Input voltage display setting , UPS: OFF / displays the current rated voltage 100 / 110 / of the system; If select “100 /…/ 115 / 120; 240”, the input voltage displays 100 - 120V “100V /…/ 240V”, the transformer... - Page 15 AC output Contact the dealer or supplier from whom it voltage is too was purchased. high AC output Contact the dealer or supplier from whom it voltage is too low was purchased. Output overload Check the load. Contact the dealer or supplier from whom it Relay fault was purchased.
- Page 16 Contact the dealer or supplier from whom it Soft-start fault was purchased. BUS voltage is Check the battery voltage. Contact the too high (Battery dealer or supplier if the problem persists. is overcharged) Charging over- Contact the dealer or supplier from whom it current was purchased.
- Page 17 Ecological information: Waste electrical and electronic equipment are a special waste category, collection , storage, transport , treatment and recycling are important because they can avoid environmental pollution and are harmful to health. Submitting waste electrical and electronic equipment to special collection centers makes the waste to be recycled properly and protecting the environment.
- Page 18 Manual de utilizare UPS-HEATST-COMMANDER300-1600W-WL UPS-HEATST-SPRINTEN300-600W-WL UPS-HEATST-EVOLUTION1000W-WL ~ - 15 - ~...
- Page 19 ~ - 16 - ~...
- Page 20 Cuprins 1 Informații de siguranță ............... - 0 - 2 Prezentarea produsului ............- 1 - 2.1 Specificații ................- 1 - 2.2 Caracteristici ale panoului frontal ........- 3 - 2.3 Caracteristici ale panoului posterior ........- 4 - 3 Instrucțiuni de montaj ..............
-
Page 21: Informații De Siguranță
Vă mulțumim că ați ales WELL. Citiți cu atenție următoarele instrucțiuni și păstrați-le la îndemână 1 Informații de siguranță ATENȚIE Electricienilor necalificați le este interzisă deschiderea carcasei, întrucât există pericol de electrocutare. Consultați comerciantul înainte de utilizarea echipamentului descris în continuare. -
Page 22: Prezentarea Produsului
2 Prezentarea produsului 2.1 Specificații Model 300 W 600 W 1000 W 1600 W 2500 W 3500 W Intrare DC (invertorul trebuie conectat la baterii, pentru a funcționa corect) Tensiune nominală de 12 V 24 V intrare Raza tensiunii de intrare 10 –... - Page 23 supraîncărcare Mod Invertor: 110% 60 s; 125% 10 s; 150% 10 s (oprire) Baterie Prestabilit Prestabilit 20 A, pas de reglare 1 A (< 10 A) / 5 A (> 10 A) Curent de încărcare 10 A (selectabil) Max. 40 Max.
-
Page 24: Caracteristici Ale Panoului Frontal
Caracteristici de încărcare Proces Trei stadii: CC (curent constant) CV (tensiune constantă) Intermitentă (încărcare încărcare plutire) Diagrama proces Tensiune constantă, durată de încărcare: 60 s 2.2 Caracteristici ale panoului frontal 300 W ~ 1600 W panou frontal Tip turn Tip montat pe perete 2500 W ~ 3500 W panou frontal ~ - 3 - ~... -
Page 25: Caracteristici Ale Panoului Posterior
2.3 Caracteristici ale panoului posterior 300 W ~ 1600 W panou posterior ⑪ Priză de intrare CA ⑫ Prize de ieșire ⑬ Protecție la supracurent Buzer pentru polaritatea inversă ⑭ a bateriei ⑮ Conexiunile bateriei ⑯ Întrerupător baterie ⑰ Ventilator Tip montat pe perete Siguranță... -
Page 26: Instrucțiuni De Montaj
2500 W ~ 3500 W panou posterior Cutie de borne intrare/ieșire ⑦ Protecție la supracurent ⑧ Întrerupător baterie ⑨ Buzer pentru polaritatea inversă a ⑩ bateriei Bornă de conexiune la baterie ⑪ Ventilator ⑫ 3 Instrucțiuni de montaj 3.1 Inspecția la despachetare Inspectați conținutul pachetului la primire. - Page 27 Asigurați-vă că borna de împământare este conectată la pământ. 3.2.1 Informații de montaj Verificați dacă tensiunea bateriei sau a rețelei este sau nu corectă. Conectați invertorul la baterii, la rețeaua de alimentare și la sarcini. Verificați corectitudinea conexiunilor, dacă bornele sunt înșurubate strâns și capacul cutiei de borne este închis. ...
-
Page 28: Utilizare
(Acordați atenție faptului că la borna pozitivă este conectat cablul roșu, iar la cea negativă, cablul negru și cablul bateriei de 2500 W are peste 35 mm , cablul bateriei de 3500 W are peste 50 mm 4 Utilizare ATENȚIE Mai întâi, porniți invertorul în modul baterie. -
Page 29: Indicatori De Stare Pentru Mppt Și Modulele Dc (Opțional)
Încărcare Sistem ventilator Încărcare Frecvența de ieșire Tensiunile de ieșire invertor invertor Modul de alimentare de la rețea Tensiune de Tensiune de 4.3 Indicatori de stare pentru MPPT și modulele DC (opțional) intrare ieșire Starea modulelor Indicatoare cu LED Activitate Indicatoarele galbene și verzi Funcționarea este Încărcare normală... - Page 30 În modul de configurare, apăsați butonul „ON” pentru a trece la interfața cu pagina „salvare și ieșire”, apăsați butonul „OFF” și selectați „Y”, apoi apăsați butonul „ON”, pentru a confirma salvarea datelor și ieșirea din modul de configurare. După ce ați configurat reglajele, opriți și reporniți invertorul, ca să aibă efect parametrii stabiliți.
- Page 31 A: Reglajul punctului de alarmă a tensiunii joase a 10,8V 9,6V ~ 13,0V bateriei (opțiune) E: Pragul tensiunii de 10,2V 9,6V ~ 11,5V descărcare (opțiune) 10A (300W ) CUR: Curent de încărcare 20A (600W 0 ~ 60A (opțiune) ~3500W) IECO: Invertor în mod ECO fără...
-
Page 32: Depanare
ACAU: Funcție de repornire automată CA (opțiune) DCAU: Funcție de repornire automată CC Observație: Dacă selectați „Y”, verificați dacă durata configurată în „durata de repornire automată CC” este corectă sau nu, în caz de răspuns negativ, schimbați-o. (opțiune) T: Durată de repornire 0,5H ~ 8,0H automată... - Page 33 putea afișa. Acțiunea sugerată de corecție este indicată în dreptul mesajului de afișare, pentru a vă ajuta la remedierea defectelor. Descrierea Mesaj afișat Acțiune de remediere problemei Scurtcircuit la Verificați dacă sarcina este scurtcircuitată. ieșirea de CA Tensiunea de Contactați comerciantul sau furnizorul de la ieșire de CA care a fost achiziționată...
- Page 34 Tensiunea de ieșire de CA a Contactați comerciantul sau furnizorul de la invertorului este care a fost achiziționată unitatea. prea ridicată. Tensiunea de ieșire de CA a Contactați comerciantul sau furnizorul de la invertorului este care a fost achiziționată unitatea. prea joasă...
- Page 35 ~ - 14 - ~...
- Page 36 Informații ecologice Deșeurile de echipamente electrice și electronice constituie o categorie specială de deșeuri; colectarea, depozitarea, transportul, tratarea și reciclarea lor sunt importante, întrucât se poate evita poluarea mediului și riscul pentru sănătate. Prin depunerea deșeurilor de echipamente electrice și electronice la centrele speciale, aceste deşeuri sunt reciclate corect și se protejează...
- Page 37 Felhasználói kézikönyv UPS-HEATST-COMMANDER300-1600W-WL UPS-HEATST-SPRINTEN300-600W-WL UPS-HEATST-EVOLUTION1000W-WL ~ - 16 - ~...
- Page 38 Tartalomjegyzék 1 Biztonsági információk ................- 0 - 2 A termék áttekintése ................- 1 - 2.1 Jellemzők ..................- 1 - 2.2 Előlapi funkciók ................- 3 - 2.3 Hátsó panel jellemzői ..............- 4 - 3 Telepítési útmutató ................- 5 - 3.1 Ellenőrzés kicsomagoláskor ............
-
Page 39: Biztonsági Információk
Köszönjük, hogy a WELL terméket választotta. Kérjük, figyelmesen olvassa el a következő utasításokat, és tartsa kezügyben. 1 Biztonsági információk FIGYELMEZTETÉS A nem szakképzett villanyszerelőknek, áramütés veszélye miatt, tilos kinyitni a szerkezetet! Mielőtt a berendezést használná, kérjen tanácsot a forgalmazótól. Különös figyelmet kell fordítani, és meg kell tervezni a berendezés alkalmazását, konfigurálását, kezelését és... -
Page 40: Termék Áttekintése
2 A termék áttekintése 2.1 Jellemzők MODEL 300 W 600 W 1000 W 1600 W 2500 W 3500 W DC Bemenet (az átalakítót az akkumulátorokhoz kell csatlakoztatni, hogy megfelelőképpen működjön) Névleges bemeneti 12 V 24 V feszültség DC bemeneti 10 ~ 15 V 20 ~ 30 V tartomány AC Bemenet... - Page 41 Motorterhelés Igen Egyenirányító terhelés Igen Hálózati üzemmód: 110% 120 s; 125% 60 s; 150% 10 s (átkapcsolás Túlterhelési képesség bypass-ra) Átalakító mód: 110% 60 s; 125% 10 s; 150% 10 s (kikapcsol) Akkumulátor Alapértel Alapértelmezett 20 A, szabályozó lépés 1 A (< 10 A) / 5 A mezett (>...
-
Page 42: Előlapi Funkciók
Teljes tömeg (kg) 9.0/9.5/8.4 11.9/12.4/12 15.0/15.6 19.0/19.5 34.0 38.0 280×258×120 (nincs opció) Méretek (W×D×H) 293×280×160 (nincs opció) 293×280×160 302×479×209 400×210×127 (Falra szerelt) 330×352×200 (nincs opció) Csomagolási méretek 370×355×235 (nincs opció) 370×355×235 353×582×287 490×290×195 (Falra (W×D×H) mm szerelt) Megjegyzés: A műszaki adatok előzetes értesítés nélkül változhatnak. Töltési funkciók Háromfokozatú: Töltési... -
Page 43: Hátsó Panel Jellemzői
2500 W ~ 3500 W előlap 2.3 Hátsó panel jellemzői 300 W ~ 1600 W hátsó panel 21 AC bemeneti csatlakozó aljzat 22 Kimeneti csatlakozó aljzat 23 Túláram védelem 24 Hangjelzés forditott polaritás 25 Akkumulátor vezeték 26 Akkumulátor megszakítás 27 Ventiláció Torony típus Falra szerelhető... -
Page 44: Telepítési Útmutató
Opcionális model ( MPPT / DC modullal 2500 W ~ 3500 W hátsó panel Bemenet/Kimenet terminál ⑬ blokk Túláram védelem ⑭ Akkumulátor megszakítás ⑮ Hangjelzés forditott polaritás ⑯ eseten Akkumulátor vezeték terminál ⑰ Ventiláció ⑱ 3 Telepítési útmutató 3.1 Ellenőrzés a kicsomagoláskor Ellenőrizze a csomag tartalmát az átvételkor. - Page 45 A frekvenciaváltót beltéri használatra tervezték. Ne használja ezt az UPS-t közvetlen napfényben, folyadékkal érintkezve, vagy ahol nagymértékű a por vagy a páratartalom. Helyezze az akkumulátorokat szellőző környezetbe. A rövidzárlat kockázatának csökkentése érdekében használjon szigetelt szerszámokat a frekvenciaváltó, az akkumulátorok, vagy az ehhez csatlakoztatott egyéb berendezések beszerelésekor vagy működésekor.
-
Page 46: Működés
Opcionális modell (MPPT modulokkal) (Vegye figyelembe, hogy a piros kábel csatlakozik a pozitív terminálhoz, a fekete kábel a negatív terminálhoz csatlakozik). 2500 W / 3500 W átalakító akkumulátor csatlakozás (Vegye figyelembe, hogy a piros kábel csatlakozik a pozitív terminálhoz, a fekete kábel csatlakozik a negatív terminálhoz, és a 2500 W akkumulátor kábele több mint 35 mm , a 3500 W akkumulátor kábele pedig több mint 50 mm... -
Page 47: Mppt & Dc Modulok (Opcionális) Státus Indikátorok
Ha az inverter hálózati feszültség / AC üzemmódban működik, nyomja le és tartsa lenyomva az "OFF" gombot 3 másodpercig, engedje fel, amíg a hangjelző sípol, ekkor az inverter bypass módban van. Ha az inverter bypass módban működik, nyomja le és tartsa lenyomva az "ON" gombot 3 másodpercig, engedje fel, amíg sípoló... -
Page 48: Beállítások
Az akkumulátor MPPT töltés ki van A sárga jelző vibrál túlfeszültség elleni kapcsolva védelme A DC modul A piros kijelző folyamatosan DC modul kimeneti biztosítéka kiolvadt DC Modul túlterhelés világít és a kimenet megszakad 4.4 Beállítások 4.4.1 Beállítási művelet Normál üzemmódban nyomja meg és tartsa lenyomva egyszerre az "ON" + "OFF" gombot 3 másodpercig, a Setup/Beállítás módba való... - Page 49 4.4.2 Általános beállítások Bármikor konfigurálhatja ezeket a beállításokat, a kijelző felületét használva. LCD Kijelző Paraméterek Alapérték Opciók OUT: Az inverter névleges 220V / 230V 220V kimeneti feszültsége (opció) / 240V 10% ~ 120% INP: A generátor bemeneti (névleges teljesítményének illesztése 120% teljesítmény (opció)
- Page 50 E: Kisülési feszültség vége 10.2V 9.6V ~ 11.5V (opció) (300W ) CUR: Töltési áram (opció) 0 ~ 60A (600W ~3500W) Az inverter üresjárati IECO: ECO módja. Megjegyzés: Ha az "Y"-t választja, ellenőrizze, hogy a beállított terhelési ráta Y / N "Inverter-leállító...
- Page 51 ACAU: AC önindító funkció Y / N (opció) DCAU: DC automatikus újraindítás funkció Megjegyzés: Ha kiválasztja az "Y" értéket, ellenőrizze, hogy a "DC auto restart Y / N time" időben beállított idő megfelelő-e vagy sem, ha nem, változtassa meg. (Opció) T: DC automatikus 0.5H ~ 8.0H újraindítási idő...
-
Page 52: Hibaelhárítás
SAVE: Mentés és Kilépés Y / N 5 Hibaelhárítás Ez a rész azokat az állapot- és riasztási üzeneteket sorolja fel, amelyek az UPS-n megjelenhetnek. A javasolt hibaelhárítási művelet minden egyes üzenetben megjelenik a kijelzőn, amely segít önnek a problémák megoldásában. A Kijelző... - Page 53 Csökkentse az üzemi terhelést. Ha a probléma továbbra is fennáll, lépjen túlhevülés kapcsolatba az eladóval vagy a szállítóval. A hűtőborda és Vegye fel a kapcsolatot azzal a a hőmérséklet forgalmazóval vagy szállítóval, akitől érzékelő megvásárolta. károsodása Csökkentse az üzemi terhelést. Ha a Transzformátor probléma továbbra is fennáll, lépjen túlmelegedése...
- Page 54 Várja meg az automatikus önkezelést, vagy kézzel állítsa le és indítsa újra az Önzáró hiba invertert Ellenőrizze a CT jelsort CT hiba DC modul (opcionális) meghibásodása esetén cserélje ki a DC kimeneti biztosítékot, ha a DC-modul piros LED-je világít. Ökológiai információk: Az elektromos és elektronikus készülékek olyan speciális hulladékok, amelyeknek a gyűjtése, raktározása, kezelése és újrahasznosítása fontos feladat, mivel megelőzhető...
Need help?
Do you have a question about the UPS-HEATST-COMMANDER Series and is the answer not in the manual?
Questions and answers