
Subscribe to Our Youtube Channel
Related Manuals for Troy-Bilt TB-350S


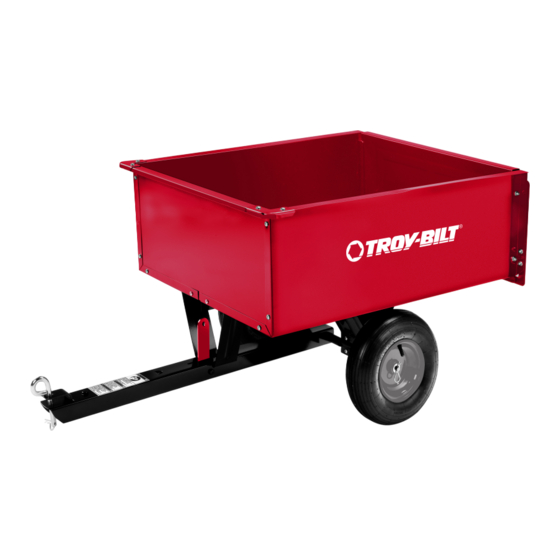
Summary of Contents for Troy-Bilt TB-350S
- Page 1 TB-350S 9 cu ft STEEL DUMP CART READ AND FOLLOW ALL SAFETY RULES AND OPERATING INSTRUCTIONS BEFORE USING THIS EQUIPMENT 6004394 - REV A 2/20...
-
Page 2: Safety Rules
Safety Rules This is the safety alert symbol. It is used to alert you to potential personal injury hazards. Obey all safety messages that follow this symbol to avoid possible injury or death. Read and understand all safety rules and operating instructions before using this tractor attachment. -
Page 3: Warranty
Warranty IF YOU ARE MISSING PARTS DO NOT RETURN TO STORE Email cs@ohiosteel.com or call 1-800-652-2321, ext. 212 Before you call, please email our customer service team at cs@ohiosteel.com with the following: A description of the issue you are having Photos of the issue that include an overall view and detailed view from multiple angles If applicable, a short video showing the issue... -
Page 4: Tools Required For Assembly
Carton Contents 3 (x1) 4 (x1) 2 (x1) 1 (x1) 10 (x1) 5 (x2) 6 (x4) 7 (x1) 8 (x1) 9 (x1) 19 (x1) (x1) 18 (x2) 20 (x4) 21 (x50) 22 (x50) 23 (x1) 25 (x2) 24 (x3) TOOLS REQUIRED FOR ASSEMBLY: •... - Page 5 Assembly Instructions Place Body Halves (1 & 2) on a smooth, flat surface so they are square and fasten together with hardware (21 & 22) as shown. Attach Front Support (9) to body and tighten with hardware (21 & 22) as shown. Attach Front Gate (3) to inside of body with supplied hardware (21 &...
- Page 6 Assembly Instructions Attach Corner (5) to body and install hardware (21 & 22) as shown. Attach Undercarriage (6) to body. LOOSELY tighten bolts at this time. Insert Axle (19) into Undercarriage (6) halfway as shown. Attach a Spacer (25), the drawbar assembly, and then a second Spacer (25).
- Page 7 Assembly Instructions Slide Axle (19) completely through Undercarriage (6); be sure to catch the drawbar when sliding the Axle (19). Align drawbar with the Front Support (9) and press down to latch. Slide Washers (20) and Wheels (18) onto Axle (19) and secure with Hairpins (24). At this time, tighten all hardware.
- Page 8 Assembly Instructions Attach Gate Retainers (7 & 8) to rear and sides of body and tighten with hardware (21 &22) as shown. Attach Tailgate(4) to body as shown. No hardware is required, tailgate should move freely up or down. Install Hitch Pin (23) and Hairpin (24) to secure to attachment vehicle.
- Page 9 Operating Instructions Before Using Dump Cart: Check tire pressure and inflate to 30 psi if needed. Read all Safety Rules found on page 1. How to Use Dump Cart: Attach Dump Cart to your tractor using the supplied hitch pin. Do not exceed 350 pounds when loading material into the cart body.
-
Page 10: Repair Parts
Repair Parts ITEM PART NO DESCRIPTION QTY ITEM PART NO DESCRIPTION 6000949-R2 BODY HALF,RIGHT SPRING, LATCH 6000948-R2 BODY HALF,LEFT HEX BOLT,3/8-16 X 3/4" 6000956-BR 6000951-R2 GATE,FRONT HEXBOLT, 3/8-16 X 3" 6000952-R2 TAILGATE HEXNUT, 3/8-16 C-LOCK 401051-R2 CORNER 6002416 WHEEL 6000946-B2 UNDERCARRIAGE 6000955 AXLE 401071-R2 RETAINER GATE,RIGHT... - Page 11 Proudly designed and tested in Columbus, Ohio Manufactured in the U.S.A. from domestic and imported components MODEL # TB-350S (800) 652-2321 (800) 652-2321...
Need help?
Do you have a question about the TB-350S and is the answer not in the manual?
Questions and answers