Table of Contents
Advertisement
Quick Links
Welcome:
Thank you kindly for purchasing this fine product.
Much investment in time and effort has gone into its development, and it is our hope
that it will give you many years of trouble-free service.
Safety Notice:
1. Do not drop, puncture or disassemble the device; otherwise the warranty will be voided.
2. Avoid all contact with water, and dry hands before using.
3. Do not expose the device to high temperature or leave it in direct sunlight. Doing so may
damage the device.
4. Use the device with care. Avoid pressing hard on the device body.
5. For your own safety, avoid using the device when there is a storm or lightning.
6. Do not use batteries of different specifications. Doing so may lead to the potential for serious
damage.
7. Remove the battery during long periods between usage, as a deteriorated battery may affect
the functionality of the device.
8. Remove the battery if it shows signs of leaking or distortion.
9. Use only the accessories supplied by the manufacturer.
10. Keep the device out of the reach of infants.
11. Risk of explosion if battery is replaced by an incorrect type.
12. Dispose of used batteries according to the instructions.
FCC Compliance Statement:
This device complies with Part 15 of the FCC Rules. Operation is
subjected to the following two conditions: (1) this device may not cause
harmful interference, and (2) this device must accept any interference
received, including interference that may cause undesired operation.
This equipment has been tested and found to comply with limits for a
Class B digital device, pursuant to Part 15 of the FCC rules. These limits
are designed to provide reasonable protection against harmful interference in residential
installations. This equipment generates, uses, and can radiate radio frequency energy, and if
not installed and used in accordance with the instructions, may cause harmful interference to
radio communications.
However, there is no guarantee that interference will not occur in a particular installation. If this
equipment does cause interference to radio or television equipment reception, which can be
determined by turning the equipment off and on, the user is encouraged to try to correct the
interference by one or more of the following measures:
-Reorient or relocate the receiving antenna.
-Move the equipment away from the receiver.
-Plug the equipment into an outlet on a circuit different from that to which the receiver is
connected.
-Consult the dealer or an experienced radio/television technician for additional suggestions.
You are cautioned that any change or modifications to the equipment not expressly approved
by the party responsible for compliance could void Your authority to operate such equipment.
If the time arises to throw away your product, please
recycle all the components possible.
Batteries and rechargeable batteries are not to be
disposed in your domestic waste! Please recycle
them at your local recycling point.
Together we can help to protect the environment.
Advertisement
Table of Contents

Related Manuals for AIPTEK PocketCinema V20


Summary of Contents for AIPTEK PocketCinema V20
- Page 1 Welcome: Thank you kindly for purchasing this fine product. Much investment in time and effort has gone into its development, and it is our hope that it will give you many years of trouble-free service. Safety Notice: 1. Do not drop, puncture or disassemble the device; otherwise the warranty will be voided. 2.
- Page 2 Care and Safety Information: Please follow all warnings, precautions and maintenance as recommended in this user’s guide. Warning- Keep away from liquid to avoid electric fires. Warning- Do not disassemble the projector. Warning- Avoid facing directly into projector’s lens. Eye Safety Warnings Avoid Hearing Damage: Avoid staring/facing directly into Listening at high volume for a...
-
Page 3: Table Of Contents
Table of Contents Getting Started ..............1 The Projector ..................1 Package Content .................. 2 Remote Controller................. 2 Reading LED indicators ................ 3 Installing the battery................3 Charging the battery ................3 Inserting a memory card (optional) ............4 Turning on/off your projector ..............4 Adjusting the Focus ................ -
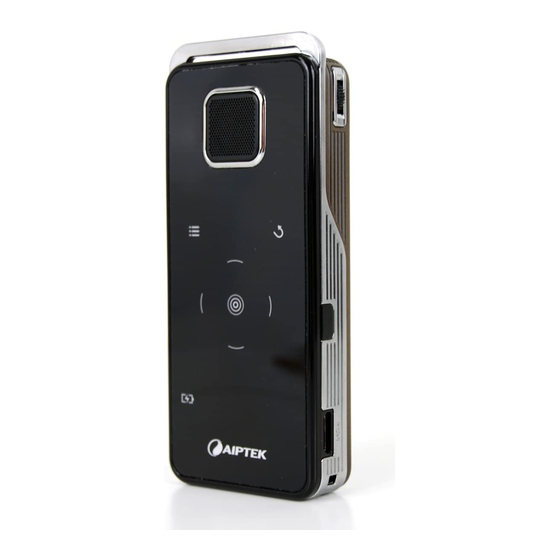
Page 4: Getting Started
Getting Started The Projector Up button Menu button Return Button OK button Left button Right button Power/Charging Down button Focus switch Speaker USB connector IR receiver VGA Connector Strap holder Tripod socket Battery cover Power ON/OFF Lens SD/MMC card slot AV input / Headphone output... -
Page 5: Package Content
Package Content Projector Pouch Manual Tripod AV cable AV cable AC power adapter (RCA female to mini jack) USB cable VGA cable Remote Control Battery Remote Controller Up button Memory change Photo folder Video folder OK/Play/Pause button Left button Right button Return Button Menu button Down button... -
Page 6: Reading Led Indicators
Reading LED indicators The Power LED is lighting orange when projector is charged. The Power LED is lighting green when connected with AC power adapter in standby mode or the battery is fully charged. Installing the battery 1. Slide the battery cover open. 2. -
Page 7: Inserting A Memory Card (Optional)
Inserting a memory card (optional) To insert a memory card, do the following: 1. Open the SD card cover. 2. Gently push the card as indicated until the card reaches the bottom of the slot. To remove the memory card, gently push it down and it will pop up. Then pull the card out of the slot. - Page 8 Adjusting the Projected Image Projection Distance Screen size - Width Screen Size - Height Screen Diagonal (cm) (inch) (cm) (inch) (cm) (inch) (cm) (inch) 19.0 12.2 15.2 38.1 24.4 18.3 30.5 12.0 63.5 40.6 16.0 30.5 12.0 50.8 20.0 101.3 39.9 65.0 25.6...
-
Page 9: Functions And Operations
Functions and Operations Main menu After turn on the projector, you will see opening screen first then main menu as below. VIDEO: This function allows users to select video file to project on screen. PHOTO: This function allows users to select JPEG image file to project on screen. MUSIC: This function allows users to select MP3 files to play on the projector. -
Page 10: Playing Video
Playing Video 1. Use the Left/Right button to select “Video” and then press OK button. 2. Use the Up/Down button to select target folder or video files. 3. When selecting one Video file, press OK to play it. (Some larger files may require more time to load) Please convert all videos with the bundled Arcsoft Media Converter to have the right file format which can be displayed by the projector. - Page 11 During playback 1. Press Left/Right button to move to previous/next file Long press Left/Right button to fast forward and fast rewind 2. Use Up/Down button to control volume. 3. Press OK to pause the video (OK again the continue). The following status information will pop up.
-
Page 12: Playing Photo
Playing Photo 1. Use the Left/Right button to select “Photo” and then press OK button. 2. Use the Up/Down button to select target folder or a photo displayed in preview mode. 3. After a photo is selected, press OK to display full size of this photo. 4. - Page 13 Photo Mode Application Photo Single Display Press Up/Down to enlarge/ In the order of 1X, Enlargement mode reduce 2X, 3X, 4X, 1X… mode Circular Display 1. Press OK to pause the In the order of 1X, mode circular display 2X, 3X, 4X, 1X… 2.
-
Page 14: Card Change
Card Change This function is to select which memory to use for playback. 1. Use the Left/Right button to select “Memory” and then press OK button. 2. The Memory Check box will display as above. Use the Up/Down button to select the memory type. -
Page 15: Playing Files In Other Devices
Playing files in other devices Connecting the projector to your media players Before connecting your media player to projector, you need to have media player dedicated composite AV-out cable and projector AV cable ready. DVD Player/ Projector AV cable Composite AV-out cable SAT- Receiver (red) (red) - Page 16 Connecting the Projector to your Notebook/PC Before connecting your laptop PC to projector, you need to have VGA cable ready. Once you want to use notebook power take this cable shown here. You have three options to supply the projector with power: 1.
-
Page 17: File Management With A Pc
File management with a PC Follow the procedures below to manage files in either built-in memory or memory card by using a PC or Notebook. 1. Make sure the projector is powered off. 2. Connect one end of the bundled USB cable to the USB port of the projector and the other end to a powered PC. - Page 18 How to download YouTube video for projection During installing ArcSoft Media Converter (AMC), you are recommended to install ArcSoft Video Downloader as well. It will bring you more convenience to download the videos from the Internet and convert them as mp4 format to be played back in your projector. Then you can share them with your family and friends.
-
Page 19: Specifications
Specifications Item Description Optical Technology LCoS Light Source RGB LEDs Aspect Ratio 15 Lumens (AC Mode); 12 Lumens (Battery Luminous Flux Mode) Resolution 640 x 480 (VGA) Pixels Projection Image Size 15 cm ~ 165.1 cm (6” ~ 65” Diagonal) Projection Distance 19 cm ~ 206 cm Zoom &... - Page 20 Item Description Working mode: 5 Watts Power consumption Standby mode (Projector light off): 3.5W Operation temperature 0°C ~ 35°C Dimension 131mm x 55mm x 25mm AV cable(RCA female to mini jack), AV cable(mini jack to mini jack),Pouch, Manual, Package Content Tripod, AC Power Adapter, VGA cable, USB cable, NP-120 battery, CD Note: Specifications are subject to change without notification.
-
Page 21: Troubleshooting
Troubleshooting If your projector does not seem to be functioning properly, check the items below before you contact an authorized service center. Symptom Check Point The projector can not be turned Ensure the battery is loaded or the AC • power adapter is in use. - Page 22 Symptom Check Point No power is supplied with the The USB Power on VGA Cable is an USB Power on the VGA Cable. optional function. As the power supply is different on the USB port of each computer, sometimes there may not be enough power supply for projection.
Need help?
Do you have a question about the PocketCinema V20 and is the answer not in the manual?
Questions and answers