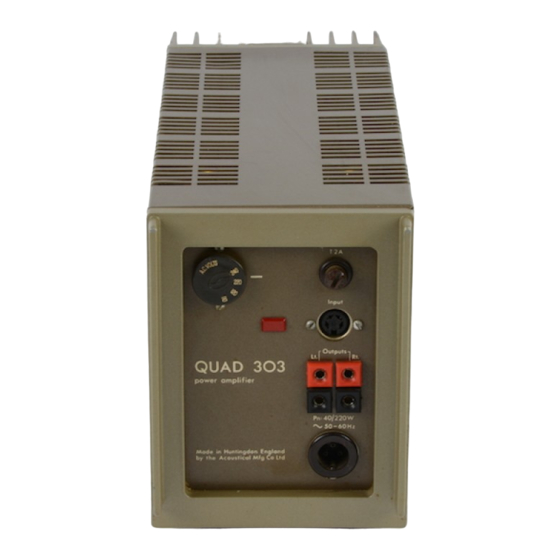
QUAD 303 Manuallines
Hide thumbs
Also See for 303:
- User manual ,
- Service supplement manual (29 pages) ,
- Instruction book (10 pages)
Advertisement
Quick Links
Quad 303 all versions illustrated upgrade guidelines V2.0
Including installing HE boards
These are the illustrated step-by-step guidelines for upgrading your Quad 303 with
the Dada Electronics upgrade-kit.
First of all, thanks for your purchase of our upgrade kit! Hereunder, you will find the
step-by-step guidelines for upgrading the Quad 303 amplifier to modern, high-end
standards. A word of advice: be sure to always watch the polarity of all diodes,
zeners & electrolytic capacitors mentioned, and strictly follow the steps described in
these guidelines!
There are in fact three versions (as far as we now until now) of the Quad 303. The
first two versions (up to serial no. 11500) have different driver boards. Make sure you
use the schematic that corresponds with the version you have. You will find the
schematics and the service manual in our download section, the information from the
service manual and the diagrams will not be repeated in this manual. We cover all
the versions with one kit. Only RV101 is different and will be delivered in two values!
We do not advice to revise boards older than version 9, although it can be done, the
quality of the boards is too low in most cases and there are circuit changes. Instead,
purchase our HE boards or already revised version 10 boards.
Quad 303 all versions illustrated upgrade guidelines V2.0 Page 1 of 14
Advertisement

Subscribe to Our Youtube Channel
Related Manuals for QUAD 303


Summary of Contents for QUAD 303
- Page 1 & electrolytic capacitors mentioned, and strictly follow the steps described in these guidelines! There are in fact three versions (as far as we now until now) of the Quad 303. The first two versions (up to serial no. 11500) have different driver boards. Make sure you use the schematic that corresponds with the version you have.
- Page 2 Replacing these capacitors with high-end components will render a dramatic improvement in sound quality. As the 303 is a push-pull Class AB amplifier, the correct calibration of the quiescent- current is extremely important in order to reduce the crossover distortion. The old trimmers will be replaced and a re-calibration of the output circuit will have to be executed for optimal performance.
- Page 3 • R200, R201, R204: Resistance 10K ½W 1% (Brown-Black-Black-Red-Brown) • R202: Resistance 8K2 ½ W 1% (Grey-Red-Black-Brown-Brown) • R203: Resistance 2K2 ½ W 1% (Red-Red-Black-Brown-Brown) • R205: Resistance 4K7 ½ W 1% (Yellow-Violet-Black-Brown-Brown) Quad 303 all versions illustrated upgrade guidelines V2.0 Page 3 of 14...
- Page 4 • 303 high-end replacement boards (power supply & drivers) • 2N3055, MJ15003 replacement transistors • MJ15004 for fully complementary output stage • All other Quad 303 components are available on request Quad 303 all versions illustrated upgrade guidelines V2.0 Page 4 of 14...
- Page 5 Remove the non-wired side of the printed circuit-boards from the plastic mounting- clips using a small screwdriver. In earlier versions of the 303, the PSU & output capacitors have been installed with connections on the downside, in later versions the connections were on the upside of the capacitors.
- Page 6 The trimmer should remain in the middle position for the time being. Please be considerate and watch the polarity of the diode and the zener. The cathode (black stripe or white/silver) should be pointing towards the middle of the board. Quad 303 all versions illustrated upgrade guidelines V2.0 Page 6 of 14...
- Page 7 Be advised: watch the polarity of the electrolytic capacitors. The of C104 + (positive) and C101 is towards the inside of the board. The of C106 is towards the + (positive) back-end of the board. Quad 303 all versions illustrated upgrade guidelines V2.0 Page 7 of 14...
- Page 8 12. Red: (from the PSU capacitor) + (positive) 13. Brown: Negative voltage & Collector of TR3 14. Orange: Base of TR3 15. Blue: - (negative) (from the PSU capacitor) Quad 303 all versions illustrated upgrade guidelines V2.0 Page 8 of 14...
- Page 9 • Adapt RV101 until you measure at least 6 mV DC. A somewhat higher value will not pose a problem, but 15mV is about the maximum. The optimum is 10 Quad 303 all versions illustrated upgrade guidelines V2.0 Page 9 of 14...
- Page 10 On the driver board there is a two position switch, with both switches off, as in the picture, the sensitivity is 0,5V, standard 303 value, with one switch on, the sensitivity is 1V, with both switches on the sensitivity is 1,5V. For the 1V setting, one of the switches must be activated.
- Page 11 3. Color coding of resistors 4. Identification of electrolyte capacitors, diodes and zeners Layout of the driver board, below serial 11500, placement of electrolytes is the same as in later versions. Quad 303 all versions illustrated upgrade guidelines V2.0 Page 11 of 14...
- Page 12 M12038 Issue 5 and 9 boards in one 303! Graphic by Jose Ignacio Alfaro Allona Quad 303 all versions illustrated upgrade guidelines V2.0 Page 12 of 14...
- Page 13 ×0.1 ±5% Silver – – – ×0.01 ±10% None – – – – ±20% Example: Red, Red, Black, Red, Brown 220 X 100 = 22Kohm and 1% tolerance Quad 303 all versions illustrated upgrade guidelines V2.0 Page 13 of 14...
- Page 14 The plus wire is sticking through the black plastic cap. Indication of the cathode of diodes and zener diodes The cathode will be indicated by a white, silver or black line on the body of the diode. Quad 303 all versions illustrated upgrade guidelines V2.0 Page 14 of 14...
Need help?
Do you have a question about the 303 and is the answer not in the manual?
Questions and answers