
Related Manuals for Instant Vortex 6


Summary of Contents for Instant Vortex 6
- Page 1 VORTEX 5.7 Litre Air Fryer User Manual Welcome Important Safeguards Getting Started Product, Parts and Accessories Control Panel Smart Programmes Cooking Tips Care and Cleaning Troubleshooting Warranty Contact Information...
- Page 2 Welcome to the world of Instant cooking. Thank you for welcoming us into your kitchen. Having families ourselves, we developed the Instant Vortex air fryers to allow ™ ™ busy families and professionals alike to cook healthy, delicious meals more easily and in less time.
-
Page 3: Table Of Contents
Table of Contents IMPORTANT SAFEGUARDS ..................4 Special Lead Set Instructions ................6 Product Specifications ..................6 Initial Set Up ......................7 Product, Parts and Accessories ................8 Air Fryer ........................8 Air Fryer Accessories ...................9 Control Panel ......................10 Smart Program Settings ..................11 Status Messages .....................12 Status Indicators ....................13 Getting Started .......................14 Initial Test Run .....................14... -
Page 4: Important Safeguards
+44 (0) 3331 230051 or on 11. Do not use any accessories or attachments not authorised by Instant Brands ™ Inc. The use of attachments not recommended by the manufacturer, such as frying baskets, may cause a risk of injury, fire or electric shock. - Page 5 IMPORTANT SAFEGUARDS 13. Do not place the appliance on any kind of hob, or in a heated oven; heat from an external source will damage the appliance. 14. Do not let the power lead come into contact with hot surfaces or open flames, including hobs.
-
Page 6: Special Lead Set Instructions
To reduce the risk of electric shock, plug the power lead into an earthed and easily accessible electric socket. Product Specifications Model: Vortex 6 1700 W 120 V ~ 60 Hz 5.7 Litres 5.48 kg... -
Page 7: Initial Set Up
Initial Set Up • Read the Important Safeguards in this User Manual before using the appliance. Failure to read and follow Important Safeguards may result in damage to the appliance, property damage or personal injury. • Remove all packaging material and accessories from within and around the appliance. -
Page 8: Product, Parts And Accessories
Product, Parts and Accessories Before using the air fryer, verify that all parts and accessories are accounted for. Air Fryer Air Vents (Rear) Control Panel Dial Air Fryer Basket Handle Cooking Chamber (Interior) Air Fryer Basket Handle Power Lead (Rear) Illustrations are for reference only and may differ from the actual product. -
Page 9: Air Fryer Accessories
Product, Parts and Accessories Air Fryer Accessories Cooking Tray Air Fryer Basket Illustrations are for reference only and may differ from the actual product. -
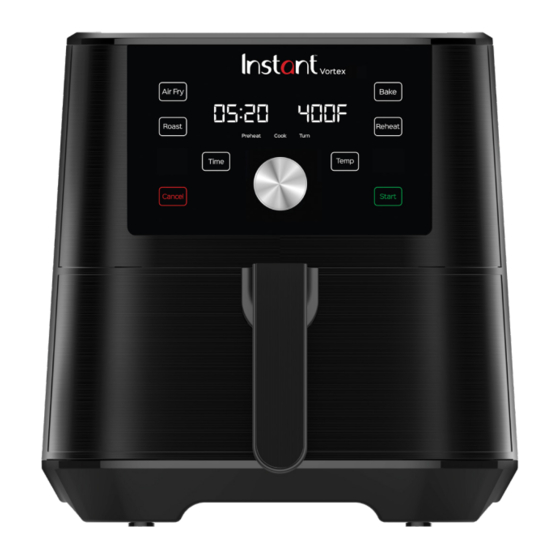
Page 10: Control Panel
Control Panel Instant air fryers feature an intuitive control panel with touch screen controls and an LED display to make cooking fast and easy. AirFry Bake Roast Reheat Dehy- Broil Time Temp drate Cancel Start Display Shows cooking time, cooking temperature, reminders and error messages. -
Page 11: Smart Program Settings
Smart Program Settings Setting Description Standby Mode When the air fryer is in Standby mode, the display reads OFF. Touch Cancel at any time to end a Smart Programme and return to Cancel Key Standby mode. When in Standby mode, touch and hold both the Time and Temp keys Turn Sounds for 5 seconds. -
Page 12: Status Messages
Status Messages Indicates that the air fryer is in Standby mode. Indicates that the air fryer is in Preheat mode. Note: Not applicable to Reheat and Dehydrate. Indicates that the air fryer has reached cooking temperature and food can be added. Note: Applicable only to Air Fry, Roast and Bake. -
Page 13: Status Indicators
Status Messages Status Indicators AirFry Bake Roast Reheat Dehy- Broil Time Temp drate Cancel Start Preheat Indicates that the air fryer is preheating. The display reads On during preheating. Cook Indicates that cooking is in progress. The display shows the remaining cooking time and temperature during cooking. -
Page 14: Getting Started
Getting Started Initial Test Run Follow these steps to familiarize yourself with your air fryer and to ensure it is operating properly. Approximate time: 25 minutes Connect the power lead to a 220-240 V power source. The air fryer is in Standby mode and the display indicates OFF. AirFry Bake Roast... - Page 15 Getting Started Place the cooking tray on the bottom of the air fryer basket. Note: Ensure the indicator arrows point towards the back or the front of the air fryer. Insert the air fryer basket back into the cooking chamber. Illustrations are for reference only and may differ from the actual product.
- Page 16 Getting Started Select Smart Program: Air Fry. AirFry Bake Roast Reheat Dehy- Broil Time Temp drate Cancel Start Touch Temp, then use the dial to adjust the cooking temperature to 205ºC/400ºF. Touch Time, then use the dial to adjust the cook time to 20 minutes. AirFry Bake Roast...
- Page 17 Getting Started Touch Start to begin cooking. The display indicates On while the air fryer Preheats. AirFry Time Temp Cancel To adjust the cooking time or temperature at any time during cooking, touch the Time or Temp key and rotate the dial. Press the dial to confirm the adjustment.
- Page 18 Getting Started Carefully remove and re-insert the air fryer basket. The display indicates the cooking time and temperature, and the status indicator shows Cook. AirFry Time Temp Cancel Illustrations are for reference only and may differ from the actual product.
- Page 19 Getting Started Part way through the Smart Programme, the display changes to turn Food to remind you to flip or shake your food items. AirFry Time Temp Cancel Remove the air fryer basket to pause the Smart Programme. Turn or shake food as desired, then place the air fryer basket back in the cooking chamber.
-
Page 20: Smart Programs
Smart Programs Instant air fryers use rapid air circulation to cook food, giving your meals all the crispy rich flavour of deep frying with little to no oil. Smart Adjustment Default Default Time Adjustment Range Programme Range Temperature AirFry 15 minutes 1–60 minutes... -
Page 21: Cooking Timetable
*Cooking times and temperatures are recommendations only. Always follow a trusted recipe. Find dozens of easy-to-follow recipes or download the Instant Pot App. CAUTION Always use a meat thermometer to ensure the internal temperature reaches a safe minimum temperature. Refer to the USDA’s Safe Minimum Internal Temperature Chart for more information. -
Page 22: Care And Cleaning
Care and Cleaning Clean your air fryer and accessories after each use. Always unplug the air fryer and allow it to cool to room temperature before cleaning. Never use harsh chemical detergents, scouring pads or powders on any of the parts or components. -
Page 23: Troubleshooting
Troubleshooting Register your product today. +44 (0) 3331 230051 Contact Customer Care: support@instantappliances.com instantappliances.com/#Chat Problem Possible Reason Try This Stop cooking immediately. Cancel the Smart Program, then CAUTION unplug the oven and allow it to cool to room temperature. Use only cooking oils with a high smoke point, Oil used has a low e.g., virgin or extra virgin olive, avocado, canola, smoke point... -
Page 24: Warranty
Warranty Limited Warranty Earlyview Ltd., an authorised distributor of Instant Brands, Inc., and Instant Brands Inc. (collectively the “Company”) warrant this appliance to be free from defects in workmanship and material, under normal household use, for a period of one (1) year from the date of original purchase. This Limited Warranty extends only to the original purchaser and use of the appliance in the UK. - Page 25 • A copy of the original purchase receipt with order number, model and serial number. • A description of the product defect, including any photographs or video if possible. Contact Information Instant Pot / Earlyview Ltd Unit 5 Hersham Farm Business Park Kitsmead Lane...
- Page 26 Instant Brands Inc. 11–300 Earl Grey Dr., Suite 383 Ottawa, Ontario K2T 1C1 Canada Earlyview Ltd (Instant Pot Official Distributor) 5 Hersham Farm Business Park Kitsmead Lane, Chertsey Surrey, KT16 0DN Register your product today www.instantpot.co.uk/support/register Contact Customer Care +44 (0) 3331 230051 support@instantpot.co.uk...
Need help?
Do you have a question about the Vortex 6 and is the answer not in the manual?
Questions and answers