Advertisement
Quick Links
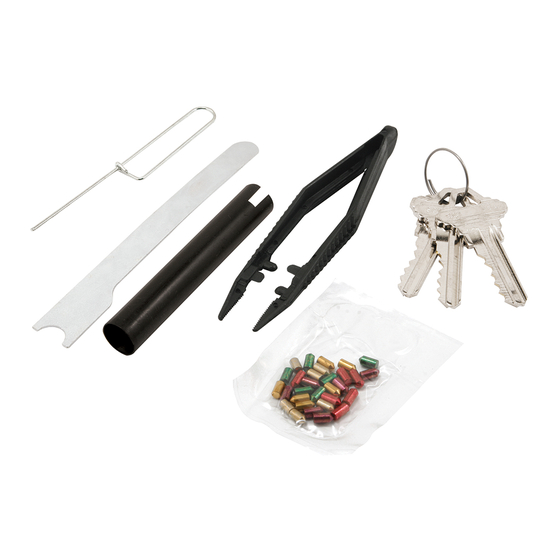
E-2402
Re-Keying Set for Up to Six Locks
Ensamble para cambiar hasta seis cerraduras para puertas
Trousse pour modifier jusqu'à six serrures de portes
NOTE: Installation drawings are typical for this style of replacement part.
They may not show a part identical to the one you are installing.
NOTA: Los dibujos para la instalación son genéricos para repuestos de este
tipo; por lo que podrían no mostrar una pieza idéntica a la que usted esté
instalando.
REMARQUE : Les dessins d'installation sont typiques pour ce style de pièce
de rechange. Ils pourraient ne pas illustrer une pièce identique à celle que
vous installez.
26950 San Bernardino Ave., Redlands, CA 92374
©
2010 Prime-Line Products
E 2402-INS
Advertisement

Related Manuals for Prime-Line E-2402


Summary of Contents for Prime-Line E-2402
- Page 1 REMARQUE : Les dessins d'installation sont typiques pour ce style de pièce de rechange. Ils pourraient ne pas illustrer une pièce identique à celle que 26950 San Bernardino Ave., Redlands, CA 92374 vous installez. © 2010 Prime-Line Products...
- Page 2 2. See back of insert for specific keying una extremidad ovalada, utilice la extremidad con ranura de la herramienta para © 2008 Prime-Line Products Co., Redlands, CA 92374 a. Using retainer removal tool, push against retainer ring until it pops off cylinder instructions to fit your new lock.
- Page 3 Caution! There are two sets of pins and springs within the cylinder housing unit. One set will sit in the cylinder plug. The other (top pins and springs) will remain in the cylinder Use the following instructions in case of accidental dislodging of the top springs and pins. housing.
- Page 4 E-2402 L. F. 1/24/2013...
- Page 5 ~ Remove Exterior Knob from Door ~ 1. Insert key and turn to the right 1/4 turn (3 O'clock position). 2. Using the flat remover tool, depress the spring-loaded clip on the neck of the knob and pull the knob off the shank. 3.
- Page 6 ~ Remove Key from Exterior Knob ~ 4. Turn the key back 1/4 turn to the left (12 O'clock position) and remove the key from the knob. L. F. 1/24/2013...
- Page 7 ~ Remove Cylinder Lock from Exterior Knob ~ 5. Push on the keyway to remove the cylinder lock through the back end of the knob. 6. Use the fork-end of the tool to pry off the Clip Ring on the back end of the cylinder lock.
- Page 8 ~ Remove Key Plug from Plug Housing ~ 7. Re-insert the key, turn it 1/4 turn to right (3 O'clock position). 8. Rotate the plug housing and key to the left 1/4 turn… (Driver pin chamber should be pointing to the left (9 O'clock position) (Key should be standing vertical (12 O'clock position) 9.
- Page 9 ~ Remove Key Plug from Plug Housing ~ NOTE: Push out key plug… do not pull out. (Driver pins hidden in driver pin chamber will fall out.) Keep constant presure of the plastic tool against the end of the key plug. LEAVE TOOL INSIDE HOUSING.
- Page 10 ~ Insert New Pin Tumblers into Key Plug ~ 11. Insert the new key into the key plug, then drop in the new pins as illustrated on the yellow insert; pointed ends down. Top of Pins should be flush with top of key plug housing (when key is fully inserted).
- Page 11 ~ Reinsert Key Plug into Plug Housing ~ 12. With the new key still inserted into the key plug, hold the driver pin chamber at the 9 O'clock position; reinsert the key plug into the plug housing with the key head standing vertically in the 12 O'clock position. MAINTAIN CONSTANT PRESURE OF THE KEY PLUG AGAINST THE PLUG FOLLOWER L.
- Page 12 ~ Secure Clip Ring and Remove Key ~ 13. Snap clip ring back onto end of key plug PRIOR TO REMOVING KEY 14. Turn back key to align with driver pin chamber, then remove key. L. F. 1/24/2013...
- Page 13 ~ Reinsert Cylinder Lock into Exterior Knob ~ 15. Squeeze down the spring-loaded shield on top of the driver chamber, then reinsert the cylinder lock into the neck of the knob; keyway end first. L. F. 1/24/2013...
- Page 14 ~ Remount Knob onto Shank ~ 16. Align the slotted opening on the knob in direction of the spring-loaded lock clip on the shank, then rest it on the tip of the shank to prepare the key and cylinder position. 17.
- Page 15 E-2402 L. F. 1/24/2013...
- Page 16 ~ Remove Deadbolt Cylinder ~ 1. Remove deadbolt thumbturn & cylinder from door. 2. Stand the cylinder face down on table, remove the cylinder lock stop screw, then lift out the cylinder lock from housing. L. F. 1/24/2013...
- Page 17 ~ Disassemble Cylinder Lock ~ 3. Stand the cylinder lock on end with tailpiece up, depress lock pin with wire tool, unscrew threaded cap and remove tailpiece, cut washer & threaded cap from plug housing. MAKE SURE THE KEY PLUG DOES NOT SLIDE OUT OF THE PLUG HOUSING. L.
- Page 18 ~ Disassemble Cylinder Lock ~ 4. Set cap, washer and tailpiece aside. MAKE SURE THE KEY PLUG DOES NOT SLIDE OUT OF THE PLUG HOUSING. 5. Remove Lock Pin and Spring from key plug, then set aside. 6. Insert the existing key into the key plug and give it a 1/4 turn to the right… MAKE SURE THE KEY PLUG DOES NOT SLIDE OUT OF THE PLUG HOUSING.
- Page 19 ~ Remove Key Plug from Plug Housing ~ 7. Use the un-notched end of the plastic plug follower tool, push out the key plug from the back end of the plug housing, MAINTAINING CONSTANT PRESURE OF THE PLUG FOLLOWER AGAINST THE KEY PLUG. Note: Key must be turned horizontally, driver pin chamber standing vertically.
- Page 20 ~ Install New Tumbler Pins ~ 8. Dump out pin tumblers and discard. 9. Insert the new key into the key plug, then drop in the new pins as illustrated on the yellow insert; pointed ends down. Top of Pins should be flush with top of key plug housing (when key is fully inserted).
- Page 21 ~ Reinsert Key Plug into Plug Housing ~ 10.a. With the new key still inserted into the key plug, 10.b. Hold the plug housing at the 9 O'clock position, (Horizontal facing left) 10.c. Reinsert the key plug (w/key inserted) into the plug housing with the key at the 12 O'clock position…...
- Page 22 ~ Reassemble Cylinder Lock and Install ~ 12. Stand the cylinder lock on end, unscrew cap, drop spring and pin in hole, mount tailpiece, cut washer and cap using the wire tool to depress spring- loaded pin. 13. Drop the cylinder lock back into the outside cylinder housing…...
Need help?
Do you have a question about the E-2402 and is the answer not in the manual?
Questions and answers