Table of Contents
Advertisement
Advertisement
Table of Contents

Related Manuals for ASP STERRAD 100S


Summary of Contents for ASP STERRAD 100S
- Page 1 ® STERRAD 100S Sterilization System Routine Maintenance Guide...
- Page 2 ® STERRAD 100S Sterilization System Routine Maintenance Guide 1-888-STERRAD (1.888.783.7723) 949.581.5799 www.sterrad.com ® ©2005 Advanced Sterilization Products. All rights reserved. STERRAD is a registered trademark of Advanced Sterilization Products. Other products mentioned in this publication are trademarked by their respective corporations. Reproduction, adaptation, or translation of this publication without prior written permission is prohibited.
-
Page 3: Table Of Contents
Contents Chapter 1. Introduction Operation Information ........................5 Chapter 2. For Your Safety Overview ............................7 Personal Safety and First Aid ......................7 Device Safety ..........................8 Cassette Handling ........................9 Safe Maintenance.........................9 Additional Information ........................10 Chapter 3. Routine Maintenance Maintenance Schedule ........................12 PM Level 1 ............................13 Seismic Restraint Inspection ......................13 Vaporizer Plate/Vaporizer Maintenance ..................14 Replace Vacuum Pump Oil......................14... - Page 4 Chapter 4. Technical Data Physical Specifications ........................41 Environmental Conditions ........................ 42 Electrical Requirements ........................43 Heater Impedance ..........................43 Thermocouples..........................44 Standards............................44...
-
Page 5: Chapter 1. Introduction
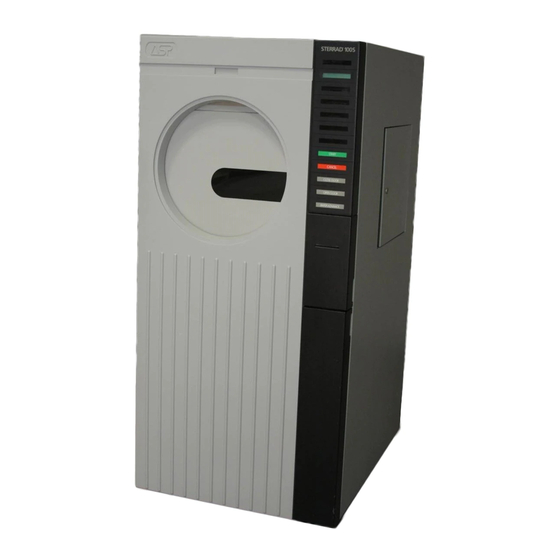
A variety of routine maintenance procedures are performed on the STERRAD 100S Sterilizer both at scheduled intervals and as needed. These procedures are detailed in Chapter 3 of this guide. You must read, understand, and follow the safety information presented in Chapter 2 and throughout this guide. - Page 6 Introduction The main sterilizer components are shown in the following illustration: ® Figure 1. STERRAD 100S Sterilizer. Your sterilizer may be slightly different in appearance. Briefly, the sterilizer operates as follows: • “Ready to Use” is displayed indicating that a sterilization cycle can be started.
-
Page 7: Chapter 2. For Your Safety
Chapter 2. For Your Safety Overview Your safety is of primary concern to ASP. This section provides information on safely using the sterilizer. You must read, understand, and use the information in this chapter before operating the unit. Also, always pay attention to the warnings, cautions, and notes throughout this guide. -
Page 8: Device Safety
• Do not change the power source without checking the electrical phase rotation. Prior to relocating the STERRAD 100S Sterilizer to a new power source, electrical phase rotation should be checked by a qualified technician. Failure to verify and match phase rotation may cause damage to the sterilizer and voids the warranty. -
Page 9: Cassette Handling
• Do not remove the plastic wrapper from the cassette package if the indicator strip is red. Red indicates that the cassette might have been damaged. Call the ASP Customer Care Center at 1-888-STERRAD for credit. • Do not remove used cassettes from the cassette collection box. -
Page 10: Additional Information
• Notes are shown in the text with the word Note in bold. They highlight specific information about the proper use and maintenance of the STERRAD 100S Sterilizer. ® STERRAD Sterilization System Routine Maintenance Guide... -
Page 11: Chapter 3. Routine Maintenance
VOIDS THE WARRANTY. Caution: Do not leave the sterilizer unplugged or turned off for longer than 24 hours. If the sterilizer must be turned off for longer than 24 hours, call the ASP Customer Care Center for instructions. ® STERRAD... -
Page 12: Maintenance Schedule
Routine Maintenance Maintenance Schedule Task Description Inspect Seismic Restraints Replace Vacuum Pump Oil Vaporizer Plate and Vaporizer Maintenance Drain Water From Air Storage Tank Drain Pressure Regulator Moisture Trap Replace Vacuum Pump Oil Filter (Leybold D16A only) Clean Air Filters/Panel Assemblies Baratron Zero Shift Test Replace the Catalytic Converter Replace HEPA Filter... -
Page 13: Pm Level 1
Routine Maintenance PM Level 1 The PM Level 1 is performed every 1500 cycles or 6 months whichever comes first. When performing PM Level 2, the PM Level 1 procedures should be done first. Following are the items serviced during this PM. ♦... -
Page 14: Vaporizer Plate/Vaporizer Maintenance
Routine Maintenance Vaporizer Plate/Vaporizer Maintenance The injector valve vaporizer plate is normally replaced by the customer when the cassette collection box is replaced. If the vaporizer plate needs to be changed at planned maintenance, this procedure should be performed for the customer. See the section on “As Needed Maintenance”... -
Page 15: Drain The Air Storage Tank
Routine Maintenance Drain the Air Storage Tank The air storage tank is different on Block 2.0 machines. See the following section for details. 1. Using a towel, cover the drain of the air storage tank, and then slowly open the drain cock. On Block 2 systems, press the trigger or turn the valve to fill the bottle. -
Page 16: Replace The Catalytic Converter/Exhaust Filter
Routine Maintenance Replace the Catalytic Converter/Exhaust Filter The converter filter core is disposable according to standard facility procedures. 1. Unscrew the converter element from the top of the housing and discard it. 2. Loosen the wing nut on the clamp holding the exhaust filter assembly on the vacuum pump, then open the clamp and remove the filter assembly. -
Page 17: Vacuum Pump Flush
Routine Maintenance Vacuum Pump Flush This procedure should be used ONLY if the drained pump oil was very dirty. It is not a regular PM procedure. 1. Turn OFF the pump and reference the “Replace Vacuum Pump Oil” procedure to drain the used pump oil. 2. -
Page 18: Pm Main Menu
Routine Maintenance PM Main Menu Enter the deep edit mode as shown in Module 6. PM WARNING = ON (or) OFF OPEN(chng)- CANCEL(next) ON or OFF indicates the state of the Planned Maintenance warning feature. When this feature has been turned OFF, no messages related to performing planned maintenance are generated. - Page 19 Routine Maintenance The Y changes to N automatically when a PM is due. The level of PM due is indicated on the printout after a cycle has been completed, and on the display in the idle state. You can reset the N to Y by pressing OPEN DOOR;...
- Page 20 Routine Maintenance 1. Press OPEN DOOR to change the displayed interval to the next available option, based on the PM Level 1 duration. The PM Level 2 interval can be only 1, 2 or 3 times the PM Level 1 duration, with a range of 500 to 4000 cycles.
-
Page 21: Pm Level 2
Routine Maintenance PM Level 2 The STERRAD Sterilizer requires limited maintenance activity after 1500 cycles (PM1) have been completed and more extensive maintenance after 3000 cycles (PM2). PM2 is performed when the 1500 cycle interval is reached or at one year. Remember: some sterilizers may have older parts. -
Page 22: Replace The Hepa Filter
Routine Maintenance 8. During the test, the pressure displayed on the LCD should remain stable. This is the value of the Baratron. The zero pot should be adjusted to equal the value measured by the TM-20 vacuum gauge. 9. After completion of the test, remove the gauge and re-assemble the vacuum pump. -
Page 23: Clean Injector Pump Platen Surface
Routine Maintenance 1. Reinstall the panels and reconnect the cassette door assembly cable. 2. Return the door to the normal position. Clean the rear surface of the door with deionized water. 3. Close the chamber door. Close the storage drawer. Clean Injector Pump Platen Surface 1. - Page 24 Routine Maintenance 1. The Y changes to N automatically when a PM is due. The level of PM due is indicated on the print-out after a cycle has been completed, and on the display in the idle state. You can reset the N to Y by pressing OPEN DOOR;...
- Page 25 Routine Maintenance 1. Press OPEN DOOR to change the displayed interval to the next available option, based on the PM Level 1 duration. The PM Level 2 interval can be only 1, 2 or 3 times the PM Level 1 duration, with a range of 500 to 4000 cycles.
-
Page 26: As Needed Maintenance
Routine Maintenance As Needed Maintenance The following items are serviced on an “as needed” basis and should be checked at both the Level 1 and Level 2 PM intervals. • Change the cassette collection box. • Replace the injector valve vaporizer plate. •... - Page 27 Routine Maintenance WARNING! AVOID HANDLING USED CASSETTES. IF IT IS NECESSARY TO HANDLE A USED CASSETTE WEAR LATEX, PVC (VINYL), OR NITRILE GLOVES . DO NOT TOUCH GLOVES TO FACE OR EYES. DISPOSE OF THE CASSETTE COLLECTION BOX IN REGULAR TRASH OR FOLLOW HOSPITAL PROCEDURES.
-
Page 28: Replacing The Vaporizer Plate
It also helps keep the load and the chamber clean. Operation of the STERRAD 100S Sterilizer without the vaporizer plate in place may result in hydrogen peroxide remaining on the load after a successfully completed cycle. - Page 29 Routine Maintenance 2. Reach into the sterilizer and grasp the protruding end of the vaporizer plate that is closest to you. Pull firmly on the plate; outward and downward so that the lips of the plate unhook from the electrode. You may also want to squeeze the plate slightly and move it outward and downward.
-
Page 30: Replacing The Printer Ribbon Rolls Or Cartridge
Routine Maintenance Make sure the plate is correctly placed before using the sterilizer. Figure 9. Replacing the Printer Ribbon Rolls or Cartridge To replace the printer ribbon rolls, do the following: 1. Open the printer drawer on the control panel. Figure 10. - Page 31 Routine Maintenance Figure 12. Unrolling the ribbon before mounting the second roll. 4. Hold back the right security clip and insert the other roll into the printer. 5. Turn the right roll clockwise to remove any slack from the ribbon. 6.
-
Page 32: Replacing The Printer Paper
Routine Maintenance 5. Turn the knob on the cartridge clockwise to remove any slack from the ribbon. Figure 15. Removing slack from the printer ribbon. 6. Close the printer drawer, taking care to ensure that the printer paper exits the printer paper slot. Figure 16. - Page 33 Routine Maintenance Figure 18. Placing a new paper roll into the retaining slots. 4. Insert the new paper roll so that the paper feeds from the back of the roll. Set the rod in the metal retaining clips. 5. Make sure the paper is smooth and the edge is cut clean. 6.
- Page 34 Routine Maintenance Figure 20. Removing the take-up reel containing the yellow backup copies. 2. Hold the black side of the take-up reel in one hand and, with the other hand, pull off the metal side of the reel. Figure 21. Removing the metal side of the take-up reel. 3.
- Page 35 Routine Maintenance Figure 23. Placing a new paper roll into the proper position. 7. Feed the edge of the paper roll under the metal rod located just behind the paper roll. 8. Feed the edges of both the white and yellow papers into the slot behind the printer.
-
Page 36: Resetting The Date And Time
Resetting the Date and Time The STERRAD 100S Sterilizer is set-up at installation by a Field Service Engineer to display the time in 12- or 24-hour mode. Be sure to let your engineer know the time method you prefer. You also can change the date ®... - Page 37 Routine Maintenance and time as needed. (Change the date and/or time BEFORE starting a cycle.) To change the date, do the following: 1. Open the sterilizer door. 2. Press START and CANCEL at the same time. 3. The message screen shows the date: DATE = MON 02/14/99 4.
-
Page 38: Setting Pressure Units
Routine Maintenance 8. Press OPEN DOOR to change the displayed seconds. 9. Press CLOSE DOOR to accept the desired seconds. The display changes to date. 10. At the same time, press START and CANCEL to exit the time and date editor. Clock Mode 1. -
Page 39: Using The History Menu
Routine Maintenance Using the History Menu The history menu allows you to print any or all of the following: • A report of the last 10 cycle cancellations. • A report of the last 10 barcode read failures. • A report of the RF reflected power level. •... -
Page 40: Cleaning The Sterilizer
Routine Maintenance Cleaning the Sterilizer The outside surfaces of the STERRAD 100S Sterilizer can be cleaned with a mild detergent. The inside of the sterilization chamber does not normally require cleaning. The chamber door and the chamber should not be cleaned with an abrasive, such as a wire brush or steel wool. If you have any questions regarding cleaning the STERRAD 100S Sterilizer, call the ASP Customer Care Center at 1-888-STERRAD. -
Page 41: Chapter 4. Technical Data
Chapter 4. Technical Data Physical Specifications System Dimensions Dimensions 765 mm W x 1660 mm H x 1020 mm D (30" W x 65.5" H x 40" D) Appearance FED color specification #26408 Block 2 has a custom color Weight Approximately 325 Kg (700 lbs) Shipping Weight Approximately 350 Kg (750 lbs) -
Page 42: Environmental Conditions
Technical Data Environmental Conditions Transport and Storage Ambient Temperature -40° to +70° C (-40° to 158° F) Relative Humidity 10 to 100% including condensation Atmospheric Pressure 500 hPa to 1060 hPa Operation Ambient Temperature +10 to 40° C (50 to 104° F) Altitude -100 to 3000 m above msl (-330 to 10,000 ft above msl) Relative Humidity... -
Page 43: Electrical Requirements
Technical Data Electrical Requirements Voltage Specification IMPORTANT WARNING! Prior to relocating the sterilizer to a new power source, electrical phase rotation should be checked by a qualified technician. Failure to verify phase rotation may cause damage to the system and void the warranty. 208V 60 Hz Power For versions employing 208V, 60 Hz power, the sterilizer 200V and 208V (Block 2) -
Page 44: Thermocouples
Technical Data Thermocouples Thermocouples Measurement Location 42°-50° C Top of chamber behind injector valve 42°-50° C Bottom of chamber near door 42°-50° C Middle of door 42°-50° C Edge of door Standards Agency Description EPA/OSHA Maximum hydrogen peroxide ambient concentration: less than 1 PPM (8 hour weighted average).
Need help?
Do you have a question about the STERRAD 100S and is the answer not in the manual?
Questions and answers