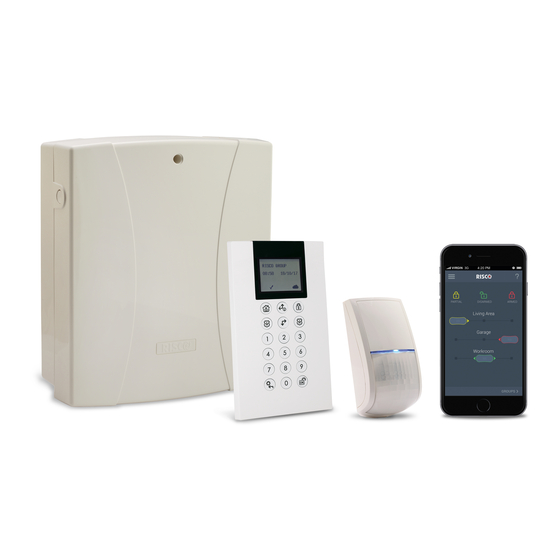
Risco LightSYS 2 User Manual
Hide thumbs
Also See for LightSYS 2:
- Quick installation manual (28 pages) ,
- Quick user manual (12 pages) ,
- Installation and programming manual (256 pages)
Table of Contents
Advertisement
Advertisement
Table of Contents

Related Manuals for Risco LightSYS 2


Summary of Contents for Risco LightSYS 2
- Page 1 LightSYS 2 User Manual...
- Page 2 Register with RISCO Cloud (if enabled) Registering with RISCO Cloud enables you to monitor and control your LightSYS™2 system. Note: Registration and connection of your system to www.riscocloud.com may depend on your installer. Go to www.riscocloud.com/register. Enter your first name and last name.
- Page 3 Scroll to “Panel ID” and press . 15 digit Panel ID is now displayed. Interface: LCD Keypad (432KP) Full (Away) Arm Code > Part (Stay) Arm Code > System Disarm and Silence an Alarm Code> Partition Away Arm Code > >...
- Page 4 Status Request Press for 2 seconds Press for 2 seconds to view to view followed by code LED display of system status (see LED display of system Indicators below) status (see Indicators below) Press 1/2/3 for 2 seconds Output Control Press 1/2/3 for 2 seconds followed by code Wake up keypad...
- Page 5 2-way Remote Control keyfob Notes: Operation Quick High Security Mode 1. Consult your Full Arm > [Code] Partial > [Code] Arm* Full > [Code Disarm System for 2 seconds > for 2 seconds Status Code for 2 for 2 Output Control A/B/C seconds seconds >...
- Page 6 Page 6...
- Page 7 SETTINGS sub-tab System user and codes Edit, Delete and ADD NEW USERs Web interface users and codes EDIT user fields and access credentials Change Password Enter Old/New/Confirm > SET NEW PASSWORD Quick Zone Bypass Select ZONE xx > Omit > Update Change Appearance Select Color Scheme Alerts/Add New Contact...
- Page 8 Utility Full Arm [Code][A], example, 1234A Outputs Toggle Full Disarm [Code][D], example, 1234D ON/OFF > Update Stay Arm [Code][H], example, 1234H Partition Arm [Code][A] [Partition No.] examples: To arm partitions 1: 1234A1 To arm partitions 1 and 2: 1234A12 Partition Disarm [Code][D] [Partition No.] Example 1234D1 1-way Remote Control keyfob Full Arm...
- Page 9 (Ready): Rapid Flash Alarm On Ready to arm Off : Not ready to arm (Tamper) : ( Proximity [ Touchscreen only] On Tamper alarm Flashing: Indicates keypad has a Off No tamper alarm proximity reader 2- way Slim Keypad LED Indicator Color State Status...
-
Page 10: Table Of Contents
Flash: Fire trouble Operation LED* (Send command) LED* (Receive Status) Full Setting (Away) Green Part Set (Stay Arm) Green Orange Unset (Disarm) Green Green Alarm Green Flash LED * If the LED changes to orange, it indicates a low battery condition. Table of Contents Chapter 1 Mastering Your System ................. - Page 11 Appendix D – SMS Operation................. 53 Appendix E – System Testing and Maintenance ..........55 Page 11...
-
Page 12: Chapter 1 Mastering Your System
Mastering Your System Chapter 1 Introduction Congratulations on your purchase of RISCO Group's LightSYS™2 Security System. The LightSYS™2 has been specifically designed to meet a wide range of security needs for residential and commercial applications. LightSYS™2 is designed to recognize abnormal conditions and inform the system of the status of any protected door, window, hallway, room, or area. -
Page 13: Lightsys™2 Architecture
Mastering Your System LightSYS™2 Architecture Your LightSYS™2 controls and monitors a variety of sensors, detectors, and contacts placed throughout the premises, which provide external, perimeter and internal burglary protection. The system is supervised, meaning that the panel checks the status of each sensor to detect problems. If trouble is detected, you are notified both with panel beeps and indicator lights as well as remote messaging. - Page 14 LightSYS™2 system from any location. As with the Smartphone app, the application is powered by the RISCO Cloud server. Note: Registration and connection of your system to www.riscocloud.com may depend on your installer 4 Button Keyfob: Using the wireless 4 button keyfob you can arm, disarm, send a panic alarm and activate outputs.
-
Page 15: System Monitoring
5IN1545 LightSYS Voice Module Programming and Operations Guide. SMS: If your system is equipped with RISCO Group's GSM/GPRS module it can provide information about the system by SMS and enable operation of the system using SMS commands for arming the system, disarming the system and more. - Page 16 Mastering Your System Caution: Remember that no security system can prevent emergencies. This system is only intended to alert you in case of an emergency and should not take the place of prudent security practices or life and property insurance. Follow Me Messaging When an alarm or event, the system can initiate a report message of up to 16 predefined designated destinations using a voice announcement, SMS, smartphone app, or email to...
-
Page 17: System Tones
Mastering Your System S: Partition Stay Armed R: Partition Ready LCD Blank Display If defined by your installer, two minutes after the last keypad operation the keypad will be disabled and the following display will appear on the LCD: Enter code: To release the keypad and return to normal operation mode press: [CODE] + Note: During blank display mode the Ready LED indicates a trouble in the system. - Page 18 Mastering Your System Reject Operation Three rapid error beeps, No sound No sound if incorrect (2,3) Entry Delay Slowly repeating tones No sound No sound until the entry delay time Countdown period expires (2) Exit Delay Slowly repeating tones No sound No sound until the exit delay time Countdown...
-
Page 19: Chapter 2 Arming And Disarming
Arming and Disarming Chapter 2 Arming and Disarming The following chapter describes how to operate your LightSYS™2 locally from the LCD keypad. For system operation from other accessories, refer to the instructions supplied with the product. As a user of your security system, you'll mostly be concerned with the keypad. The LightSYS™2 LCD keypad is the primary system interface. - Page 20 Arming and Disarming • If you are unable to arm the system, press to view system messages. • If defined by your installer, your system can be defined to accept force arming. This definition arms the system regardless of open zones when using a keyswitch or automatic arming.
- Page 21 Arming and Disarming the icon lights • indicating that the interior zones are being bypassed. When the exit delay time period has expired, the icon lights steadily. Notes: 1. Press to cancel the Entry Delay time period for the current STAY arming. 2.
- Page 22 Arming and Disarming To arm partitions 3 and 4: • 1-2-3-4 To arm partition 3 in stay mode: • 1-2-3-4 Notes: Keypads and Partitions — Each keypad is assigned to different partition(s). The grand master and the manager (with access to all partitions) can use any keypad to access any partition.
-
Page 23: Disarming Your System
Arming and Disarming For example, to arm group C, enter: [Code] [ for two seconds] [Partition No] [ for two seconds]. To arm another group, repeat above steps . Note: If your system supports Quick Arming, press the function key for two seconds corresponding to the group(s) you want to arm. - Page 24 Arming and Disarming When you enter the premises, the entry delay count-down period begins. You must disarm the system within the entry delay period to prevent it from triggering an alarm. The disarming operation will be followed by a local message announcement (if defined). LightSYS™2 disarming varieties include the following: Full Disarming If outside the premises, open an "entry"...
- Page 25 Arming and Disarming Observe the keypad. If the icon is flashing, and the display shows the activated partition, an alarm activation has occurred. Pressing the key will show the activated partition and zone. Hold the tag close to the keypad's keys OR enter your user code and press .
- Page 26 Arming and Disarming Resetting after an alarm Your installation company can configure the reset of the system to a normal operation mode to require the intervention of your monitoring station or installer. In this case, after an alarm condition, the system will be regarded as not ready and the display will show a Call Installer message.
-
Page 27: Additional Arm/Disarm Capabilities
Arming and Disarming Under no circumstances must the duress code be used haphazardly or without reason. Central stations, along with police departments, treat duress codes very seriously and take immediate action. Disabling a Fire Alarm (Switch Auxiliary) Unsetting the fire alarm interrupts the power supplied to the system's smoke detector(s) for a predetermined interval, thus resetting and "readying"... -
Page 28: Emergency Alarms
Arming and Disarming Emergency Alarms Your keypad provides three sets of emergency keys, which can be pressed whenever the police, fire department, or auxiliary assistance is required. Police Emergency Pressing simultaneously, and for at least seconds, activates a police emergency alarm (panic alarm). -
Page 29: Chapter 3 User Functions And Settings
User Functions and Settings Chapter 3 User Functions and Settings Your LightSYS™2 comes with a variety of selectable user functions that become available when you enter the User Functions mode. This chapter describes in detail the most frequent user functions and also lists the complete menu of user functions. To enter the User Functions mode, press and enter your code followed by... - Page 30 This code can be changed by the installer or the grand master. Notes: Your LightSYS™2 was given a grand master code of 1-2-3-4 during manufacturing. RISCO advises that you modify this code to one that is unique and personalized as herein described, unless your alarm company has already done so.
- Page 31 User Functions and Settings Setting / Changing User Codes The user assigned the grand master authority level can change all user codes but cannot view the digits in the user code fields. Users with other authority levels can only change their own codes.
-
Page 32: Proximity Tags
User Functions and Settings User Code Labels You can rename the labels that identify users by changing the default labels (User 1, User 2, and so on) to the names of the users themselves. To enter a user label: Follow steps 1-4 of the previous procedure (See Setting/Changing User Codes) Scroll to Edit Label. - Page 33 User Functions and Settings To add a new proximity tag: Press and enter your code followed by Using the arrow keys, scroll to the option Codes/Tags and press Scroll to Define and press Select the user to which you want to assign the proximity tag and press .
-
Page 34: Setting And Changing System Time And Date
User Functions and Settings Toggle Y or N by using the key and then pressing . If you select Y, the following confirmation message is displayed: USER XX: TAG DELETED To delete a proximity tag by user tag: Press and enter your code followed by Using the arrow keys, scroll to the option Codes/Tags and press Scroll to Del By Tag and press Within 10 seconds, approach the proximity tag at a distance of 4 cm. -
Page 35: Bypassing Zones
User Functions and Settings Press and enter your code followed by Using the arrow keys, scroll to the option Follow Me and press Select the Follow Me index number you want to define and press The display will show Destination. Press Enter the phone number, including the area code (if required) or email address. -
Page 36: Scheduling Weekly Programs
User Functions and Settings Warning: A bypassed zone may reduce the system's security capability. To view Not Ready zones: Before performing the following procedure, identify the violated zone(s) as follows: Enter your user code followed by Scroll down with the key to view all "not ready"... - Page 37 User Functions and Settings User Limitation: A user limitation program automatically prevents certain users • from disarming the system during specified time intervals. Up to four scheduling programs can be defined. Use the table in Appendix C – Scheduling Tables to define your date. Automatic Arming/Disarming Press and enter your code followed by...
-
Page 38: Macro Keys
User Functions and Settings The Vacation option for the UO scheduling program defines the way in which the group of UOs are activated during a vacation: N: During vacation, UOs are activated in the same way as defined in the time windows of the week. - Page 39 User Functions and Settings Before programming a function key, it is recommended to note the keystroke sequence. These keys will be entered in the form of characters in step 5 (below) of the procedure for programming the macro key. For example, to arm partitions 1 and 2 in a 3-partitioned system, you would press the following keys in step 5: [Code] This example requires the following sequence of characters: 1234r12r To program a Macro:...
-
Page 40: Parking Control With Lightsys™2 Gate Control Keyfobs
User Functions and Settings Parking Control with LightSYS™2 Gate Control Keyfobs If your system is equipped with a wireless expander it can support up to 200 keyfobs that can be used for controlling two outputs for gate and parking control. These keyfobs are additional to the keyfobs that can be used to control the security applications of the system. - Page 41 User Functions and Settings Change keyfob buttons that controls the outputs By default, button 3 (small round key) of the keyfob controls output 1 and button 4 (egg shape) controls output 2. This can be changed for all the keyfobs that are already assigned to the wireless receiver.
-
Page 42: Complete List Of User Functions
User Functions and Settings Complete List of User Functions This section lists the complete menu of user functions. The following table shows full Keypad Operations according to users. √ : User is able to perform this function (GM=grand master or master, U=user, and In.=installer) –... - Page 43 User Functions and Settings Consult with your installer as to which outputs can be activated. If no outputs are defined, this option will not appear on the list. Menu Structure Keypad Sound √ √ √ Chime Keypad Chime—Allows to control (turning ON and OFF) of the current keypad's internal sounder for any function involving the Chime feature.
- Page 44 User Functions and Settings Reset SIM: After charging a prepaid SIM card, the user has to reset the SIM expire time manually. The time period duration for expiration is defined by your installer. Menu Structure User call: Use this function to receive the SIM credit level using the voice channel.
- Page 45 User Functions and Settings Overload restore: Use this option to restore overloading of the system’s switched power supply. If the overload condition is still present, disconnect all loads from AUX. Follow Me Define √ √ Destination: Used to define (up-to-16) Follow Me destinations according to its type: Voice message, SMS or E-mail.
- Page 46 System Version The installed firmware version of LightSYS™2. Serial Number The 11-digit number used by the cloud to identify the panel Panel ID The 15-digit number used by the end-user for self- registration to the RISCO cloud (See page 2) Menu Structure IP Address √...
- Page 47 User Functions and Settings Codes: Edit Code— Use this menu to edit user codes in the system. For detailed information refer to page 31. Erase Code — Use this menu to delete user codes in the system Proximity Tag: (Re)write Tag— Assigns user codes to proximity tags. For detailed information refer to page 30 Delete Tag—...
- Page 48 User Functions and Settings Allows the viewing of significant system events including date time. Notes: The events memory cannot be erased . To skip 10 event at a time backward or forward use the keys consecutively . Maintenance Walk test √...
-
Page 49: Appendix A - System Troubles
Appendix A – System Troubles The following table lists possible trouble conditions, their descriptions, and recommended responses. Trouble Description Response Low Battery The capacity of the battery is low or Contact your dealer. missing and needs to be recharged or replaced. -
Page 50: Appendix B - Glossary
Bell Trouble Trouble has been detected in a bell Contact your dealer. connected to the main panel or to the power supply expander. Zone Trouble A zone has been faulted during the Check the integrity of the arm/disarm period. indicated zone. Day Zone Trouble A zone designated as a DAY ZONE has Check the integrity of the... - Page 51 Follow-Me Destinations: In addition to the standard event reporting to the monitoring station, the system can send event messages to a designated system user's telephone/email. Group: A number of zones gathered as one unit to allow partial arming. Each zone can be assigned to any one (or a combination) of four groups (A, B, C or D).
-
Page 52: Appendix C - Scheduling Tables
more smoke detectors. Such zones are called fire zones. An environmental zone typically protects the premises from gas leaks and/or flooding. Appendix C – Scheduling Tables Use the following table to define each of the weekly schedules. Weekly Schedule: _________ Schedule Name: __________ Schedule Type Parameter Definitions... - Page 53 1st UO No:_________ 3rd UO No:_________ Utility Output 2nd UO No:________ 4th UO No:_________ For the UO weekly schedule, you can Note: define a separate time definition during vacation. User # Name User # Name User Access Authorization You can choose any user in the system.
- Page 54 Note: This application is available only if a GSM/GPRS module is installed in your system. Operation SMS Message Structure Example Full Away Arm [Code] A 1234A Home Arm [Code] H 1234H Group Arm [Code][G][Select a one Group 1234GA A/B/C/D]) Full disarm [Code] D 1234D Arm by partition...
- Page 55 Important Notice This guide is delivered subject to the following conditions and restrictions: This guide contains proprietary information belonging to RISCO Group. Such information is supplied solely for the purpose of assisting explicitly and properly authorized users of the system.
- Page 56 The information contained herein is for the purpose of illustration and reference only. Information in this document is subject to change without notice. Corporate and individual names and data used in examples herein belong to their respective owners Page 56...
- Page 57 RISCO, for a period of (i) 24 months from the date of delivery of the Product ( the “Warranty Period”). This Limited Warranty covers the Product only within the country where the Product was originally purchased and only covers Products purchased as new.
- Page 58 RISCO in conjunction with the Product (with or without the RISCO brand), including, but not limited to system software, as well as P2P services or any other service made available by RISCO in relation to the Product, are not covered under this Limited Warranty. Refer to the Terms of Service at: https://riscocloud.com/ELAS/WebUI/UserLogin/License for details of your rights and...
- Page 59 COPYRIGHT, TRADEMARK, TRADE SECRET OR OTHER INTELLECTUAL PROPERTY RIGHT IN ANY EVENT RISCO SHALL NOT BE LIABLE FOR ANY AMOUNTS REPRESENTING LOST REVENUES OR PROFITS, PUNITIVE DAMAGES, OR FOR ANY OTHER INDIRECT, SPECIAL, INCIDENTAL, OR CONSEQUENTIAL DAMAGES, EVEN IF THEY WERE FORESEEABLE OR RISCO HAS BEEN INFORMED...
- Page 60 RISCO product was purchased from © 2017 RISCO Group. All rights reserved.
- Page 61 5IN2052 C RISCO Group 11/2017...
Need help?
Do you have a question about the LightSYS 2 and is the answer not in the manual?
Questions and answers