Table of Contents
Advertisement
Quick Links
Advertisement
Table of Contents

Related Manuals for Risco LightSYS 2 Series


Summary of Contents for Risco LightSYS 2 Series
- Page 1 Installation and Programming Manual ...
- Page 2 Important Notice This guide is delivered subject to the following conditions and restrictions: This guide contains proprietary information belonging to RISCO Group. Such information is supplied solely for the purpose of assisting explicitly and properly authorized users of the system. No part of its contents may be used for any other purpose, disclosed to any person or firm, or reproduced by any means, electronic or mechanical, without the express prior written permission of RISCO Group. The information contained herein is for the purpose of illustration and reference only. Information in this document is subject to change without notice. Corporate and individual names and data used in examples herein belong to their ...
-
Page 3: Table Of Contents
Table of Contents Chapter 1 Introduction What is LightSYS2? ..................... 9 LightSYS2 Architecture and Capabilities ............... 11 LightSYS2 Features .................... 12 LightSYS2 Communication Methods .............. 17 Channels ......................... 17 Reporting Destinations and Clients ................ 18 Cloud Communication .................... 18 Chapter 2 Mounting and Wiring LightSYS2 installation steps .................. 22 Choosing the mounting location ................. 22 Wall Mounting the LightSYS2 Box ................. 23 AC adaptor and main board .................. 23 Main Board Wiring ...................... 26 Main Board — Bus Connection ................ 26 ... - Page 4 Wireless Expander ...................... 45 1.5 and 3A Switching Power Supply Expansion Modules ........ 46 Digital Voice Module .................... 51 Sounders ......................... 53 ProSound ...................... 53 Lumin 8 ......................... 54 Connecting Bus Detectors ..................... 54 Single Zone Expander .................... 55 Completing the Installation .................. 58 Chapter 4 Installer Programming Programming Methods .................... 59 Configuration Software .................... 59 PTM: Data Storing Device .................... 59 LCD Keypad ........................ 61 Keypad Programming Key Functions .............. 61 ...
- Page 5 Using the Installer Programming Menus ............... 68 Installer Programming Menu Conventions ............... 68 1 System .......................... 69 Timers ........................ 70 Controls ......................... 74 Labels ........................ 90 Sounds ........................ 90 Settings ........................ 92 Automatic Clock .................... 93 Service Information ..................... 94 Firmware Update .................... 94 2 Zones .......................... 95 Parameters ...................... 95 Zones: Parameters: One By One ............. 95 ...
- Page 6 PSTN ...................... 142 GSM ...................... 144 Timers ....................144 Controls ................... 148 Parameters ..................148 Prepay SIM ..................149 IP ....................... 150 IP Config ..................150 Email ....................151 Host Name ..................151 MS Keep alive (Polling) ..............151 ...
- Page 7 Sounder ....................... 199 Proximity Key Reader .................. 205 3A Power Supply .................... 206 Chapter 5 Using the Installer Non‐Programming Menus Activities Menu ...................... 207 Follow Me ........................ 207 View Menu ........................ 208 Clock Menu ........................ 209 Event Log ........................ 209 Maintenance ......................... 209 Macro .......................... 211 Stand Alone Keyfobs .................... 211 Appendix A Technical Specifications Appendix B LightSYS2 Accessories ...
- Page 8 Table of Figures Figure 1-1 LightSYS2 Architecture ..................... 10 Figure 1-2 LightSYS2-supported Keypads ................ 14 Figure 2-1 Box clip release ...................... 23 Figure 2-2 Mounting screw template .................. 23 Figure 2-3 Placing the AC adapter with mains fuse .............. 24 ...
-
Page 9: Chapter 1 Introduction
Introduction Chapter 1 Introduction This chapter provides a basic introduction to the LightSYS2 system and its architecture and capabilities, as described in the following sections: What is LightSYS?, below LightSYS2 Architecture and Capabilities, page 11 LightSYS2 Features, page 12 What is LightSYS2? LightSYS™ 2 hybrid security system offers Smartphone App control and communication flexibility as well as your choice of wired, 2‐way wireless, or RISCO Bus detectors. The Smartphone App transforms the security system into an appealing gadget for home and small business owners 2‐way wireless sounders, slim keypads and detectors ease your installation and enhance your offering RISCO Bus saves you cabling and labor costs and enables remote service, as detectors are installed in series on the system Bus and can be remotely configured and diagnosed. Communication flexibility includes IP, GSM/GPRS, PSTN and Long Range Radio, all installed within the main housing LightSYS2 provides monitoring and supervision for up to 32 zones. Through its 4‐wire bus it can support a variety of optional modules including: assorted keypads, proximity key readers, zone expanders, interactive voice module, 868/433 MHz wireless expansion, supplement power supply, utility outputs and numerous bus detectors. LightSYS2 features integrated multiple‐path reporting, including a Cloud channel and integrated plug in IP module for IP communication, plugin GSM/GPRS modules for advanced cellular communication all in one box, and an IP/GSM receiver package for monitoring stations (MS). LightSYS2 provides a new level of remote service and installation convenience, with unique remote diagnostic capabilities, Auto‐Install™ technology and bus test which checks communication quality of the bus and enables pinpointing intermittent wiring faults. ... -
Page 10: Figure 1-1 Lightsys2 Architecture
Introduction Featuring remote management, advanced communication, simple installation, and a comprehensive range of peripherals, LightSYS2 is the ideal hybrid solution for your residential and small commercial requirements. This LightSYS2 Installation and Programming Manual details how to install the LightSYS2 hardware and to program the LightSYS2 main panel, as described in the following main steps: ♦ Step 1: Mounting and Wiring the Main Panel (Chapter 2) ♦ Step 2: Identifying, Mounting and Wiring Keypads and Expansion Modules (Chapter 3) ♦ Step 3: Programming the LightSYS2 (Chapters 4 and 5) Note: While this manual describes all of the above steps, the section on programming the main panel comprises the bulk of the information, as it covers all the programmable functions that can be performed using the keypad. Figure 1-1 LightSYS2 Architecture Page 10... -
Page 11: Lightsys2 Architecture And Capabilities
Introduction LightSYS2 Architecture and Capabilities Feature LightSYS Zones 8 – 32 wired, wireless or RISCO bus in any combination Partitions 4 Groups per partition 4 Zone resistance Fully selectable Programmable outputs 4 onboard expandable to 14 User codes 16 Event log 500 Keypads 4 wired/wireless (one‐and two‐way) Wireless keyfobs 16 multi‐functional + 200 stand‐alone Proximity key readers 8 Follow‐me numbers 16 PSTN onboard Communication Plug‐on IP module or fast modem Plug on GSM/GPRS or integrated KP long range radio Long range radio Cloud‐based Account Numbers 4 Additional inputs Bell tamper, box tamper Max Current ... -
Page 12: Lightsys2 Features
Introduction LightSYS2 Features Main Panel The main panel is the foundation of the systemʹs operation and has the following features: 8 basic hardwired zones 4 Utility Outputs: 1 x relay (programmable output) (3 Amps) 3*100mA opto‐relays Box tamper input (normally open) Bell tamper input (using a 2.2KΩ end‐of‐line resistor) 4‐wire bus with ʺquick connectorʺ from the main panel. Power for the operation of an external sounder Offers the required type of voltage for one or more electronic sirens, bells, or loudspeakers, respectively Supports more than 25 zone types 4 zone terminations, including: closed‐circuit (NC), open‐circuit (NO), end‐of‐line (EOL) resistors, and double end‐of‐line (DEOL) resistors Configurable zone resistance 500 Event log on board Polycarbonate plastic (1.5 A) or metal (1.5 or 4A) Zone Expansion Support for additional 24 wired / wireless zones Zones expansion using 8‐Zone wired expander (Max 3 expanders) or Bus Zones expander Bus zones support (maximum 32) Up to two wireless 868MHz or 433MHz expansion modules 4 zone terminations, including closed‐circuit (NC), open‐circuit (NO), end‐of‐line (EOL) resistors, double end‐of‐line (DEOL) resistors Configurable zone resistance Supports more than 25 zone types Forced setting zone capability Wireless Capabilities Up to two WL receivers per LightSYS2 system The wireless expansion module includes the following features: Up to 32 supervised wireless zones (bus mode) Up to 16 multi‐function keyfobs (bus mode) Up to 200 stand‐alone keyfobs (bus and stand‐alone modes) ... - Page 13 Introduction Signal‐jamming detection Programmable supervision time Threshold‐level calibration Tamper detection Transmitter’s low battery detection Transmitter supervision Nominal center frequency: 868.65 MHz or 433.92 MHz Can be installed inside or outside the LightSYS2 main enclosure When using wireless zones, the LightSYS2 Wireless expansion modules respond to different wireless detectors, such as: Smoke detectors Door contacts/Door magnet/universal transmitter/door contact +universal Up to 16 rolling code 4‐button keyfobs Double key panic keyfob Flood detector Shock detectors CO detectors Gas detectors Glassbreak detectors Internal and External PIR/PET and WatchOUT detectors Partitions/Areas Up to 4 independent partitions/areas Any zone can be assigned to any partition/area Each partition/area supports both zone sharing and cross zoning Groups Groups are combined zones within a partition/area that are used for partial arming. Up to four groups of zones can be defined for each partition/area. Group arming and setting is performed by using the function keys on the keypad, smartphone or via the web (A, B, C, and D) or by SMS or keyfob. Each keypad key represents a different group of zones. Each zone can be assigned to any of the four groups Users can arm any of the four groups individually Page 13...
-
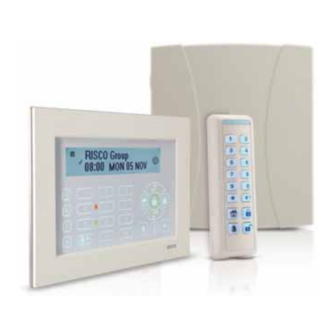
Page 14: Figure 1-2 Lightsys2-Supported Keypads
Introduction Keypads The LightSYS2 can support up to four keypads, wired or wireless (1‐ and 2‐way) with a choice of different model styles. RP128KC 432KP RP128KP RW132KL1P Figure 1-2 LightSYS2-supported Keypads Each keypad is equipped with: Three emergency key zones (panic, fire, and emergency) The ability to produce a duress (ambush) code Optional proximity tags (different part number) Double tamper‐protection (box and wall) Internal buzzer Audible feedback for keypad operations Easy‐to‐use hot‐key sequences for simple zone bypassing A one‐key quick‐arm feature for both ʺStayʺ and ʺAwayʺ In partitioned systems, keypads can be selectively assigned to specific partitions Four function keys (A,B,C,D) can be programmed to carry a sequence of commands With this version, LightSYS2 now supports a slim wireless bi‐directional keypad for end‐user output control and a function key (see page 197) User Codes and Authority Levels 1 installer code 1 sub installer code 1 Grand Master code Up to 16 user codes 8 authority levels Codes can be defined to 4 or 6 digits (By default 6 digits) Each user can be assigned with a proximity tag or keyfob Page 14... - Page 15 Introduction Programmable Utility Outputs Supports additional 10 outputs (to the 4 on the main board) 4‐relay, 8‐transistor or 2 relay (WL expander or 3A power supply expander) expansion output modules Outputs operation follows system events, codes or scheduling programs Output can follow up to 5 zone events (All/Any definition) X‐10 Module: The LightSYS2 also supports the connection of an X‐10 Transmitter module to its 4‐wire expansion bus. X‐10 technology converts the LightSYSʹs programmable output events into a protocol understood by the transmitter module. When triggered, this module generates activation and control signals along existing AC premises wiring to the appropriate X‐10 receiver modules, placed and connected within the premises to control lighting and appliances. X‐10 transmitter modules are available for the LightSYS, supporting either 8‐ or 16‐premises receiver modules Advanced Digital Voice Module The Advanced Digital Voice module provides audible information about the status of your LightSYS2 system and enables any remote, touch‐tone (DTMF) telephone to act as a keypad for the system. The advanced digital voice module can be used in the following situations: Upon event occurrence, such as alarm activation, the advanced digital voice module informs you of a security situation, such as intrusion or fire, by calling you and playing a pre‐recorded event announcement. You can then acknowledge the event and remotely operate the system. Remotely operating the system, which includes: Partition arming and disarming Zone bypassing UO activation/deactivation Changing follow‐me numbers Performing listen and talk options Recording opening messages or zone descriptors 3A or 1.5A Power Supply Expansion Module Although the LightSYSʹs main panel provides 800mA of auxiliary power (500mA for Bell), the ...
- Page 16 Introduction Scheduling Through the use of the systemʹs built‐in clock, it is possible to automate system operations at the same time on selected days of the week or at a specific time within the subsequent 24‐ hour period or during vacation periods. The system operations include: Scheduling automatic arming and disarming (of one or more partitions). Scheduling automatic operation of utility outputs. Restricting users from disarming during predefined time periods Event Logging The LightSYS2 has the capability of storing up to 500 significant events, including arming, disarming, bypassing, alarms, troubles, restorals, and resets. These events are logged in order according to date and time, and when applicable, according to zone, partition, area, user code, keypad, etc. When appropriate, such events can be displayed on an LCD keypad or uploaded to the MS via the Configuration Software. Advanced Installation Tools Auto Installation: For quick and easy installation, the system performs automatic installation of the modules connected to the bus. The system searches for the modules by automatically verifying their connection and operation through the bus‐ scanning feature and prompts the user to approve each module connection. The auto installation feature is performed automatically after defaulting the system or can also be performed manually. Self Monitoring The bus test enables the system to verify the connection and the operation of the modules connected to the bus by indicating the efficiency of each one on a 0‐ 100% scale. Each result is individually displayed on the LCD keypad (or via the Configuration Software). A watchdog feature, which periodically (every minute) and automatically performs a comprehensive self‐test and reports when operating faults are found. A maintenance mode which, when selected, performs an active self‐check on many of its components. One‐man walk testing capabilities, enabling an installer or technician to check the operation of each contact and detector which, when tripped, produce audible feedback and are visibly logged at the keypad from which the test was initiated. Page 16...
-
Page 17: Lightsys2 Communication Methods
LightSYS2 without the need for power. Local/Remote Configuration Software Remote software upgrade over IP False Alarm Reduction In an effort to deter false alarms, the LightSYS2 provides various programmable features, including the following: Cross zoning Swinger shutdown Audible/visual entry/exit delays Fire alarm verification Dialer delay before an alarm transmission Cancel report option Double knock Soak test Exit termination zone. LightSYS2 Communication Methods LightSYS2 communicates event reporting and state notification to monitoring stations or to home owners through a variety of channels and report frameworks, both directly and through the RISCO cloud. These same channels and frameworks can also be used to exert remote system and panel control for purposes of programming and maintenance. Channels The principal channels through which LightSYS2 communicates are: PSTN (On‐board) IP (To activate, see page 34) The LightSYS2 IP module is an easy‐to‐add plug‐in module that enables the system to communicate over IP networks for reporting, control and programming. It can be used as the primary communication channel, parallel channel or as a failure back up for the GPRS/GSM or PSTN communications. GSM/GPRS (To activate, see page 33) The LightSYS2 GSM/GPRS module is an easy‐to‐add plug‐in module that enables the system to communicate over GPRS/GSM networks for reporting, control and programming. It can be used as the primary communication channel, parallel channel or as a failure back up for the IP or PSTN communications. Long Range Radio (where available) Page 17... -
Page 18: Reporting Destinations And Clients
Introduction Reporting Destinations and Clients End‐User — The end‐user can use the smartphone app to full and partially alarm the system, individual groups (if supported) and partitions and to bypass detectors. Additional actions, available through the web interface, include quick zone bypasses and toggling of utility outputs. LightSYS2 supports a follow‐me feature in which the system can report to a homeowner at work, or to a business owner at home, that there has been an alarm at a specific location by voice message over the phone, SMS, Email or smartphone app. The GSM/GPRS module also supports two‐ way voice communication which has been found to be beneficial for elderly care, allowing two way communication with users in times of emergency Monitoring Station — LightSYS2 can report event packets directly and through the RISCO cloud, in any of the supported channels, to single or multiple alarm monitoring centers / central stations for purposes of alarm signal response and maintenance. LightSYS2 supports all major monitoring station transmission formats and protocols including ADEMCO Contact ID, SIA/IP and SIA level 1 with text over PSTN. Reporting can also be done via IP/GPRS, and over voice, SMS or GPRS using the RISCO IP Receiver software. Installer — As per system programming, installers can receive follow‐me reporting like that of the end‐user (see Chapter 5 Using the Installer Non‐Programming Menus). Similarly, installers can connect remotely to the panel for purposes of configuration, diagnostics, maintenance and testing using RISCO’s Configuration Software through any of the above channels directly or through the cloud. Cloud Communication RISCO Cloud is a proprietary application server which enables RISCO’s users and partners to enjoy the advanced features offered with several RISCO Group products. By maintaining an “Always On” connection to the intrusion panel via IP or GRPS, RISCO Cloud enables end users with self monitoring capabilities through Smartphone & Web Applications, and monitoring stations with more robust and redundant communication to their clients install base, to perform remote control and diagnostics. Additionally, installers can benefit from the seamless cloud connection (or directly via IP/GPRS/GSM) in communication with the panel using RISCO’s Configuration Software, for purposes of: Configuration Maintenance ... - Page 19 Introduction How does it work? Self Monitoring via Smartphone & Web Applications Self‐monitoring is a growing trend among alarm system owners as it gives them full control of their systems with or without the added cost of central monitoring stations. LightSYS™ 2 security system enables end‐users to be always connected and always in control of their system from anywhere in the world. Smartphone App: Home and small business owners can now enjoy the iRISCO Smartphone App for smart and easy control of their LightSYS™ 2 system. The revolutionary app enables users to arm/disarm the system on‐the‐go, view a history of events, activate home automation devices, bypass detectors, and view the system’s status and history, and much more. Available for iPhone, iPad and Android. Web Application: RISCO Group’s web application enables home and small business owners to monitor, control and configure their LightSYS™ 2 system via a web browser. In addition to the capabilities of the iRISCO Smartphone app, users can use the web application to register their system, add users and more. The application is powered by the RISCO Cloud server at www.riscocloud.com Page 19...
- Page 20 Introduction Cloud Communication Route RISCO Cloud institutes new communication route between the panel and the CMS more robust and redundant than ever before wither via IP or GPRS communication channels. RISCO cloud is available either as a private server or hosted by RISCO. Backup Mode Page 20...
- Page 21 Introduction Parallel Mode The cloud communication configuration and capabilities are as follows: Page 21...
-
Page 22: Chapter 2 Mounting And Wiring
Mounting and Wiring Chapter 2 Mounting and Wiring This chapter covers the installation and wiring of the LightSYS2 main unit. Due to its modularity, the specific component assembly will depend on your system configuration. The following assembly is presented in the recommended order. LightSYS2 installation steps The following workflow illustrates the recommended method for installing the LightSYS2. A detailed description is provided in the following sections of the manual. Create an installation plan. Mount the LightSYS2 to the wall. Plug in the AC adaptor and main board inside the LightSYS2 enclosure. Wire the main panel (zones, outputs etc.). Connect telephone line. Plug in communication modules. Allocate and connect bus expansion modules. Set dipswitches and jumpers on the main board and on the various expanders. Connect backup battery and AC power. 10. Perform automatic setting and complete system programming. Choosing the mounting location Before you mount the LightSYS, study the premises carefully in order to choose the exact location of the unit for the best possible coverage and yet easily accessible to expanders and accessories and prospective users of the alarm system. Among the mounting location considerations are the following: Centrality of location among all the transmitters. Proximity to An uninterrupted AC outlet. A communication (telephone/internet) outlet. Distance from sources of interference, such as: Direct heat sources Electrical noise such as computers, televisions etc. Large metal objects, which may shield the antenna. ... -
Page 23: Wall Mounting The Lightsys2 Box
Mounting and Wiring Wall Mounting the LightSYS2 Box The LightSYS2 is housed in a state‐of‐the‐art plastic enclosement, consisting of back and front panels and featuring a plastic click‐mounting for all internal components. To prepare the wall for box mounting Separate the sub‐assemblies by pressing the circular locking plastic brackets on either side to release the front cover. Figure 2-1 Box clip release Hold the mounting bracket against the wall as a template and mark the locations for the mounting holes (4 mounting holes and an additional optional hole for securing the tamper protection bracket item). Note: For mounting the LightSYS inside a metal enclosure ( RP432BM, RP432BM1) refer to the instructions supplied with the box. Figure 2-2 Mounting screw template Drill the desired mounting holes and place the screw anchors. AC adaptor and main board The LightSYS2 is powered by an AC/DC Adaptor 100‐240V 50/60Hz 14.4V— 1.5A. Caution: AC wiring should be done by a certified electrician ... -
Page 24: Figure 2-3 Placing The Ac Adapter With Mains Fuse
Mounting and Wiring Connection to AC must be permanent and connect through the mains‐ fuse terminal block (see Figure 2‐3 below): A. Affix AC adapter as per placement struts. According to the location of the electrical and communication outlets, remove the knockouts to allow cable and wire passage for routing through the right or left‐side (default) knockout exit. C. Do not connect AC power at this point of the installation. Figure 2-3 Placing the AC adapter with mains fuse Note: 1.5A PS can be mounted inside either the plastic enclosure RP432B or the metal box RP432BM. 4A PS can be mounted only in the metal enclosure RP432BM1. Caution: When the main panel is powered on, mains voltage is present on the main PCB. To prevent risk of electric shock, disconnect all power (AC transformer and battery) and phone cords before servicing. Under no circumstances should mains power be connected to the PCB other than to the main terminal block. A readily accessible disconnection device shall be incorporated in the building installation wiring. For continued protection against risk of fire, replace fuses only with fuses of the same type and rating. Install the socket‐outlet near the equipment in an easily accessible ... -
Page 25: Figure 2-4 Placing The Main Panel
Mounting and Wiring Figure 2-4 Placing the main panel Wire all require expansion modules as described in Chapter 3 Installing Bus Devices. Page 25... -
Page 26: Main Board Wiring
Mounting and Wiring Main Board Wiring The LightSYS2 main board provides plugs, connectors and peripheral module interfaces for all the principal functional expanders. In addition, its terminal connector block offers unparalleled ease and access to the full range of alarm functionality and the board includes communication ports for sound and digital data throughput Figure 2-5: Main board wiring diagram Main Board — Bus Connection Figure 2-6: Main board terminal block The set of four terminals on the left of the terminal block represent the expansion bus. These terminals support the connection of keypads and expansion modules. The connections are terminal‐to‐terminal with color‐coded wires, as follows: AUX RED: +12V DC power BUS YEL: Yellow data COM BLK: 0V common BUS GRN: Green data Connect any/all keypads and expanders necessary for the installation using the bus connections. (Refer to the table of gauge sizes in Appendix A Technical Specifications.) Page 26... -
Page 27: Figure 2-7: Terminal Block Bus Connectors
Mounting and Wiring Maximum Current Flows Figure 2-7: Terminal block bus connectors Page 27... -
Page 28: Zone Inputs Wiring
Mounting and Wiring Notes: 1. The parallel wiring system supports parallel connections from any point along the wiring. 2. The maximum wire run permitted is 300 meters (1000 feet) for all legs of the bus. 3. In case of bus communication problems, connect two 2.2KΩ resistors, one at each end of the data bus terminals, between the green and yellow wires. 4. If connecting remote power supplies, do NOT connect the Red wire (+12v) between the Power Supply Unit and LightSYS2. 5. For long cable runs, please use the correct cable as stated in Appendix A Technical Specifications Zone Inputs Wiring The following diagrams illustrate the various zone connections to the main unit or to the 8 wired zones expander and possible 4‐wire smoke detector. NORMALLY CLOSED NORMALLY OPEN ZONE DOUBLE END OF LINE END OF LINE ZONE END OF LINE ZONE ZONE CONFIGURATION CONFIGURATION ZONE CONFIGURATION (N.C CONTACT) -
Page 29: Wiring Auxiliary Devices
Mounting and Wiring Wiring Auxiliary Devices Use the Auxiliary Power AUX (+) COM (‐) terminals to power PIRs, glass‐break detectors (4‐wire types), smoke detectors, audio switches, photoelectric systems and/or any device that requires a 12V DC power supply. Notes: If the auxiliary outputs are overloaded (exceed 800mA) and are shut down, you must disconnect all loads from the outputs for a period of at least 10 seconds before you reconnect any load to the auxiliary outputs. LightSYS2 supports 4‐wire smoke detectors. To connect a 4‐wire smoke detector or device that requires resetting after an alarm condition, connect the auxiliary power AUX and output terminals. Use a power supervision relay to supervise the 4‐wire smoke detectors. Loss of power to the detector(s) de‐energizes the relay, causing a break in the zone wiring and a “Fire Fault” message at the panel. Remember to define the Output as Switched Auxiliary. In addition, when connecting a 4‐wire smoke detector, observe the wiring guidelines mentioned in the previous sections, along with any local requirements applicable to smoke detectors, as per the following diagram: To prevent a possible drop in voltage due to current requirements and distances involved, make sure to use the appropriate wire gauge (refer to the table of gauge sizes in) Appendix A Technical Specifications. To increase your power supply when employing multiple auxiliary devices, you can use the optional power supply expansion module (refer to the Wiring Power Supply Expansion Modules section, page 46) Wiring Internal Bell The Bell/LS terminal provides power to the internal siren. When connecting an internal sounding device, pay attention to the polarity. It is important to position the BELL/LS DIP switch SW1 (see p. 37) correctly. The position varies depending on the type of internal siren. A maximum of 500mA may be drawn from this terminal. -
Page 30: Wiring Bell Tamper
Mounting and Wiring Note: To avoid bell loop trouble, if no connections are made to an internal siren, use a 2.2K resistor in its place. Wiring Bell Tamper Connect the bell tamper to the BELL TMP and COM terminals on the main panel using 2.2K resistor in serial. Important: If you DO NOT use the terminal TMP BELL, remember to connect a 2.2K resistor (Resistor colors: Red, Red, Red) between TMP and COM. + BELL: To connect to the self activated bell’s (SAB) positive hold off input. ‐ LS: To connect to the SAB negative hold off input. BELL TMP: To connect to the bell input of the SAB Unit. Wiring Utility Outputs The LightSYS utility outputs support a variety of power‐line device activation, whether resulting from: time dependency, external input, or device sensor. As detailed in Chapter 4, 3 Outputs, you can program customized device activation powerfully and granularly. For additional details, see page 43. To wire Utility Output 1: Utility output 1 can be used to activate a self‐powered siren or any other self‐ powered device. Page 30... -
Page 31: Back Tamper (Optional)
Mounting and Wiring Figure 2-8: Wiring U01 for self-powered device To wire Utility Outputs 2‐4: Connect the device to the UOʹs as illustrated below: Back Tamper (Optional) The back tamper switch is an optional feature that provides an extra safeguard. In the event that the LightSYS2 is removed from the wall, the screw causes the perforated section of the plastic and attached tamper mechanism metal plate to break and remain attached to the wall. As a result, the back tamper switch is released and an alarm is generated. For this feature to operate: Slide the tamper mechanism (from the right) onto the placement struts and click into place. The metal lip extends to the screw mounting hole. When the LightSYS2 housing box is screw attached to the wall, also screw attach the tamper hole and abutting tamper metal lip (to the mounting bracket you inserted in step on page 23) Attach the tamper wires to PCB main board PLUG2 (see below, Figure 2‐9). The back tamper switch is located on the rear side of the back panel and is constantly depressed by the section shown in Figure 2‐9 Page 31... -
Page 32: Connecting A Telephone Line To The Lightsys
Mounting and Wiring Note: If the installation does not include the tamper mechanism, set DIP switch 4 to ON. (see page 37) Figure 2-9: Perforated Back Tamper Release and Connection to PCB Connecting a telephone line to the LightSYS Connect the incoming telephone line to the main panelʹs PHONE LINE terminals. Connect any telephone on the premises to the PHONE SET terminals or to the optional PLUG3 jack RJ11 . Note: To ensure line seizure capability, and comply with FCC part 68 regulations, the equipment must be connected directly to the Phone company lines (ʹCOʹ). Whether connected via RJ11 or terminal block, the line port must be connected to the CO lines without any other phones or other telecom equipment between them. Other telecom equipment can be connected only after (in series) the alarm. Page 32... -
Page 33: Placing The Communication Modules
Mounting and Wiring Placing the Communication Modules To activate the GSM/GPRS Module Place the optional GSM/GPRS communication board (mounted on its cylindrical placement struts). See Figure 2‐10. Insert the dedicated SIM card and, if required, enter the enabling PIN code or disable the SIM PIN Code in advance by placing it in a cell phone and disabling the code. Notes: Ensure that you remember the PIN code. Usually, after three wrong attempts (recognized by the SIM card) to enter a PIN number, the SIM card will lock. You will have to contact your local cellular provider to unlock the SIM card. Important: Do not install SIM card while power is applied to the LightSYS2. Do not touch SIM Card connectors! If doing so, you may release an electrical discharge that could damage the SIM card. Once the SIM card is placed it is recommended to test the operation of the SIM by conducting a call and testing the GSM signal strength. For more information refer to the programming menus of the GSM menu Attach the antenna plate and slide it into its right‐wall housing. (See Figure 2‐10) Note: For mounting GSM inside a metal enclosure, refer to the instructions supplied with the box Page 33... -
Page 34: Plug-In Ip
Mounting and Wiring Figure 2-10 Placing the GSM/GPRS panel and antenna Plug-in IP To activate the Plug in IP Module Place the optional IP communication modem (mounted on its cylindrical placement struts) as illustrated in Figure 2‐11 Connect the incoming LAN cable in order to enable IP Communication. Make sure that the cable is connected to the network Figure 2-11 Placing the IP modem Page 34... -
Page 35: Plug-In Fast Modem 2400
Mounting and Wiring Plug-in Fast Modem 2400 To activate the Plug in Fast Modem 2400 Module Place the optional Fast communication modem (mounted on its placement struts) as illustrated in Figure 2‐12 Figure 2-12 Placing the Fast Figure 2-13 Placing the battery and communication modem attaching the plug Page 35... -
Page 36: Plugs
PLUG 1 Bus Connector Bus 4 pin plug for easy connection to the bus PLUG 2 Back Tamper Used for the connection of the optional back tamper PLUG 3 Telephone Used for a local telephone connection (same as the PHONE SET terminal) PLUG 4 Voice Used to connect the Advanced Digital Voice Module (RP432EV) to the LightSYS2. Connect the Voice module to the VOICE connector (PLUG 4) on the main panel via the supplied cable. This connector transmits signals from the voice module to the telephone line during remote communication and is essential for normal operation of the voice module. PLUG 5 RS‐232 Used for local communication with the configuration software. PLUG 6 Use this outlet for connection to the RISCO supplied certified AC to DC adaptor. Note: the Adaptor outgoing power cord can be cut for the plug and attached to the supplied terminal block fuse (See Figure 2‐3) as per your local wiring requirements. Additionally, input wiring can also be connected to LightSYS2 through the neighboring (–) and (+) terminal block connectors. PLUG 7 Battery Use this outlet to connect to the backup battery (not‐ supplied), of 12 volts and 7Ah Page 36... -
Page 37: Jumpers
Mounting and Wiring Jumpers The LightSYS2 is equipped with an internal jumper to configure battery discharge protection. Use the following table to set the jumper. Position Function Battery Discharge Protection is disabled; The battery may be totally discharged during continuous AC failure, thus battery replacement may be required (no deep discharge protection). Note: In this position, the LightSYS2 will start to operate from a battery power supply whether it is connected to the Mains or (Default) not. Battery discharge protection is activated: If a continuous AC power outage occurs, the LightSYS2 automatically disconnects the battery when its backup battery voltage drops below 10.05 VDC, in order to prevent ʺdeep discharge” that may damage the battery. Note: In this position, the LightSYS2 will not start to operate from a battery power supply, unless connected to the Mains first. Factory DIP switches Default DIP Switch SW1 Status 1: Bell ON: Bell: For bell or electronic siren with a built‐in siren driver. OFF (Default): For loudspeaker without a built‐in sound driver. ON: Resets installer, sub‐installer and grand master codes to their 2: Default default factory values and bypasses main unit front tamper alarm. OFF (Default): Codes preserve their set values. 3:Extern ‐ Back ON: Back tamper bypass is in effect. Use this setting during ... -
Page 38: Connecting Backup Battery
Mounting and Wiring Connecting Backup Battery Insert the backup battery into its place and connect the leads to the main panel battery, PLUG7 (p. 36). Notes: The main panel is designed to work with an approved 12 VDC, 7 Amp‐hour sealed lead battery as a backup for the primary power supply in time of main power failure. The main panel is designed with reverse polarity protection on the battery charging circuit. However, prolonged improper connection of the battery to the main panel will result in damage. The battery is not supplied with the LightSYS2. The LightSYS2 Rechargeable battery should be charged for at least 24 hours. Battery is checked every 1 minute. There is a risk of explosion if a battery is replaced with an incorrect type. Dispose of used batteries according to the proper instructions. Battery in product shall be replaced every 3‐5 years. No maintenance is needed The power should remain disconnected until all connections have been made and checked for accuracy Use the internal jumper (Jumper 1) to configure battery discharge protection. See page 37. Page 38... -
Page 39: Chapter 3 Installing Bus Devices
Installing Bus Devices Chapter 3 Installing Bus Devices This chapter documents Installing Bus Expanders, p.41, including: Keypads, page 41 Zone Expander, p. 41 Utility Outputs, p. 43 Wireless , p. 45 1.5 and 3A Switching Power Supply, p. 46 Sounders, p. 53 Connecting Bus Detectors, p. 54 Single Zone Expander, p. 55. For detailed information of each device refer to the manual supplied with the product. Bus connection Each bus device has 4 bus terminals. The connections are terminal‐to‐terminal with color‐ coded wires, as follows: AUX RED: +12V DC power BUS YEL: Yellow data COM BLK: 0V common BUS GRN: Green data Connect each bus device necessary for the installation using the bus connections. Figure 3-1: Terminal block bus connectors Notes: The parallel wiring system supports parallel connections from any point along the wiring. The maximum wire run permitted is 300 meters (1000 feet) for all legs of the bus. In case of bus communication problems, connect two 2.2KΩ resistors, one at each end of the data bus terminals, between the green and yellow wires. If connecting remote power supplies, do NOT connect the red wire (+12v) between the power supply unit and LightSYS2. For long cable runs, please use the correct cable as per Appendix A Technical Specifications ... -
Page 40: Setting Bus Accessory Id Numbers
Installing Bus Devices Setting Bus Accessory ID Numbers For most devices, a DIP switch number must be set to identify its ID category number. Devices are split into ‘Families’. Each ‘Family’ of devices has sequential identification numbers which are set by the DIP switches. Before setting power on, define each module’s ID number by setting the DIP switches as follows: DIP switches DIP switches 01 OFF OFF OFF OFF OFF 17 OFF OFF OFF OFF ON 02 ON OFF OFF OFF OFF 18 ON OFF OFF OFF ON 03 ... -
Page 41: Installing Bus Expanders And Accessories
Installing Bus Devices Device Type Max. Total Wired / Bus Expanders 3 Bus Zones 32 WL Zone Expanders 2 Bus Zones Expanders 4 Outputs Expanders 4 Keypads 4 4A Power Supply 4 Bus Sirens (ProSound / Lumin8) 4 Installing Bus Expanders and Accessories Keypads The LightSYS2 supports several types of keypads. Up to 4 bus keypads can be assigned to the LightSYS2 as displayed on page 14 To install LightSYS2 bus keypads Open the keypad cover Set ID DIP switches Connect the keypad to the bus. Set the back tamper switch ( Only in model RP128KP) Adjust the brightness and contrast of the LCD keypad using a trimmer located next to the dipswitches. (Model RP128KCL). In models RP128KP and RP432KP it is done by pressing and holding [OK]. Close the keypad Notes: ... -
Page 42: Figure 3-2: Zone Expander Board And Mounting Diagrams
Installing Bus Devices Figure 3-2: Zone Expander board and mounting diagrams To install the 8‐zone expander Set DIP switches as follows: Switch Description Switch 1‐5 Defines the Zone Expander ID number. Switch 6‐7 Not Applicable Switch 8: Tamper bypass Instead of a short between the TMP/COM terminal block Wire the zone expander to the bus Wire the zones terminals as follows: a. Connect up to eight hardwired zones, using twisted‐pair or 4‐conductor cable wiring. b. Connect each zone to the appropriate Zone (Z) terminal and its related COM terminal. Each pair of zones shares a COM terminal. For example, Z1 and Z2 share a COM terminal, as do Z3 and Z4, and so on. NORMALLY CLOSED NORMALLY OPEN ZONE END OF LINE ZONE DOUBLE END OF LINE END OF LINE ZONE ZONE CONFIGURATION... -
Page 43: Utility Outputs
Installing Bus Devices Supply power to auxiliary devices. Refer to Wiring Auxiliary Devices, p. 29) Note: The RP432EZ8 enables to define the end‐of‐line resistance of its zones. Selection is done through the Quick key programming: . Mount the zone expander in either of the LightSYS2 box left‐slots: Figure 3-3: Zone Expander mounting location inside the LightSYS2 box Utility Outputs The LightSYS2 utility outputs support a variety of device activation, based on periodicity or system event. As detailed in Chapter 4, Using the Installer Programming Menus Outputs , you can program customized device activation powerfully and granularly. Figure 3-4: Utility Output Module UO4 (Showing an Example of UO4 Wiring) Page 43... -
Page 44: Figure 3-5: Utility Output Module E08
Installing Bus Devices Figure 3-5: Utility Output Module E08 Figure 3-6: Utility Output Module X-10 Notes: Outputs on module EO8: Current consumption: 25 mA, typical / 30 mA, maximum; Contacts; 12V Open Collector, Active Pull‐Down, 70 mA, maximum Outputs on module EO4: Current consumption 25 mA, typical / 140 mA, maximum; Contact rating: 5 A / 24V DC. To install the utility output expanderss: Set the output expander ID using the ID DIP switches. Wire the UO expander to the bus. Connect the devices to the output terminals as follows: a. UO4 – Relays (see Figure 2‐8 and Figure 3‐4) b. UO8 – Open collectors: AUX GND UO1 UO2 c. X10: i. Connect an RJ25 cable (4‐wire telephone cable) between the RJ11 connector on the X‐10 module and the X‐10 transmitter. Plug the X‐10 transmitter into the AC power. iii. -
Page 45: Wireless Expander
Installing Bus Devices Connect one (or more) normally open (NO) momentary‐action pushbutton switches in a series between the TAMP and COM terminals in order to short‐ circuit these terminals while the cabinet door is closed. Note: It is not necessary to use a tamper switch if another module sharing the same cabinet is equipped with one. Do NOT use an End‐of‐Line Resistor in the tamper switch circuit. If a tamper switch is not used, connect a wire jumper between the two terminals. Wireless Expander Up to two Wireless expanders (model WL432) can be assigned to the LightSYS2. WL Expander Mounting 1. Optional screw hole Bracket (used to fasten front and 1. Screw cap back covers) 2. Upper mounting hole 2. Red LED 3. Lower mounting holes 3. Green LED (optional) 4. Prog button 4. Wall tamper hole 5. DIP switch 6. Box tamper 7. Bus Connector 8. Terminal block Figure 3-7: Wireless Expander ... -
Page 46: 1.5 And 3A Switching Power Supply Expansion Modules
Installing Bus Devices Switch Description SW1‐ SW3 3 switches to set ID of the wireless expander. SW4 – SW6 3 switches to set ID of the 2‐output expander. SW7: UO expander Enable/Disable Off: Disable On: Enable SW8 Expander operational mode Off : Bus mode On: Stand alone mode Wire the wireless expander to the bus. Connect the devices to the outputs terminals (12VDC @ 1A max Dry Contact Relays). See Figure 2‐8 and Figure 3‐4 Mount the wireless expander to the mounting bracket. 10. Close the mounting screw 11. Close the front cover. Use the screw cap you tore on Step 3 on the rear side. Note: For additional programming and configuration instructions, see 5IN1424 Wireless Expander 432 Installation instructions 1.5 and 3A Switching Power Supply Expansion Modules BELL Figure 3-8: 3A PS Module Figure 3-9: 1.5A PS Module Page 46... -
Page 47: Figure 3-10: Smps Inside A Metal Box
Installing Bus Devices To mount the 3A Switching Mode Power Supply (SMPS) Mount the SMPS and the backup battery inside a metal box. Important: The SMPS should be serviced by qualified personnel only! Unless serviced, the SMPS box must be closed with screws at all times! Use only safety‐approved wires in accordance with the national rules. The SMPS is designed for indoor use only! Figure 3-10: SMPS Inside a Metal Box Note: Prior to installation, calculate the total current consumption of the connected devices in order not to exceed the power supply’s maximum current consumption! Important: To prevent risk of electric shock, disconnect all power sources before servicing! Under no circumstances should mains be connected to the PCB other than to the main terminal block! Locate the SMPS metal box in a clean and dry location, close to the mains. Open the SMPS box by releasing the attaching screws. When attaching the box to the wall, it is recommended to use Ø4.2mm, 32mm length screws (DIN 7981 4.2X32 ZP) Connect the incoming mains cable to the main fuse terminal block. Wire the SMPS terminals as follows: a. Connect the bus Terminals: Connect only three of the first four terminals at the left of the Power Supply expansion module to the main panelʹs 4‐wire bus, as follows Expansion Bus Terminals COM BUS BUS ... - Page 48 Installing Bus Devices Important: Do NOT make any connection to the AUX (RED) terminal from the main panel. It is used for the outgoing bus to supply voltage to other modules. Notes: The power supply expansion module is connected to the AC power supply. This module, therefore, supplies power to all modules and/or keypads located AFTER the point that it is connected to the bus. b. Set the Tamper (TAMP COM): The power supply expansion module can be contained in a metal cabinet. Tamper the cabinet, as follows: Connect one (or more) normally open momentary‐action pushbutton switches in a series between the TAMP and COM terminals. Notes: It is not necessary to use a tamper switch if another module sharing the same cabinet is equipped with one. Do NOT use an end‐of‐line resistor in the tamper switch circuit. If a tamper switch is not used, connect a wire jumper between the two terminals. c. BELL/LS (+) (‐): Used to connect an external sounder driven by the SMPS (bell or loudspeaker). Position the Bell/LS jumper respectively for the connected device as described in the Jumper Settings section below. Notes: To avoid bell loop trouble, if NO connection is made for the BELL/LS terminals, connect a 2.2KΩ resistor in its place. Use a larger wire gauge if the distance between the sounder and the SMPS is significant. Take the sounder(s) current draw into account when selecting a wire gauge (see Appendix C, page 220). Any internal siren(s) connected to the power supply expansion module will operate exactly like the siren(s) connected to the main panel d. AUX RED(+): Used together with the COM (‐) terminal to apply power to Aux. devices (e.g. PIRs, smoke/glass break detectors and any other devices that require 12VDC power supply). Total current consumption from the SMPS (Via The Aux./COM and BELL/LS terminals) is 4A Notes: If one or more of the AUX/BELL/LS outputs is overloaded and the SMPS shuts down, the SMPS must be reset, using the LightSYS2 software as follows: (User menu > Activities > Advanced > Overload Restore option, or enter and exit the installation‐programming mode. If overload still exists, ...
-
Page 49: Figure 3-11: Smps - Ac & Ground Connection
Installing Bus Devices e. GROUND (Earth): Used to connect the GND terminal to the main box ground pin (see illustration below). Use 16 AWG (at least). f. AC: Used for connection of the AC terminals (see illustration below) to the transformer outputs (16.5VAC/50 VA). 3-11: SMPS – AC & Ground Connection Figure Set the SMPS jumpers and the DIP switches as follows: Mod- DIP switch Description PS/SW1‐SW3 Used to set a unique ID number for the bus module for communication purposes. Power PS/SW4 Enables/disables Power Supply – LightSYS2 Supply communication. On (up): Communication enabled. Off (down): Communication disabled Used to set a unique bus ID number for the UO module UO/ SW1‐SW3 located on the SMPS board. Utility Enables/disables UO module – LightSYS2 UO/SW4 Output communication. ... - Page 50 Installing Bus Devices Jumper Description Battery discharge protection If a continuous AC power outage occurs, the SMPS automatically disconnects the battery when its backup Protection battery voltage drops below 10.8VDC. This is done to prevent ʺdeep discharge” that may damage the battery The battery may be totally discharged during continuous AC failure (no deep discharge protection). Protection Note: If 2 pins configuration is selected, the battery might be damaged, may be required. Used to determine the SMPS mode of operation in accordance with the sounder device connected to the BELL/LS terminals. Note: Bell/LS The sounder(s) connected to the SMPS operates identically to the panel’s sounder(s). Bell For a bell/electronic siren with a built‐in siren driver, position jumper on one pin; 12VDC is produced at the sounder’s terminals during burglary/panic alarms. Slow pulsing voltage is produced during fire alarm. For a loudspeaker without a built‐in siren driver, position (Speaker) jumper on both pins. The SMPS produces continuous oscillating voltage for burglary/panic alarms and an interrupted oscillating voltage for fire alarm. Locate the battery at the bottom of the SMPS box. Connect flying leads (battery connectors) from the SMPS board to the battery terminals ‐ (+) Red, (‐) Black). Note: Use only lead acid battery type, rated 12V, 7‐21AH (maximum) and safety approved in accordance with the national standards! ...
-
Page 51: Digital Voice Module
Installing Bus Devices Digital Voice Module Figure 3-12: Voice Module PCB To mount the voice module: Set the voice module DIP switches as follows: Switch Description Usage 1 Bypass tamper Instead of a short with the TMP/COM terminal block 2 OPT Not in use 3 Test Connected in parallel to all output channels and enables to listen to all played messages using a speaker (at least 32 Ohm) connected between the Test Spkr and COM terminals 4 Intern Mic Select an external or internal microphone for recording messages: On: Recording messages from the microphone located on the Voice module board. Off: Recording messages from a microphone located on Listen / Talk unit (IN1 terminal) Page 51... -
Page 52: Figure 3-13: Voice Module - Listen/Talk Unit Wiring
Installing Bus Devices Wire the voice expander as follows: Figure 3-13: Voice Module — Listen/Talk Unit Wiring Bus connection: The connection to the main bus can be made through the terminals of the module voice AUX (RED), COM (BLK), BUS (YEL) and BUS (GRN) as illustrated or through the bus (PLUG1) using the supplied 4‐ wire cable. If required, connect the Listen/Talk unit as illustrated in the diagram above. Connect the Voice module to the VOICE connector on the LightSYS2 main panel (PLUG 4) via the supplied cable, as illustrated below. This connector transmits signals from the Voice module to the telephone line during remote communication, and is essential for normal operation of the Voice module. Mount the Voice module inside the plastic enclosure with the LightSYS2 main panel in order to make a connection between the two units. (as above) Mount the Listen/Talk unit. Mount the unit in a place where Listen ‐ In operation is to be performed. Page 52... -
Page 53: Sounders
Installing Bus Devices Sounders For detailed information of installation the bus Sounders (ProSound or Lumin 8) refer to the manuals supplied with the products ProSound Figure 3-14: ProSound Bus Wiring To install LightSYS‐compatible bus sounders Connect the siren according to Figure 3‐14. Set the related DIP switches for bus mode operation. Set DIP switch DIP 1:SW4 should be in ON position for ProSound bus connection DIP switch DIP 1:SW5 : Defines the siren sound rhythm (ON = Slow, Off = Fast) DIP switch DIP 1:SW1‐3: Set ID Bus Number. Up to 4 sirens can be connected to the LightSYS2. DIP switch DIP 2:SW2: Set different siren sound Notes: The sounder will not operate when a battery is not connected or no power supply is connected to the PS terminals. After powering‐up the sounder, it will not operate for a period of 20 seconds (sound and strobe) in order to avoid accidental activation during installation. After powering‐up the sounder, the sounder inputs (C+/C‐) will cause activation only if they have been in normal (silent) state at least for 10 seconds. The PROX and TRBL outputs are deactivated in bus mode configuration. To protect the battery against deep discharge, the battery will be automatically disconnected below 10.5 VDC. Page 53... -
Page 54: Lumin 8
Installing Bus Devices Lumin 8 Connecting Bus Detectors Up to 32 addressable bus detectors can be assigned to the LightSYS2. Bus detectors can be wired to the main bus or to a Bus Zone Expander (BZE). For full installation instructions refer to the instructions supplied with each bus detector. To connect bus detectors to the main LightSYS2 bus Set the bus detector ID number (1‐32) using the detectorʹs DIP switches. Note: For WatchOUT, LuNAR, and WatchIN set the switch that defines the detector operation mode to bus mode. Wire the bus terminals AUX(RED), COM (BLK), BUS (YEL) and BUS (GRN) to the LightSYS2 bus. Note: For maximum operation stability, it is best NOT to exceed a total 300 meters (1000 feet) of wiring from the bus detector to the LightSYS2 panel. To connect bus detectors using a Bus Zone Expander (BZE) Important Note: Connecting bus zones to the LightSYS2 using the bus zone expander can only be done using Bus Zone Expander version B and later, PN RP128EZB000B. Set the BZE ID number (1‐3) using the DIP switches SW1 1‐3. Set the BZE SW2‐3 to ON position. Wire the BZE terminals marked as TO PANEL to the LightSYS2 bus. Set the bus detector ID number (1‐32) using the detectorʹs DIP switches. Page 54... -
Page 55: Single Zone Expander
Installing Bus Devices Note: Do not repeat the same ID twice on the same BZE. Wire each detectorʹs bus terminals to the relevant BZEʹs terminals marked as TO DEVICE.(see figure below) Note: For maximum operation stability, it is best NOT to exceed a total of: 300 meters (1000 feet) of wiring from the BZE to the LightSYS2 panel. 300 meters (1000 feet) of wiring from the BZE to the last bus detector. When connected to LightSYS2 the Bus Zone Expanders can be defined to support 32 bus zones. UP to 4 Bus Zones Expanders can be connected to the LightSYS2 . Single Zone Expander The RISCO RP128EZ01 is a Single Zone Expander that enables to connect any detector to RISCO system BUS. Using the BUS connection you can ease your installation by connecting any detector in parallel connections from any point along the wiring route. In addition you can define any detector with one of the following zone terminations supported by the panel: NO, NC, EOL, DEOL. Page 55... - Page 56 Installing Bus Devices To connect the RP128EZ01 to the LightSYS2 bus Note: Up to 32 Single Zone Expanders can be installed on the LightSYS2. Set the RP128EZ01 ID number (1‐32) using DIP switches 1‐5. SW1 (1 ‐ 5): ID switches. Defines the Single BUS Zone Expander ID number SW1 ‐ 6: Not used Wire the RP128EZ01 BUS wires Red, Black (COM), Yellow(BUS) and Green (BUS) to the LightSYS2 BUS. Note: For maximum operation stability, it is best NOT to exceed a total of 300 meters (1000 feet) of wiring from the BZ1 to the LightSY panel or to the BUS Zone Expander Wiring RP128EZ01 to the Main BUS Page 56...
- Page 57 Installing Bus Devices Wiring RP128EZ01 to BUS Zones Expanders Notes: When connecting RP128EZ01 to a BUS Zone Expander wire the RP128EZ01 wires to the relevant BUS zone expanderʹs terminals marked as TO DEVICE. Wire the RP128EZ01 zone wires, Black and White, to the detectorʹs terminals according to the required termination. Notes: The Black and White wires are equivalent to zone input terminals in the LightSYS2. Page 57...
-
Page 58: Completing The Installation
Installing Bus Devices Completing the Installation To complete the installation Mount the back panel to the wall using affixing screws Connect the system to the mains power Note: If no back tamper is connected set SW1‐4 to ON position to avoid tamper alarm Close the front cover and close the locking screw Upon completion of LightSYS2 bus device installation, module wiring, and DIP switch and jumper setting, proceed to Chapter 4 Installer Programming and Chapter 5 Using the Installer Non‐Programming Menus Page 58... -
Page 59: Chapter 4 Installer Programming
Installer Programming Chapter 4 Installer Programming Programming Methods Program the LightSYS2 through one of three methods: Configuration Software (Local or remote) Program Transfer Module (PTM) LCD Keypad Configuration Software A software application that enables you to program the LightSYS2 from a PC computer. It offers the following alternatives: Working locally, through a portable computer connected to the LightSYS2 via cable Working at a remote site, communicating with the LightSYS2 via one of the following options: A phone line and modem TCP/IP network using the IP Module GPRS using the GSM/GPRS communication module For further information on programming the LightSYS2 via the Configuration Software, refer to the Configuration Software manual. PTM: Data Storing Device The PTM is a tiny circuit board into which the LightSYS2 panel can transmit a copy of the systemʹs configuration. The PTM stores this copy and can also transmit the configuration information back to the LightSYS2 panel. To copy from a programmed main panel into the PTM: Position the PTM on PLUG 1 connector on the main panel with the red LED facing the row of terminals on the main panel. The red LED flashes slowly. Position the default DIP switch 2 to the ON position. Note: The DIP2 should be software enabled (Installer programming Quick key 1 5 1) From an LCD keypad, access the main Installer Programming menu. ... - Page 60 Installer Programming When the LED stops flashing rapidly, the keypad beeps twice and displays the following: Data is saved Please wait… Then the keypad returns to the normal initial display. Remove the PTM from the PLUG 1 connector Position the default DIP switch 2 to the OFF position. The PTM now contains a copy of the main panelʹs configuration To load the PTM’s stored configuration into a main panel: Position the PTM on the PLUG 1connector on the Main with the red LED facing the row of terminals on the main panel. The red LED flashes slowly. Position the default DIP switch 2 to the ON position. Note: The DIP2 should be software enabled (Installer programming: Quick key 1 5 1) Momentarily remove all power from the main panel (both AC and Standby Battery). Restore all power to the main panel. After a moment, the LED on the Program Transfer module flashes rapidly, indicating that the information is being copied from the PTM to the main panel. The LCD keypad displays the following: Please wait… When the LED stops flashing rapidly, the keypad beeps once, and its display returns to the normal initial display. Remove the PTM from the bus connector PLUG 1. Position the default DIP switch 2 to the OFF position. From an LCD keypad, access the main Installer Programming menu. Without making any changes, exit the main Installer Programming menu by pressing [0]. The LED on the Program Transfer Module flashes rapidly, and the keypad displays the following: Do you want to Save the data? Y 10.
-
Page 61: Lcd Keypad
Installer Programming LCD Keypad The LCD keypad is a visual interface tool that helps you operate and program the LightSYS2 main panel. Keypad Programming Key Functions The following table describes the uses of the keypad keys during programming: LCD KP LCD KP Touch screen Function RW432KP RP128KCL keypad RP128KP – 1. To enter numeric values where required. 2. For quick key programming. Press the number keys to access a programming option. 3. To edit labels and names. To go back (up) / quit / don’t save. Enter / Save (to move into the displayed menu or to save the data that you have changed). Press either one of these keys to move back and forth through the programming level functions. These keys also change the position or ... -
Page 62: Entering Text Descriptions (Labels)
Installer Programming Entering Text Descriptions (Labels): Use the keys on the keypad to produce characters according to the table below. Pressing a particular key toggles between the characters available from that key in the sequence listed below followed by a blank space. The LightSYS2 permits a total of 74 characters (letters, numbers, and symbols) for use in labeling Data Sequence 1 1 . , ʹ ? ! ʺ – ( ) @ / : _ + & * # 2 2 a b c A B C 3 3 d e f D E F 4 4 g h i G H I 5 5 j k l J K L 6 6 m n o M N O 7 7 p q r s P Q R S 8 8 t u v T U V 9 9 w x y z W X Y Z 0 0 Keypad Timeout If, after 15 minutes, no entry is made to a keypad that has been placed in the Installer Programming mode, it will produce an audible reminder, consisting of several beeps in rapid succession, along with the following display: Time out Hit any Key Pressing any key stops the beeping. To re‐enter the Installer Programming menu, you ... -
Page 63: Regular Operation Mode
Installer Programming Press the key. Select language. Scroll through the options and press . Note: Changing the language can be done also in regular operation mode by pressing + simultaneously Enter the Installer code (default: ) and press . Correct the time and date and confirm by pressing . The system automatically enters the automatic accessories settings process option. 10. Move to the section ʺIdentifying the connected devicesʺ as described below. Regular operation mode To enter Installer Programming mode From the main display press . Enter the Installer code (default: ) and press . Select [1] Programming and press . You are now in Installer Programming mode. Move to the section ʺIdentifying the connected devicesʺ described below Identifying the Connected Devices Automatic Setting Note: By default, when entering Installer mode with the default DIP Switch 2 in ON position, ... -
Page 64: Bus Test
(Install, Bus Device, Manual, WL Expander) Set the expander ID (1 or 2) and using , set the type to WL and press . If the expander is mounted inside the LightSYS2 box select Y to bypass the box tamper. Press and move to step 2. Step 2: Calibrate the WL Expander For successful communication, strength of the signal should be higher than the noise threshold level, measured in a process termed calibration. From the Installer menu, select (Install, WL Device, RX Calibration) Select the wireless expander and press . Using the key, choose [Y] (Yes) to ‘Re‐Calibrate’ the Wireless Expander and press to confirm. Explanation: The calibration measurement above shows the amount of background ‘noise’ that the expander can ‘hear’ on the same frequency as the RISCO wireless devices. This ‘noise’ could be neighboring devices of another system or other devices operating on the same frequency nearby. These are ‘unwanted’ signals that the LightSYS2 wireless expander must be told ‘not to listen to’. The threshold (set above) is the absolute minimum signal strength needed to be heard from a wireless device in order for the expander to effectively ‘hear it’. Page 64... -
Page 65: Step 3: Allocating Wireless Device
Installer Programming Step 3: Allocating Wireless Device Each wireless device must identify itself to the system wireless expander, in a process termed “enrollment”. Enrollment can be performed by sending an RF signal from each device, or by typing the device’s unique serial code into the system. Enrollment can be done locally using the keypad or remotely using the configuration software. To quick enroll by RF signal using a keypad From the Installer menu, select (Zones, Parameters, By Category, Advanced, WL Parameters) Using the numeric keys, enter the desired device number and press The wireless device is in learn mode. Send a write message from the your wireless device as shown in the table below: Wireless Device Sending Write Message Detector/Contacts/Siren Depress the tamper switch for 3 seconds. Smoke Detector Insert battery. Write message is sent automatically within 10 seconds. Gas, CO detectors Depress the test button for 3 seconds. 2 Panic ButtonKey fob Depress both buttons for at least 7 seconds. 4 Button Keyfob ... -
Page 66: Step 2: Set Bus Zone Basic Attributes
Installer Programming Enter the bus detector ID number as set by the detectorʹs DIP switches (01‐32) Note: The display ʺ(x:yy) Type: Noneʺ represent the bus detector location in the system. In the 0:yy designation, the 0 denotes that the bus detector is on the main unit and is not assigned to a bus zone expander. The yy represents the bus detector ID number (up to 32) as set by the detectorʹs DIP switches. Using the arrow keys move to the Type field. Use the key to select the detectorʹs type. Repeat steps 2 ‐ 4 for other bus detectors. Step 2: Set Bus Zone Basic Attributes From the main Installer menu select [1] Zones > [1] Parameters > [1] One by One . Select the zone number that the bus zone was assigned to and press . Configure the parameters for the relevant bus detector. Step 3: Programming the Bus Detectors Advanced Parameters From the main Installer menu select [2] Zones > [1] Parameters > [2] By Category >... -
Page 67: Step 2: Adding Bus Detector
Installer Programming Step 2: Adding Bus Detector Refer to section Step 1: Adding Bus Detector to the Main Unit to assign a bus detector to the system. Note When the bus zone is connected to a bus expander, you should define the X in the (x:yy) display as the bus expander ID (1,2,3 or 4). The yy represents the bus detector ID number (up to 32) as set by the detectorʹs DIP switches. Step 3: Set Bus Zone Basic Attributes From the main Installer menu select [1] Zones > [1] Parameters > [1] One by One . Select the zone number that the bus zone was assigned to and press . Configure the parameters for the relevant bus detector. Note: In the zone designation XY:ZZ the X represent the Bus Expander ID as set by its dip switches. Step 4: Programming the Bus Detectors Advanced Parameters From the main Installer menu select [2] Zones >... -
Page 68: Using The Installer Programming Menus
Installer Programming Restoring Manufacturer's Programming Defaults You may find it useful to be able to remove all or some changes made to the main panelʹs programming and restore the default settings provided by the manufacturer. To restore the main panel to the manufacturerʹs defaults: From the installer Programming menu, select: 1) System > 5) Setting> 2) Default Panel Using the key select whether to also restore the system labels to the manufacturer defaults and press to confirm. Using the key to toggle Y. To save your settings exit the programming mode. Using the Installer Programming Menus Installer Programming Menu Conventions The following typographical conventions are used throughout this chapter: Numeric keys are represented as unless they are the final keys in a programming sequence, in which case they are represented as Screen text is presented in déjà vu sans mono font: System: 1)Timers ... -
Page 69: 1 System
Installer Programming The column headings appear as follows: Column Heading Description Quick Keys A shortcut to program an option. The shortcuts are listed in numerical sequence. Parameter The name of the option programmed by the selection. Default The factory default. The default values have been carefully chosen and are suitable for most installations. Range Where applicable, the range of possible values. To program the system using Quick Keys: Access the Installer Programming menu and select the main menu option that you want to access. Press the Quick Keys listed in sequence (from left to right) to locate the option listed in the Parameter column and then press . 1 System The System menu provides access to submenus and their related parameters that are used for programming configuration settings applicable to the entire system. After you access the System menu from the main Installer Programming menu, as described in this section, you can access the following sub‐menus: Timers, page 70 Controls, page 74 Labels, page 90 Sounds, page 90 Settings, page 92 Auto Clock, page 93 ... -
Page 70: Timers
Installer Programming Timers The Timers menu contains parameters that specify the duration of an action. Access and configure the parameters in the System Timers menu, as follows: System: Timers Quick Keys Parameter Default Range Exit/Entry Delay 1 Exit/Entry delays (Group 1). Entry Delay 1 30 seconds 01‐255 seconds Duration of entrance delay 1. Exit Delay 1 45 seconds 01‐255 seconds Duration of exit delay 1. Exit/Entry Delay 2 Exit/Entry delays (Group 2). 30 seconds 01‐255 seconds Entry Delay 2 Duration of entrance delay 2 ... - Page 71 Installer Programming Quick Keys Parameter Default Range Switch Aux Break 10 seconds 00‐90 seconds The time that the power supplied to the systemʹs smoke detectors through the programmable output is interrupted during a user‐initiated smoke detector reset, typically performed after a fire alarm or automatically when a fire verification is defined in the system control. (Refer to Double Verification of Fire Alarms, page 7777, for additional details.) Note This feature is supported through any programmable output that is defined as Switch AUX . Wireless Specifies the time intervals relating to the operation of the wireless module Jamming Time None None, 10, 20 or 30 seconds Specifies the period of time that the LightSYSʹs wireless module tolerates unwanted radio frequencies capable of blocking (jamming) signals produced by the systemʹs transmitters. Once the specified time is reached, the main panel sends a report code to the alarm receiving center. (Refer to Jamming Fault, page 224.) NONE ...
- Page 72 Installer Programming Quick Keys Parameter Default Range TX Supervise 058 1‐255 seconds Specifies how often a bi‐directional wireless device generates a supervision request to the system. If any of the accessories does not respond to the request, at least once, during the RX Supervision time, the system will regard the accessory as Lost. Notes The device will generate the supervision message according to the time defined. Important: The RX Supervision time should be higher than the Tx Supervision time in order to eliminate false lost event. Service Mode 020 1‐255 seconds The time period that all tampers (main unit and accessories) can be opened for purposes of battery replacement without triggering a tamper alarm. 30 001‐255 minutes AC Off Delay In the case of a loss of AC power, this parameter specifies the delay period before reporting the event or operating the programmable output. If the delay time is set to zero, there will be no delay period. 30 01‐99 minutes Guard Delay ...
- Page 73 Installer Programming Quick Keys Parameter Default Range Redial Wait 30 0–255 seconds The number of seconds between attempts at redialing the same phone number. Applies to the MS Retries parameter, described on page 160 and FM Retries described on page 173. 10 01–255 seconds Last Exit Sound Defines the final seconds of the Exit Time for which the beep sound will change (keypads), indicating that Exit Time period is about to expire. 15 01‐99 seconds Buzzer at Stay Defines how much time keypads buzzer will sound before the external sounders start to operate while an alarm occurs in STAY mode. The timer is relevant only if the system control Bell>Buzzer is defined ed as Yes. Status Timer 000 0‐255 seconds Defines if the status of the system will be displayed while the system is armed . When the time is defined as 0, the system status will be displayed ...
-
Page 74: Controls
Installer Programming Quick Keys Parameter Default Range Pulse Open 00 sec 0‐255 seconds This timer is relevant only for zones defined with a pulse counter greater ZZ than one ( see , page 106) . If such a zone is regarded as not ready for the time defined under this timer, then the zone will be tripped and act definition. according to its type Inactivity Timer 0 0‐255 minutes This timer relates to Automatic Arm/Disarm scheduler. If there is no signal from any of the zones located in a partition that is defined under an Arm/Disarm scheduler for the time defined as Inactive Timer then the automatic schedule will be activated and the relevant partitions will be auto armed (according to the schedule definition). Note: The Inactive Timer of the scheduling program should be defined as ON under User Menu> Clock>Scheduler>Weekly>Schedule #>Arm/Disarm>6) Inactive. Controls The System Control menu contains parameters that control specific system operations. Access and configure the parameters in the system control menu, as follows: System: Controls: Basic Quick Keys Parameter Default Range... - Page 75 Installer Programming Quick Keys Parameter Default Range Allow Bypass Yes Yes/No YES: Permits zone bypassing by authorized system users after entering a valid user code. NO: Zone bypassing is NOT permitted. Quick Bypass No Yes/No YES: Eliminates the need for a valid user code when bypassing zones. NO: Qualified users must enter a valid user code to bypass zones. Yes Yes/No False Code Trouble YES: A false code report is sent to the monitoring station after three successive attempts at arming or disarming in which an incorrect user code is entered. No alarm sounds at the premises, but a trouble indication appears on the wired keypads. NO: A local alarm is sounded at the premises. ...
- Page 76 Installer Programming Quick Keys Parameter Default Range Buzzer Bell No Yes/No YES: If an alarm occurs when the system is armed in the stay arm mode, a buzzer sounds for the time defined under Buzzer At Stay (see page 73) before the external sirens operate. NO: An alarm in the Stay Arm mode causes sirens to operate simultaneously. Audible Jamming No Yes/No Relates to the Jamming Time parameter, described on page 71 YES: Once the specified time is reached, the Main Panel activates any internal sounders and sends a Report Code to the MS. NO: Same as above, except the internal sounders do not operate. No Yes/No Exit Beeps at Stay Determines whether the system will sound beeps during exit time in stay arming. ...
- Page 77 Installer Programming Quick Keys Parameter Default Range Arm Pre‐Warning No Yes/No Related to auto arm/disarm operation. YES: For any partition(s) set up for auto arming, an audible exit delay (warning) countdown will commence 4.25 minutes prior to the automatic arming. During this period, exit delay beeps will be heard. You can enter a valid user code at any time during the countdown to delay the partition’s automatic arming by 45 minutes. When an “Auto‐Arm” partition is disarmed, as described above, it can no longer be automatically armed during the current day. The extended 4.25 minutes warning does not apply to automatic partial arming. NO: Auto arming for any programmed partition(s) takes place at the designated time. The programmed exit delay period and any audible signal occur as expected. Advanced Yes Yes/No This section refers to the advanced controls in the system. Double Verification No Yes/No ...
- Page 78 Installer Programming System: Controls: Advanced Quick Keys Parameter Default Range Alarm ZE Cut No Yes/No YES: Produces an alarm if the communication between the main panel and any expander is lost. A report is transmitted to the MS. NO: No alarm occurs. The system, however, produces a local trouble indication. No Yes/No Code Grand Master YES: Only a user with the grand master authority level can change all user codes, along with the time and date. NO: Users with the grand master and master authority levels can change their own user codes, all codes with a lower authority level, and the time and date. Area No Yes/No Changes the system operation to area instead of partition, which then ...
- Page 79 Installer Programming Quick Keys Parameter Default Range 24‐Hour Bypass No Yes/No YES: It is possible for the user to bypass a 24‐hour zone. NO: It is not possible for the user to bypass a 24‐hour zone. No Yes/No Technician Tamper YES: It is necessary to enter the installer code to reset a tamper alarm ( ). Therefore, resetting a tamper alarm requires the intervention of the alarm company. However, the system can still be armed although the tamper indication is on. NO: Correcting the problem resets a tamper alarm, requiring no alarm company assistance. No Yes/No Technician Reset YES: It is necessary to enter the installer code to reset an alarmed partition after it has been disarmed. This requires the intervention of the alarm company. ...
- Page 80 Installer Programming Quick Keys Parameter Default Range Fire Temporal Pattern No Yes/No YES: During a fire alarm, the sirens produce a pattern of three short bursts followed by a brief pause. NO: During a fire alarm, the flow of sounds produced by the siren is a pattern of two seconds ON, then two seconds OFF. Yes/No IMQ Install YES: Causes the following parameters to function as follows: Auto Arm Bypass: If there is an open zone during the auto arm process, the system will be armed, and a silent alarm will be activated (unless the open zone is closed). A utility output defined as “Auto Arm Alarm” is activated. A utility output defined as “Zone Loss Alarm” is activated Guard User: If a Guard user disarms a partition, the system will be armed automatically after the predefined time period (refer to Guard, page 72). If there is an open zone during the arming process, the system will be armed, and an alarm will be sounded (unless the open zone is closed). NO: Causes the following parameters to function as follows: ...
- Page 81 Installer Programming Quick Keys Parameter Default Range Disable Keypad When No Yes/No Auto Disarm Exists YES: When a partition is armed manually or in auto arm mode, and an auto disarm time is defined, this parameter specifies that all the keypads that are masked to this partition will not function and that it will be impossible to disarm the relevant partition. Note The partition can be disarmed only by using the configuration software or the auto disarm function. NO: When a partition is armed manually or in auto arm mode, and an auto disarm time is defined, the relevant keypads will function normally. Buzzer Delay No Yes/No YES: The keypad buzzer will be silent during the bell delay time. NO: The keypad buzzer will be audible immediately when a system alarm occurs. Speaker = Buzzer No Yes/No ...
- Page 82 Installer Programming Quick Keys Parameter Default Range Error Speaker Time Out No Yes/No This option determines the duration of the alarm that is generated via the internal sounders (speakers) when the exit door is programmed as “Final Exit”, and it is not closed once the exit time expires (an “EXIT ERROR”). YES: The “EXIT ERROR” alarm in the internal speaker matches the alarm bell timeout setting. NO: The “EXIT ERROR” alarm in the internal speaker sounds continuously until user reset. No Yes/No Tamper Report This option determines if a tamper signal will be reported to the MS while the system is disarmed. YES: A tamper signal will always be reported. NO: A tamper signal will not be reported to the MS during the unset period. Note: A tamper restore report to the MS is always reported, regardless of the “TAMPER REP” definition ...
- Page 83 Installer Programming Quick Keys Parameter Default Range Stay Strobe No Yes/No YES: For Stay or group arming, a squawk indication will be made by the strobe activated by an output (Utility output >Follow Partition > Strobe Trigger) at the end of the exit delay time. NO: For Stay or group setting, no indication will be made by the strobe at the end of the exit delay time. Blank display No Yes/No YES: Two minutes after the last keypad operation, the display will appear blank. After pressing any key, an Enter Code message will be displayed. The user should enter his code or pass his proximity tag. The display returns to the normal operation mode. Select this option for keypads that can be viewed from outside the protected area to disguise the system status. NO: The keypad display operates normally System: Controls: Communication Quick Keys Parameter Default Range ...
- Page 84 Configuration Software Yes Yes/No (U/D) Enable YES: Enables communication between the alarm company and the LightSYS2 main panel using the configuration software. This enables modifying an installationʹs configuration, obtaining status information, and issuing main panel commands, all from a remote location. NO: Disables communication, as detailed above. Cloud Enable No Yes/No YES: Enables communication between the LightSYS2 system and the RISCO Cloud. NO: Does not enable communication, as detailed above. System: Controls: EN 50131 Quick Keys Parameter Default Range EN 50131 This section refers to controls that apply to EN 50131 approvals. No Yes/No Authorize Installer ...
- Page 85 Installer Programming Quick Keys Parameter Default Range Restore Alarm No Yes/No YES: The user must confirm that he is aware that alarm occurred in the system before rearming the system. The system/partition will be in “Not Ready” status until it confirms the alarm. The user needs to confirm the alarm by going to View > Alarm Memory NO: The user does not need to confirm the alarm before rearming the system. Mandatory Event Log No Yes/No YES: Only mandatory events (specified in the EN standard) will be displayed in the event log. NO: All the events will be displayed in the event log. Restore Troubles Yes/No YES: The user must manually confirm the restoral of each trouble to a normal condition. This is done from the User menu > View Trouble > Press OK.
- Page 86 Installer Programming Quick Keys Parameter Default Range 20 Minutes Signal No Yes/No YES: Prior to arming the system, the system will check for zones that did not send a signal for more than 20 minutes. These zones will be regarded as not ready. A partition assigned with a not ready zone cannot be armed. NO: Prior to arming, the system will not check whether a zone did not send a signal for more than 20 minutes. Attenuation Yes/No YES: The LightSYS2 device will be attenuated by six dB during the communication test. NO: The LightSYS2 device works in normal operation mode. System: Controls: PD6662:2010 Quick Keys Parameter Default Range PD6662:2010 ...
- Page 87 Installer Programming Quick Keys Parameter Default Range Installer Reset Yes/No Confirmation YES: An installer reset confirmation is required in order to reset the system after a confirmed alarm. The system cannot be armed until an installer reset confirmation is performed. The reset can be done by entering the Anti code or entering the installation mode or by performing an “Installer reset” from the keypad. NO: Any means can be used to arm or disarm the system (keypad, remote phone operation etc.). Yes/No Key Switch Lock YES: Only a latched key switch zone can arm or disarm the system. Note When the system has more than one zone defined as latch key switch, the arm/disarm operation will occur only after all these zones are armed or disarmed. NO: Any means can be used to arm or disarm the system (keypad, remote phone operation etc.). ...
- Page 88 Installer Programming System: Controls: CP-01 Quick Keys Parameter Default Range CP‐01 This section refers to controls that apply to comply with SIA CP 01. Exit Restart No Yes/No This parameter is used to define if an exit time shall restart one additional time while an entry/exit zone is tripped twice during exit time. YES: Exit time will restart for one time only when an entry/exit zone is tripped during exit time. NO: Exit time will not be affected if an entry/exit zone is tripped during exit time. Auto Stay No Yes/No This parameter is used to define the system’s arming mode when using a keypad and no exit/entry zone is tripped during exit mode. YES: If no exit/entry zone is tripped during exit time the system will be ...
- Page 89 Installer Programming Quick Keys Parameter Default Range Proximity Anti Mask No Yes/No =Tamper Used to determine the operation of the proximity anti masking detection indicated by the MW channel in the WatchOUT DT detector. YES: Proximity anti mask detection will activate the tamper alarm. NO: Proximity anti mask detection will be regarded as a fault event. Note that Proximity AM operates for approximately 2.2 seconds when the detector is approached in close proximity. Ensure that Prox Anti Mask has been enabled when configuring the WatchOUT DT bus zone parameters. Audible Proximity Tamper No Yes/No This parameter relates to the bus siren. YES: A proximity anti approach violation will activate the siren. NO: A proximity anti approach violation will not activate the siren and will be regarded as trouble by the system. ...
-
Page 90: Labels
Installer Programming Quick Keys Parameter Default Range Keyfob Instant Stay No Yes/No YES: Stay arming from any 2‐way remote control will be instant. NO: Stay arming from any 2‐way remote control will be delayed, following exit delay 1. Disarm using Code No Yes/No Defines if a PIN code is required to perform the disarm operation while using any of the 2‐way remote controls. Labels The System Labels menu enables you to modify the labels displayed by the LCD that identify the system and partition labels. For changing labels from the keypad refer to page 62. System: Labels Quick Keys Parameter Default Range System Security System Any 16 Characters Editʹs the global(system label) ... - Page 91 Installer Programming System: Sounds: Tamper Quick Keys Parameter Default Range – During Disarm Buzzer Sets the sound produced by tamper violation while the system is disarmed – During Arm Bell only Set the sound produced by tamper violation while the system is armed Speaker Volume Sets the volume of internal sounder (speaker) connected to the Bells+/LS‐ terminal according to different system modes. The volume range is between 0 (Silent) and 9 (Max volume). After changing the volume, sound will be emitted by the internal sounder to enable evaluation of the selected volume level. Trouble 9 0‐9 Determines the volume of the internal sounder beeps while there is trouble in the system ...
-
Page 92: Settings
Installer Programming Settings This option allows setting the system in compliance with specific standardization, languages, customer of panel default: System: Settings Quick Keys Parameter Default Range DIP 2 Enable Enable/Disable Used to determine whether the LightSYS2 default switch SW1‐2 is enabled or disabled. Enabled: When power to the main panel is switched off and then on and SW1‐2 is in ON position , the Installer, Sub‐Installer and Grand‐Master codes will return to the original, factory default values. In this case, after entering the Installer Programming section, the system automatically enters the Automatic Accessories arming setting process. Toggle the enable/disable option with . Default Panel Restores programming options to factory defaults. The panel default option will be followed by questions regarding the defaults of the labels and erasing wireless devices. Use to select your option. (See page 68) Erase Wireless Erase wireless devices without changing the system current programmed parameters. Select the WL device to be erased. (Note: This entry appears only if a wireless device is registered in the system.) ... -
Page 93: Automatic Clock
Installer Programming Quick Keys Parameter Default Range Customer Sets the panel programming options in compliance with the selected customer code. Each customer has its predefined parameters. Note: Selecting a customer that is different than the one in use will automatically default the panel Language Sets the system language (Email, SMS and keypad interface language) Text –Change the interface keypad language – Voice Change the voice language. (This option is only available if a ) voice module is assigned to the system Automatic Clock This option is used to retrieve an automatic time update (NTP or Daytime) through the IP network or GPRS. System: Automatic Clock Quick Keys Parameter Default... -
Page 94: Service Information
Installer Programming Service Information The Service Information menu enables you to insert information accessible to the systemʹs users of the alarm company from whom the service is obtained. System: Service Information Quick Keys Parameter Default Range Name Any 16 characters Enables you to insert and/or edit the name of the MS from whom service may be obtained. Any 16 characters Phone Enables you to insert and/or edit the service phone number. Firmware Update Note: The firmware update menu option series is visible only if the IP or GSM module is installed. Access and configure the parameters in the System Control menu, as follows: System: Firmware Update Quick Keys Parameter Default Range ... -
Page 95: 2 Zones
Installer Programming 2 Zones The LightSYS2 supports up to 32 zones. Each zone can be defined to be a wired zone, a wireless zones or a bus zone. The attributes for each zone vary according to the zone’s type (wired, wireless or type of bus zone). The Zones menu provides access to submenus and their related parameters that are used for programming the characteristics of each of the systemʹs protected zones. After you access the Zones menu from the main Installer Programming menu, as described in this section, you can access the following submenus: Zone Parameters, page 95 Testing, page 121 Cross Zones, page 122 Alarm Confirm, page 124 Parameters The Parameters submenu allows you to program the zones parameters. You can program the basic parameters for a single zone (One by One) or a certain parameter for all zones at the same time (By Category) . Note: In addition to the basic parameters described under this section, each zone has addition advanced parameters, quick key 2>1>2>7 Zones: Parameters: One By One Important: When using the One by One method, the listing of each zoneʹs parameters is sequential. Once Zone 1ʹs parameters have been programmed, they are followed by Zone 2ʹs, then Zone 3ʹs, and so forth. To program one or more of the systemʹs zones using the One by One method, changes made to any (or all) of the Zone parameters will NOT be recorded without going through the entire Zone One by One list. The following procedure describes how to program the full complement of parameters for each zone on a one‐by‐one basis. ... - Page 96 Installer Programming To program the full complement of parameters for each zone on a one‐by‐one basis. 1. Access the 2) Zones menu. 2. From with the Zones menu, press 1)Parameters 3. From with the Parameters sub‐menu, Press the 1) One by One menu option. The following display appears: ZONE ONE BY ONE ZONE#=01 (XY:ZZ) Note The display next to the selected zone number defines the type of zone and its location in the system in the format XY:ZZ X: Zone physical type (E=Wired zone, W=Wireless zone, B=Bus zone, I=Input zone or single BUS zone expander) Y: The expander ID number. “0” represent the main bus, for example: E0:04 refer to wired zone 04 on the main board. B0:15 refers to bus zone 15 on the main bus. ZZ : The serial zone number in the system (01‐32) 4. Specify a two‐digit zone number from which you want to start programming (for example, 01) and press to access the category of Zone Label. 5. Enter the zone label. The Labels category enables you to create and/or edit up to 15 characters to describe each of the systemʹs zones (see page 90) 6. Press to confirm and proceed to the partitions category. The Partitions menu ...
-
Page 97: Zones: Parameters: By Category
Installer Programming Note: Each partition has 4 groups. The zone group definition is common to each of the partitions assigned to the zone. 8. Press to confirm and proceed to the zone type category, displayed as follows: Z=01 TYPE: 01)EX/EN1 (and subsequently sound (page 104), termination (page 105) and loop response (page 106). Zones: Parameters: By Category Use this option to modify settings of a specific parameters to all zones. Quick Keys Parameter Default Range Label The label identifies the zone in the system. Up to 16 characters, as per the procedure described on page 62. Partition ... - Page 98 Installer Programming Zone Type Default Range Quick Keys Parameter Not Used Disables a zone. All unused zones should be given this designation Exit/Entry 1 Used for Exit/Entry doors. Violated Exit/Entry zones do not cause an intrusion alarm during the Exit/Entry Delay. If the zone is not secured by the end the delay expires it will trigger an intrusion alarm. To start an arming process, this zone should be secured. When system is armed, this zone starts the entry delay time. Exit/Entry 2 Arm/Stay Same as above, except that the Exit/Entry 2 time period applies. Exit (OP)/Entry 1 Used for an exit/entry door, open during the armed period. This zone behaves as described in the Exit/Entry 1 parameter, shown above, except that, if faulted when the system is being armed, it does NOT prevent arming. To avoid an intrusion alarm, it must be secured before the expiration of ...
- Page 99 Installer Programming Default Range Quick Keys Parameter I+ Exit/Entry 1 (Interior+ Exit/Entry 1) Used for Exit/Entry doors, as follows: If the system is armed in the AWAY (ARM) mode, the zone(s) provide a delay (specified by Exit/Entry 1) allowing entry into and exit from an armed premises. If the system is armed in the STAY mode, the zone is bypassed. Important: For greater security when arming in the STAY mode, it is possible to eliminate the Entry Delay period associated with any zone(s), classified as Exit/Entry Delay 1 by pressing the key twice, one after another. In effect, this makes it an INSTANT zone during the STAY mode of operation I + Exit/Entry 2 (Interior + Exit/Entry 2) Same as the I+Exit/Entry 1 parameter, described above, but the Exit/Entry 2 time period is applicable. I + Exit(OP)/Entry 1 Interior + Exit(OP)/Entry 1) Used for an exit/entry door that, for convenience, may be kept open when the system is being armed, as follows: In AWAY (FULL ARM) mode behaves as an Exit (Op)/Entry 1 zone ...
- Page 100 Installer Programming Default Range Quick Keys Parameter foyer), which would have to be violated after entry in order to disarm the system, as follows: In AWAY (FULL ARM) mode behaves as an Entry Follower zone. above (see In Stay (ARM) mode, the zone will be bypassed. I + Instant (Interior + Instant) Usually intended for non‐exit/entry doors, window protection, shock detection and motion detectors. In AWAY (FULL ARM) mode behaves as an intruder (instant) zone. In STAY (ARM) mode, the zone is bypassed. UO Trigger For a device or zone, which if violated at any time triggers a previously programmed utility output, and is capable of activating an external indicator, relay, appliance, and so on. Day Usually assigned to an infrequently used door, such as an emergency ...
- Page 101 Installer Programming Default Range Quick Keys Parameter Fire For smoke or other types of fire detectors. This option can also be used for manually triggered panic buttons or pull stations (if permitted), as follows: If violated, it causes an immediate fire alarm, and the Fire/ LED is lit (steady). A fault in the wiring (wire open) to any fire zone causes a Fire Trouble signal (a rapid flashing of the keypadsʹ FIRE / LED). A short in the wires will cause an immediate alarm. Panic Used for external panic buttons and wireless panic transmitters. If violated, an immediate panic alarm is sounded (if the zone sound is not defined as silent or audible panic system control is enabled), regardless of the system’s state and panic report is sent to the monitoring station. An alarm display will not appear on the keypads. If violated, an immediate panic alarm is sounded, regardless of the systemʹs state. Special For external auxiliary emergency alert buttons and wireless auxiliary ...
- Page 102 Installer Programming Default Range Quick Keys Parameter Latch Keyswitch Connect an external SPST latched (non‐momentary) keyswitch to any zone terminals given this designation and operate the keyswitch, as follows: After arming one or more partitions using the keyswitch and then disarming using the keypad, the related partitions will be disarmed. In order to arm the partition using the keyswitch again, turn the key to the disarm position and then to the arm position. If a keyswitch latch is assigned to more than one partition and one of the partitions is armed by using the keypad (the keyswitch stays in the disarm position), then: When changing the position of the keyswitch to the arm position, all the disarmed partitions, which belong to this keyswitch, will be armed. When turning the keyswitch to the disarm position, all the partitions will be disarmed. Entry Follower + Stay Assigned to motion detectors and to interior doors protecting the area between the entry door and the keypad, as follows: In STAY (ARM) mode, a zone(s) given this designation behaves like an Exit/Entry zone and is subject to the Entry and Exit Delay time periods specified under Exit/Entry Delay 1. (Refer to Exit/Entry Delay 1, page 95.) ...
- Page 103 Installer Programming Default Range Quick Keys Parameter Tamper For tamper detection. This zone operates the same as 24 hours zone, but it has a special reporting code. Note: For this zone type the zone sound is determined according to the Tamper Sound defined under 1) System 4) Sound 1) Tamper Technical This zone operates the same as 24 hours zone, its report code should be manually set according to the relevant detector connected to the zone. Water For flood or other types of water detectors. This zone operates the same as 24 hours zone, but it has a special flood report code. Gas ...
-
Page 104: Sound
Installer Programming Default Range Quick Keys Parameter Key Box This zone is mainly used in Scandinavia. Triggering this zone will be recorded in the event log. It can also be reported to the monitoring station. No alarm is triggered. When using this zone you should connect the alarm wiring of this zone (usually the auxiliary contact of a door) to an external key box and the tamper wiring to the housing switch. KeySwitch Arm This zone is used by financial institutions such as cash distribution centers and banks to control the arming of the vault door or treasury department entrance. Use this zone for instant arming of the partition in which the zone is allocated. This zone cannot perform disarming operation. KeySwitch Delayed Arm ) ( Same as the KeySwitch Arm type but the arming will be delayed following exit delayed time. Sound This menu enables you to program the sound produced when a systems zone triggers and alarm. Report to the central station are not affected by the option of this menu. ... -
Page 105: Termination
Installer Programming Quick Keys Parameter Default Range At Arm Set the sound produced when a systemʹs zone triggers an alarm while the system is armed in Away. At Stay Set the sound produced when a systemʹs zone triggers an alarm while the system is armed in STAY. At Disarm Set the sound produced when a systemʹs zone triggers an alarm while the system is Disarmed. Termination The Termination menu enables you to program the connection type used for each of the systemʹs zones. The actual (physical) termination for each zone must comply with that selected in the zone termination menu N/C Uses normally‐closed contacts and no terminating End‐of‐Line Resistor ... -
Page 106: Loop Response
Installer Programming Loop Response The Loop Response menu enables you to set the different times for which a zone violation must exist before the zone will trigger an alarm condition 1) Normal: 400 ms (milliseconds). 2) Long: 1 second 3) Fast: 10 ms (milliseconds). 4) Extra Fast: 1 ms (millisecond). This loop response is usually used for shutters or other devices that require very quick responses Quick Keys Parameter Default Range Advanced Forced Arming ZZ This option enables or disables the use of forced arming for each of the systemʹs zones, as follows: 1. If forced arming is enabled for a particular zone, it allows the system to be armed even though this zone is faulty. 2. When a zone(s) enabled for forced arming is faulted, the red LED blinks during the disarm period. ... -
Page 107: Bus Zones Configuration
Installer Programming Abort Alarm ZZ This parameter defines whether a zone alarm report to the monitoring station will be immediate or delayed: ENABLE: A report to the MS will be delayed according to the Abort Time Delay parameter 5) Communication > 2 MS > 6 MS Times > 2 Abort Alarm, page 161). DISABLE: A report to the MS will be sent immediately Quick Keys Parameter Default Range Bus Zones Configuration The Bus Zone Parameters menu contains parameters that enable you to program the special parameters of a bus zone. The options are ... - Page 108 Installer Programming iWISE DT Grade 3: A motion detector incorporating both Anti‐ Mask and Anti‐Cloak Technologies (ACT). It adheres to environmentally friendly guidelines and is available in 15m and 25m models. BWare DT Grade 3 A dual technology Grade 3 industrial detector with signal processing based on two Passive Infrared (PIR) channels and two k band Microwave (MW) channels BWare QUAD Grade 3 A motion detector incorporating Anti‐Mask and Quad PIR technologies. Seismic: A detector that monitors the vibration and temperature of a specific surface and will react to all known types of intruder attacks. Use the instructions below to set parameters for the relevant bus zone detector. To configure the Bus Zone detector parameters: From the Miscellaneous menu, press [3] to access the Bus Zone parameters menu options. The following display appears: Select the zone that the bus zone detector was assigned to and press . The Bus Zone parameters menu appears. Use the below tables to configure the parameters for each Bus Zone detector type. Bus Zone: OPR12 (WatchOUT PIR) Quick Keys Parameter Default Range ZZ LEDS ...
- Page 109 Installer Programming Quick Keys Parameter Default Range ZZ Auxiliary Relay Mode Defines the operation of the auxiliary relay of the detector. OFF ‐ Auxiliary relay is disabled 24 Hours ‐ The auxiliary relay will always follow an alarm NIGHT ONLY ‐ The auxiliary relay output will follow an alarm condition only during night time. The time defined by the photocell on the PCB. ZZ Auxiliary Relay Time 2.2 Seconds 2.2–480 seconds Defines the time duration that the auxiliary relay is activated. 2.2 SECONDS 2 MINUTES 4 MINUTES 8 MINUTES Bus Zone: iWISE DT Grade 2 Quick Keys Parameter Default...
- Page 110 Installer Programming Quick Keys Parameter Default Range ZZ Green Line A feature that follows environmental guidelines by avoiding surplus emission This feature defines the activation of the microwave channel while the system is disarmed. NO ‐ Green Line feature is disabled. MW is constantly activated. YES ‐ Green Line feature is activated. ZZ Self Test Remote Used to test the detection technologies. In the event of a failed test, a Self Test Trouble is created. REMOTE (Manual) ‐ The remote self test is performed by the system when a user manually selects the Diagnostics option from the Maintenance menu via the LightSYS2 User Functions menu LOCAL (automatic) ‐ Once an hour, the detector automatically checks that the detector’s channels are functioning properly. Bus Zone: (Industrial) Lunar /BWare/iWISE DT Grade 3 Quick Keys Parameter Default Range ZZ...
- Page 111 Installer Programming Quick Keys Parameter Default Range ZZ Automatic Microwave Bypass Defines whether the MW channel will be bypassed or not while the detector identifies trouble in the MW channel. NO ‐ While detecting a problem in the MW channel it is not bypassed. Alarm condition cannot be established until the MW channel is fixed. YES ‐ Switches the detector to operate only in PIR mode in case of MW trouble ZZ Green Line A feature that follows environmental guidelines by avoiding surplus emission This feature defines the activation of the microwave channel while the system is disarmed. NO ‐ Green Line feature is disabled. MW is constantly activated. YES ‐ Green Line feature is activated. ZZ Anti‐Mask Enable Defines the operation of Anti Masking detection. DISABLE ENABLE and behaves according to the settings defined in ZZ quick keys ZZ Arm/Disarm Defines the operation of the anti masking detection while the detector is armed or disarmed . ...
- Page 112 Installer Programming Bus Zone: iWISE QUAD Grade 2 Quick Keys Parameter Default Range ZZ LEDS Defines the LEDS operation mode. OFF ‐ Disables the LEDS operation. ON ‐ Enables the LEDS operation ZZ PIR Sensitivity High Defines the PIR sensitivity of the detector. LOW HIGH ZZ Self Test Remote Used to test the detection technologies. In the event of a failed test, a Self Test Trouble is created REMOTE (Manual) ‐ The remote self test is performed by the system when a user manually selects the Diagnostics option from the Maintenance menu via the LightSYS2 User Functions menu LOCAL (automatic) ‐ Once an hour, the detector automatically checks that the detector’s channels are functioning properly Bus Zone: iWISE/BWare QUAD Grade 3 Quick Keys Parameter Default...
- Page 113 Installer Programming Quick Keys Parameter Default Range ZZ Arm/Disarm Defines the operation of the anti masking detection while the detector is armed or disarmed. NO – While armed or disarmed, anti‐mask behaves according to the ZZ setting defined in quick keys above. YES – While armed, anti‐mask is disabled. When detector is disarmed Anti‐mask behaves according to the settings defined in quick keys ZZ . ZZ Self Test Remote Used to test the detection technologies. In the event of a failed test, a Self Test Trouble is created REMOTE (Manual) ‐ The remote self test is performed by the system when a user manually selects the Diagnostics option from the Maintenance menu via the LightSYS2 User Functions menu LOCAL (automatic) ‐ Once an hour, the detector automatically checks that the detector’s channels are functioning properly. Bus Zone: ODT15 (WatchOUT DT) Quick Keys Parameter Default Range ZZ...
- Page 114 Installer Programming Quick Keys Parameter Default Range ZZ Anti Mask Sensitivity Defines the sensitivity of the active IR AM: LOW HIGH ZZ Lens Type Wide Angle Defines the actual lens of the detector. WIDE ANGLE BARRIER / LONG RANGE ZZ Anti‐Mask Enable Defines the operation of Anti Masking detection. DISABLE Enable ZZ Arm/Disarm Defines the operation of the LEDs and Anti masking detections while the detector is armed. Active IR AM and Proximity AM (Anti masking) is enabled. LEDs behave according to the LEDs parameter definition. YES – Active IR AM and Proximity AM (Anti masking) is disabled LEDs are disabled. ZZ Prox Anti‐mask Enable Defines the operation of proximity anti masking detection. ...
- Page 115 Installer Programming Quick Keys Parameter Default Range ZZ MW (Microwave) Range Trimmer Defines the microwave channel range. MINIMUM 25% 50% 65% 85% MAXIMUM TRIMMER (MW is defined by the trimmer setting on the PCB) ZZ Alarm Logic PIR and Microwave Determine the detector’s logic of defining an alarm. PIR & MW (and Microwave) – An alarm is activated when both PIR and MW channels detect an alarm (AND Logic). PIR / MW (or Microwave) ‐ An alarm is activated when either PIR or MW channels detect an alarm (OR Logic). ZZ Lens Type Wide Angle Defines the actual lens of the detector. ...
- Page 116 Installer Programming Seismic Quick Keys Parameter Default Range ZZ Sensitivity Normal Defines the Seismic sensitivity of the detector. LOW MEDIUM NORMAL HIGH ZZ Interference (Accumula‐ 10 Sec 10, 20, 40, 80 sec ‐ tion/Integration) Time Defines the moving window of time in which the vibration signal is accumulated (integrated). Detection is triggered when the accumulated signal reaches a threshold value. Longer time causes higher detection sensitivity. ZZ Explosion Sensitivity Normal Defines the explosion sensitivity of the detector. LOW MEDIUM NORMAL HIGH ZZ Temperature Sensitivity Defines the sensitivity to temperature change. LOW HIGH ZZ ...
-
Page 117: Wireless Zones Configuration
Installer Programming Wireless Zones Configuration The Wireless Zone Parameters menu contains parameters that enable you to program the special parameters of a wireless zone. The options are determined according to the wireless detector type: 1‐Way Non‐Restorable: 2‐Way WatchOUT: A dual technology outdoor detector with signal processing based on two Passive Infrared (PIR) channels and two Microwave (MW) channels. 2‐Way Magnet: (including shutter and universal) 2‐Way IR Beams 2‐Way Smoke 2‐Way PIR, Shock, Flood, Gas, Curtain, High Temperature, Zone Button Use the instructions below to set parameters for the relevant wireless zone detector. 1-Way and 2-Way Smoke Quick Keys Parameter Default Range ZZ Serial No. - Page 118 Installer Programming 2-Way PIR, Shock, Flood, Gas, Curtain, High Temperature, Zone Button, WatchOUT and Wired IR Beam Quick Keys Parameter Default Range ZZ Serial No. The identifying 11‐digit number on the detector sticker ZZ Control ZZ Supervision No Yes/No Determines if this zone will be supervised by the system expander according to the time defined under the timer RX Supervision (see page 71).. ZZ LED Enable Yes Yes/No Defines whether or not the LEDS operation mode is enabled ZZ...
- Page 119 Installer Programming 2-Way Magnet (X73) Quick Keys Parameter Default Range ZZ Serial No. Normal The identifying 11‐digit number on the detector sticker ZZ Control ZZ Supervision No Yes/No Determines if this zone will be supervised by the system expander according to the time defined under the timer RX Supervision (see page 71)... ZZ LED Enable Yes Yes/No Defines whether or not the LEDS operation mode is enabled ZZ (M&F Univ only) Magnet Enable Yes Yes/No Yes (Enable) or No (disable) the transmitter’s magnet. ZZ Alarm Hold On On On/Off Use this parameter to define the minimum period between alarm broadcasts. ...
- Page 120 Installer Programming N/C: Uses normally‐closed contacts and no terminating End‐of‐Line Resistor. DEOL: Uses normally‐closed (NC) contacts in a zone using two 10 KΩ of End‐of‐Line Resistors to distinguish between alarms and tamper conditions ZZ Input Response Time 500 10/500mSEC 10 mSEC 500mSEC Set the duration for which a zone violation must exist in order for the zone to trigger an alarm condition. ZZ (F Univ. only)Anti‐Sabotage Disabl Enable/Disable Enable or disable the transmitter’s anti‐sabotage magnet. ZZ (F SP only)Shutter Pulse 02 01‐16 Define here the number of pulses for the input. Resistance In the LightSYS2 you have the ability to define separately the end‐of‐line resistance of the zones on the main unit Selection is done by the software with the following available options Specify here the optional circuit resistance configuration. Custom 4.7K; 4.7K 2.2K; 2.2K 3.3K; 4.7K 4.7K; 6.8K 1K; 1K 6.8K; 2.2K 3.3K;...
-
Page 121: Testing
Installer Programming Testing The following menu is used to perform tests on the system. Note that each test refers to the last time the device was activated. Tests can be performed on the following elements: Quick Keys Parameter Default Range Self Test This feature provides an automated self‐test for a selected group of localized intrusion sensors (for example, glass break detectors, sound discriminators and shock sensors) which respond to an artificial source of noise and/or vibration. Automated self‐testing is especially useful when sensors are placed in high security areas where failure cannot be tolerated. Up to 16 zones can be designated for self‐testing. A sound or vibration generator should be used that can be placed close enough to the sensors to trigger them when the noise source is activated. A Programmable Output acts as the source of switched power for the noise/vibration generator (refer to Sensors Test, page 127). This is set to conform to the testing schedule. The schedule defines the time and day for the first test, and sets the times for repeated tests over a 24‐ hour period. A message is sent to the Central Station if all the related sensors are triggered during the test (if a Report Code has been defined).With successful completion of the self‐test, an entry is also placed in the system’s Event Log. If one or more of the sensors fails to trip during the test period, a self‐ test failure message is generated and sent to the Central Station. A record of the failure is also entered in the Event Log. Soak Test The Soak Test feature is designed to allow false alarming for predefined detectors to be bypassed from the system, while any alarms generated are ... -
Page 122: Cross Zones
Installer Programming If a zone in the Soak Test list has an alarm during the 14‐day period, the keypad indicates to the user that the test has failed. After the user looks at the View Trouble option (described in the LightSYS2 User’s Manual), the trouble message will be erased. This will be indicated in the event log, but no alarm will be generated. The alarmed zone’s 14‐day Soak Test period is then reset and restarted.. To set up a Soak‐Test. [LightSYS] From the Install menu, press quick keys . The following display appears: ZONES FOR TEST: 01) ZONE 01 2. To put a zone on Soak Test, press . The following display appears: LOCATION 01: ZONE: 00-32 Press the keys as per the zone number (e.g. 01 for zone 1) Press to confirm and display the initial menu. To add a second zone for Soak Test, press and repeat the procedure above, ‐OR Press the key to return to the previous menu. Cross Zones Default: No cross zoning The Zone Crossing menu is used for additional protection from false alarms and contains parameters that enable you to link together two related zones. Both must be violated within a designated time period (between 1 and 9 minutes) before an alarm occurs. ... - Page 123 Installer Programming Quick Keys Parameter Default Range Cross Zones None To set up a Cross Zone From the Install menu, press quick keys . The first zone link appears: ZONES CROSSING: 01 S 01 : Press to modify the first set (01) of zone links CROSSING SET 01: = 01 2 Select the zone pairs manually, as required, by making changes to the number of the first zone in the set, followed by the number of the second zone. If necessary, use the keys to position the cursor. Note: Zones crossed with themselves are valid pairs. They need to register a violation twice to trigger the alarm. This process is known as Double Knock. ...
-
Page 124: Alarm Confirm
Installer Programming Quick Keys Parameter Default Range ORDERED–Correlated: Effects an alarm so the first listed zone is tripped before the second NOT ORDERED–Correlated: Effects an alarm in which either zone in the pair may be tripped first. In this case, the specified zone order (1 , 2 ) has no bearing on the alarm activation. Press to display the alarm violation differential screen: T.SLOT: XX,YY SIZE=1 MINUTES Enter the time slot, meaning the maximum amount of time allowed between the triggering events for them to be considered a valid violation (XX,YY indicate the crossed zones). Default: 1 min Range: 1 to 9 minutes Repeat the entire process, as required, for any additional zone links (up to 10). Alarm confirm The Alarm Confirmation menu enables to define protection against false alarms and can be used for alarm verification Quick Keys Parameter Default Range Alarm confirm ... -
Page 125: 3 Outputs
Installer Programming Quick Keys Parameter Default Range Confirm zones Define which zones are to be defined for alarm sequential confirmation. When the first zone goes into alarm the system transmits the first zone alarm. When the second zone goes into alarm, during the confirmation time, the panel transmits the zone alarm and the police code. Notes: A confirmed zone will be part of the sequential confirmation only if the partition in which the alarm occurs is defined as confirmed partition as well. Any Code can reset a confirmed alarm. If the first zone is violated and not restored until the end of the confirmation time (no second zone alarm), than this zone will be excluded from the confirmation process until the next arming. Cycle through the eight zones and to toggle Y/N 3 Outputs The Utility Output menu provides access to submenus and their related programming parameters that enable you to choose the event that will trigger a selected Utility Output, as well as the manner in which the output will be applied. Adding one or more Utility Output expansion modules to the system makes an extensive list of switched output possibilities available. After you access the Utility Output menu from the main Installer Programming menu, as described in this section, you can access the following submenus: Nothing, page 126 System, page 126 Partition, page 128 ... -
Page 126: Nothing
Installer Programming To access the Utility Output menu: From the main Installer Programming menu, press , or press the / keys until you find the number 3)UTILITY OUTPUT option and then press . Enter a two‐digit number for the Utility Output that you want to program, using a leading zero for numbers between 1 and 9 (for example, 01, 02, and so on) and then press . You can now program the selected Utility Output. Use the information shown below. Note When selecting an output the display “(x:yy) represent the output location in the system. In the 0:yy designation, the 0 represents denotes that the output is on the main unit and is not assigned to an output expander. The yy represents the output ID number (up to 14). Nothing The Nothing option enables you to disable the selected Programmable Output. Access the Utility Output menu and select an output. Press to disable the selected utility output. Follow System The System menu contains Utility Output parameters that follow the System Event. Utility Outputs: System Quick Keys Parameter Bell Follow ... - Page 127 Installer Programming Quick Keys Parameter Trouble Follow Activates when a system trouble condition is detected. Deactivates after the trouble has been corrected Main Low Battery Follow Activates when the LightSYS2 rechargeable standby battery has insufficient reserve capacity and the voltage decreases to 11 V or following an accessory low battery indication. AC Loss Follow Activates when the source of the main panel’s AC power is interrupted. This activation will follow the delay time defined in the system control times and the AC Off Delay Time parameter (refer to page 72). Sensors Test Relates to the LightSYS2 Zone Self‐Test (Quick Keys ) This option is selected if the designated utility output is part of the circuit providing switched power for the source of noise (or vibration) used in the sensors test procedure. Battery Test A pulsed utility output will follow the battery test only once a day at 9:00 AM. The pulse interval is ten seconds. This parameter is usually ...
- Page 128 Installer Programming Quick Keys Parameter Switched Aux Activates the utility output when a fire zone is activated (for fire detection) according to the time defined in double verification of fire alarms, page 7777. This utility output will not have the option to choose pulse or latch in the Utility Output: Code. The pulse time is defined in switched auxiliary break, page 71. GSM Error Relates to GSM/GPRS module. Activates the utility output in the following cases: There is no SIM card in the GSM/GPRS BUS Module or SIM is faulty GSM RSSI signal level is low GSM network fault Bell Test Activates the output when the “Bell Test” option is selected and deactivates when the “Bell Test” option is finished. Installation Activates the output following the system installation status. It activates when the system is in installer programming mode and deactivates when exiting installer’s mode. ...
-
Page 129: Follow Partition
Installer Programming Panic Activates the output (Pulsed only) following any panic activation in the system. The maximum number of times an output can be activated from the same zone is defined according to the Swinger Limit Timer (Quick key ). Fire Activates the output (Pulsed only) following any fire activation in the system. The maximum number of times an output can be activated from the same zone is defined according to the Swinger Limit Timer (Quick key ).. Special Activates the output (Pulsed only) following any special emergeny activation in the system. The maximum number of times an output can be activated from the same zone is defined according to the Swinger Limit Timer (Quick key ). 24 Hour Activates the output (Pulsed only) following any 24 Hour zone activation in the system. The maximum number of times an output can be activated from the same zone is defined according to the Swinger Limit Timer (Quick key ). ... - Page 130 Installer Programming Quick Keys Parameter Ready Follow Activates the output when all the selected partition(s) are in the READY state. Alarm Follow Activates the output when an alarm occurs in the selected partition(s). Arm Follow Activates the utility output when the selected partition(s) is armed in either the AWAY or STAY mode. The utility output will be activated immediately, regardless of the exit delay time period. Burglary Follow Activates the output when an intruder (intrusion) alarm occurs in the selected partition(s). ...
- Page 131 Installer Programming Quick Keys Parameter Exit/Entry Follow Activates the output when the selected partition(s) initiates an Exit/Entry delay period. Fire Trouble Follow Activates the output when a FIRE TROUBLE is detected in the selected partition(s). Day (Zone) Trouble Activates when a day zone trouble is detected in the selected partition(s). General Trouble Follow Activates the output when a fault condition is detected in the selected ...
- Page 132 Installer Programming Quick Keys Parameter Bell Stay Off This parameter causes the output to function as follows: In Away arming mode, the output will follow the bell activation in the defined partitions. In Stay mode, the output will not be activated. Notes: If an alarm occurs in a zone that shares more than one partition and one of the partitions is in Arm mode (while the other is in Stay mode), the output will be activated, as described above. In Stay mode, a 24‐hour zone will not activate this output. Zone Bypass Activates the output when the relevant partitions are in Away or Stay mode and any zone in the relevant partitions is bypassed. Automatic Arm Alarm ...
- Page 133 Fail To Arm Activates when one of the defined partitions fails to arm and deactivates at user reset. Confirm Alarm The output activates when a confirmed alarm occurs in a partition and deactivates at the restore of the alarm confirmation. RISCO recommends that you use this output for the Red‐Care STU Confirmed Alarm channel. Duress Follow Activates the Utility Output when a DURESS alarm is initiated at the keypad related to the selected partition(s). Press . The following display appears: P=1234 UO=XX Y... Note: The XX in the UO=XX refers to the number of the Utility Output currently being programmed Use the ...
-
Page 134: Follow Zone
Installer Programming Follow Zone The Zone menu contains Utility Output parameters that follow the Zone Event. Each Utility Output can be activated by a group of up to five zones To access the Zone sub‐menus: Access the outputs menu, as described on page 125. From the Utility Output menu, press [3]. The following display appears UO=01 FOLLOWS: 3) ZONE Press to access the Zones menu. The following display appears: ZONE EVENT: UO=01 ZONE FOLLOW Select the zone event type to be followed from the following list: Utility Output: Zone Quick Keys Parameter Zone Follow Activates the utility output when the selected zone is tripped. The tripped zone need not be armed to trigger the utility output. ... -
Page 135: Follow Code
Installer Programming Follow Code The code menu parameters enable you to program the activation of the selected utility output when the user chooses the user functions menu (Selects ACTIVITIES/UTIL OUTPUT, enters an authorized user code and presses . The installer designates the user code(s) for triggering the selected UO. Refer to the LightSYS2 User’s Manual for additional details about triggering utility output(s) via user codes. Note: The utility output is activated by entering a user code only if the Quick UO parameter under System Control is defined as Disabled. When the Quick UO is defined as Enabled, no user code is required. To access the Code sub‐menus: Access the outputs menu, as described on page 125. From the Utility Output menu, press . The following display appears: UO=01 FOLLOWS: 4) CODE Press to display the following CODES FOR UO=01: 00)GRAND N Use the and keys to select from any of the 16 available users codes. Use the key to toggle between Y YES or N NO for each user chosen to trigger the designated utility output. ... - Page 136 Installer Programming Utility Output: Pattern of Operation Quick Keys Parameter Default Range 05 seconds 01‐90 seconds Pulse N/C The utility output is always activated (N/C) before it is triggered (pulled down to negative). When triggered, it deactivates for the pulse duration specified below and then reactivates automatically. Press and then press . Choose the desired pulse duration, between 01‐90 seconds. Press and set the activation by choosing ALL or ANY using the key. Press and define a label for the UO (refer to the note below). Latch N/C The utility output is always Activated (N/C) before it is triggered ...
-
Page 137: 4 Codes
Installer Programming Quick Keys Parameter Default Range Latch N/O 05 seconds 01‐90 seconds The utility output is always deactivated (N/O) before it is triggered (pulled up). When triggered, it activates (is pulled down) and remains activated (latched) until the operation is restored. Press and then press . Using the key select ALL or ANY to set the activation and press . Using the key select ALL or ANY to set the deactivation and press . Define the output label and press Note You can create and/or edit a ten‐character label description for each utility output. See page 62, for additional details Utility Output; Activation/Deactivation When the utility output is following more than one partition or zone, the installer can choose the logic of the utility output activation or deactivation, as follows: If the Pattern of Operation is defined as Latch N/O or Latch N/C, the Installer can choose the activation and deactivation logic of the UO to follow either after all the Partitions/Zones or after any of the Partitions/Zones. ... -
Page 138: User
Installer Programming Sub‐Installer Code: Used by a technician sent by the LightSYS2 installation company to carry out restricted tasks defined at the time of system installation by the installation technician. The Sub‐Installer can access with his code only those programming menus predefined for his access. This section describes how to perform the following: Determine the authority level of each user code Assign partition(s) to a specific code Change the Grand Master, Installer, and Sub‐Installer codes Upgrade the security level to a six‐digit code After you access the Code Maintenance menu from the main Installer Programming menu, as described in this section, you can access the following submenus: User, page 137 Grand Master, page 140 Installer, page 141 Sub‐Installer, page 141 Code length, page 141 To access the Codes menu: 1. From the main Installer Programming menu, press [4], or press the / keys until you find the number [4] Codes and then press . The first submenu 1) User appears. 2. You are now in the Codes menu and can access the required submenus, as described ... - Page 139 Installer Programming Quick Keys Parameter Default Range Partition Specify the partition(s) for which the designated user can have access by using the to keys. Authority Level The Authority menu enables you assign the Authority Level of each User Code. There are seven Authority Levels to match the needs of various users, as described in Authority Levels, below Toggle through the set of available user definitions using the key: Master: There are no restrictions in the number of master codes (as long as they do not exceed the number of codes remaining in the system). Restricted to assigning and changing user codes belonging to those with authority levels of master and below (user, arm only, and maid) Restricted access to designated partitions User: There are no restrictions in the number of user codes (as long as they do not exceed the number of codes remaining in the system). The user has access to the following: Arming and disarming ...
-
Page 140: Grand Master
Installer Programming Quick Keys Parameter Default Range Cleaner: The cleaner code is a temporary code, which is to be immediately deleted from the system as soon as it is used to arm. This code is typically used for maids, home attendants, and repairmen who must enter the premises before the owner(s) arrive. These codes are used as follows: For one‐time arming in one or more partitions. If first used to disarm the system, the Maid code may be used once for subsequent arming. User Unbypass: This user has access to all the user’s privileges apart from bypassing zones. Guard: This user can only disarm the system. After entering the Guard code, the system will be disarmed for the predefined time period (See: Guard Delay, page 72). Duress: When coerced into disarming the system, the user can comply with the intruder’s wishes while sending a silent duress alarm to the central station. To do so, a special duress code must be used, which when used, will disarm the system in the regular manner, while simultaneously transmitting the duress alarm. In any other situation the Duress authority level behaves the same as the user authority level. UO Control: Typically used to enable the operation of a device controlled by a utility output (meaning a door and so on). These codes are used only to operate a utility output. Grand Master Default: 1234. The Grand Master Code is used by the system’s owner and is the highest Authority Level. The owner can set/change the Grand Master Code. ... -
Page 141: Installer
Installer Programming Installer Default: 1111 The Installer Code provides access to the Installer Programming menu, allowing modification of all system parameters. The Installer Code is used by the LightSYS2 installation company technician to program the system. The Installer can change the Installer Code. Sub Installer Default: 2222 The sub‐installer code allows limited access to selected parameters from the installer programming menu. We recommend changing the factory default to a code unique to the main panel and/or to those who may serve as sub‐installers in your MS, as described in the following procedure. The Sub‐Installer is prohibited to access the following parameters: Default Enable Code Length Installer Code Communication menu. Code Length The Code Length specifies the number of digits (either 4 or 6) for the Grand Master and Master codes. All the other codes (User, Arm Only and Maid) use from one digit up to a maximum of six digits. Note: When you change the code length parameter, all user codes are deleted and must be re‐ programmed or downloaded. For a 6‐digit Code Length system, 4‐digit default codes like 1‐2‐3‐4 (Grand Master), 1‐1‐1‐1 (Installer), and 2‐2‐2‐2 (Sub‐Installer) become 1‐2‐3‐4‐0‐0, 1‐1‐1‐1‐0‐0, and 2‐2‐2‐2‐0‐0, respectively. If you change the Code Length back to 4 digits, the system codes are restored to the default 4‐ digit codes. EN 50131 Note: ... -
Page 142: 5 Communication
Installer Programming 5 Communication The Communication menu provides access to submenus and their related parameters that enable the system to establish communication with the monitoring station, Follow Me or Configuration Software. The Communication menu is divided into the following sub‐menus: Method, page 142 Monitoring Station (MS), page 153 Configuration Software, page 164 Follow Me, page 167 Method This option allows you to configure the parameters of the communication methods (channels) of the LightSYS, with three available communication types: PSTN GSM IP Radio (Long Range radio) PSTN Quick Keys Parameter Default Range PSTN The PSTN screens contains parameters for the communication of the LightSYS2 over the PSTN network. ... - Page 143 Installer Programming Quick Keys Parameter Default Range Wait for Dial Tone 0–255 seconds The number of seconds the system waits to detect a dial tone. Control No Yes/No Alarm Phone Line Cut YES: Activates the external sirens if the land line, connected to the LightSYS2 panel is cut or the telephone service is interrupted for the time defined in the PSTN Lost time parameter. NO: No activation occurs. Answering Yes/No Machine Override YES: The Answering Machine Override is enabled, as follows: The configuration software at the alarm company calls the account. 2. The software hangs up after one ring by the CS operator. 3. Within one minute, the software calls again. 4. The LightSYS2 is programmed to pick up this second call on the first ring, thus bypassing any interaction with the answering machine. ...
-
Page 144: Timers
Installer Programming Quick Keys Parameter Default Range Rings To Answer 12 01‐15 The number of rings before the system answers an incoming call Area Code The system area telephone code. This code will be deleted from a telephone number while the system tries to dial the number through the PSTN network. PBX Prefix A number dialed to access an outgoing line when the system is connected to a Private Branch Exchange (PBX) and not directly to a PSTN line. This number will be added automatically by the system while trying to call from a PSTN line. Call Wait Enter a string to prevent call waiting from interrupting the system during a report to the monitoring station, as defined by your local telephone provider, for example: *70. This string will only appear during the first attempt to send a report to a MS number (PSTN or GSM). Note: Do Not use the Call Waiting cancel features inappropriately. Using this feature on a line with no call waiting will prevent successfully reporting to the monitoring station. Quick Keys Parameter Default Range... - Page 145 Installer Programming Quick Keys Parameter Default Range Low RSSI GSM 1 minute 001–255 minutes Duration The period length during which the reception is below the minimum threshold (defined by the GSM Network Sensitivity parameter) that ( triggers the Panel to send a report of GSM Lost. GSM Network Loss 10 minutes 001–255 minutes The period length after which the Panel will send a report of GSM network loss to the MS. 0 months 00–36 months SIM Expire A pre‐paid SIM card has a defined life length defined by the provider. After each charging of the SIM, the user will have to manually reset the expiration time of the SIM card. Thirty days before the expiring date, a notification will be displayed on the keypad’s LCD. Set the SIM expiring date (in months) using the numeric keys, according to the time given by the provider. MS Polling 00000 0‐65535 times ...
- Page 146 Installer Programming Quick Keys Parameter Default Range MS report MS 1 Polling MS 2Polling MS 3 Polling Urgent State State State events Do not call N/A N/A N/A Call 1 Primary N/A N/A Call 2 N/A Primary N/A Call 3 N/A N/A Primary ...
- Page 147 Installer Programming Quick Keys Parameter Default Range When communication to MS 1 fails, polling occurs every 90 seconds according to the backup interval to MS 2. When communication returns to MS 1, polling reverts back to the secondary time interval and occurs every 3600 seconds (1 hour) to MS#2. GPRS Allows programming parameters that relate for the communication over the GPRS network. APN Code To establish a connection to the GPRS network an APN (Access Point Name) code is required. The APN code differs from country to country and from one provider to another (the APN code is provided by your cellular provider). The LightSYS2 supports an APN code field of up to 30 alphanumeric characters and symbols (!, &, ? etc). APN User Name Enter user name for the GPRS network (if required). The user name is provided by your provider. The LightSYS2 supports a user name field of up to 20 alphanumeric characters and symbols (!, &, ? etc). APN Password The password to the GPRS network as provided by your provider (if required). ...
-
Page 148: Controls
Installer Programming Quick Keys Parameter Default Range SMTP Port 00000 00000–65535 The port address of the SMTP mail server. Email Address The Email address that identifies the system to the mail recipient. SMTP User Name A name identifying the user to the SMTP mail server The user name field can include up to 10 alphanumeric characters and symbols (!, &, ? etc) SMTP Password The password authenticating the user to the SMTP mail server The password can include up to ten alphanumeric characters and symbols (!, &, ? etc). Controls Allows controlling timers related to operation with the GSM module. ... -
Page 149: Prepay Sim
Installer Programming Quick Keys Parameter Default Range SIM Number The SIM phone number. The system uses this parameter to receive the time from the GSM network in order to update the system time. SMS Center Phone A telephone number of the message delivery center. This number can be obtained from the network operator. GSM Network Sensitivity (RSSI) Disabled/Low/High Set the minimum acceptable network signal level (RSSI level). Options: Disabled (No troubles for low signal reception) / Low signal / High signal Prepay SIM Allows programming parameters that will be used when a prepaid SIM card is used in the system. Get Credit by ... -
Page 150: Ip Config
Installer Programming Quick Keys Parameter Default Range SMS Message When performing manual Credit Level check this message will be sent to the provider in order to receive the SIM card credit. The message is predefined (for example “BILL”) by your service provider. * When using a service command this field is ignored. Quick Keys Parameter Default Range IP The IP menu contains parameters for the communication of the system over the IP network. IP Config The IP menu contains parameters for the communication of the system over the IP network . Obtain Automatic IP Defines whether the IP address, which the LightSYS2 refers to, is dynamic or static. ... -
Page 151: Email
Installer Programming Quick Keys Parameter Default Range Gateway (Only for Static IP) The IP address of the local Gateway, which enables communication settings to other LAN segments. This address is the IP address of the router connected to the same LAN segment as the LightSYS2. DNS Primary (Only for Static IP) The IP address of the primary DNS server on the network. DNS Secondary (Only for Static IP) The IP address of the secondary DNS server on the network. Email Allows programming parameters that enable the LightSYS2 to send Email messages following Follow Me events 000.000.000.000 Mail Host The IP address or the host name of the SMTP mail server. SMTP Port 00000 00000–65535 The port address of the SMTP mail server Email Address The Email address that identifies the system to the mail recipient. ... - Page 152 Installer Programming Quick Keys Parameter Default Range (polling) with the MS over the IP network, in order to check the connection. Three polling times can be defined: primary, secondary and backup. For each time period, define the number of units between 1– 65535. Each unit represents a time frame of 10 seconds. Note: When using the polling feature through IP, the MS channel parameter must be defined as IP only. The use of these time periods depends on the reporting order to the MS defined by the report split MS urgent parameter (See page 163). The following table describes how the three MSs use the primary, secondary and backup time intervals in the various MS report split options.) MS report MS 1 Polling MS 2Polling MS 3 Polling Urgent State State State events Do not call N/A N/A N/A Call 1 Primary N/A N/A ...
-
Page 153: Radio (Lrt)
Installer Programming Quick Keys Parameter Default Range MS Polling example: When selecting MS 1 (IP Only), MS 2 (IP only) and split report option 1 Backup 2 (using the default primary, secondary and backup time intervals), the report process will be as follows: In a normal state: Polling through the IP network using the IP module will occur every 30 seconds according to the primary time interval to MS 1 and every 3600 seconds (1 hour) according to the secondary time interval to MS 2. When communication to MS 1 fails, polling occurs every 30 seconds according to the backup interval to MS 2. When communication returns to MS 1, polling reverts back to the secondary time interval and occurs every 3600 seconds (1 hour) to MS#2 Radio (LRT) Quick Keys Parameter Default Range LRT (Long Range Transmission) The LRT menu contains parameters for setting a system long‐range radio communication network, using the Location Aided Routing (LARS) protocol (LARS, LARS1, or LARS2) or E‐LINE protocol to facilitate detailed event transmission to monitoring stations. 0 0–00FFFF Account Page 153... - Page 154 Installer Programming Quick Keys Parameter Default Range The number that recognizes the customer at the monitoring station. You can define an account number for each monitoring station. These account numbers are the 6‐digit numbers assigned by the monitoring station. Notes: Account Number Communication Format: The account number will always be reported as 4 digits, for example: A number defined as 000012 will be reported as 0012 The account range depends on which protocol is in effect, as follows: Protocol Range LARS 0000–7779 (First 3 digits: 0–7 only) LARS1 0000–1FFF LARS2 0000–FFFF If more than 4 digits were defined, the system always sends the last 4 digits of the account number, for example: Account number that was defined as 123456 will be sent as 3456. System 0 LARS 0–3 LARS1 0–7 LARS2 0–F Use the one‐digit system code to efficiently allocate transmitter reporting among monitoring stations. 00 HR: 00–96 Periodic Test MIN 00–59 The Periodic Test enables you to set how often the system will ...
-
Page 155: Monitoring Station
Installer Programming Quick Keys Parameter Default Range Control 060 0‐255 Disable Low Battery Y Yes/No YES: [For use when LRT is housed in the main LightSYS2 box] LRT low battery trouble condition will not be regarded. NO: [For use when LRT is housed remotely in its own box] LRT low battery trouble condition will be regarded. Monitoring Station The Monitoring Station menu contains parameters that enable the system to establish communication with the (up to three) monitoring stations and transmit data. Quick Keys Parameter Default Range Report Type Defines the communication type that the system will establish with each monitoring station. The system can report in four optional communication channels: Voice IP ... - Page 156 During regular operation mode all calls and data transmission are carried out using the GSM line. In the case of trouble in the GSM line, the line is routed to the PSTN line. 3. PSTN Only: The outgoing calls are executed through the PSTN audio channel only. Use this option for installations where no GSM line is available. 4. GSM Only: The outgoing calls are executed through the GSM audio channel only. Use this option for installations where no PSTN line is available. Enter the monitoring station telephone number including area code and special letters (if required). If calling from PBX do not include the number for outgoing line. Function Results Stop dialing and wait for a new dial W tone Wait a fixed period before continuing , Send the DTMF * character * Send the DTMF # character # Delete numbers from the cursor [*] position simultaneously IP Encrypted events are sent to the monitoring station over the IP or GPRS network using TCP/IP protocol. 128 BIT AES encryption is used. RISCO Group’s IP/GSM Receiver Software located at the MS site receives the messages and translates them to standard protocols used by the monitoring station applications (For example; contact ID). Page 156...
- Page 157 Select the required channel via the Configuration Software as follows: IP/GPRS: The panel checks for the availability of the IP network. During regular operation mode all calls and data transmission are carried out using the IP network line. In the case of trouble in the IP network, the report is routed to the GPRS network. 2. GPRS/IP: The panel checks for the availability of the GPRS network. During regular operation mode all calls and data transmission are carried out using the GPRS. In the case of trouble the report is routed to the IP network. 3. IP Only: The report is executed through the IP network only. 4. GPRS Only: The report is executed through the GPRS network. Enter the relevant IP and Port numbers for the MS that will receive reports from the system. (See IP and Port) SMS Events are sent to the monitoring station using encrypted SMS messages (128 BIT AES encryption). Each event message contains information including the account number, report code, communication format, time of event and more. The event messages are received by RISCO Group’s IP/GSM Receiver Software located at the MS/ARC site. The IP/GSM Receiver translates the SMS messages to standard protocols used by the monitoring station applications (For example; contact ID).This channel requires that RISCO Group’s IP/GSM receiver has to be used at the MS side. Enter the relevant phone numbers for the MS that will receive reports from the system. (See explanation in Voice type on page 168.) LRT The LRT menu contains parameters for setting a system long‐range radio communication network, using the Location Aided Routing (LARS) protocol (LARS, LARS1, or LARS2) or E‐LINE protocol to facilitate detailed event transmission to monitoring stations. Page 157...
-
Page 158: Accounts
Installer Programming Quick Keys Parameter Default Range Accounts The number that recognizes the customer at the monitoring station. You can define an account number for each monitoring station. These account numbers are the 6‐digit numbers assigned by the central station Notes: Notes for Account Number in contact ID Communication Format: The account number will always be reported as 4 digits, for example: A number defined as 000012 will be reported as 0012 If more than 4 digits were defined, the system always sends the last 4 digits of the account number, for example: Account number that was defined as 123456 will be sent as 3456. In Contact ID you can place digits and letters A–F. The A character is always sent as 0 for example: Account number that was defined as 00C2AB will be sent as C20B. Notes for Account Number in SIA Communication Format: Account number for SIA should be defined as a decimal number (Only digits 0..9) Account number can be reported as 1 to 6 digits. To send an account number with less than 6 digits use the “0” digit, for example: For account number 1234 enter 001234. In this case the system will not send the “0” digit to the monitoring station. In order to send the “0” digit in SIA format, located at the left side of the number, use the “A” digit instead of the “0” digit. For example, for account number 0407 enter 00A407, for a 6 digit account number such as 001207 enter AA1207. Communications Format ... -
Page 159: Controls
Installer Programming Quick Keys Parameter Default Range Controls Allows to program controls related to operation with the monitoring station Call Save No Yes/No YES: For reducing MS traffic congestion, the system holds all non‐urgent events (for example, opening/closing reports, test transmissions) for up to 12 hours (programmable) and sends them as a batch at a less busy time, for example, at night. (Refer to Dialer: Periodic Test, page 160) NO: All events are transmitted as they occur. Yes/No Show Kissoff No YES: The keypad indicates when the dialer receives the kissoff signal from the MS’s receiver. NO: The keypad does not indicate on receipt of the kissoff signal. Yes/No Show Handshake No ... -
Page 160: Parameters
Installer Programming Quick Keys Parameter Default Range Random MS Testing Yes/No Yes: At power‐up the panel will random set a test time between 00:00 and 23:59. Once the hour is set, this will be the fixed report hour of this panel. The time can be viewed under the Periodic test timer fields ). The interval of sending the test will be as defined under the Periodic Test timer No: The periodic test will be according to the time defined under the MS periodic timer ( ). Parameters Allows to program parameters related to operation with the Monitoring Station MS Retries 08 01–15 The number of times the LightSYS2 redials the MS after failing to establish communication. Alarm Restore Specifies under what conditions an Alarm Restoral is reported. This option informs the MS of a change in the specified condition(s) during an alarm restore. These reports need a valid Report Code. ... - Page 161 Installer Programming Quick Keys Parameter Default Range Use the table below to specify the daily testing intervals (D)‐effective from the day of programming: Meaning 0 Never H Every hour 1 Every day 2 Every other day 3 Every 3 day 4 Every 4 day 5 Every 5 day 6 Every 6 day 7 Once a week 15 secs Abort Alarm 00‐255 seconds Defines the time delay before reporting an alarm to the MS. If the alarm system is disarmed within the abort window, no alarm transmission shall be sent to the MS. ...
-
Page 162: Report Split
Installer Programming Quick Keys Parameter Default Range Confirmation The confirmation times relate to the Zone Sequential Confirmation ) (Alarm Confirmation, see 000 1–120 minutes Confirm Start (Confirm delay time) Specifies that the system cannot start a sequential confirmation process until the timer has expired. This time starts when the system has set and will prevent confirmed alarms being generated in situations when a person has been accidentally locked in the building. 030 30–60 minutes Confirm Time Window Specifies a time period that starts when an alarm is triggered for the first time. If a second alarm is triggered before the end of the confirmation time window, the system will send a confirmed alarm to the monitoring station Report Split The Report Split menu contains parameters that enable the routing of specified events to up to three MS receivers. MS Arm/Disarm backup 2 ... - Page 163 Installer Programming Quick Keys Parameter Default Range Backup 3 Call 2 : Reports MS 1. If communication is not established calls to MS 3. In addition it will also call MS 2. Backup 3 Call 1 : Reports to MS 2. If communication is not . established calls MS 3. In addition it will also call MS 1 MS Urgent backup 2 Reports urgent (alarm) events to the Central Monitoring Station Do not call (no report) Send 1 : Reports Openings and Closings to MS 1. Send 2 : Reports Openings and Closings to MS 2. Send 3 : Reports Openings and Closings to MS 3. Send all: Reports Openings and Closings to the all defined MS. Backup 2 : Reports Openings and Closings to MS 1. If communication is not established, calls MS 2. ...
-
Page 164: Report Codes
Installer Programming Quick Keys Parameter Default Range 1 Backup 2 3rd: Reports to MS 1. If communication is not established calls MS 2. If communication is not established again calls the MS. Backup 3 Call 2 : Reports MS 1. If communication is not established calls to MS 3. In addition it will also call MS 2. Backup 3 Call 1 : Reports to MS 2. If communication is not established calls MS 3. In addition it will also call MS 1 Report Codes Enables you to view or program the codes transmitted by the system to report events (for example, alarms, troubles, restores, supervisory tests, and so on) to the monitoring station. The codes specified for each type of event transmission are a function of the central station’s own policies. Before programming any codes, it is important to check the central station protocols. Reporting codes are assigned by default, according to the selected communication format SIA or contact ID. Assigns a specified report code for each event, based on the reporting format to the monitoring station. An event that is not assigned with a report code will not be reported to the monitoring station. For list of report events refer to Appendix E Report Codes Using a double‐zero (00) for any event will prevent a report from being generated. ... - Page 165 Installer Programming Quick Keys Parameter Default Range Access Code 5678 Enables you to define an up‐to six‐alpha‐numeric‐character installation access code. In order to enable communication between the alarm company and the system the same access code must subsequently be entered into the corresponding account profile created for the installation in the configuration software For successful communication, the access code along with the ID code must match between the configuration software and the system. 0001 Remote ID Defines an ID code that serves as an extension of the access code. In order to enable communication between the alarm company and the installation, the same remote ID code must be entered into the account profile in the configuration software. For successful communication, the ID code along with the access code must match between the Configuration Software and the main panel. Dealers often use the customer’s monitoring station account number for the ID code, but you can use any 4‐digit code unique to the installation. MS Lock 000000 MS Lock is a security function used in conjunction with the configuration software. It provides greater proprietary security when viewing monitoring station parameters. The same 6‐digit code, which will be stored in the panel, must be entered into the corresponding account profile created for the installation in the ...
- Page 166 Installer Programming Quick Keys Parameter Default Range Call Back Phones 0001 Define three numbers that the panel can call to perform Configuration Software communication. If no numbers have been defined, a call back can be performed to any phone. The installer will enter a phone number when establishing communication to the panel. If at least one number has been defined, it will be the only number that the call back can be established to. When the Configuration Software establishes communication to the panel, it sends the panel its calling phone number. (This number needs to be defined as My Number under the GSM and PSTN Communication menu in the Configuration Software.) If the panel identifies one of the numbers as one of the numbers predefined in the panel, the call will hang up and the panel will call back to that same number. Control Call Back Yes Yes/No The call back feature requires the system to call back to a pre‐ programmed telephone number to which the alarm company’s configuration software computer is installed. This provides more security for remote operations using the configuration software YES: Call back is enabled. NO: Call back is disabled. ...
-
Page 167: Follow Me
Installer Programming Quick Keys Parameter Default Range IP Gateway The IP and port address of the configuration’s software PC. If you have a router connected to the PC of the configuration software, then you should enter the IP of the router. This definition will be used when there is a request to create a remote connection from the panel to the configuration software. The connection can be done over IP or GPRS. Note: In the configuration software, under Communication Configuration GPRS you should enter the IP address of the PC that the software is installed in. Follow Me In addition to reporting to the monitoring station, the LightSYS2 has a Follow‐Me feature which enables reporting system events to predefined follow me destinations using a voice message, SMS message or Email. Up to 16 Follow Me destinations can be defined in the system. Note: If FM is enabled and no voice module is installed then “beeps” will be sent instead of messages. Quick Keys Parameter Default Range Define FM Up to 16 Follow Me destinations can be defined in the system. Select a ... - Page 168 Installer Programming Quick Keys Parameter Default Range Voice Report to follow me will be done by voice message thorough the PSTN or GSM network. (See Channel For Voice Messaging below). Enter the telephone number including area code or special letters for Follow Me defined as SMS or Voice. Reporting events by Voice can be established through different channels. The optional channels depend on the hardware installed in the system. Select the required channel as follows: PSTN/GSM : The system checks for the availability of the PSTN line. During regular operation mode voice messaging is carried out using the PSTN line. In the case of trouble in the PSTN line, the line is routed to the GSM line GSM/PSTN: The panel checks for the availability of the GSM line. During regular operation mode voice messaging is carried out using the GSM line. In the case of trouble in the GSM line, the line is routed to the PSTN line PSTN Only: The outgoing calls are executed through the PSTN audio channel only. Use this option for installations where no GSM line is available GSM Only: ...
-
Page 169: Partition
Installer Programming Quick Keys Parameter Default Range SMS Report to Follow Me will be done by SMS. Each event message contains information including the system label, event type and time. Enter the telephone number including area code or special letters. Partition Assign the partitions from which events will be reported to the Follow Me number. Events Each Follow Me destination can be assigned with its own set of events. Choose the events that will be reported to each Follow Me Event Description Default Alarms Intruder alarm in the system Yes Intruder ... - Page 170 Installer Programming Event Description Default Low battery indication from the LightSYS2 main No Main Low panel (below 11V) Battery Low battery indication from any wireless device in No Wireless Low the system Battery Jamming indication in the system No WL Jamming Wireless device lost. When no supervision signal is No WL Lost received from a wireless device Interruption in the source of the main AC power. No AC Off This activation will follow the delay time predefined in the AC Loss Delay timer Bell trouble in the system Bell Trouble Bus trouble in the system Bus Trouble Low battery indication from any sounder in the ...
-
Page 171: Restore Events
Installer Programming Event Description Default CO (Carbon Monoxide) alert from a zone defined a No CO Alert CO detector High Temperature High Temperature alert from a zone defined a No Temperature detector No Low Temperature Low Temperature alert from a zone defined a Temperature detector Alert from the zone defined as Technical No Technical Miscellaneous Zone has been bypassed No Zone Bypass Follow Me test message will be established No Periodic test following the time defined in the Periodic Test parameter under the MS parameters System is in remote installation mode No Remote programming ... -
Page 172: Remote Control
Installer Programming Event Description Default Interruption in the source of the main AC power No AC Off restored Bell trouble restored Bell Trouble Bus trouble restored Bus trouble Siren low Battery trouble restored Siren low Battery trouble PSTN Trouble PSTN lost event restored No Communication trouble in the IP restored No IP Network GSM General GSM trouble restored No GSM Trouble Environmental ... -
Page 173: Parameters
01–05 Voice Message Recurrence This number of times a voice message repeats itself when establishing a call to a Follow Me number. 01–05 Follow Me Periodic Test The Periodic Test enables you to set the time period that the system will automatically establish communication to a Follow Me destination defined with the Periodic Test event. (See page 160) 01–05 Cloud Define here the server settings for communication with the LightSYS2 system 01–05 IP Address The IP address or server name. If the LightSYS2 system is connected to the RISCO cloud for self‐monitoring, then use: riscocloud.com. Otherwise enter the IP address or name where the cloud server is located IP Port 33000 The server port address Page 173... - Page 174 Installer Programming Password AAAAAA Up to 6 characters (case sensitive) Specify the password for server access. This password should be identical to the CP Password defined in the server under the Control Panel Page definition. Channel 01–05 Communication with the cloud can be established through an IP or GPRS channel, depending on your system installed hardware. IP/GPRS: The system checks for the availability of the IP network. During regular operation, cloud communication will be established using the IP network line. In case of trouble in the IP network, communication is routed to the GPRS network. GPRS/IP: The system checks for the availability of the GPRS network. During regular operation mode cloud communication will be established using the GPRS. In case of trouble, communication is routed to the IP network. IP Only: Communication is executed through the IP network only. GPRS Only : Communication is executed through the GPRS network only.
- Page 175 Installer Programming FM Call All Yes: Parallel reporting to the Follow Me destination can be established via both the cloud and non‐cloud channels. No: Communication to the Follow Me destination via the non‐cloud channels can be established only in backup mode (when LightSYS2 – cloud connection is down) Reporting Priority 01–05 MS First The system first reports to all registered MSs according to internal priority (report split) with the configured retries. Only then is a report generated to registered FMs according to internal priority (consecutive) with the configured retries. This is the default value. FM First The system first reports to all registered FMs according to internal priority (consecutive) with the configured retries. Only then is a report generated to registered MSs according to internal priority (report split) with the configured retries. 01–05 Alternately MS First Report alternately between MS and FM destinations starting with MS, that is: MS1FM1MS2FM2MS3… The internal priority is used (report split to MS and consecutive to FM) to determine next destination. Retries are attempted as per each type specification. For example, if MS retries is 8 and FM reties is 4, then after 4 full loops continue only with MS destinations. ...
-
Page 176: 6 Audio
Installer Programming 6 Audio This menu is used to define voice message parameters. Note This menu will be displayed only if a voice module had been assigned to the system The Audio Messages menu is divided into the following sub menus: Messages, below Local Announcements, page 178 Messages Quick Keys Parameter Default Range Messages Use this menu to customize the spoken messages of Zones, Partitions, Outputs , Macroʹs and Opening Message that the Voice module announces when you access the system from a remote telephone or you hear on the premises. There are 2 ways to customize a voice message: 1. User recorded: The Common Message and the Library Messages are user recorded messages. The recording can be done either from the microphone located on the voice module expander or from a microphone located on the Listen/Talk unit. Note: The definition of which microphone to use is determined by dip switch 4 located on the voice module board. ... - Page 177 Installer Programming Quick Keys Parameter Default Range Note: The first five descriptors allow for customized words specific for the client’s needs. The customized words are the Library message on option After recording or assigning a message you can verify messages by selecting [1] Play option in each category. Common Message User‐defined identification of the premises, for example, the address and/or telephone number of the premises. This message is up to 10 seconds long. The default Common message is Hello, this is your security system calling. Zone Message User‐defined name for the zone in which the event occurred, for example, Kitchen. The Zone message can be up to 2 seconds long, and is only announced when the Event announcement message concerns a zone. Partition Message User‐defined name for the partition in which the event occurred, for example, Kitchen. The Partition message can be up to 2 seconds long. ...
-
Page 178: Local Announcements
Installer Programming Local Announcements Local Announcement Upon event occurrence, the system can announce the security situation to occupants of the premises by sounding a local announcement message from the Add on Listen/Talk unit. This announcement message can be enabled or disabled (via the toggle ), per event. Enable or disable each message announcement according to your customer request. Parameter Description Default Intruder alarm Yes Intruder alarm Fire alarm Yes Fire alarm Emergency (medical) Yes Emergency alarm Panic alarm Yes Panic alarm Tamper alarm Yes Tamper alarm Yes Flood, Gas, CO or ... -
Page 179: 7 Install
Installer Programming 7 Install The Install menu provides access to submenus that are used to add, remove or test accessories in the system. The Install menu is divided into the following sub‐menus: Bus Device, below Wireless Device, page 193 Bus Device The BUS Device menu provides access to submenus and their related parameters that enable you to add to or remove BUS expansion modules. From this section you can also access system tests to check the quality of their connections to the 4‐wire BUS, as described in the following sections: This menu option allows you to set the of the LightSYS2 installation device, module and expander parameters and to verify the full operational functionality of installed hardware Automatic Manual Testing Bus Devices: Automatic Setting Quick Keys Parameter Default Range ... -
Page 180: Bus Devices: Manual Setting
Installer Programming Quick Keys Parameter Default Range To automatically identify all the devices on the bus Press to begin the automatic BUS SCANNING (the Auto Settings process) in which it identifies all the devices on the bus. A list of the accessories that were found is displayed with the data definition that is required for each one. Verify that the keypad displays all the devices you have connected (displayed with the data definition that is required for each one). If a device does not appear, ensure that you have given it a unique ID. Press to accept what is being displayed, to progress through configuration screens and to advance on to the next device found. Repeat steps 2 and 3 until the presence of all devices has been confirmed and all parameters configured. Bus Devices: Manual Setting Quick Keys Parameter Default Range Manual Use this option to manually add or remove a Bus accessory in the system. ... - Page 181 Installer Programming Quick Keys Parameter Default Range Place the cursor on the TYPE field and use the key to toggle between the options provided to select the keyboard type, as follows: NONE LCD, LCDP (Model RP128KP / RP128KPP) LCDI , LCDPI ( Model RP432KP / RP432KP) WLKP (1‐Way Wireless keypad) STEP 2: To Assign a Partition: After pressing to store your keypad choice. The following display appears: ASSIGN TO PAR: KEYP=01 PAR=1 Assign keypad 01 to the selected partition using the [1 to 4] keys. This partition specifies the location of the keypad and is ...
- Page 182 Installer Programming Quick Keys Parameter Default Range Press to repeat the process for other keypads in the system (up to 4). Press to return to the previous programming level. Zone Expander To choose/modify a zone expander Through the menu selection, the following display appears: ZONE EXPANDER ID=01 TYPE=NONE Use the or keys to position the cursor over the Zone Expanderʹs ID number for which you want to assign (or delete). The first zone expander must be assigned to the first ID number, which is 01. Note: Make sure that the Zone Expanderʹs physical ID number has been ʺdip switchʺ programmed as described in in Setting Bus Accessory ID Numbers, page 40. Place the cursor on the TYPE field and use the key to toggle between the options provided to select the keyboard type, as follows: NZE08: 8 hardwired zone expander Note: When adding a Zone Expander NZE08 you should define the ...
- Page 183 Installer Programming Quick Keys Parameter Default Range Utility Output To choose/modify a utility output Through the menu selection, the following display appears: UTIL OUTPUT: ID=01 TYPE= Use the or keys to position the cursor over the UOʹs ID number for which you want to assign (or delete) a utility output. The first UO must be assigned to the first ID number, which is 01. Note: Make sure that the UO’s physical ID number has been ʺdip switchʺ programmed as described in Setting Bus Accessory ID Numbers, page 40. Place the cursor on the TYPE field and use the key to toggle between the options provided to select the UO type, as follows: NONE UO04 (a 4‐Output Relay‐Type Unit) UO08 (an 8‐Output Solid‐State Type Unit) ...
- Page 184 Installer Programming Quick Keys Parameter Default Range Power Supply To choose/modify a power supply Through the menu selection, the following display appears: POWER SUPPLY: ID=01 TYPE= Use the or keys to position the cursor over the power supply ID number for which you want to assign (or delete) a power supply. The first PS must be assigned to the first ID number, which is 01. Note: Make sure that the power supply’s physical ID number has been ʺdip switchʺ programmed as described in in Setting Bus Accessory ID Numbers, page 40. Place the cursor on the TYPE field and use the key to toggle between the options provided to select the power supply type, as follows: NONE PS02: 3A power supply Press . The following display appears: ...
- Page 185 Installer Programming Quick Keys Parameter Default Range If a power supply module is found and NONE has been selected, the following display appears: **DELETE** ARE YOU SURE? N Press to select Y YES and press to confirm. Wireless Expander The LightSYS2 can support up to two wireless modules. Each module can support up to 32wireless zones and 16 multi function key fobs (For additional information refer to LightSYS2 Wireless Expander Installation Manual.) To Allocate a Wireless expander Through the menu selection, the following display appears: Wireless Module: ID=1 TYPE=WM Set the expander ID (1 or 2) and using , set the type to WL and press . The following display appears: WME=X: BYPASS BOX TAMPER ? If the expander is mounted inside the LightSYS2 box select Y ...
- Page 186 Installer Programming Quick Keys Parameter Default Range Press . The following display appears: P=1234 KR01 Y... MASK Use the or keys and the key to assign the partitions that will be affected by the instant arm function Press . The following display appears: Controls: PKR=1 Use the or keys to scroll the list and the key to toggle and choose the required option INSTANT ARM? If Yes, the partitions will be armed instantly. If No, the Exit Delay time period will be applied SHOW READY? If YES, the ready status will be indicated on the reader. If No, no ready status indication will be indicated on ...
- Page 187 Installer Programming Quick Keys Parameter Default Range Voice Module To specify the voice module expander parameters Through the menu selection, the following display appears: VOICE MODULE TYPE=VOICE With the cursor positioned at the TYPE field, use the key to toggle and choose the VOICE option.. Press . The following display appears.: ENTER R. PHONE CODE: 00 Enter a remote phone code and press . The remote code is used when calling the system from a remote phone. Sounder To specify and configure a sounder (siren) Through the menu selection, the following display appears: OUT DOOR SIREN: ID=1 TYPE=NONE ...
- Page 188 Installer Programming Quick Keys Parameter Default Range Press . The following display appears.: SIREN= SOUND? Y Use the key to toggle Y Yes or N No to activate or deactivate the sound. Press . The following display appears.: SIREN= SQUAWK SOUND? Y Use the key to toggle Y Yes or N No. If yes, the siren will sound one squawk to indicate the armed status. 10. Press . The following display appears.: SIREN= SQUAWK STROBE? Y 11. Use the key to toggle Y Yes or N No. If yes, the siren will flash to indicate the armed status. 12. Repeat above steps for other sirens if needed. BUS Zones ...
- Page 189 Installer Programming Quick Keys Parameter Default Range Use the or keys to position the cursor over the ID filed and enter the Bus Zone ID number that you are assigning or deleting. Make sure that the detectorʹs physical ID number is identical to the ID number you select during programming. Using the arrow keys move to the Type field. Use the key to toggle and select the detectorʹs type: OPR12: WatchOUT PIR ODT15: WatchOUT DT WatIN: WatchIN ILun3: Industrial Lunar Grade 3 iDTG3: iWISE DT Grade 3 iQUG3: iWISE QUAD Grade 3 iDTG2: iWISE DT Grade 3 iQUG2: iWISE QUAD Grade 2 BZ1: Single BUS zone expander Press to confirm. Repeat the process for the other bus detectors Note: The iWISE BUS detectors have additional input on board. When selecting iWISE Bus detector the following question will appear: ʺLink Bus Detector to zone xx? ʺ Selecting Yes will assign the input as the consecutive zone of the selected iWISE Bus detector. ...
- Page 190 Installer Programming Quick Keys Parameter Default Range Note: If GSM/GPRS module is found and NONE has been selected, press to return to the prior display ‐OR‐ press to display a confirm delete screen. IP To specify and configure an installed IP module Through the menu selection, the following display appears: IP MODULE TYPE=NONE With the cursor positioned at the TYPE field, use the key to toggle and choose the IPC option. Press to store your choice Note: If IP module is found and NONE has been selected, press to return to the prior display ‐OR‐ press to display a confirm delete screen Modem ...
-
Page 191: Bus Devices: Testing
Installer Programming Quick Keys Parameter Default Range Bus Expander The BUS Zone Expander enables to expand the number of BUS detectors connected to the LightSYS2 to 32. Up to 4 Bus expanders can be defined. Each BUS Zone Expander creates a separate BUS loop that is used only for the BUS detectors connected to it. The separate BUS loop increases the total system security in case a certain BUS detector is sabotaged. To specify and configure Bus expander Through the menu selection, the following display appears: BUS Expander: TYPE=NONE With the cursor positioned at the TYPE field, use the key to toggle and choose the BZE32 option Press to store your choice LRT (Long Range Transmitter) To specify and configure LRT Through the menu selection, the following display appears: LRT Module: TYPE=NONE ... - Page 192 Installer Programming Quick Keys Parameter Default Range To perform BUS test Through the menu selection , the bus testing begins to check the connections between the devices on the bus, and the following display appears briefly: BUS TEST: >--XXXXXX--< The system then displays the programmed device, its address, and the quality of the communication, expressed as a percentage, as shown in the following examples: BUS COM QUALITY: VOICE:01 =100% BUS COM QUALITY: LCDPI:01 =99% A result of less than 100% means that there are bus connection problems (for example, bad wiring or cabling located in a harsh electrical environment or two modules in the same family have been given the same ID number) Bus Scan The Bus Scanning menu scans the bus and reports all modules found ...
-
Page 193: Wireless Devices
Installer Programming Quick Keys Parameter Default Range Verify Module The Verify Module menu provides a verification list of the modules in accordance with the modules you defined in the Bus Device menu (page 179) automatically or manually. To verify the bus’s recognition of each programmed device and its address Through the menu selection, the following display appears: VERIFY MODULE: VOICE:01 =VOICE Use the or keys to scroll down the list of displayed accessory devices (shown in the examples below) to ascertain that all keypads and expansion modules in the installation have been identified correctly. VERIFY MODULE: LCPDI:01 =LCPDI VERIFY MODULE: WM :01 =WM The system displays each programmed device, its address, and whether or not itʹs found on the bus. This helps you to identify programming ... - Page 194 Installer Programming Quick Keys Parameter Default Range RX Calibration Note Allocation is step two of the three step Wireless Device Defining process. See Step 1: Allocating a wireless expander p. 185 Step 3: Allocation , below The calibration measurement shows the amount of background ‘noise’ that the receiver can ‘hear’ on the same frequency as the RISCO wireless devices. This ‘noise’ could be neighboring devices of another system or other devices operating on the same frequency nearby. These are ‘unwanted’ signals that the LightSYS2 wireless expander must be told ‘not to listen to’ in order to eliminate false jamming alarms. The threshold noise level can be established automatically or manually To measure and set wireless device RF noise thresholds Through the menu selection, the following display appears: Choose Receiver: 1)ID:1 TYP:WM Select the wireless zone expander for which you want to establish the threshold level and press . The following display appears, showing the current threshold level: THOLD=XX RE-CALIBRATE? N To perform a new automatic calibration, use the key to select Y Yes. After the calibration process is finished, the new receiving threshold is displayed, as follows: ...
- Page 195 Installer Programming Quick Keys Parameter Default Range Allocation Note: Allocation is step three of the three step Wireless Device Defining process. See Step 1: Allocating a wireless expander p. 185 Step 2: RX Calibration , above Each wireless device must identify itself to the system receiver, in a process termed “enrollment”. Enrollment can be performed by sending an RF signal from each device, or by typing the device’s unique serial code into the system. Enrollment can be done locally using the keypad or remotely using the configuration software. LightSYS2 supports up to two wireless expanders. If two WL expanders are allocated in the system, the first screen in the wireless devices allocation menu series requires you to specify to which receiver the device should be allocated: Choose Receiver 1)ID1 TYP:WM Note: The number of wireless expanders present affects only the total possible set of keypads: two keypads per each expander for a maximum of four. The maximum 32 zones and 16 keyfobs are irrespective of the presence or absence of a second expander. By RF ...
-
Page 196: 8 Devices
Installer Programming Quick Keys Parameter Default Range By Code Same procedure as described in RF allocation (above) with the difference that instead of sending RF transmission you should enter the 11 digit serial number of the device followed by to confirm. Delete Use this sub‐menu to delete a wireless device. 8 Devices The Devices menu provides access to submenus and their related parameters that enable you to manually configure and modify installed system devices. The Devices menu is divided into the following sub‐menus (as per your set of system‐ installed‐devices): Keypad, below Keyfob, page 198 Sounder, page 199 Proximity Reader, page 205 3A Power Supply, page 206 Quick Keys Parameter Default Range... - Page 197 Installer Programming Quick Keys Parameter Default Range Controls Advance through the parameters to be controlled: Emergency The keypad’s emergency keys can be enabled or disabled per keypad. Yes: Enable the operation of the keypad’s emergency keys. No: Disable the operation of the emergency keypad’s keys. Multi view (Bus) Yes: The keypad will display the status of all masked partitions. No: The keypad will display only the status of its partition. Exit beeps (2‐Way with bypass unit;)— Sounds beeps during exit time in stay arming. Serial Number : The identifying 11‐digit number of the keypad (display only) Function Key (2‐Way) Disable The keypad’s function keys can be enabled or disabled per keypad. Yes: Enable the operation of the keypad’s function keys. No: Disable the operation of the keypad’s function keys. Panic : Sends a panic alarm to the monitoring station M/S Listen/Talk— The system dials the Monitoring Station to establish 2‐way communication.. ...
- Page 198 Installer Programming Keyfob Options for the 1‐Way Keyfob: The keyfob menu defines the operation of the wireless buttons keys. Each keyfob consists of 4 buttons, and each button can be programmed to a different mode of operation. 1. The first step in the menu is to select a user. Each user has a single keyfob. When selected press . 2. Select a button (1‐4) and define the button operation according to the options below. Note: Each key has its own list of options. The list varies between the keys. The available modes of operation are: None: Button disabled. Arm: The button is used for away (full) arming of the assigned partitions. Disarm: The button is used for disarming its assigned partitions. : Stay The button is used for stay (home) arming of the assigned partitions. Group: The button is used for Group arming (Partial arming within a partition / area) of the assigned partitions. ...
-
Page 199: Sounder
Installer Programming Description of 2‐Way Keyfob Options Quick Option Description Serial No The identifying 11‐digit number of the keypad (display only) Masking: Specifies the partitions that are controlled by the specified keypad. , Panic Enable: Disable/enable the issue panic Controls alarm button PIN code UO Key 1: The button is used to operate a single utility output UO Key 2: The button is used to operate a single utility output UO Key 3: The button is used to operate a single utility output Sounder The Sounder menu enables to define all parameters of external sounder that can be connected ... - Page 200 Installer Programming Quick Keys Parameter Default Range Strobe Use this menu to define parameters relating to the sounder strobe Follow Bell Control Defines the strobe operation mode. ALWAYS OFF ‐ The strobe is deactivated. FOLLOW BELL — The strobe is activated when the siren bell is triggered. FOLLOW ALARM — The strobe is activated when an alarm occurs in the selected siren’s partitions. 40 Blink Defines the number of times that the strobe will blink in a minute. 20 [Times/Min] 30 [Times/Min] 40 [Times/Min] ...
- Page 201 Installer Programming Quick Keys Parameter Default Range Siren LED Follow Arm Defines the operation mode of the Status LED2. ALWAYS ON — The status LED2 is always on. ALWAYS OFF — The status LED2 is deactivated. FOLLOW ARM — The status LED2 is activated when any of the siren selected partition is armed (Away or Stay mode). FOLLOW ALARM ‐ The status LED 2 is activated after any alarm condition. ALTERNATE (Only for Lumin8) — The status LEDs will constantly alternate FLASH (Only for Lumin8) — The status LEDs will constantly flash . Battery Load Test Every 24 Hours Enables to set the time period that the LightSYS2 will automatically generate a Load test on NEVER: The system will not set a battery load test ...
- Page 202 Installer Programming Quick Keys Parameter Default Range Type Defines the way the external lamp will be operated. ALWAYS ON–The lamp is always on. ALWAYS OFF–The lamp is always off. SCHEDULER– The lamp operates according to the time defined under the Sounder Lamp menu (Quick Key: ). Brightness (01–10%) Used to set the brightness level of the external lamp. Power Source SAB/SCB (Only for Lumin 8) Used to define the SAB or SCB power source mode of the LuMIN8.: SAB—Power supply for the sounder will be drawn from the control panel. SCB—Power supply for the sounder will be drawn from the ...
- Page 203 Installer Programming 2-Way WL Sounders Label As appropriate, rename the sounder’s label, as per the key definitions on page 62. Strobe Use this menu to define parameters relating to the sounder strobe Control Follow Bell Defines the strobe operation mode. ALWAYS OFF ‐ The strobe is deactivated. FOLLOW BELL — The strobe is activated when the siren bell is triggered. FOLLOW ALARM — The strobe is activated when an alarm occurs in the selected siren’s partitions. 40 Blink ...
- Page 204 Installer Programming Volume Sets the sirenʹs internal speaker Alarm volume. The volume ranges between 0 (silent) to 9 (Max volume). After setting/changing the volume, sound will be emitted by the internal speaker to enable evaluation of the selected volume level Alarm 9 (1‐9) General alarm volume Squawk 9 (1‐9) Squawk sound alarm Exit Entry 9 (1‐9) Notification of system status in exit or entry delay. Serial No. The identifying 11‐digit number of the sounder (display only) Supervision Determines if this zone will be supervised by the system expander according to the time defined under the timer RX Supervision (see page 71).. Lamp Times Specify here the sounder lamp illumination duration. Lamp Start–Specify here the start time for the sounder lamp to be activated. Lamp Stop ––Specify here the stop time for the sounder lamp to be deactivated. ...
-
Page 205: Proximity Key Reader
Installer Programming Proximity Key Reader This menu enables to define or modify parameters of Proximity Key Reader that can be connected to the LightSYS2 as a bus accessory. Up to 8 PKRʹs can be connected to the LightSYS2. From the menu Select a PKR and press . Note Access to this sub‐menu requires that a Proximity Key reader device is installed on your site. Quick Keys Parameter Default Range Masking Specifies the partitions that are controlled by the specified PKR. Press to display the partition application screen: P=1234 KR=1 MASK Use the key to toggle Y/N)to set the partitions. Control Use this menu to define controls of the PKR. Scroll the list and use the key to toggle Y/N for each option. (See page 185) INSTANT ARM? SHOW READY? ... -
Page 206: 3A Power Supply
Installer Programming 3A Power Supply This menu enables to define or modify parameters of 3A switched power supply connected to the LightSYS2 as a bus accessory. Up to 4 power supplies can be connected to the LightSYS2. From the menu Select a power supply and press Quick Keys Parameter Default Range Masking Specifies the partitions that the power supply is assigned to. Press to display the partition application screen: P=1234 PS=1 YYYY Use the key to toggle Y/N to set the partitions. Control Use this menu to define controls of the power supply. Use the key to toggle Y/N for each option: BELL/L.SPEAK: Page 206... -
Page 207: Chapter 5 Using The Installer Non-Programming Menus
Using the Installer Non‐Programming Menus Chapter 5 Using the Installer Non-Programming Menus This chapter describes the parameters and programming options available to the installer that are not under the Programming Menu. . Your LightSYS2 comes with a variety of selectable functions available to the installer, user and Grand Master. This section lists the complete menu of installer‐configurable functions, the most frequently used of which are described in detail in previous chapters of this manual. The following table shows the installer‐configurable keypad operations. Activities Menu Activities Keypad Sound Chime Keypad Chime—Allows user control (turning ON and OFF) of the current keypadʹs internal sounder for any function involving the Chime feature. Partition Chime— Allows user control (turning ON and OFF) of all keypadʹs buzzers in the partition for any function involving the Chime feature) Buzzer On/Off Used to control the (Turning ON and OFF) the current keypadʹs internal buzzer during both Entry and Exit Delay time periods and all fire and burglar alarms. Follow Me Follow Me Define Destination: Used to define (up to 16) Follow Me destinations according to its type: Voice message, SMS or E‐mail. For more information, refer to page 167 Label: Identifying labels for the Follow Me destination. Fill in the labels according to the instruction defined for user label on page 62 Terminate Follow Me If Follow Me Destination(s) were chosen, their operation can be terminated. Use this function when an alarm has been tripped and there is no need to utilize the Follow Me feature. Test Follow Me ... -
Page 208: View Menu
Using the Installer Non‐Programming Menus View Menu View Trouble Should be used when the system has detected a problem, which is evidenced by the rapid flashing of the Power icon, as described in the LightSYS2 LCD Keypad Manual. Alarm Memory Displays the five most recent alarm conditions stored by the system Partition Status Allows the viewing of the partitionsʹ status and all “not ready” zones in the system. Note: Pressing on the key from the normal operation mode displays the status of the partition to which the keypad is assigned. Pressing the sequence [CODE] from the normal operation mode will display the status of all the partitions assigned to the user code. Zone Status Allows the display of all system zones and their current status. Service Information Allows the display of any previously entered service information and the system version. IP Address Use this option to view the IP address of the LightSYS2. This option is available only if IP module is defined in the system. Page 208... -
Page 209: Clock Menu
Using the Installer Non‐Programming Menus Clock Menu Clock Time & Date Use this option to set the system time and date, in the format: HH:MM DD/MM/YY. This definition is required for setting the scheduler programming in the system. Scheduler Weekly — Enables you to define up to four weekly programs with up to two time intervals per day, during which the system automatically arm/disarm, activates utility output, or prevents users from disarming. One Time — Enables a one‐time operation of automatic arm/disarm of the system at a specific time within the next 24 hours. Vacation Enables to define up to 20 holiday periods and the partitions that will be set automatically during the holiday. Event Log Event Log Allows the viewing of significant system events including date and time. Notes The events memory cannot be erased. To skip 10 events at a time backward or forward, use the consecutively Maintenance Maintenance Walk Test Enables to easily test and evaluate the operation of selected zones in your system. Walk test is set for up to 60 minutes. During the last 5 minutes of walk test mode, the keypad used to perform the walk test will indicate that the walk test is about to end. Full walk test — The test will display the detected zones and type of detection. Quick walk test —The test will display the undetected zones Page 209... - Page 210 ( ). Follow Strobe Zone Resistance Tests the resistance and voltage level of the wired zones in the system. Use the key to toggle between resistance and voltage of each detector Diagnostics Activates the relevant tests for: Main Unit: Tests the standby battery level of the main board and the system version. Bus Zones: Performs a diagnostic test to the Bus zones in the system and displays the relevant information for each detector. Zone Expander: Performs a diagnostic communication test on installed zone expanders and tests its version. Power supply: Performs a diagnostic communication test on installed power supplied expanders and displays the relevant information for each power supply. Siren: Performs a diagnostic communication test on installed bus sirens and displays the information regarding each siren (depending on the siren type). GSM: Performs a diagnostic test for the following parameters of the plug in GSM module: Signal (RSSI): Displays the signal level measured by the GSM module. (0=No signal, 5= Very high signal) Version: Displays information regarding the GSM module version IMEI: View the IMEI number of the GSM module. This number is used for identification of the LightSYS2 at the RISCO IP receiver when using GSM or GPRS communication. IP: Performs a diagnostic test for the following parameters of the plug in IP module: IP Address: View the IP address of the LightSYS Version: View the IP module software version Page 210...
-
Page 211: Macro
Using the Installer Non‐Programming Menus MAC Address: View the MAC address of the IP card. This number is used for identification of the LightSYS2 at the RISCO IP receiver when using IP communication Wireless: Displays the wireless module software version and enables to activate the following tests for recognized wireless devices in the system (keyfobs, wireless zones, wireless keypads). Communication Test— Displays the results of the last measurement performed after the last transmission (last detection or last supervision signal) of the selected device. To receive updated signal strength, activate the detector prior to performing the communication test. For successful communication, the strength of the signal should be higher than the noise threshold level as measured during calibration of the main unit. Battery Test — Displays the results of the last battery test of the selected device performed after the last transmission. OK message is displayed for a successful test. For an updated value activate the device Keypads: Displays the RP432 keypads software version number and momentarily tests the keypad indicators. Voice: Displays the voice module software version number and creation date. LRT: Displays the Log Range Radio module software version and its active protocol Macro Macro LightSYS2 enables the installer or Grand Master record a series of commands and assign them to a macro. For more information refer to LightSYS2 User Manual. Stand Alone Keyfobs Stand Alone Keyfob LightSYS2 enables the installer or Grand Master to assign up to 200 keyfobs that can be used for gate control. For addition information refer to LightSYS2 User Manual. Page 211... -
Page 212: Appendix A Technical Specifications
Technical Specifications Appendix A Technical Specifications Main Technical Information Input Power: AC/DC Adaptor 100‐240V 50/60Hz 14.4V—1.5A , 4A Current Consumption: 60 mA, typical / 70 mA, maximum 1.5A PS: 12 Volts up to 7 Amp‐Hours (AH), typical Rechargeable Standby Battery: 4A PS: 12 Volts up to 17 Amp‐Hours (AH), typical Auxiliary Power: Power Outputs: 1.5A PS: Total current 800mA; Maximum Aux = 500mA; Maximum BUS (AUX RED) = 800mA 4A PS: Total current 1500mA; Maximum Aux = 500mA; Maximum BUS (AUX RED) = 1000mA Bell/LS (External): 12 Volts DC @ 500 mA, maximum Programmable outputs: UO1: Dry contact relay (24V, 1 Amps) UO2‐UO4: 100 mA, opto relay RP432B Polycarbonate (1.5A PS): 290 x 254 x 97 mm Main Box Dimensions RP432BM Metal, small (1.5A PS): 264 x 299 x 80 mm RP432BM1 Metal, large (4A or 1.5A PS): 420 x 379 x 95 mm Operating temperature ‐10°C to 55°C (14°F to 131°F) Weight 1.9 Kg (including battery) Storage temperature ‐20°C to 60°C (‐4°F to 140°F) Keypads LCD Keypad (RP432KP, RP432KPP) Voltage 13.8V +/‐10%, Current Consumption ... - Page 213 Technical Specifications Dimensions 210 mm x 152 mm x 20 mm (8.2ʺ x 5.9ʺ x 0.7ʺ) Operating temperature ‐10°C to 55°C (14°F to 131°F) Storage temperature ‐20°C to 60°C (‐4°F to 140°F) Prox. RF Frequency 13.56MHz LCD Keypad (RP128KP, RP128KPP) Voltage 13.8V +/‐10%, Current RP128KP: 100 mA maximum RP128KPP (with prox) 250 mA maximum Main Panel Connection 4‐wire BUS, up to 300 m (1000 ft) from Main Panel Dimensions 16.2 cm x 12.2 cm x 3 cm (6.37ʺ x 4.8ʺ x 1.18ʺ) 2‐Way WL Slim Keypad (RW132KL 1/2 P Voltage 3V (2 CR123 batteries in parallel) Current Stand‐by current 10μA, Max current 100 mA Main Panel Connection Wireless Dimensions 100 mm X 45 mm X 25 mm (3.9 i X 1.8 X .98 inches) Zone Expander (RP432EZ8) Voltage 13.8VDC +/‐10%; Current 25 mA, typical / 30 mA, maximum Main Panel Connection 4‐wire BUS, up to 300 m (1000 ft) from Main Panel Dimensions 10.5 cm x 6.6 cm x 1.8 cm Utility Output Expanders 4 Relay Output(RP296EO4) Voltage 13.8VDC +/‐10%; ...
- Page 214 Technical Specifications Current 30 mA, maximum Main Panel Connection 4‐wire BUS, up to 300 m (1000 ft) from Main Panel Dimensions 10.5 cm x 6.6 cm x 1.8 cm Wireless Expander (RP432EW) Voltage 12‐14.4V DC VDC Current Typical: 40 mA; 65mA maximum Frequency RW432EW8 – 868.65 MHz; RW432EW4 – 433.92 MHz RF immunity: According to EN50130‐4 Range (L.O.S) 300 meters Relay outputs 12VDC @ 1A max Dry Contact Relays Operating temperature: ‐10°C to 55°C (14°F to 131°F) Storage temperature: ‐20°C to 60°C (‐4°F to 140°F) Main Panel Connection 4‐wire BUS, up to 300 m (1000 ft) from Main Panel Dimensions 125.5 X 78X 25.5 mm (4.94 X 3.07 X 1 inch) Proximity Key Reader (RP128PKR) Voltage 13.8VDC +/‐10%; Current 70 mA, typical / 180 mA max Main Panel Connection 4‐wire BUS, up to 300 m (1000 ft) from Main Panel Dimensions 40 mm x 43.6 mm x 22 mm (1.57“ x 1.7“ x 0.86“) Voice Module (RP432EV) Voltage 13.8VDC +/‐10%; Current ...
- Page 215 Technical Specifications * For full technical information refer to the manual of the siren * Lumin8 ( RS200WA, RS200WAP) Input DC Power Regulated 13.0‐ 14.2V Current Consumption Single piezo: 350mA (Regulated) Twin piezo: 450mA (Regulated Battery charging current 15 mA maximum Speaker Sound level Single piezo: 111dbA Twin piezo: 114dbA) Main Panel Connection 4‐wire BUS, up to 300 m (1000 ft) from Main Panel * For full technical information refer to the manual of the siren Singe Zone Expander (RP128EZ01) Voltage 13.8VDC +/‐10% Current 20mA Main Panel Connection 4‐wire BUS, up to 300 m (1000 ft) from Main Panel Plug In GSM (RP432GSM) Voltage 13.8VDC +/‐10% Current During Communication ‐ 300mA During Standby ‐ 30mA Dimensions 80 mm x 50 mm x 25 mm Plug In IP (RW132IP) Voltage 13.8VDC +/‐10%; Current 90mA maximum Dimensions 70 mm x 60 mm Plug In Modem 2400 (RP432MD24) Voltage 13.8VDC +/‐10%; ...
-
Page 216: Appendix B Lightsys2 Accessories
LightSYS2 Accessories Appendix B LightSYS2 Accessories Keypads Description RP432KP LightSYS2 LCD keypad, slim RP432KPP LightSYS2 LCD keypad with proximity, slim (13.56 MHz) RP128KP Touch screen keypad RP128KPP2 Touch screen keypad with proximity (13.56 MHz) RP128KCL LCD keypad RP128KCLP LCD keypad with proximity (125 KHz) RP128PKR Proximity Key Reader RP200KT Proximity tags (13.56 MHz) RP128KT Proximity tags (125 KHz) RP132KL1/2P 2‐Way Wireless Slim Keypad with Prox, (2–Outdor, Black) (1–Indoor, White) Zone Description Expanders RP432EZ8 8 Zone Expansion Module RP128EZB Bus Zone Expander RP128EZ01 Single Zone Expander Wireless Expanders Description RP432EW8 ... - Page 217 LightSYS2 Accessories Control Keyfob RWT4RCP8 4‐Button RC Keyfob with 2‐Button Panic RW132KF1A RW132KF1H 4‐Button Rolling‐Code Keyfob, Black RP128T4RC, RP296T4RC, 4‐Button Rolling‐Code Keyfob, Gray RWT51P8 RWT51P4 Wristband Panic Transmitter RWT52P868 RWT52P433 2‐Button Panic Keyfob RWT6SW868 RWT6SW433 WL Shock Detector RWT6FW868 RWT6FW433 WL Flood Detector RWT6C08 RWT6C04 WL CO Detector RWT6G0868 RWT6G0433 WL Glassbreak Detector RWT6GS8 RWT6GS4 WL Gas Detector RWT312PR8 RWT312PR4 Wireless WatchOUT PIR ...
- Page 218 LightSYS2 Accessories Description Programmable Output Devices RP296E04 4‐Relay Output Expansion Module RP296E08 8 Open‐Collector Output Expansion Module Voice Unit Description RP432EV LightSYS2 Voice module RP128EVL000A Listen and speak‐in module Proximity Key Description Reader/Tag RP128PKR3 Proximity Key Reader Kit 13.56MHz RP200KT Proximity Keytags 13.56MHz (10 units) X-10 Module Description RP296EXT X‐10 Transmitter Module IP Module Description RW132IP Plug‐in TCP/IP Module GSM/GPRS Module Description RP432GSM Plug‐in GSM/GPRS + Antenna RGSMANT` External GSM Antenna with 3m cable Fast PSTN Description...
- Page 219 RK200DTG3 Industrial LuNAR DT AM Grade 3 RK815DTB iWISE Bus DT AM Grade 3 , 15m RK515DTB BWare Bus DT AM Grade 3 RK825DTB iWISE Bus DT AM Grade 3 , 25m RK800Q0B iWISE Bus Quad 15m (50 ft) AM Grade 3 RK500QB BWare Bus QUAD AM Grade 3 RK815DTB iWISE DT AM Grade 2 , 15m RK825DTB iWISE DT AM Grade 2 , 25m RK800Q0B iWISE Quad 15m Grade 2 RK66S RISCO Seismic Detector Boxes Description RP432B LightSYS2 Polycarbonate housing RP128B5 Plastic accessories box + tamper Main panel and Description Housing RP432M LightSYS2 Main Board RP432B LightSYS2 Polycarbonate Housing RP432PS LightSYS2 1.5A Power Supply RP432PS15 LightSYS2 1.5A Power Supply, without wall plug RP432IN (xx) ...
-
Page 220: Appendix C Wiring
Wiring Appendix C Wiring The proper use of wire and cable is necessary for the successful installation and operation of the LightSYS2 system. It is important to select wire of the correct thickness to minimize power loss and ensure reliable system operation. Take into account both the installationʹs current requirements and the wiring distances involved. The following tables provide useful information to help make your installation trouble‐free. Wire Diameter Resistance: Resistance: Feet Gauge Meters Size Millime Inches Ω Per Ω Per Ω Ω Per ters Meter 1000 Feet Meters Foot 24 0.50 0.020 0.085 8.5 0.026 26.0 22 0.64 ... - Page 221 656 feet 20 AWG 24/02mm 333 meters 1092 feet 19 AWG 28/02mm 400 meters 1312 feet Table A-3: Wire Gauge Notes: For maximum system stability, it is best NOT to exceed a total of 300 meters (1000 feet) of wire when wiring the Expansion bus. For a distance of more than 300 meters, refer to RISCO Group technical support service for detailed information. Total Desired Wire Gauge in Particular Branch Auxiliar 32/02 28/02 24/02 mm 16/02 7/02 mm y Power 20 AWG 24 AWG...
- Page 222 Wiring Desired Wire Gauge in Particular Branch External 32/02 28/02 24/02 16/02 mm Sounder Current Max Run Max Run Max Run Max Run (Max current Meter Feet Meter Feet Meter Feet Meters Feet draw per branch) 100mA 238 780 191 625 ...
-
Page 223: Appendix D Library Voice Messages
Library Voice Messages Appendix D Library Voice Messages 001 (Custom) E M 130 Store 002 (Custom) 046 East 087 Macro 131 Student room 003 (Custom) 047 Elevator 088 Magnet 132 Study 004 ... -
Page 224: Appendix E Report Codes
Report Codes Appendix E Report Codes Report Codes Parameter Contact ID Report Category Alarms Panic alarm 120 PA Urgent Panic alarm restore 120 PH Urgent Fire alarm 115 FA Urgent Fire alarm restore 115 FH Urgent Medical alarm 100 MA Urgent Medical alarm restore 100 MH Urgent Duress alarm 121 ... - Page 225 Report Codes Report Codes Parameter Contact ID Report Category Main phone trouble restore 351 LR Non‐ urgent RF Jamming 344 XQ Non‐ urgent RF Jamming restore 344 XH Non‐ urgent GSM trouble 330 IA Non‐ urgent GSM trouble restore 330 IR Non‐ urgent GSM Pre‐Alarm Non‐ urgent IP Network trouble Non‐ urgent IP Network trouble restore Non‐ urgent Arm/Disarm ...
- Page 226 Report Codes Report Codes Parameter Contact ID Report Category Medical alarm 100 MA Urgent Medical alarm restore 100 MH Urgent 24 Hour alarm 133 BA Urgent 24 Hour alarm restore 133 BH Urgent Entry/Exit 134 BA Urgent Entry/Exit restore 134 BH Urgent Water (Flood) alarm 154 WA Urgent Water (Flood) alarm restore 154 WH Urgent Gas alarm ...
- Page 227 Report Codes Report Codes Parameter Contact ID Report Category Low battery 384 XT Non‐ urgent Low battery restore 384 XR Non‐ urgent Soak fail 380 UT Urgent Soak fail restore 380 UJ Urgent Zone Alarm 134 BA Urgent Zone Alarm restore 134 BH Urgent Zone confirm alarm 139 BV Urgent Zone confirm alarm restore 139 Urgent No activity ...
- Page 228 Report Codes Report Codes Parameter Contact ID Report Category Tamper 145 TA Urgent Tamper restore 145 TR Urgent AC trouble 301 AT Non‐ urgent AC trouble restore 301 AR Non‐ urgent RF Jamming 380 XQ Urgent RF Jamming restore 380 XH Urgent Power Supply Bell trouble 321 YA Non‐urgent Bell trouble restore ...
-
Page 229: Appendix F Installer Event Log Messages
Installer Event Log Messages Appendix F Installer Event Log Messages Event Message Description AC Low PS=y Loss of AC power from power supply ID=y AC RST PS=y AC power restore on power supply ID=y Activate UO=xx UO XX activation Actv UO=xx KF=zz UO XX is activated from remote control ZZ AL.ReinstateP=Y Alarm reinstatement on partition Y Alarm Z=xx Alarm in zone no. XX Alrm Cancel P=y Alarm is cancelled in partition ID=Y Anti mask proximity detection on Bus zone XX AMPRX DTCT Z=xx Anti mask proximity detection restore on Bus zone XX AMPRX RSTR Z=xx Group A on partition Y is armed by user ZZ ARM A:P=y C=zz Group A on partition Y is set by wireless keyfob ZZ ARM A:P=y KF=zz Group B on partition Y is armed by user ZZ ARM B:P=y C=zz Group B on partition Y is set by wireless keyfob ZZ ARM B:P=y KF=zz Group C on partition Y is armed by user ZZ ARM C:P=y C=zz Group C on partition Y is set by wireless keyfob ZZ ARM C:P=y KF=zz Group D on partition Y is armed by user ZZ ... - Page 230 Installer Event Log Messages Event Message Description Bell tmp rs Bell tamper alarm restore Box tamper Box tamper alarm from main unit Box tmp rs Box tamper alarm restore Bypass Box+Bell Box + Bell tamper is bypassed Byp Trbl C=xx System troubles were bypassed by user XX Bypass Zn=xx Zone no. XX is bypassed Charge Curr S=y Battery charging trouble in siren ID=Y Chng code=xx Changing user code XX Change FM=yy Changing Follow‐Me number YY CHNG PROG=xx Change in the Access Control definitions of daily program, weekly program or access group. Each change will appear in 2 events. The first XX defines the quick key function. The second XX defines the program number (for example, Access Group 04) Charge Current RS S=y Battery charging trouble restore in siren ID=Y Clk not set Time is not set Clk set C=xx Time defined by user no. XX Cloud Comm.Trbl Communication problems with the cloud channel Cloud Connected Cloud communication channel is functioning Cloud Disconnect Cloud communication channel is not functioning Cloud Login Err Login problems with the cloud channel CO Alarm Z=xx ...
- Page 231 Installer Event Log Messages Event Message Description Conf. Z=xx Confirmed alarm occurred from zone XX Conf. alarm P=y Confirmed alarm occurred in partition Y Conf.holdup P=y Confirmed holdup occurred in partition Y Confirm rs Z=xx Restore zone confirmed alarm CP reset The control panel has reset Dat set C=xx Date defined by user no. XX Day A:P=y Daily arm on partition Y Daily Arm on Partition Y Day Arm:p=y Arm by scheduler of group B on partition Y Day b:p=y Arm by scheduler of group C on partition Y Day c:p=y Arm by scheduler of group D on partition Y Day d:p=y Day dis:P=y Daily disarm on partition Y Day hom:P=y Daily STAY or GROUP arming in partition Y DC trouble restore in Bus zone XX DC Restore Z=XX DC trouble in Bus zone XX DC Trouble Z=XX Dis:P=y C=zz Partition Y disarmed by user ZZ Dis: P=y KF=zz Partition Y disarmed by remote control ZZ Duress P=y C=xx Partition Y duress alarm from user no. XX Dust trouble restore from WatchOUT DT Bus zone XXX DUST RST Z=xx ...
- Page 232 Installer Event Log Messages Event Message Description Fire alarm in zone XX Fire z=xx Fire alarm from keypad (ID=XX) (keys 3 & 4) Fire kp=y Foil ok Z=xx Restore in foil (Day) zone no. XX Foil Z=xx Trouble in foil (Day) zone no. XX Forced P=y Partition Y is force armed Found Z=xx Wireless zone found, zone no. XX Func=xx C=yy Quick key function XX by user YY Gas Alarm Zn=xx Gas (natural gas) alert from zone XX defined as a gas detector Gas Rst. Z=xx Gas (natural gas) alert restored from zone XX defined as a gas detector Authentication password is incorrect GSM:GPRS PW ERR Authentication password is correct GSM:GPRS PW OK GSM:IP OK IP connection OK GSM:IP Trouble IP address is incorrect GSM:Mdl comm.OK Communication between the GSM/GPRS Module and the LightSYS2 is OK GSM: Module comm. Internal GSM/GPRS bus module trouble GPRS communication to the MS is OK GSM:MS OK GPRS communication failure to the MS GSM:MS trouble GSM:NET avail. GSM network is not available ...
- Page 233 Installer Event Log Messages Event Message Description Partition Y is home armed using keyfob ZZ HOME:P=y KF=zz HU.ReinstateP=y Hold‐Up Reinstatement in partition y IPC:DHCP error Failed to acquire an IP address from the DHCP server IPC:DHCP OK Succeeded to acquire an IP address from the DHCP server IP Card generated a download error IPC: downld err IP Card download was OK IPC: download OK IP Card generated an event log error IPC: evnt log ER IP Card event log generated no error IPC: evnt log OK IP Card hardware is OK IPC: hardware OK IP Card generated a hardware error IPC: hardware error IP Card generated a mail error IPC: mail error IP Card mail is OK IPC: mail OK IP Card Monitoring station ID=Y generated an error IPC:MS=y error IP Card Monitoring station ID=Y was OK IPC:MS=y OK IPC: Network err Failed to connect to IP network IPC: Network OK Successful connection to IP network IPC:NTP error Failed to acquire time data from the time server IPC:NTP ok Succeeded to acquire time data from the time server The IP Card upgrade generated an error IPC: upgrade err ...
- Page 234 Installer Event Log Messages Event Message Description Group D in partition Y is armed by keyswitch zone XX KSW D: Z=xx P=Y Partition Y is disarmed by keyswitch zone XX KSW DIS:Z=xxP=Y LB rstr KF=yy Low battery trouble restore from wireless remote control YY L.Temp rst Z=xx Low temperature alert restored from zone XX defined as a temperature detector LB RSTR Z=xx Low battery restore from wireless zone XX Lost Z=xx Wireless zone lost, zone no. XX Low battery trouble from wireless remote control ID=XX Low Bat KF=xx Low battery trouble from power supply ID=Y Low Bat PS=y Low Bat RS Z=xx Low battery trouble restored from wireless zone no. XX Low Bat Siren=y Low battery trouble from siren ID=Y Low bat Z=xx Low battery trouble from wireless zone no. XX Low Temp. Z=xx Low temperature alert from zone XX defined as a temperature detector The long range transmitter account generates an error LRT:ACCOUNT ERR The long range transmitter account is OK LRT:ACCOUNT OK The long range transmitter hardware is OK LRT:HARDWARE OK The long range transmitter hardware generates an error LRT:HARDWRE ERR The long range transmitter is experiencing low battery trouble. LRT:LOW BAT The long range transmitter low battery in not troubled LRT:LOW BAT OK ...
- Page 235 Installer Event Log Messages Event Message Description MS=y restore Communication fail trouble restore to MS phone no. Y Trouble restore in the MW channel of BUZ zone XX MW restore z=xx Trouble in the MW channel of BUZ zone XX MW trouble z=xx Partition Y armed in Next Arm mode Next arm:p=y Partition Y disarmed in Next Disarm mode Next dis:p=y Failure in the Aux power on power supply ID=X No aux ps=y Failure in the S. Aux power on zone expander Y No aux ze=y Bell trouble in power supply ID=Y No bell ps=y No Com IPC Communication failure between the LightSYS2 and IP card Communication failure between the LightSYS2 and keypad No com kp=y ID=Y Communication failure between the LightSYS2 and Key Reader No com kr=y ID=Y Communication failure between the LightSYS2 and the No com voice Advanced Voice module Communication failure between the LightSYS2 and wireless No com WME=y module expander ID=Y Communication failure between the LightSYS2 and bus zone No comm BZE=y expander ID=Y Communication failure between the LightSYS2 and power No comm PS=y supply Y No comm Siren=y ...
- Page 236 Installer Event Log Messages Event Message Description Overload restore from 3A SMPS Y Overld rs ps=y Overload from 3A SMPS Y Overload ps=y Panic Z=xx Phone fail If the phone line is cut or the DC level is under 1V Phone restore Phone line trouble restore PIR trouble restore from Bus zone XX PIR rstr Z=xx PIR trouble from Bus zone XX PIR trbl Z=xx Police KF=yy Police (panic) alarm from remote control YY Police KP=y Police (panic) alarm from keypad Y Potential overload restore of 3A SMPS joined by 3A SMPS Y POT.LD RS PS=y Potential overload of SMPS joined by 3A SMPS Y POT.OVRLD PS=y Fail in the proximity anti approach protection in siren Y PROX FAIL S=y Proximity anti approach protection is restored in siren Y PROX OK SIREN=y Proximity tamper restore from siren ID =Y PROX TMP RS S=y Proximity tamper from approaching siren ID=Y PRX TMP SIREN=y Overload in 3A SMPS Y. Reset by user ZZ PS=yOVER.R C=zz Radio l.bat S=y Radio low battery trouble from siren Y Radiol.bat rS=y Radio low battery restore from siren Y Remote Prog The system has been programmed from the configuration ...
- Page 237 Installer Event Log Messages Event Message Description Soak fail Z=xx Zone XX has failed in the soak test Spec. KP=y Special alarm from the from wireless keypad Y Spk Trbl RS S=y Speaker low battery restore from siren Y Spkr Trbl Sir=y Speaker low battery trouble from siren Y Spkr l.bat S=y Speaker low battery trouble from siren Y Spkr l.batrsS=y Speaker low battery restore from siren Y Start exit P=y Exit time started in partition Y STU=Y Line Rstr STU adapter Y line restoration STU=Y Line Trbl STU adapter Y line trouble STU=Y R.RESET STU adapter Y line restoration reset Tamper BZE=y Tamper alarm from bus zone expander ID=Y Tamper Kp=y Tamper alarm from keypad ID=Y Tamper LRT Tamper alarm from long range transmitter Tamper PS=y Tamper alarm from power supply Y Tamper Siren=y Tamper alarm from wireless siren Y Tamper alarm from utility output expander Y Tamper UO=y Tamper alarm from Advanced Voice module Tamper Voice Tamper alarm from wireless module expander Y Tamper WME=y Tamper alarm in zone expander ID=X Tamper ZE=y ...
- Page 238 Installer Event Log Messages Event Message Description Unknown evnt Unknown event alert A zone defined as “UO Trigger” has been deactivated UO REST ZN=xx A zone defined as “UO Trigger” has been activated UO TRIG ZN=xx Bus communication OK with Voice Module VOC:COMM OK Bus communication failure with the Voice Module VOC:NO COMM Water Alrm Zn=xx Flood alarm from zone no. XX Water rstr Z=xx Flood alarm restore on zone no. XX Weak battery indication joined by 3A SMPS Y WEAK BAT PS=y Weak battery restore indication joined by 3A SMPS Y Weak Bat RS PS=y Z=xx aut bad Zone self‐test failed, zone no. XX Z=xx auto ok Zone self‐test OK, zone no. XX Page 238...
-
Page 239: Appendix G Installer Programming Maps
Installer Programming Maps Appendix G Installer Programming Maps 1) Programming See programming menu on page 240 2)Activities Keypad Sound Chime Buzzer On/Off Follow Me View Trouble Alarm Memory ... - Page 240 Installer Programming Maps Installer Programming Menu 1) System 1) Timers 01) Ex/En Delay 1 06) Wireless 11) Last Exit Sound 02) Ex/En Delay 2 061) Jamming Time 12) Buzzer at Stay 03) Bell Timeout 062) RX Supervise 13)Status Timer 04) Bell Delay 07) AC Off Delay 14) Service Timer 05) Switch Aux Break 08) Guard Delay 15) Payment Timer 09) Swinger Limit 16) Pulse Open 10) Redial Wait 17) Inactivity Timer 2) Controls ...
- Page 241 Installer Programming Maps 2) Proximity Anti Mask = Tamper 3) Audible Proximity Tamper 3) Labels 1) System 3) Partition 2 5) Partition 4 2) Partition 1 4) Partition 3 4) Sounds 1) Tamper Sound 1) During Disarm 2) During Arm 1)Silent 1)Silent 2) Bell 2) Bell ...
- Page 242 Installer Programming Maps 2) Zones 1) Parameters 1) One By One 2) By Category 1) Label 2) Partition 3) Type 00) Not Used 18) Special 01) Exit/Entry 1 19) Pulsed Keyswitch 02) Exit/Entry 2 ...
- Page 243 Installer Programming Maps 3) Outputs 0) Nothing 1) Follow System 01) Bell 09) Bell Burglary 17) Panic 10) Scheduler 18) Fire 02) No Telephone Line 03) Comm. Failure 11) Switched Aux 19) Special 04) Trouble 12) GSM Error 20) 24 Hours 13) Bell Test Main Low Bat 06) AC Loss 14) Installation 07) Sensors Test 15) Walk Test ...
- Page 244 Installer Programming Maps 5) Communication 1) Method 1) PSTN 1) Timers 1) PSTN Lost Delay 2) Wait Dial Tone 2) Control 1) Alarm Phone Line ...
- Page 245 Installer Programming Maps 1) Mail Host 2) SMTP Port 3) Email Address 4) SMTP Name 5) SMTP Password 3) Host Name 4) MS Polling 1) Primary ...
- Page 246 Installer Programming Maps 3) Cancel Delay 4) Listen In 5) Confirmation 7) Report Split 1) MS Arm/Disarm 2) MS Urgent 3) MS Non Urgent 8) Report Codes ...
- Page 247 Installer Programming Maps 6) Audio 1) Messages 1) Common 4) Output 2)Zone 5) Macro 3)Partition 6) Library Message 2) Local Announce ...
- Page 248 Installer Programming Maps 83106) Volume 83107) Lamp 831071) Type 1) Always On 2) Always Off 3) Scheduler 831072) Brightness 83108 Power Source 1) SAB 2) SCB 83109) Siren Current 1) Low 2) Standard 83110) Alarm Sound 1) – 4) 2) Lamp Times 1) Lamp Start 2) Lamp Stop 4) Proximity Reader 1) Masking 2) Controls 5) Power Supply ...
-
Page 249: Appendix Hen 50131 And En 50136 Compliance
EN 50131 and EN 50136 Compliance Appendix H EN 50131 and EN 50136 Compliance Compliance Statement Hereby, RISCO Group declares that the LightSYS2 series of central units and accessories are designed to comply with: EN50131‐1, EN50131‐3 Grade 2 EN50130‐5 Environmental class II EN50131‐6 Type A UK: DD243:2004, PD 6662:2004, ACPO (Police) EN50136‐1‐1 and EN50136‐2‐1 : ATS 5 for IP/GPRS; ATS 2 for PSTN Signaling security: ‐ Substitution security S2 ‐ Information security I3 EN50136 Compliance IP and GSM modules are complying with the following standards: EN50136‐1‐1 EN50136‐1‐1/A2 EN50136‐2‐1 ... - Page 250 EN 50131 and EN 50136 Compliance In order to have an indication of ACK received from the receiving center transceiver, the parameter Kiss‐Off Y/N (see page 4‐54) should be set to Y. Possible logical keys calculations: Logical codes are codes punched in the wireless keypad to allow Level 2 (users) and Level 3 (installer) access. All codes ‐ 4 digits structure: xxxx 0‐9 can be used for each digit. There are no disallowed codes ‐ codes from 0001 to 9999 are acceptable. Invalid codes cannot be created due to the fact that after the code 4 digit has been punched, ʺEnterʺ is automatically applied. Code is rejected when trying to create a non existing code. Possible physical keys calculations: Physical keys are implemented in the Wireless Keyfobs. It is assumed that only a user possesses a Keyfobs, therefore a physical key is considered as access Level 2 Each Keyfob has 24 bit identification code comprising 2^24 options. A Keyfob has to be recognized and registered by the LightSYS, therefore, a ʺwriteʺ process must be performed. A valid Keyfob is one ʺLearnedʺ by the panel and allowing Arm/Disarm A non valid Keyfob is one not ʺLearnedʺ by the panel and not allowing Arm/Disarm. System Monitoring The main unit is monitored for AC trouble, battery fault, low battery and more. All other wireless elements are monitored for low voltage battery. Page 250...
- Page 251 EN 50131 and EN 50136 Compliance Setting the LightSYS2 to comply with EN 50131 requirements Access the Installer programming mode. From the [1] System menu select [5] to access the Settings menu. From the Settings menu select [4] to access the Standard option. Select EN 50131. Once selected, the following changes will occur in the LightSYS2 software: Feature EN 50131 Compliance Timers Quick Key Required Value: Phone Line cut delay Immediate (0 minutes) , Entry Delay 45 seconds (maximum allowed) AC Delay Immediate (0 minutes) Jamming Time 0 minutes RX Supervision ...
-
Page 252: Appendix I Remote Software Upgrade
Remote Software Upgrade Appendix I Remote Software Upgrade This appendix explains how to perform remote upgrade of your LightSYS2 main panel software using the LightSYS2 keypad or SMS command. Remote software upgrade is performed via IP or GPRS. Notes: 1. It is recommended to perform the upgrade process from keypad 1 (Not wireless keypad) 2. Software upgrade does not delete all previous parameters of the panel Step 1: Set parameters for IP/GPRS Communication Define all parameters required to set GPRS or IP communication as explained in the Communication section of the LightSYS2 (See page 142). Step 2: Enter the location of the upgrade file In the System menu, Firmware Upgrade submenu, enter the relevant information regarding the location of the upgrade file: Server IP: Enter the IP address of the router/gateway where the upgrade file ... - Page 253 Remote Software Upgrade Notes: Each option appears only if the relevant module (IP or GPRS module) is installed in the system. If your panel is equipped with an IP or GSM module you can start the download file procedure by sending an SMS command to the panel in the following format: (If address and port are configured and updated) a. Via IP 97239637777IPFILE. b. Via GSM (GPRS) 97239637777GSMFILE. (Address and port can be added to the SMS command string as per the following. If specified, these parameters also override any existing panel settings) a. Via IP 97239637777IPFILE10.10.10.6:80. b. Via GSM (GPRS) 97239637777GSMFILE212.150.25.223:80. Once selected, the LightSYS2 will start downloading the required files. The upgrade procedure may take approximately 40 minutes to complete. This will vary according to whether the procedure is performed via GPRS or IP. Once the files are downloaded the panel automatically starts with the upgrade procedure of the units connected to the system. Note: 1. During the upgrade process of the panel firmware there will be no display on the keypad. 2. While downloading the files for the upgrade procedure the STATUS green LED on the main panel will flash slowly. When the upgrade procedure starts it will start to flask rapidly. Step 4: Verify that upgrade has been successful From the main display press and enter the installer code followed by ...
- Page 254 However, there is no guarantee that interference will not occur in a particular installation. If this equipment does cause harmful interference to radio or television reception, which can be determined by turning the equipment off and on, the user is encouraged to try to correct the interference by one or more of the following measures: Reorient or relocate the receiving antenna. Increase the separation between the equipment and receiver. Connect the equipment to an outlet on a circuit different from that to which the receiver is connected. Consult the dealer or an experienced radio/TV technician. FCC Warning The manufacturer is not responsible for any radio or TV interference caused by unauthorized modifications to this equipment. Such modifications could void the userʹs authority to operate the equipment. RTTE Compliance Statement Hereby, RISCO Group declares that this equipment is in compliance with the essential requirements and other relevant provisions of Directive 1999/5/EC. For the CE Declaration of Conformity please refer to our webs Page 254...
- Page 255 RISCO Group Limited Warranty Standard Limited Warranty RISCO Group and its subsidiaries and affiliates (ʺSellerʺ) warrants its products to be free from defects in materials and workmanship under normal use for 24 months from the date of production. Because Seller does not install or connect the product and because the product may be used in conjunction with products not manufactured by the Seller, Seller cannot guarantee the performance of the security system which uses this product. Sellerʹs obligation and liability under this warranty is expressly limited to repairing and replacing, at Sellerʹs option, within a reasonable time after the date of delivery, any product not meeting the specifications. Seller makes no other warranty, expressed or implied, and makes no warranty of merchantability or of fitness for any particular purpose. In no case shall seller be liable for any consequential or incidental damages for breach of this or any other warranty, expressed or implied, or upon any other basis of liability whatsoever. Sellerʹs obligation under this warranty shall not include any transportation charges or costs of installation or any liability for direct, indirect, or consequential damages or delay. Seller does not represent that its product may not be compromised or circumvented; that the product will prevent any personal injury or property loss by burglary, robbery, fire or otherwise; or that the product will in all cases provide adequate warning or protection. Seller, in no event shall be liable for any direct or indirect damages or any other losses occurred due to any type of tampering, whether intentional or unintentional such as masking, painting or spraying on the lenses, mirrors or any other part of the detector. Buyer understands that a properly installed and maintained alarm may only reduce the risk of burglary, robbery or fire without warning, but is not insurance or a guaranty that such event will not occur or that there will be no personal injury or property loss as a result thereof. Consequently seller shall have no liability for any personal injury, property damage or loss based on a claim that the product fails to give warning. However, if seller is held liable, whether directly or indirectly, for any loss or damage arising under this limited warranty or otherwise, regardless of cause or origin, sellerʹs maximum liability shall not exceed the purchase price of the product, which shall be complete and exclusive remedy against seller. No employee or representative of Seller is authorized to change this warranty in any way or grant any other warranty. WARNING: This product should be tested at least once a week. Page 255...
- Page 256 China (Shenzhen) Tel: +34‐91‐490‐2133 Tel: +86‐755‐82789285 E‐mail: support‐es@riscogroup.com E‐mail: support‐cn@riscogroup.com France Poland Tel: +33‐164‐73‐28‐50 Tel: +48‐22‐500‐28‐40 E‐mail: support‐fr@riscogroup.com E‐mail: support‐pl@riscogroup.com Belgium (Benelux) Israel Tel: +32‐2522‐7622 Tel: +972‐3‐963‐7777 E‐mail: support‐be@riscogroup.com E‐mail: support@riscogroup.com Australia USA Tel: + 1‐800‐991‐542 Tel: +1‐631‐719‐4400 E‐mail: support‐au@riscogroup.com E‐mail: support‐usa@riscogroup.com RISCO product was purchased from No part of this document may be reproduced in any form without prior written permission from the publisher. © RISCO Group. All rights reserved. 09/2013 5IN2048 Page 256...
Need help?
Do you have a question about the LightSYS 2 Series and is the answer not in the manual?
Questions and answers