Table of Contents
Advertisement
Quick Links
OWNER'S MANUAL
FRIDGE & FREEZER
Before beginning installation, read these instructions carefully.
This will simplify installation and ensure that the product is
installed correctly and safely. Leave these instructions near the
product after installation for future reference.
Copyright © 2019 LG Electronics Inc. All Rights Reserved.
www.lg.com
Advertisement
Table of Contents

Related Manuals for LG LM89SXD


Summary of Contents for LG LM89SXD
- Page 1 Before beginning installation, read these instructions carefully. This will simplify installation and ensure that the product is installed correctly and safely. Leave these instructions near the product after installation for future reference. www.lg.com Copyright © 2019 LG Electronics Inc. All Rights Reserved.
-
Page 2: Table Of Contents
TABLE OF CONTENTS This manual may contain images or content that may be different from the model you purchased. This manual is subject to revision by the manufacturer. SAFETY INSTRUCTIONS........4 READ ALL INSTRUCTIONS BEFORE USE......4 WARNING................4 CAUTION ................10 INSTALLATION ..........12 Product Overview .............12 Before Installation ............13 Removing the Handle............13... - Page 3 SMART FUNCTIONS........37 LG ThinQ Application............37 Smart Diagnosis ..............38 MAINTENANCE ..........40 Cleaning ................40 Water Filter ................41 TROUBLESHOOTING ........43 Before Calling for Service..........43...
-
Page 4: Safety Instructions
SAFETY INSTRUCTIONS SAFETY INSTRUCTIONS READ ALL INSTRUCTIONS BEFORE USE The following safety guidelines are intended to prevent unforeseen risks or damage from unsafe or incorrect operation of the appliance. The guidelines are separated into ‘WARNING’ and ‘CAUTION’ as described below. Safety Messages This symbol is displayed to indicate matters and operations that can cause risk. - Page 5 SAFETY INSTRUCTIONS responsible for their safety. Children should be supervised to ensure that they do not play with the appliance. • This appliance is intended to be used in household and similar applications only. It should not be used for commercial, or catering purposes, or in any mobile application such as a caravan or boat.
- Page 6 • Do not clean the appliance with brushes, cloths or sponges with rough surfaces or which are made of metallic material. • Only qualified service personnel from LG Electronics service centre should disassemble, repair, or modify the appliance. Contact an LG Electronics customer information centre if you move and install the appliance in a different location.
- Page 7 • Ensure that the outlet socket is properly grounded, and that the earth pin on the power cord is not damaged or removed from the power plug. For more details on grounding, inquire at an LG Electronics customer information centre.
- Page 8 • Do not bend the power cable excessively or place a heavy object on it. • Immediately unplug the power plug and contact an LG Electronics customer information centre if you detect a strange sound, odour, or smoke coming from the appliance.
- Page 9 SAFETY INSTRUCTIONS • Do not apply excessive force or impact to the back cover of the appliance. • Be careful of nearby children when you open or close the appliance door. The door may bump the child and cause injury. •...
-
Page 10: Caution
SAFETY INSTRUCTIONS CAUTION CAUTION To reduce the risk of minor injury to persons, malfunction, or damage to the product or property when using this product, follow basic precautions, including the following: Operation • Do not touch frozen food or the metal parts in the freezer compartment with wet or damp hands. - Page 11 They may shatter if exposed to sudden temperature changes. • Do not insert the shelves upside down. The shelves may fall. • To remove frost from the appliance, contact an LG Electronics customer information centre. • Dispose of the ice inside the ice bin in the freezer compartment...
-
Page 12: Installation
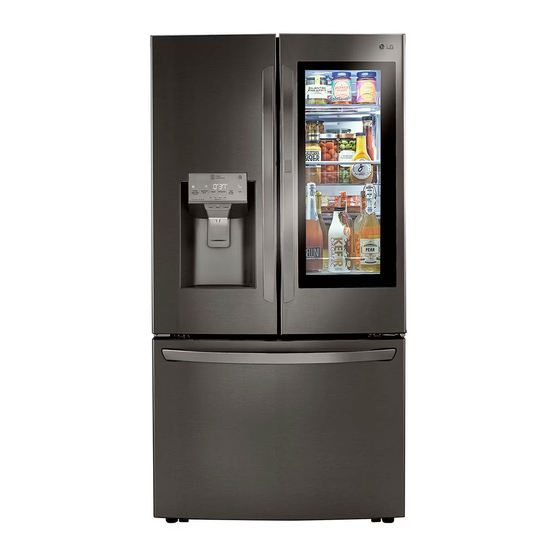
INSTALLATION INSTALLATION Product Overview The appearance or components of the appliance may differ from model to model. Front View *1:This feature is only available on some models. Door Button*1 Opens the Door in Door Compartment. InstaView Door-in-Door*1 The InstaView Door-in-Door compartment allows for easy access to commonly used food items. Accessories *1:This feature is only available on some models. -
Page 13: Before Installation
INSTALLATION Before Installation • The climate class can be found on the rating label. Dimensions and Clearances Climate Class Ambient Temperature Too small of a distance from adjacent items may Range ºC result in the degradation of freezing capability and SN (Extended +10 - +32 increased electricity costs. -
Page 14: Removing The Door And Drawer
INSTALLATION Removing the Door and 6.35 mm (1/4 in.) Allen wrench, and remove the mounting fasteners. Drawer If your entrance door is too narrow for the appliance to pass through, remove the appliance doors and pass the appliance laterally. WARNING •... - Page 15 INSTALLATION CAUTION NOTE • Disassembling/Assembling the Water Lines • Place the door, inside facing up, on a nonscratching surface. Collet Tube Insert line Clip Pull out the water supply lines . Disconnect all the wire harnesses . Unscrew the ground wire Removing the Right Fridge Door Detach all the wire harnesses...
- Page 16 INSTALLATION • Use two or more people to remove and install CAUTION the fridge doors and freezer drawer. • When lifting the hinge free of the latch, be careful that the door does not fall forward. Pull the drawer open to full extension. Gently lift and pull out the ice bin.
-
Page 17: Connecting The Water Line
INSTALLATION operate the water dispenser. If the refrigerator is CAUTION installed in an area with low water pressure (below 138 kPa), you can install a booster pump to • Do not hold the handle when removing or compensate for the low pressure. replacing the drawer. -
Page 18: Levelling And Door Alignment
INSTALLATION Checking the Water Connection Firmly push the water tube onto the water inlet valve and tighten up the collar nut. Turn on the water supply and switch on the appliance. Carefully check all fittings for possible leaks due to poorly fitted hoses. Press and hold the Water Filter button for three seconds. - Page 19 INSTALLATION Levelling the Appliance the height. Turn the nut to the right to raise the door or to the left to lower it. The appliance has two front leveling legs. Adjust the legs to alter the tilt from front-to-back or side- to side.
-
Page 20: Turning On The Power
INSTALLATION With one hand, lift up both the inner and outer Pull the power plug out, insert and fix it into the door sections of the right door to raise them at power plug hook at the rear or on top of the the middle hinge. -
Page 21: Operation
• The automatic defrosting system in the NOTE appliance ensures that the compartment • Contact the LG Electronics customer information remains free of ice buildup under normal centre if the alarm sound continues after 30 operating conditions. - Page 22 OPERATION Freezing the Maximum Amount • Store raw meat and fish in suitable containers in the refrigerator, so that it is not in contact with or of Food drip onto other food. • Refrigerated foods and other food items can be If large quantities of food are to be stored, all the stored on top of the vegetable box.
-
Page 23: Product Features
OPERATION Product Features The appearance or components of the appliance may differ from model to model. Exterior *1:This feature is only available on some models. Control Panel Sets the refrigerator temperature and freezer temperature, the water filter condition and the dispenser mode. - Page 24 OPERATION Interior Standard Door Model: Door in Door Model:...
- Page 25 OPERATION InstaView Door in Door Model: LED interior lamps Light up the inside of the fridge. Fridge Icemaker This is where ice is automatically produced and stored. Humidity Controlled Crisper Helps vegetables and fruit to stay crisp and controls humidity. Fixed Door Bin Store chilled food or drinks.
-
Page 26: Control Panel
Wi-Fi The Wi-Fi button, when used with the LG SmartThinQ app, allows the appliance to connect to a home Wi-Fi network. Refer to Smart Functions for information on the initial setup of the application. icon shows the status of the appliance's network connection. The icon illuminates when the appliance is connected to the Wi-Fi network. - Page 27 OPERATION Indicates the set temperature of the freezer compartment in Celsius (°C) or Fahrenheit (°F). The default freezer temperature is -18 °C (0°F). Press the Freezer button repeatedly to select a new set temperature from -21 °C to -13 °C (- 6 °F to 8 °F). Fridge Indicates the set temperature of the fridge compartment in Celsius (°C) or Fahrenheit (°F).
-
Page 28: Ice And Water Dispenser
OPERATION NOTE • When the fridge is in the Power Saving Mode, the display remains off until a door is opened or a button is pressed. Once on, the display remains on for 20 seconds. Ice and Water Dispenser Using the Ice and Water Dispenser Before Using the Ice and Water Press the dispenser selection button repeatedly... -
Page 29: Automatic Icemaker
• If discolored ice is dispensed, check the water tank and the water supply for a possible source. If the problem continues, contact the LG Electronics customer information centre. Do not use the ice or water until the problem is corrected. - Page 30 OPERATION Freezer Icemaker (Craft Ice the door being opened, amount of food stored in the appliance, etc.). Maker) Power Switch Auto Shutoff (feeler arm) Feeler Arm Power Switch Before Using the Freezer CAUTION Icemaker • Do not insert round ice into the in-door ice bin, This feature is only available on some models.
-
Page 31: Instaview
OPERATION Turning the Automatic To access the InstaView Door in Door compartment, lightly press the button on the right Icemaker On or Off fridge door handle. To turn the automatic icemaker On/Off, press the power switch on the icemaker to the ON ( | ) or OFF (O) position. -
Page 32: Humidity Controlled Crispers
OPERATION To remove the door bins, lift up and pull out. To remove the case, lift up and pull out. To refit the door bins, slide the door bin in To refit the case, line up the tabs on the case above the desired support and push down until with the slots on the door and push down until it snaps into place. - Page 33 OPERATION • Fruit lets moist air out of the crisper for best Lift the front of the cover up with both hands storage of fruit. until it detaches from the back wall of the cabinet, then pull it out. Removing/Refitting the To refit, insert the cover into the refrigerator with both hands and lower it onto the guides.
-
Page 34: Glide'n'serve
OPERATION Removing/Refitting the NOTE Glide‘N’Serve • The Door-in-Door feature is only available on some models. To remove the Glide'N'Serve, pull out the Glide'N'Serve to full extension, lift the front up, and pull straight out. To refit, slightly tilt up the front, insert the Glide'N'Serve into the frame and push it back Glide‘N’Serve into place. -
Page 35: Fridge Shelf
OPERATION Removing/Refitting the Half To remove the baskets, simply lift the basket up and pull straight out. Width Shelf Tilt up the front of the shelf and then lift the shelf straight up. Pull the shelf out. To assemble the baskets, slide it in above the desired support and push down until it snaps into place. -
Page 36: Durabase
OPERATION Durabase Using the Durabase CAUTION • If the Durabase divider is removed, there is enough open space for children or pets to crawl inside. To prevent accidental child and pet entrapment or suffocation risk, DO NOT allow children or pets to touch or go near the drawer. The Durabase divider allows you to organize the Durabase area into 2 sections. -
Page 37: Smart Functions
Internet service provider or refer to your wireless router manual. • The application is subject to change for appliance improvement purposes without notice • LG ThinQ is not responsible for any network to users. connection problems or any faults, malfunctions, or errors caused by network •... -
Page 38: Smart Diagnosis
Connecting to Wi-Fi In addition to the source code, all referred license The Wi-Fi button, when used with the LG ThinQ terms, warranty disclaimers and copyright notices application, allows the appliance to connect to a are available for download. - Page 39 After the data transfer is complete, the LG ThinQ application. diagnosis will be displayed in the application. • Launch the LG ThinQ application and select the Smart Diagnosis feature in the menu. Follow NOTE the instructions provided in the LG ThinQ •...
-
Page 40: Maintenance
MAINTENANCE MAINTENANCE Cleaning Cleaning the Interior • When removing a shelf or drawer from inside General Cleaning Tips the appliance, remove all stored foods from the shelf or drawer to prevent injury or damage to • When cleaning the inside or outside of the the appliance. -
Page 41: Water Filter
• Visit your local dealer or distributor • Do not install on hot water supply lines. The • Search using "water filter" on lg.com maximum operating water temperature of this • Use replacement cartridge: LT1000P, LT1000PC filter system is 37.8 °C. - Page 42 MAINTENANCE Replace with a new water filter. Insert the new filter into the filter head and rotate it clockwise until the arrow on the new filter lines up with the arrow on the filter head. Swing the filter back into the compartment. Refit the door basket.
-
Page 43: Troubleshooting
TROUBLESHOOTING TROUBLESHOOTING Before Calling for Service Cooling Symptoms Possible Cause & Solution There is no Is there a power interruption? refrigeration or • Check the power of other appliances. freezing. Check the power of other appliances. • Plug the power plug in the outlet properly. There is poor Is the fridge or freezer temperature set to its warmest setting? refrigeration or... - Page 44 • Press I on the automatic icemaker switch or set ON for the automatic icemaker button on the control panel. (For more details on how to use, visit LG Electronics website or use your smart device.) Is the temperature of the freezer compartment set too high? •...
- Page 45 TROUBLESHOOTING Symptoms Possible Cause & Solution Water does not come The supply valve may be turned off? (For Plumbed models Only) out. • Open the water supply valve. • Check if the fridge compartment temperature is too cold, as the water filter can freeze and block the water flow to the dispenser.
- Page 46 TROUBLESHOOTING Condensation & Frost Symptoms Possible Cause & Solution There is condensation Did you store hot food without cooling it first? inside the appliance or • Cool the hot food first before putting it inside the fridge or freezer. on the bottom of the vegetable drawer Did you leave the appliance door open? cover.
- Page 47 The inside lamp in the Lamp failure appliance does not • Close the door and re-open. If the lamp does not turn on, please contact turn on. the LG Electronics customer information centre. Do not attempt removal of the lamp.
- Page 48 TROUBLESHOOTING Noises Symptoms Possible Cause & Solution The appliance is noisy Is the appliance installed on a weak floor or improperly levelled? and generates • Install the appliance on a solid and flat area. abnormal sounds. Does the rear of the appliance touch the wall? •...
- Page 49 • Find the Wi-Fi network connected to your smartphone and remove it, then not connected to the register your appliance on LG SmartThinQ. Wi-Fi network. Mobile data for your smartphone is turned on. • Turn off the Mobile data of your smartphone and register the appliance using the Wi-Fi network.
- Page 50 Electric Specifications Model LM89SXD Supply voltage 127 V ~ Operating frequency 60 Hz Rated current 3,4 A Defrosting input 445 W...
- Page 51 Memo...
Need help?
Do you have a question about the LM89SXD and is the answer not in the manual?
Questions and answers