Advertisement
Table of Contents
- 1 Parts List
- 2 Hardware List (Found in Box 3)
- 3 Step 2: Attach the Headboard Back Support (3) to the Headboard
- 4 Step 4: Fix the Cross Bars (6) to the Side Rails (5)
- 5 Step 5: Fix Center Bar (7) to the Cross Bar (6)
- 6 Step 6: Fix the Support Legs (8) to the Center Bar (7)
- 7 Step 7: Fix the Plastic Cap (I) and (J) Onto the Sprung Slat (9)
- 8 Chilgrove Addendum
- Download this manual
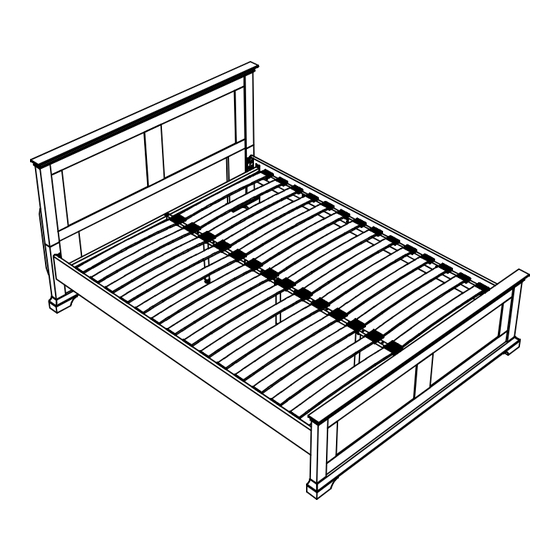
CHILGROVE 5FT ASSEMBLY INSTRUCTIONS
Thank you for purchasing from The Oak Bed Store. As an independent family run company, customers
such as yourself really make a big difference and we sincerely appreciate it.
We hope you are delighted with your purchase, however if you have any further queries or concerns,
please don't hesitate to contact us by;
Email at help@theoakbedstore.co.uk
Telephone on 02393 552 550
Live Chat via our website
Please read the instructions carefully before assembling or use to ensure a safe
and satisfactory operation of this product.
Please note:
1.
This product takes approximately 60 minutes to assemble with 2 people.
2.
This product is heavy, it should be assembled as near as possible to the point of use.
Please do not drag the bed frame, always lift and reposition with 2 people to avoid personal injury
3.
as well as damage to the product.
Please do not discard any of the packaging until you have checked that you have all the parts and
4.
the pack of fittings.
DO NOT use any power tools as this may damage the frame and will invalidate any claim.
5.
Periodically check all screws & fixings to ensure they are secure.
6.
7.
Please do not jump on this bed frame.
The fittings pack contains small parts, which should be kept away from children.
8.
In the unlikely event that this product has missing or damaged parts, please call 02393 552 550 to obtain
replacements.
Page 1 of 7
Advertisement
Table of Contents

Related Manuals for The Oak Bed Store CHILGROVE


Summary of Contents for The Oak Bed Store CHILGROVE
- Page 1 CHILGROVE 5FT ASSEMBLY INSTRUCTIONS Thank you for purchasing from The Oak Bed Store. As an independent family run company, customers such as yourself really make a big difference and we sincerely appreciate it. We hope you are delighted with your purchase, however if you have any further queries or concerns, please don't hesitate to contact us by;...
- Page 2 Parts List Parts Description Headboard Frame Headboard Wood Post L/R Headboard Back Support Footboard Side Rail Cross Bar Center Bar Support Leg Sprung Slat Page 2 of 7...
- Page 3 Hardware List (Found in box 3) Parts Description 10 x 50 mm Wooden Dowel 8 x 30 mm Wooden Dowel Minifit M6 x 40 mm JCBC Bolt M8 x 25 mm JCBC Bolt M6 x 15 mm JCBC Bolt M6 x 30 mm JCBC Bolt M8 x 40 mm JCBC Bolt (assembly) Single Slat Cap Double Slat Cap...
- Page 4 Step 1: Attach the Headboard Frame (1) to the Headboard Wood Post L/R (2) using hardware A,B, and C. Step 2: Attach the Headboard Back Support (3) to the Headboard and shown using hardware B & D and tighten securely with (K). Page 4 of 7...
- Page 5 Step 3: Attach the Side Rail (5) to the Headboard (2) and Footboard (4) using Bolt (E) and Allen Key (L) as shown ensuring the pre-drilled holes on the side rail are facing up. Step 4: Fix the Cross Bars (6) to the Side Rails (5) using Bolt (F) and tighten using Allen Key (K).
- Page 6 Step 5: Fix Center Bar (7) to the Cross Bar (6) using Bolt (G) and tighten using Allen Key (K). Step 6: Fix the Support Legs (8) to the Center Bar (7) using Bolt (H) and tighten using Allen Key (L). Page 6 of 7...
- Page 7 Chilgrove Addendum Please note you will require a cross head screwdriver: Attach the Metal Bracket to the pre-drilled holes on the back of the Headboard Frame and Headboard Wood Posts L/R using the CSK screw.
Need help?
Do you have a question about the CHILGROVE and is the answer not in the manual?
Questions and answers