Table of Contents
Advertisement
Quick Links
Advertisement
Table of Contents

Subscribe to Our Youtube Channel
Related Manuals for Mio F740s Series

Summary of Contents for Mio F740s Series
- Page 1 F740s Series User Manual...
- Page 2 Revision: R00 (4/2020) Trademark All brand and product names are trademarks or registered trademarks of their respective companies. Disclaimer Specifications and documents are subject to change without notice. Note Not all models are available in all regions. Not all features are available on all models. Depending on the specific model purchased, the colour and look of your device and accessories may not exactly match the graphics shown in this document.
-
Page 3: Table Of Contents
Table of Contents 1. Device Basics ..................4 Getting to Know Your Device..................4 Front-Side View ....................... 4 Rear-Side View ....................... 4 Right-Side View ....................... 4 Bottom-Side View ....................4 Cradle ........................5 Using a Micro-SIM Card ....................5 Using a Memory Card ....................5 Charging the Battery .................... - Page 4 4. Personalising Your Device ............17 Settings Menu ......................17 Network & internet ....................17 Connected devices ....................18 Apps & notifications ....................18 Battery ........................18 Display ........................18 Sound ........................19 Storage ........................19 Security & location ....................19 Accounts .......................
-
Page 5: Device Basics
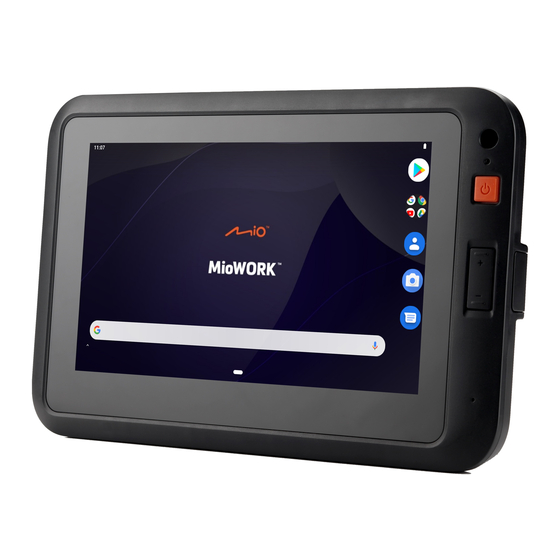
1. Device Basics Getting to Know Your Device Front-Side View NFC sensor* Light sensor Power button Volume buttons Touch screen Microphone * For selected models only. Rear-Side View Camera lens* Flash LED* Speaker Dock connector Microphone * For selected models only. Right-Side View Memory card slot Micro-SIM card slot*... -
Page 6: Cradle
Cradle Release button AMPS hole pattern (x4) USB port* Fleet port Headphone jack Dock connector Micro-B USB connector * For selected models only. Using a Micro-SIM Card The devices uses a Micro-SIM card. Open the cover on the right side of the device to locate the Micro-SIM card slot. With its label side facing the rear side of the device, hold the Micro-SIM card by the edges and gently insert it into the slot. -
Page 7: Charging The Battery
Charging the Battery Note: • The AC charger may be sold separately. • Use the specified charger for your device. Use of another type of charger will result in malfunction and/or danger. When charging the battery for the very first time, it is recommended to charge it for at least 8 hours (using the AC charger). -
Page 8: Using The Cradle
Using the Cradle Depending on your model, a cradle and/or a mount may be provided for your device. Follow the illustrations to mount your device. „ To install the cradle: 1. Line up and connect the dock connector on the cradle to the dock connector on the device. Magnets are incorporated to ensure proper alignment. -
Page 9: Sleep Mode
Sleep Mode Your device will automatically switch off the screen after 1 minute (by default) of inactivity. You can manually switch off the screen by pressing the Power button briefly. To resume the screen, press the Power button briefly and then unlock the device by dragging the Lock icon ( ) upwards. -
Page 10: Getting Started
2. Getting Started Using the Touch Screen To operate your device, touch the screen with your finger. You can perform the following actions: • Tap: Touch the screen once with your finger to open items or select on-screen buttons or options. Tap and hold: Tap and hold on the desired item to open the pop-up menu that contains the •... -
Page 11: Rotating The Screen
Rotating the Screen For most applications, you can automatically change the screen orientation, from portrait to landscape and vice versa, by turning the device sideways. To enable the auto-rotate screen function: open the All Apps screen and tap Settings Display Advanced, then tap the Auto-rotate screen switch to turn it on. -
Page 12: Application Shortcuts And Widgets
• Swipe left or right to switch between the screens. • To add an extended screen: make sure that at least one application shortcut or widget is already set on the Home screen or an extended screen, then drag the icon toward the edge of the screen to add a new extended screen. -
Page 13: Changing The Wallpaper
Changing the Wallpaper 1. Tap and hold anywhere on the desktop, and select Wallpapers. 2. Select a wallpaper image and tap SET WALLPAPER. Quick Settings Some frequently used settings can be found in Quick Settings. To open Quick Settings, simply swipe down from the top of the screen with two fingers or twice with one finger. -
Page 14: Adding Your Email Accounts
• Tap the cursor, and tap and drag the tab below the cursor to the new position. To select text: 1. Tap and hold (or double-tap) within the text. 2. The nearest word highlights, with a tab at each end of the selection. Drag the tabs to change the selection. -
Page 15: Removing An Account
Removing an Account When you remove an account that you have added to your device, everything associated with that account, including email, contacts, calendar events and settings, is also deleted. 1. Open the All Apps screen and tap Settings Accounts. 2. -
Page 16: Connectivity
3. Connectivity Cellular Data Connection Note: This feature is not available on all models. To use cellular services, you must have a subscription to the function with a mobile phone network service. In most cases, the settings of the cellular services are installed automatically. To turn on or off the cellular services: 1. -
Page 17: Disconnecting A Bluetooth Connection
3. The device will automatically scan for available Bluetooth devices. 4. Tap the desired device from the list to initiate pairing. 5. Make sure that the same passkey is displayed on your device and the other device, and then tap PAIR. -
Page 18: Personalising Your Device
4. Personalising Your Device You can easily customise the device for personal settings through the Settings menu, such as personalising the Home screen, changing the display and sound settings, configuration the connection settings, and more. Note: Not all setting items and options are available for all models. Settings Menu To access the Settings menu, do one of the following: •... -
Page 19: Connected Devices
To set up a VPN connection, tap +, enter the details of the VPN and tap Save. Tap the VPN to connect, enter the required username and password, select the checkbox for Save account information, and tap Connect. „ Private DNS Select Off, Automatic, or Private DNS provider hostname to enter a hostname if you want to use a private DNS provider. -
Page 20: Sound
„ Auto-rotate screen When this item is enabled, the screen rotates automatically based on the device orientation. „ Font size Select the desired font size. „ Display size Select the desired size for the items on your screen. „ Screen saver Set the screensaver when the device is charging or docked. -
Page 21: Accounts
„ Device security Set the Screen lock setting when the screen enters the sleep mode or when you press the power button. This can protect your personal information. • None • Swipe • Pattern • • Password „ Privacy • Location: You can turn the location services on or off, and set the location mode. -
Page 22: About Phone
• Text-to-speech output: Customise the text-to-speech settings. „ Gestures Enable or disable gesture-based navigation: Jump to camera, Swipe up on Home button and Prevent ringing. „ Date & time You can change the date and time, and time zone of your device. „... -
Page 23: Reference
5. Reference Troubleshooting For initial support, contact your IT department or your local authorised dealer. „ Power does not switch on when using battery power. The remaining battery power may be too low to run your device. Charge the battery. „... -
Page 24: Regulatory Information
• Do not store or carry flammable liquids, gases or explosive materials in the same compartment as your device, its parts or accessories. • To discourage theft, do not leave the device and accessories in plain view in an unattended vehicle. - Page 25 USA Contact Information Magellan 279 E Arrow Highway San Dimas, CA 91773 USA +1 909-394-5000 http://www.magellangps.com Canadian Department Of Communications CAN ICES-3(B)/NMB-3(B) Radio Interference Regulations Class B Compliance Notice This Class B digital apparatus meets all requirements of the Canada Interference-Causing equipment regulations.
-
Page 26: Rf Exposure Information (Sar)
Products with the CE marking comply with Radio Equipment Directive (Directive 2014/53/EU) - issued by the Commission of the European Community. Compliance with these directives implies conformity to the following European Standards: • EN 62311 • EN 62209-2 • EN 50566 •... -
Page 27: Safety Precautions
Safety Precautions • When using the device, note that the ambient temperature should be below 45ºC (113ºF). • To prevent possible hearing damage, do not listen at high volume levels for long periods of time. „ About Charging • Use only the charger supplied with your device. Use of another type of charger will result in malfunction and/or danger.
Need help?
Do you have a question about the F740s Series and is the answer not in the manual?
Questions and answers