Table of Contents
Advertisement
Quick Links
Advertisement
Table of Contents

Subscribe to Our Youtube Channel
Related Manuals for Fisher-Price 79011


Summary of Contents for Fisher-Price 79011
- Page 1 SOOTHING SOUNDS DELUXE BOUNCER SEAT Model Number: 79011 Adult assembly is required. Please save these instructions for future reference. Tool needed for assembly: Phillips screwdriver (not included). Requires three “C” (LR14) alkaline batteries (not included) in the soothing unit.
-
Page 2: Consumer Information
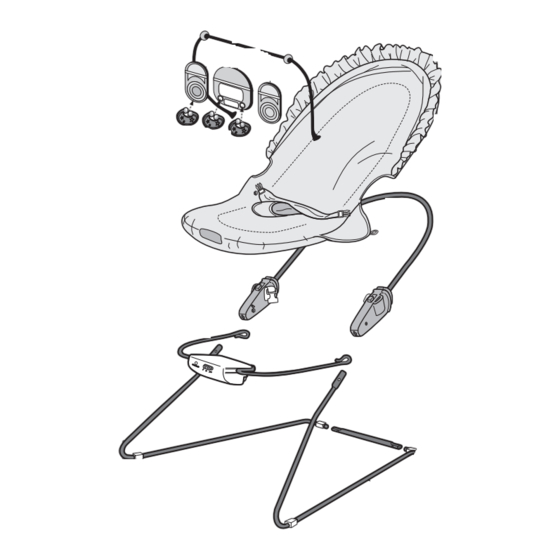
If this should happen, please call us toll-free, rather than return this product to the store. Usually, we can solve the problem over the telephone or send you replacement parts. Please call Fisher-Price ® Consumer Affairs, toll-free at 1-800-432-KIDS, between 8 AM - 5 PM EST, Monday through Friday. - Page 3 PARTS Mirror Toy Bar 2 Paddles 3 Rings Seatback Wire Footrest Wire Soothing Unit Right Base Wire Base Connector Left Base Wire #8 - 32 x " #8 - 32 Nut - 2 Screw - 2 Shown Actual Size Shown Actual Size...
-
Page 4: Battery Installation
BATTERY INSTALLATION 1.5V x 3 – “C” (LR14) SHOWN ACTUAL SIZE Battery Compartment Door • Locate the soothing unit on the footrest wire. • Loosen the screw in the soothing unit battery compartment door with a Phillips screwdriver. • Remove the battery compartment door. •... - Page 5 ASSEMBLY CAUTION This package contains small parts. Adult assembly is required. Right Base Colored Dots Wire Base Connector Left Base Wire • Place the base connector on a flat surface as shown. • Position the left and right base wires as shown. Note the locations of the colored dots on the left and right base wire.
- Page 6 ASSEMBLY Colored Base Wire Footrest Colored Wire Base Wire Soothing Unit Base Connector Base • Position the footrest wire so that the soothing Wire unit is upright. Back View • While flexing the base wires toward each other, hook the footrest wire onto the ends of the base wires. •...
- Page 7 ASSEMBLY Pull Up Plastic Cover Protruding Side • Fit the nut (so that the protruding side is facing the seating area) into the hexagonal #8 x 32 Nut opening on the inside of each plastic cover. • Insert a screw through the outside of each plastic cover and tighten with a Phillips screwdriver.
- Page 8 ASSEMBLY Seat Back Wire Slot Restraint Belt • Position the pad with the canopy upright. • Fit the upper pocket on the back of the pad onto the seat back wire • Lift the footrest wire. Fit the lower pocket on the back of the pad onto the footrest wire .
- Page 9 ASSEMBLY Plastic Plastic Cover Cover Elastic Elastic Strap Strap • Wrap the elastic straps on the pad flaps around the outside of each Plastic Cover plastic cover. • Hook the elastic straps to the peg on Elastic the inside of each plastic cover. Strap Inside View...
- Page 10 ASSEMBLY Toy Bar Mirror Paddle Plugs Rings Sockets • Fit the toy bar plugs into the socket in each plastic cover. • Snap the mirror and paddles to the toy bar. • The rings can be attached to the mirror and one of the paddles as shown. Hint: Twist the ends of the rings apart to attach them to the mirror or paddles.
-
Page 11: Setup And Use
SET-UP & USE WARNING To prevent serious injury and/or falls: • Never use on any elevated surface. • Never use as a carrier or lift while child is seated. • Always use the restraint system. • Never leave child unattended. •... - Page 12 SET-UP & USE Anchored End Anchored End Buckle Buckle Free End Free End Tighten Loosen To tighten the restraint: • Feed the anchored end of the restraint strap up through the buckle to form a loop • Pull the free end of the restraint strap •...
- Page 13 SET-UP & USE Canopy Down Canopy Up Canopy Straps Canopy Adjustment The canopy can be adjusted down or up: Down - Remove the canopy straps from the buttons on the back side of the seat. Push the canopy down and fit it behind the seat back wire. Up –...
- Page 14 SET-UP & USE Lift for Upright Lower for Recline Press Button Button Seat Back Adjustment The seat back can be adjusted upright or reclined for baby’s comfort. Reclined – Press the button on each plastic cover to lower the seat back. Hint: If your child is not seated in the seat, you will need to push the seat back at the same time you are pressing both buttons on the plastic covers.
-
Page 15: Fcc Note (United States Only)
SET-UP & USE Soothing Sounds and Vibrations • Make sure your child is properly secured in the seat. • First, slide the switch on the soothing unit to select soothing sounds, soothing vibrations or both! Soothing Sounds (various lullabies) Soothing Vibrations Soothing Sounds and Vibrations •... - Page 16 • Replace the canopy stays into the canopy sleeves. • Refer to Assembly steps 5 and 6. Fisher-Price, Inc., a subsidiary of Mattel, Inc., East Aurora, NY 14052 U.S.A. ©2000 Mattel, Inc. All Rights Reserved. ® and ™ designate U.S. trademarks of Mattel, Inc.
Need help?
Do you have a question about the 79011 and is the answer not in the manual?
Questions and answers