NETGEAR Aircard 797 Quick Start Manual
Hide thumbs
Also See for Aircard 797:
- User manual (89 pages) ,
- Quick start manual (72 pages) ,
- Manual (4 pages)
Table of Contents
Advertisement
Available languages
Available languages
Quick Links
Advertisement
Table of Contents

Related Manuals for NETGEAR Aircard 797


Summary of Contents for NETGEAR Aircard 797
- Page 1 Quick Start/Kurzanleitung/Démarrage rapide/Inicio rápido/Avvio rapido/ Pikaopas/Snabbstart/Stručný přehled Aircard 797 Mobile Hotspot/Mobiler Hotspot/Hotspot mobile/ Hotspot móvil/Hotspot mobile/Mobiilitukiasema/ Mobil hotspot/Mobilní hotspot...
- Page 2 Content English ............3 Deutsch ..........13 Français ..........23 Español..........33 Italiano ..........43 Suomi ..........53 Svenska ..........63 Čeština ..........73...
-
Page 3: Meet Your Hotspot
What’s in the box • Mobile hotspot • Battery cover • Battery • Micro USB cable • AC adapter • Nano SIM adapter Meet your hotspot Status screen Micro USB port Power button... -
Page 4: Install The Sim Card
Install the SIM card The SIM slot accepts a micro SIM card (3FF). If you have a nano SIM card (4FF), use it with the nano SIM adapter that came in the package with your mobile hotspot. 1. Slide the SIM card into the slot with the gold colored contacts facing down. -
Page 5: Charge The Battery
Charge the battery The battery comes partially charged. To fully charge the battery, connect the USB cable to the mobile hotspot and plug it into either: • A wall socket (faster charge option) • The USB port on your laptop Set up your hotspot To connect to the mobile broadband network, your SIM account must be... - Page 6 If your SIM card supports automatic APN configuration, the hotspot sets the default APN for your SIM card and your hotspot is ready to use. 4. If APN Setup Required displays, do the following: a. Press the Power button to view a list of APNs available for your SIM card.
- Page 7 c. Complete the Configure an APN section to add a default APN manually. d. Press and hold the Power button for five seconds to turn off the hotspot. Hotspot status LED The status LED indicates data connection status: • Blue, slow blink. The hotspot is ready.
-
Page 8: Lcd Home Screen
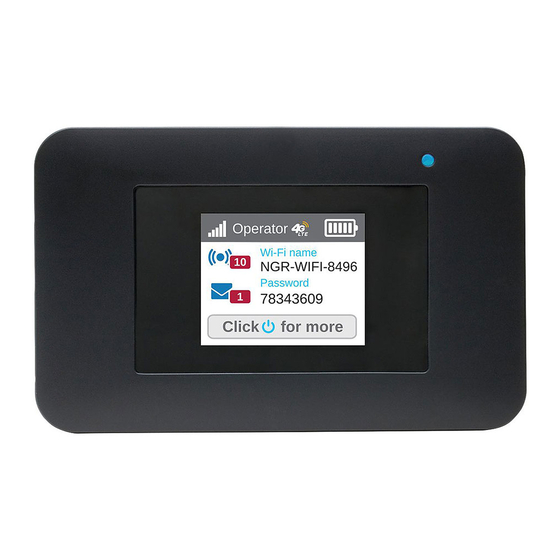
LCD home screen The home screen displays the mobile hotspot’s WiFi network name and password. The network indicator lets you know which mobile network you are connected to. Signal Network Battery level strength WiFi network name WiFi password Press the Power button to view different screens such as Notifications and Device Information. - Page 9 Configure an APN You must configure an APN if a message that APN setup is required displays on the LCD. 1. On your computer or mobile device, open your WiFi network connection manager. 2. Find your mobile hotspot’s WiFi network name and connect. The LCD home screen displays the WiFi network name and password.
-
Page 10: Connect To The Internet
Contact your network service provider for information about these details. 8. Click the Save button. 9. Click the radio button for the newly created APN to set it as the default. Your hotspot is ready to use. Connect to the Internet The LCD home screen displays the WiFi network name and password. - Page 11 Customize your hotspot You can customize your hotspot by using a web browser or by using the NETGEAR Mobile app. Use a web browser 1. On your computer or mobile device, open your WiFi network connection manager. 2. Find your mobile hotspot’s WiFi network name and connect.
-
Page 12: Download The Netgear Mobile App
Download the NETGEAR Mobile app Download the free NETGEAR Mobile app from https://www.netgear.com/mobileapps. Use this app to view your hotspot’s settings, connection, and data usage information from your smartphone or tablet. Reset your hotspot You can use the Power button to reset the hotspot to its factory settings. - Page 13 Lieferumfang • Mobiler Hotspot • Batterieabdeckung • Akku • Micro-USB-Kabel • Netzteil • Nano-SIM-Adapter Ihr Hotspot LCD- Bildschirm Status- Micro- USB- Anschluss Ein-/Aus- Taste...
-
Page 14: Einsetzen Der Sim-Karte
Einsetzen der SIM-Karte SIM-Steckplatz ist für eine Micro-SIM-Karte (3FF) ausgelegt. Wenn Sie über eine Nano- SIM-Karte (4FF) verfügen, verwenden Sie sie mit dem Nano-SIM-Adapter, der im Lieferumfang Ihres mobilen Hotspots enthalten ist. Schieben Sie die SIM-Karte in den Steckplatz. Die goldfarbenen Kontakte müssen dabei nach unten zeigen. -
Page 15: Laden Des Akkus
Laden des Akkus Der Akku ist teilweise aufgeladen. Um den Akku vollständig aufzuladen, verbinden Sie das USB-Kabel mit dem mobilen Hotspot und schließen Sie es an eine der folgenden Schnittstellen an: • eine Steckdose (Schnellladeoption) • den USB-Anschluss an Ihrem Laptop Einrichten Ihres Hotspots Damit Sie eine Verbindung zum mobilen Breitband-Netzwerk herstellen können, muss... - Page 16 Wenn Ihre SIM-Karte die automatische APN-Konfiguration unterstützt, stellt der Hotspot den Standard-APN für Ihre SIM-Karte ein und Ihr Hotspot ist einsatzbereit. Wenn APN Setup Required (APN- Konfiguration erforderlich) angezeigt wird, gehen Sie wie folgt vor: Drücken Sie die Ein-/Aus-Taste, um eine Liste der für Ihre SIM-Karte verfügbaren APNs anzuzeigen.
- Page 17 Halten Sie die Ein-/Aus-Taste gedrückt, bis der Fortschrittsbalken vollständig ist, und lassen Sie dann die Ein-/Aus-Taste los. Füllen Sie den Abschnitt „Configure an APN“ (APN konfigurieren) aus, um einen Standard-APN manuell hinzuzufügen. Halten Sie die Ein-/Aus-Taste fünf Sekunden lang gedrückt, um den Hotspot auszuschalten.
- Page 18 LCD-Startbildschirm Auf dem Startbildschirm werden der WLAN-Netzwerkname und das Passwort des mobilen Hotspots angezeigt. Die Netzwerkanzeige gibt an, mit welchem mobilen Netzwerk Sie verbunden sind. Netzwerk Batterieanzeige Signalstärke WLAN- Netzwerkname WLAN- Passwort Drücken Sie die Ein-/Aus-Taste, um verschiedene Bildschirme wie Benachrichtigungen und Geräteinformationen anzuzeigen.
- Page 19 Konfigurieren eines APN: Sie müssen einen APN konfigurieren, wenn auf dem LCD-Bildschirm eine Meldung angezeigt wird, dass die Einrichtung eines APN erforderlich ist. Öffnen Sie auf Ihrem Computer oder Mobilgerät den Verbindungsmanager für das WLAN-Netzwerk. Suchen Sie den WLAN-Netzwerknamen Ihres mobilen Hotspots, und stellen Sie eine Verbindung her.
- Page 20 Wenden Sie sich an Ihren Netzwerkdienstanbieter, wenn Sie mehr über die genannten Details erfahren möchten. Klicken Sie auf die Schaltfläche Save (Speichern). Klicken Sie auf die Optionsschaltfläche für den neu erstellten APN, um ihn als Standard festzulegen. Ihr Hotspot ist nun einsatzbereit. Herstellen einer Internetverbindung Auf dem LCD-Startbildschirm werden der...
- Page 21 Anpassen Ihres Hotspots Sie können Ihren Hotspot über einen Webbrowser oder über die NETGEAR Mobile App anpassen. Verwenden eines Webbrowsers Öffnen Sie auf Ihrem Computer oder Mobilgerät den Verbindungsmanager für das WLAN-Netzwerk. Suchen Sie den WLAN-Netzwerknamen Ihres mobilen Hotspots, und stellen Sie eine Verbindung her.
- Page 22 Die NETGEAR Mobile App herunterladen Laden Sie die kostenlose NETGEAR Mobile App unter https://www.netgear.com/mobileapps herunter. Mit dieser App können Sie Ihre Hotspot-Einstellungen sowie Informationen zur Verbindung und Datennutzung auf Ihrem Smartphone oder Tablet abrufen. Zurücksetzen Ihres Hotspots Verwenden Sie den Netzschalter, um den Hotspot auf die Werkseinstellungen zurückzusetzen.
-
Page 23: Contenu De L'emballage
Contenu de l'emballage • Hotspot mobile • Couvercle des piles • Batterie • Câble Micro-USB • Adaptateur secteur • Adaptateur Nano SIM Présentation de votre hotspot Ecran LCD Voyant d'état Port Micro Bouton d'alimentation... - Page 24 Installez la carte SIM Le logement pour carte SIM accepte une carte Micro SIM (3FF). Si vous disposez d’une carte Nano SIM (4FF), utilisez-la avec l’adaptateur Nano SIM fourni dans l’emballage avec votre point d’accès mobile. Faites glisser la carte SIM dans le logement, contacts dorés vers le bas.
- Page 25 Chargez la batterie La batterie est fournie partiellement chargée. Pour recharger complètement la batterie, connectez le câble USB au hotspot mobile et branchez-le dans : • Une prise murale (option de recharge la plus rapide) • Le port USB de votre ordinateur portable Configurez votre hotspot Pour vous connecter au réseau haut...
- Page 26 Si votre carte SIM prend en charge la configuration APN automatique, le hotspot définit l’APN par défaut de votre carte SIM et votre hotspot est prêt à être utilisé. Si APN Setup Required (Configuration APN requise) s’affiche, procédez comme suit : Appuyez sur le bouton d’alimentation pour afficher une liste des APN disponibles pour...
- Page 27 Maintenez le bouton d’alimentation enfoncé jusqu’à ce que la barre de progression se termine, puis relâchez le bouton d’alimentation. Terminez la section Configure an APN (Configuration d'un APN) pour ajouter un APN par défaut manuellement. Appuyez sur le bouton d’alimentation et maintenez-le enfoncé...
-
Page 28: Ecran D'accueil
Ecran d'accueil L'écran d'accueil affiche le nom du réseau Wifi et le mot de passe du hotspot mobile. L'indicateur de réseau vous indique le réseau mobile auquel vous êtes connecté. Puissance Niveau de charge Réseau du signal de la batterie Nom de réseau Wi-Fi... - Page 29 Configurez un APN Vous devez configurer un APN si un message indiquant qu'une configuration de l'APN est requise s'affiche à l'écran. Ouvrez le gestionnaire de connexions de réseau Wifi de votre ordinateur ou appareil mobile. Recherchez le nom de réseau Wifi de votre hotspot mobile et connectez- vous.
- Page 30 Contactez votre fournisseur de services réseau pour plus d'informations sur ces détails. Cliquez sur le bouton Save (Enregistrer). Cliquez sur le bouton radio pour l’APN récemment créé afin de le définir comme APN par défaut. Votre hotspot peut maintenant être utilisé.
- Page 31 Personnalisez votre hotspot Vous pouvez personnaliser votre hotspot en utilisant un navigateur Web ou l'application NETGEAR Mobile. Utilisez un navigateur Web. Ouvrez le gestionnaire de connexions de réseau Wifi de votre ordinateur ou appareil mobile. Recherchez le nom de réseau Wifi de votre hotspot mobile et connectez- vous.
- Page 32 Téléchargez l'application mobile NETGEAR Téléchargez l'application NETGEAR Mobile sur https://www.netgear.com/mobileapps. Utilisez cette application pour consulter les paramètres de votre hotspot, ainsi que vos informations de connexion et d'utilisation des données, depuis votre smartphone ou votre tablette. Réinitialisez votre hotspot Vous pouvez utiliser le bouton d’alimentation pour réinitialiser le hotspot...
-
Page 33: Contenido De La Caja
Contenido de la caja • Hotspot móvil • Cubierta de la batería • Batería • Cable con microadaptador USB • Adaptador de CA • Adaptador nano SIM Introducción al hotspot Pantalla Indicador de estado Puerto micro USB Botón de encendido... -
Page 34: Instalación De La Tarjeta
Instalación de la tarjeta La ranura SIM acepta tarjetas micro SIM (3FF). Si tiene una tarjeta nano SIM (4FF), utilícela con el adaptador nano SIM que venía en el paquete con el hotspot móvil. Deslice la tarjeta SIM en la ranura con los contactos dorados hacia abajo. -
Page 35: Carga De La Batería
Carga de la batería La batería viene parcialmente cargada. Para cargar completamente la batería, conecte el cable USB al hotspot móvil y, a continuación, enchúfelo en: • Una toma de corriente (opción de carga más rápida) • El puerto USB de su ordenador portátil Configuración del hotspot Para conectarse a la red de banda ancha... - Page 36 Si la tarjeta SIM admite la configuración automática de APN, después de que el hotspot establezca el APN predeterminado para la tarjeta SIM, este estaría listo para usarse. Si aparece el mensaje APN Setup Required (Configuración de APN necesaria), realice las siguientes acciones: Pulse el botón de encendido para ver una lista de APN...
- Page 37 Mantenga pulsado el botón de encendido hasta que la barra de progreso se complete y, a continuación, suéltelo. Complete la sección de APN para añadir un APN predeterminado de forma manual. Mantenga pulsado el botón de encendido durante cinco segundos para desactivar el hotspot.
- Page 38 Pantalla de inicio LCD La pantalla de inicio muestra el nombre de red y la contraseña de WiFi del hotspot móvil. El indicador de red indica a qué red móvil está conectado. Intensidad Nivel de batería de la señal Nombre de la red WiFi Contraseña de la red...
- Page 39 Configuración de un Si en la pantalla LCD aparece un mensaje en el que se indica que se requiere una configuración de APN, debe configurar un APN. En el equipo o dispositivo móvil, abra el administrador de conexiones de su red WiFi.
-
Page 40: Conexión A Internet
Haga clic en el botón Add (Añadir) e introduzca los datos del APN. Póngase en contacto con su proveedor de servicios de red para obtener información sobre estos datos. Haga clic en el botón Save (Guardar). Haga clic en el botón de radio del APN recién creado para establecerlo como predeterminado. - Page 41 Personalización del hotspot Puede personalizar su hotspot mediante un navegador web o mediante la aplicación NETGEAR Mobile. Uso de un navegador web En el equipo o dispositivo móvil, abra el administrador de conexiones de su red WiFi. Encuentre el nombre de red WiFi de su hotspot móvil y conéctese.
- Page 42 Descarga de la aplicación NETGEAR Mobile Descargue la aplicación gratuita NETGEAR Mobile en https://www.netgear.com/mobileapps. Utilice esta aplicación para ver información sobre la configuración, la conexión y el uso de datos de su hotspot desde su smartphone o tablet. Restablecimiento del hotspot Puede utilizar el botón de encendido...
-
Page 43: Contenuto Della Confezione
Contenuto della confezione • Hotspot mobile • Coperchio batteria • Batteria • Cavo micro USB • Adattatore CA • Adattatore nano SIM Hotspot Schermo LED di stato Porta micro USB Pulsante di alimentazione... -
Page 44: Installazione Della Scheda Sim
Installazione della scheda SIM Lo slot per scheda SIM accetta una scheda Micro SIM (3FF). Se si dispone di una scheda nano SIM (4FF), utilizzarla con l'adattatore per nano SIM fornito nella confezione con l'hotspot mobile. Far scorrere la scheda SIM nello slot con i contatti dorati rivolti verso il basso. -
Page 45: Ricarica Della Batteria
Ricarica della batteria La batteria viene fornita parzialmente carica. Per caricare completamente la batteria, collegare il cavo USB all'hotspot mobile, quindi collegarlo a: • Una presa a muro (opzione di ricarica più veloce) • Porta USB del laptop Configurazione dell'hotspot Per la connessione alla rete a banda larga mobile, è... - Page 46 Se la scheda SIM supporta la configurazione APN automatica, l'hotspot imposta l'APN predefinito per la scheda SIM e l'hotspot è pronto per l'uso. Se viene visualizzato il messaggio APN Setup Required (Impostazione APN richiesta), procedere come segue: Premere il pulsante Power (Alimentazione) per visualizzare un elenco di APN disponibili per la scheda SIM.
- Page 47 Tenere premuto il pulsante Power (Alimentazione) finché la barra di avanzamento non è completa, quindi rilasciare il pulsante Power (Alimentazione). Completare la sezione Configurare un APN per aggiungere un APN predefinito manualmente. Tenere premuto il pulsante Power (Alimentazione) per cinque secondi per spegnere l'hotspot.
- Page 48 Schermata iniziale LCD Nella schermata iniziale vengono visualizzati il nome e la password della rete WiFi dell'hotspot mobile. L'indicatore di rete indica la rete mobile alla quale si è connessi. Indicatore livello Livello di carica segnale Rete della batteria Nome rete WiFi Password WiFi...
- Page 49 Configurazione di un Se sullo schermo LCD viene visualizzato un messaggio in cui è richiesta la configurazione di un APN, è necessario procedere con la configurazione. Sul computer o dispositivo mobile, aprire il programma di gestione delle connessioni WiFi. Individuare il nome della rete WiFi dell'hotspot mobile e stabilire una connessione.
- Page 50 Selezionare Network > APN (Rete > APN). Fare clic su Add (Aggiungi) e immettere i dettagli dell'APN. Contattare il provider di servizi di rete per informazioni su questi dettagli. Fare clic sul pulsante Save (Salva). Fare clic sul pulsante di opzione per l'APN appena creato per impostarlo come predefinito.
- Page 51 WiFi. Avviare un browser Web. Immettere http://mywebui.net o http://192.168.1.1. Inserire la password di accesso dell'amministratore. Viene visualizzata la pagina Web dell'hotspot. Per ulteriori informazioni, consultare il manuale utente. Per scaricare il manuale dell'utente, visitare www.netgear.com/support/ e cercare AC797.
- Page 52 Scaricare l'app NETGEAR Mobile Scaricare l'app gratuita NETGEAR Mobile da https://www.netgear.com/mobileapps. L'app consente di visualizzare informazioni sulle impostazioni, sulla connessione e sull'utilizzo dati dell'hotspot direttamente dal proprio smartphone o tablet. Ripristino dell'hotspot Per ripristinare l'hotspot alle impostazioni predefinite, utilizzare il pulsante Power (Alimentazione).
-
Page 53: Pakkauksen Sisältö
Pakkauksen sisältö • Mobiilitukiasema • Akkutilan kansi • Akku • Micro USB -kaapeli • Virtasovitin • Nano-SIM-sovitin Tukiaseman esittely LCD- näyttö Tilan merkkivalo Micro USB -liitäntä Virtapainike... - Page 54 SIM-kortin asentaminen SIM-paikkaan sopii micro-SIM-kortti (3FF). Jos sinulla on nano-SIM- kortti (4FF), käytä sitä nano-SIM- sovittimen kanssa, joka toimitettiin mobiilitukiaseman mukana. 1. Työnnä SIM-kortti paikalleen kullanvärinen kontaktipinta alaspäin. 2. Varmista, että SIM-kortti on SIM- tiukasti paikka paikallaan. 3. Aseta akku paikalleen.
-
Page 55: Akun Lataaminen
Akun lataaminen Akku toimitetaan osittain ladattuna. Lataa akku täyteen liittämällä USB- kaapeli mobiilitukiasemaan ja jompaankumpaan seuraavista: • pistorasiaan (lataa nopeammin) • kannettavan USB-porttiin. Tukiaseman määrittäminen SIM-tilin on oltava aktiivinen, jotta mobiililaajakaistayhteyden voi muodostaa. Jos micro-SIM-kortin liittymä on prepaid-tyyppinen, sen tilin saldon on oltava positiivinen. - Page 56 Jos SIM-korttisi tukee automaattista APN-määritystä, tukiasema asettaa SIM-kortillesi oletus-APN:n, ja tukiasema on käyttövalmis. 4. Jos näyttöön tulee APN-määritys pakollinen -ilmoitus, tee seuraavat toimet: a. Paina virtapainiketta ja katso SIM-kortin käytettävissä olevien APN:ien luetteloa. b. Valitse oikea APN painamalla virtapainiketta. c. Jos haluat asettaa APN:n oletukseksi, paina virtapainiketta edistymispalkin toiminnan ajan...
- Page 57 c. Lisää oletus-APN manuaalisesti viimeistelemällä APN:n määrittäminen -osio. d. Katkaise tukiasemasta virta painamalla virtapainiketta viiden sekunnin ajan. Tukiaseman tilan merkkivalo Tilan merkkivalo osoittaa datayhteyden tilan: • Vilkkuu hitaasti sinisenä. Tukiasema on käyttövalmis. • Kaksi sinistä välähdystä. Tukiasema siirtää tietoja. • Vilkkuu hitaasti oranssina.
- Page 58 LCD-aloitusnäyttö Aloitusnäytössä näytetään mobiilitukiaseman WiFi-verkon nimi ja salasana. Verkon ilmaisin kertoo, mihin mobiiliverkkoon yhteys on muodostettu. Signaalin Verkko Akku voimakkuus WiFi-verkon nimi WiFi- salasana Virtapainiketta painamalla voit avata eri näyttöjä, esimerkiksi Notifications (Ilmoitukset) ja Device Information (Laitteen tiedot).
- Page 59 APN:n määrittäminen Sinun on määritettävä APN, jos LCD- näyttöön tulee ilmoitus, jonka mukaan APN-määritys on pakollinen. 1. Avaa WiFi-verkon yhteyden hallintaohjelma tietokoneessa tai mobiililaitteessa. 2. Etsi mobiilitukiaseman WiFi-verkon nimi ja muodosta yhteys. LCD-aloitusnäytössä näytetään WiFi-verkon nimi ja salasana. 3. Avaa selain. 4.
- Page 60 Saat tietoja verkkopalveluntarjoajaltasi. 8. Napsauta Save (Tallenna) -painiketta. 9. Määritä vasta luotu APN oletukseksi napsauttamalla sen valintanappia. Tukiasema on käyttövalmis. Muodosta Internet- yhteys LCD-aloitusnäytössä näytetään WiFi- verkon nimi ja salasana. 1. Avaa WiFi-verkon yhteyden hallintaohjelma tietokoneessa tai mobiililaitteessa. 2. Etsi mobiilitukiaseman WiFi-verkon nimi ja muodosta yhteys.
- Page 61 Tukiaseman mukauttaminen Voit mukauttaa tukiasemasi selaimella tai NETGEAR Mobile -sovelluksella. Selaimen käyttäminen 1. Avaa WiFi-verkon yhteyden hallintaohjelma tietokoneessa tai mobiililaitteessa. 2. Etsi mobiilitukiaseman WiFi-verkon nimi ja muodosta yhteys. LCD-aloitusnäytössä näytetään WiFi-verkon nimi ja salasana. 3. Avaa selain. 4. Kirjoita http://mywebui.net tai http://192.168.1.1.
- Page 62 Lataa NETGEAR Mobile -sovellus Lataa maksuton NETGEAR Mobile -sovellus osoitteesta https://www.netgear.com/mobileapps. Tällä sovelluksella voit tarkastella tukiaseman asetuksia, yhteyttä ja datakäyttöä älypuhelimesta tai tabletista käsin. Tukiaseman nollaaminen Tukiaseman tehdasasetukset voi palauttaa virtapainikkeella. 1. Pidä virtapainiketta painettuna. Shutting down (Sammutetaan) -näyttö avautuu.
- Page 63 Vad finns i lådan • Mobil hotspot • Batterilucka • Batteri • Mikro-USB-kabel • Strömadapter • Nano-SIM-adapter Det här är din hotspot LCD- skärm Statuslampa Mikro- USB-port Power (strömknappen)
- Page 64 Sätt i SIM-kortet Ett mikro-SIM-kort (3FF) går in i SIM- kortplatsen. Om du har ett nano- SIM-kort (4FF) så kan du använda det med nano-SIM-adaptern som levereras tillsammans med den mobila hotspoten. 1. Skjut in SIM-kortet i kortplatsen med de guldfärgade kontakterna vända nedåt.
-
Page 65: Ladda Batteriet
Ladda batteriet Batteriet är delvis laddat vid köpet. Ladda batteriet helt genom att ansluta USB-kabeln till din mobila hotspot och anslut den till något av följande: • Ett vägguttag (snabbare laddning) • USB-porten på en bärbar dator Konfigurera din hotspot Ditt SIM-konto måste vara aktivt för att du ska kunna ansluta till det mobila bredbandsnätverket. - Page 66 Om SIM-kortet har stöd för automatisk APN-konfiguration anger din hotspot standard-APN för SIM-kortet och är klar att använda. 4. Om APN Setup Required (APN- konfiguration krävs) visas gör du följande: a. Tryck på Power (strömknappen) för att visa en lista över APN som är tillgängliga för SIM-kortet.
- Page 67 b. Håll Power (strömknappen) intryckt tills förloppsindikatorn har slutförts och släpp sedan upp Power (strömknappen). c. Fyll i avsnittet Konfigurera ett APN om du vill lägga till ett standard-APN manuellt. d. Håll Power (strömknappen) intryckt i fem sekunder för att stänga av din hotspot.
- Page 68 LCD-startskärm Startskärmen visar WiFi- nätverksnamnet och -lösenordet för din mobila hotspot. Nätverksindikatorn visar vilket mobilt nätverk du är ansluten till. Signalstyrka Nätverk Batterinivå Namn på trådlöst nätverk WiFi- lösenord Tryck på Power (strömknappen) för att visa olika skärmar, till exempel meddelanden och enhetsinformation.
- Page 69 Konfigurera ett APN Du måste konfigurera ett APN om ett meddelande om att APN-konfiguration krävs visas på LCD-skärmen. 1. På datorn eller den mobila enheten öppnar du anslutningshanteraren för ditt WiFi-nätverk. 2. Hitta WiFi-nätverksnamnet för din mobila hotspot och anslut. LCD-startskärmen visar WiFi- nätverksnamnet och -lösenordet.
-
Page 70: Ansluta Till Internet
7. Klicka på knappen Add (lägg till) och ange APN-informationen. Kontakta nättjänstleverantören för mer information. 8. Klicka på knappen Save (spara). 9. Klicka på alternativknappen för det nyskapade APN-namnet för att ange det som standard. Din hotspot är nu klar att användas. - Page 71 Anpassa din hotspot Du kan anpassa din hotspot genom att använda en webbläsare eller med hjälp av appen NETGEAR Mobile. Använda en webbläsare 1. På datorn eller den mobila enheten öppnar du anslutningshanteraren för ditt WiFi-nätverk. 2. Hitta WiFi-nätverksnamnet för din mobila hotspot och anslut.
- Page 72 Ladda ned appen NETGEAR Mobile Ladda ned den kostnadsfria appen NETGEAR Mobile från https://www.netgear.com/mobileapps. Använd appen om du vill visa din hotspots inställningar, anslutning och dataanvändningsin- formation från din smartphone eller surfplatta. Återställ din hotspot Du kan använda Power (strömknappen) för att återställa din hotspot till...
-
Page 73: Obsah Balení
Obsah balení • Mobilní hotspot • Kryt baterie • Baterie • Kabel Micro USB • Napájecí adaptér • Adaptér na kartu nano SIM Seznámení s hotspotem Obrazovka Stavová kontrolka Port micro Tlačítko napájení... - Page 74 Vložení karty SIM Do slotu na kartu SIM je možné vložit kartu formátu micro SIM (3FF). Pokud máte kartu formátu nano SIM (4FF), použijte ji společně s adaptérem na kartu nano SIM, který je součástí balení mobilního hotspotu. 1. Do slotu vsuňte kartu SIM zlatými kontakty dolů.
- Page 75 Nabijte baterii Baterie se dodává částečně nabitá. Baterii nabijete úplně, když připojíte kabel USB k mobilnímu hotspotu a zároveň: • k zásuvce (možnost rychlejšího nabití) • k portu USB počítače Nastavení hotspotu Aby bylo možné připojit se k mobilní širokopásmové síti, musí být aktivní účet karty SIM. Pokud používáte předplacenou kartu micro-SIM nebo kartu s účtováním podle spotřebovaných jednotek, musí...
- Page 76 Pokud vaše SIM karta podporuje automatickou konfiguraci názvu APN, hotspot nastaví výchozí název APN pro vaši SIM kartu a hotspot je připraven k použití. Pokud se zobrazí APN Setup Required (Nutné nastavení APN), postupujte následovně: Stisknutím tlačítka Power zobrazte seznam názvů APN dostupných pro vaši SIM kartu.
- Page 77 Chcete-li přidat výchozí název APN ručně, vyplňte část Konfigurace názvu přístupového bodu (APN). Stisknutím a podržením tlačítka Power po dobu pěti sekund hotspot vypnete. Stavová kontrolka LED hotspotu Stavová kontrolka LED signalizuje stav datového připojení: • Modrá, pomalé blikání. Hotspot je připraven. •...
-
Page 78: Domovská Obrazovka
Domovská obrazovka Na domovské obrazovce se zobrazí název a heslo sítě Wi-Fi mobilního hotspotu. Kontrolka sítě informuje o tom, ke které mobilní síti jste připojeni. Intenzita Nabití baterie signálu Síť Název sítě Wi-Fi Heslo sítě Wi-Fi Stisknutím tlačítka Power procházíte různé obrazovky, například Notifications (Upozornění) a Device Information (Informace o zařízení). - Page 79 Konfigurace názvu přístupového bodu (APN) Pokud se na obrazovce LCD zobrazí zpráva o tom, že je nutné nastavení APN, musíte jej nakonfigurovat. 1. Ve svém počítači nebo mobilním zařízení otevřete Správce připojení k síti Wi-Fi. 2. Vyhledejte název sítě Wi-Fi mobilního hotspotu a připojte se. Na domovské...
- Page 80 7. Klikněte na tlačítko Add (Přidat) a zadejte podrobnosti názvu APN. Tyto informace získáte od poskytovatele síťových služeb. 8. Klikněte na tlačítko Save (Uložit). 9. Klikněte na přepínací tlačítko pro nově vytvořený název APN a nastavte jej jako výchozí. Váš hotspot je nyní připraven k použití.
- Page 81 Přizpůsobení hotspotu Svůj hotspot můžete přizpůsobit prostřednictvím webového prohlížeče nebo aplikace NETGEAR Mobile. Použijte webový prohlížeč 1. Ve svém počítači nebo mobilním zařízení otevřete Správce připojení k síti Wi-Fi. 2. Vyhledejte název sítě Wi-Fi mobilního hotspotu a připojte se. Na domovské obrazovce LCD se zobrazí...
- Page 82 Stáhněte si aplikaci NETGEAR Mobile Stáhněte si bezplatnou aplikaci NETGEAR Mobile na adrese https://www.netgear.com/mobileapps. Pomocí této aplikace lze zobrazit nastavení a připojení hotspotu a také informace o připojení a využití dat ve smartphonu nebo tabletu. Reset hotspotu K resetování hotspotu do továrního nastavení můžete použít tlačítko Power (Napájení).
- Page 83 See the regulatory compliance document before connecting the power supply. For NETGEAR’s Privacy Policy, visit https://www.netgear.com/about/privacy-policy. By using this device, you are agreeing to NETGEAR’s Terms and Conditions at https://www.netgear.com/about/terms-and-conditions. If you do not agree, return the device to your place of purchase within your return period.
- Page 84 Consulte el documento de cumplimiento normativo antes de conectar la fuente de alimentación. Para la consultar la Política de privacidad de NETGEAR, visite https://www.netgear.com/about/privacy-policy. El uso de este dispositivo implica su aceptación de los términos y condiciones de NETGEAR descritos en https://www.netgear.com/about/terms-and-conditions.
- Page 85 Dichiarazione di conformità UE, visitare il sito Web https://www.netgear.com/about/regulatory/. Prima di collegare l’alimentazione, consultare il documento relativo alla conformità normativa. Per consultare l’Informativa sulla privacy di NETGEAR, visitare il sito Web https://www.netgear.com/about/privacy-policy. Utilizzando questo dispositivo, l’utente accetta i Termini e le condizioni di NETGEAR consultabili all’indirizzo https://www.netgear.com/about/terms-and-conditions.
- Page 86 Support och community Gå till netgear.com/support för att få dina frågor besvarade och komma åt de senaste nedladdningarna. Du kan också besöka vår NETGEAR-community och få praktiska råd på community.netgear.com. Information om efterlevnad, inklusive EG-försäkran om överensstämmelse, finns på https://www.netgear.com/about/regulatory/.
- Page 88 © NETGEAR, Inc., NETGEAR and the NETGEAR Logo are trademarks of NETGEAR, Inc. Any non-NETGEAR trademarks are used for reference purposes only. NETGEAR INTERNATIONAL LTD Floor 1, Building 3 University Technology Centre Curraheen Road, Cork, T12EF21, Ireland April 2020 NETGEAR, Inc.
Need help?
Do you have a question about the Aircard 797 and is the answer not in the manual?
Questions and answers