Table of Contents
Advertisement
Quick Links
Advertisement
Table of Contents

Related Manuals for Logitek mixIT


Summary of Contents for Logitek mixIT
- Page 1 Logitek mixIT Audio Console for JetStream Manual Version 1.0 May 2020...
- Page 2 Contents ã 2020 Logitek Electronic Systems, Inc. Notice Every effort has been made to supply complete and accurate information. However, Logitek Electronic Systems, Inc. assumes no responsibility for its use, nor any infringement of patents or other rights of third parties, which would result.
-
Page 3: Table Of Contents
................................10 AIR OUTPUT ..............................11 ADER PERATION ................................12 .................................. 12 ALKBACK ......................13 TUDIO UEST EADPHONES ONITOR ONTROLS ................................ 14 TILITY OUTERS ................................15 CENE ELECTS TWO YEAR LIMITED WARRANTY ......................... 16 Logitek mixIT Audio Console System/JET67 Manual... -
Page 4: Chapter 1 - Introduction
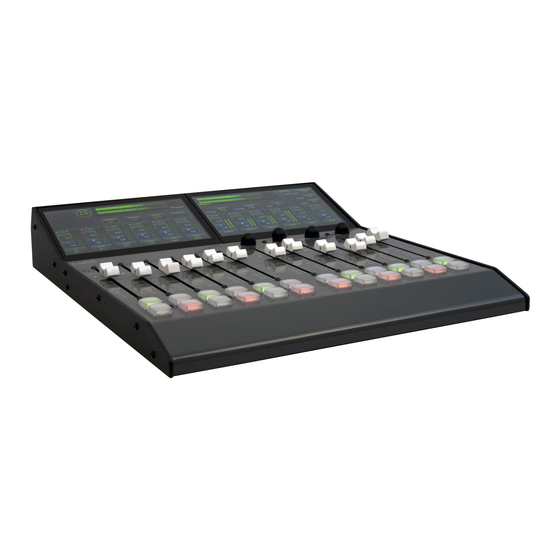
Chapter 1 – Introduction Figure 1 - The mixIT-12 console. Thank you for purchasing a mixIT-JS Audio Console. The mixIT-JS is a control surface for the JetStream Mini and JetStream Plus Audio Engines. The mixIT console is not compatible with the Logitek AE-32 Audio Engine. -
Page 5: About Logitek
KTRU, the pair decided they could design a better one themselves and the company was born. In the late 1990s, Logitek was the first North American company to offer a router-based digital console. Its first virtual PC-based console was introduced in 1999. By 2009, the company had pivoted to television, offering both physical and virtual consoles that seamlessly interface to production workflow automation systems. -
Page 6: Chapter 2 - Setup And Configuration
Connect the colored RJ-45 jack to a CAT-5 patch cable and the other end of this patch cable to the jack on the rear of the mixit. This is the data coming out with power. Connect the mains lead from the wall wart to the port on the injector. -
Page 7: How To Save A Console Scene
When you turn on device 5, bus 153, the status of the board is saved to surface 1 slot 3. When you turn on device 5, bus 154, the status of the board is saved to surface 1 slot 4. Logitek mixIT Audio Console System/JET67 Manual... -
Page 8: Routers
5 bus 154 on Utility Routers The mixIT has three Utility Routers on the right hand side of the mixIT-12 and the only LCD screen on the mixIT-6. These router crosspoints correspond to Router 1, Router 2, and Router 3 in the Surface Settings in JetSet, the web browser configuration system of the JetStream. -
Page 9: Chapter 3 - Console Operation
Chapter 3 - Console Operation The mixIT is very easy to use. The console uses touchscreens to select sources and bus assignments and knobs and buttons to adjust levels and turn faders on and off. This gives the operator the best of both worlds: simple menus and fewer buttons while still allowing someone to operate the board on air by feel without looking at where their hands are going. -
Page 10: Bus Assignments The Console Has 4 Main Mix Buses : Program , Aux 1, Aux 2, And Aux 3. Usually Program Is The Main On Air Output
As with changing the route, tap the name of the source over the fader you wish to change. Tap P (Program), 1 (Aux 1), 2 (Aux 2), or 3 (Aux 3) to assign the fader to the mix bus. When you have made your selections, tap “Done.” Logitek mixIT Audio Console System/JET67 Manual... -
Page 11: Fader Operation
To turn a channel on, press the top push button under the fader. The on button will glow green. To turn a channel off, press the lower push button under the fader. The off button will glow red. Logitek mixIT Audio Console System/JET67 Manual... -
Page 12: The Cue Bus
(for example, a codec for remote broadcasting), tapping the Talk button will route the studio talkback microphone (as defined in surface settings) to the mix minus output. Tap the button again to turn talkback off and resume sending mix minus to the output. Logitek mixIT Audio Console System/JET67 Manual... -
Page 13: Studio/Guest, Headphones, Monitor Controls
The Studio/Guest, Headphone, and Monitor selectors are on the far right. Tap the source to change what audio is being fed to these outputs. The volume knobs below the screen will adjust the level. Logitek mixIT Audio Console System/JET67 Manual... -
Page 14: Utility Routers
There are three utility routers on the console that can be used to change what is fed to the air chain, recorders, or remote codecs. Tap the box for the router to change the input. Logitek mixIT Audio Console System/JET67 Manual... -
Page 15: Scene Selects
Scene Selects There are 4 scene select buttons on the mixIT-12. Different console profiles can be stored to those buttons in setup. Press the button to recall the scene. Logitek mixIT Audio Console System/JET67 Manual... -
Page 16: Two Year Limited Warranty
LOGITEK will thereafter ship a replacement part, freight prepaid. LOGITEK may require the purchaser to return the defective part to LOGITEK freight prepaid as a condition of such replacement, either before or after LOGITEK ships the replacement part. LOGITEK shall not be responsible for any other charges or liabilities associated with purchaser-made repairs.
Need help?
Do you have a question about the mixIT and is the answer not in the manual?
Questions and answers