Table of Contents
Advertisement
Quick Links
Aspen
TLSO
®
UPGRADE KIT INSTRUCTIONS
A
1
A
B
2
A
3
TLSO INSTRUCTIONS
A
4
© 2017 Aspen Medical Products. All Rights Reserved.
Pat. aspenmp.com/patents.
TL0009G revised 09/17
ENGLISH
B
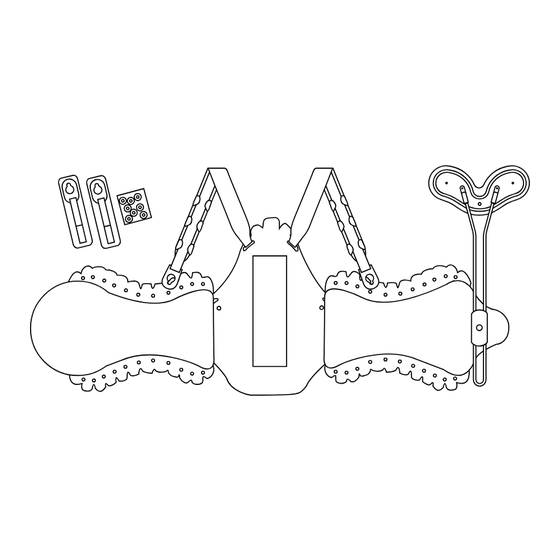
SHOULDER STRAPS
A. With the back panel lying on a
table, insert the strap through
the slot from above.
B. Align the rivet (female end away
from the patient) and press
firmly until it snaps into place.
Do this on both sides.
C
A. Align the rivet (female end
away from the patient) at the
torso control strap attachment
point. Press firmly until it snaps
into place.
B. Lace the strap through the slot
from inside.
C. Pull the buttonhole at the end
of the strap over the plastic
rivet and button it on. Pull tight
to secure.
B
CLAMP CONNECTOR
A. Remove the screw from the
clamp connector. Unlace the
black start tab and position
the clamp connector so the
threaded sleeve comes through
the slot.
B. Align the plastic rivets with the
two small holes. Press until they
snap into place then replace
the start tab.
PREPARATION
B
A. Remove the single screw in
the middle of the T-bar mount.
Remove the clamp and the
posts. Apply and tighten the
Aspen LSO. (Instructions at
aspenmp.com)
B. Hold posts and chest panel
in position on the patient. If
needed, bend the support posts
to fit patient.
Not made with natural
rubber latex.
ASPEN TLSO
CLAMP
CONNECTOR
TLSO UPGRADE KIT
ASSEMBLY PACK
ESPAÑOL
DEUTSCH
CORREAS DEL HOMBRO
SCHULTERRIEMEN
A. Con el panel posterior sobre
A. Das Rückenteil auf den Tisch
una mesa, introduzca la correa
legen und den Riemen von oben
desde arriba a través de la
in den Schlitz stecken.
ranura.
B. Das Niet (Aufnahme vom
B. Alinee el remache (el extremo
Patienten wegrichten)
hembra alejado del paciente)
ausrichten und fest drücken, bis
y presione firmemente hasta
es einrastet. Diesen Schritt an
encajarlo a presión en su lugar.
beiden Seiten durchführen.
Repita el procedimiento en
ambos lados.
CORREA DE CONTROL
TORSO-KONTROLLRIEMEN
PARA EL TORSO
A. Alinee el remache (el extremo
A. Das Niet (Aufnahme vom
hembra alejado del paciente)
Patienten wegrichten) auf den
en el punto de unión de la
Befestigungspunkt am Torso-
correa de control para el torso.
Kontrollriemen ausrichten und
Presione firmemente hasta
fest drücken, bis es einrastet.
encajarlo a presión en su lugar.
B. Den Riemen von innen durch
B. Pase la correa desde adentro a
den Schlitz ziehen.
través de la ranura.
C. Das Knopfloch am Ende des
C. Hale del ojal en el extremo de
Riemens auf das Kunststoffniet
la correa sobre el remache
ziehen und befestigen. Straff
plástico y abotónelo. Hale
ziehen und befestigen.
firmemente para asegurarlo.
CONECTOR DE LA
KLEMMANSCHLUSS
ABRAZADERA
A. Quite el tornillo del conector
A. Die Schraube aus dem
de la abrazadera. Deshaga la
Klemmanschluss entfernen.
pestaña negra y coloque el
Die schwarze Ansatzlasche
conector de la abrazadera de
lösen und den Klemmanschluss
modo que el manguito roscado
so anbringen, dass die
pase por la ranura.
Gewindehülse durch den
B. Alinee los remaches plásticos
Schlitz ragt.
con los dos orificios pequeños.
B. Die Kunststoffnieten auf die
Presione hasta que encajen
zwei kleinen Löcher ausrichten.
en su lugar, y luego vuelva a
Diese bis zum Einschnappen
colocar la pestaña.
hineindrücken und die
Ansatzlasche wieder einlegen.
PREPARACIÓN
VORBEREITUNG
A. Quite el tornillo simple en el
A. Die Schraube in der Mitte der
medio del montaje de la barra
T-Schiene entfernen. Klemme
en T. Quite la abrazadera y los
und Schienen entfernen.
soportes. Coloque y ajuste el
Das Aspen LSO anlegen und
corsé Aspen LSO. (Instrucciones
festziehen. (Anweisungen finden
en aspenmp.com.)
Sie unter aspenmp.com)
B. Sujete los soportes y el panel
B. Die Schienen und das Brustteil
torácico en su posición sobre
am Patienten in der richtigen
el paciente. Si fuera necesario,
Position halten. Bei Bedarf
doble los soportes de apoyo
können die Stützschienen
para adaptarlos a la anatomía
gebogen werden, um einen
del paciente.
guten Sitz am Patienten zu
erzielen.
No está hecho con látex
Ohne Naturkautschuklatex.
de goma natural.
ASPEN MEDICAL PRODUCTS
6481 OAK CANYON, IRVINE, CA 92618-5202, USA
800-295-2776 ∙ 949-681-0200 ∙ aspenmp.com
ITALIANO
FRANÇAIS
SPALLINE
BRETELLES
A. Con il pannello posteriore
A. Posez le panneau dorsal à
appoggiato su un tavolo,
plat sur une table, puis insérez
inserire dall'alto la spallina
la sangle dans la fente par
attraverso la fessura.
le haut.
B. Allineare il chiodino (estremità
B. Alignez l'œillet (extrémité
femmina rivolta in direzione
femelle éloignée du patient) et
opposta al paziente) e premere
appuyez fermement jusqu'à
con fermezza finché non
ce qu'il s'enclenche en place.
scatta in posizione. Ripetere su
Répétez de l'autre côté.
ciascun lato.
CINGHIETTA DI CONTROLLO
SANGLE DE CONTRÔLE DU
DEL TORSO
TORSE
A. Allineare il chiodino (estremità
A. Alignez l'œillet (extrémité
femmina rivolta in direzione
femelle éloignée du patient) au
opposta al paziente) al punto
niveau du point de fixation de
di fissaggio della cinghietta di
la sangle de contrôle du torse.
controllo del torso. Premere
Appuyez fermement jusqu'à ce
con fermezza finché non scatta
qu'il s'enclenche en position.
in posizione.
B. Enfilez la sangle dans la fente
B. Infilare la cinghietta dall'interno
par l'intérieur.
attraverso la fessura.
C. Amenez la boutonnière située
C. Tirare l'asola all'estremità della
à l'extrémité de la sangle
cinghietta sopra il chiodino di
sur l'œillet en plastique et
plastica e abbottonarla su di
boutonnez-le. Tirez fermement
esso. Tendere bene per fissare.
sur la sangle pour la maintenir
en place.
CONNETTORE DI CHIUSURA
CONNECTEUR DE BRIDE
A. Togliere la vite dal connettore
A. Retirez la vis du connecteur
di chiusura. Sfilare la linguetta
de bride. Dépliez la patte de
iniziale nera e posizionare il
départ noire et positionnez
connettore di chiusura in modo
le connecteur de bride de
che la guaina filettata passi
manière à ce que le manchon
attraverso la fessura.
fileté sorte de la fente.
B. Allineare i chiodini di plastica ai
B. Alignez les œillets en plastique
due piccoli fori. Premere finché
sur les deux petits orifices.
non scattano in posizione,
Appuyez jusqu'à ce qu'ils
quindi rimettere a posto la
s'enclenchent en position, puis
linguetta iniziale.
replacez la patte de départ.
PREPARAZIONE
PRÉPARATION
A. Rimuovere la vite singola
A. Retirez la vis du connecteur
situata nel mezzo della barra
de bride. Dépliez la patte de
di montaggio a T. Rimuovere
départ noire et positionnez
la chiusura e le stecche.
le connecteur de bride de
Applicare e stringere l'LSO
manière à ce que le manchon
Aspen (consultare le istruzioni
fileté sorte de la fente.
in merito al sito aspenmp.com).
B. Alignez les œillets en plastique
B. Tenere le stecche e il pannello
sur les deux petits orifices.
pettorale in posizione sul
Appuyez jusqu'à ce qu'ils
paziente. Se necessario,
s'enclenchent en position, puis
piegare le stecche di supporto
replacez la patte de départ.
per adeguarle meglio alla
conformazione del paziente.
Non realizzato con lattice
Pas fabriqué avec du latex
di gomma naturale.
de caoutchouc naturel.
中文
肩带
A. 将背板放在台上, 从上面
将肩带穿过槽口。
B. 对齐铆钉 (母接头一端离
开患者) 并按紧直至扣
到位。 对两侧执行上面
的程序。
躯干控制背带
A. 将铆钉 (母接头一端离开
患者) 与躯干控制背带的
挂扣端对齐。 按紧直至
扣到位。
B. 从里面将背带穿过槽口。
C. 将背带末端的扣眼拉到塑
料铆钉上, 扣上扣子。 拉紧
以保证牢固。
夹扣接头
A. 取下夹扣接头上的螺丝。
解开黑色起始扣环, 将夹
扣接头置于这样的位置使
得螺套能穿过槽口。
B. 将塑料铆钉与两个小孔对
齐。 按下直到它们扣入到
位, 然后更换起始扣环。
准备
A. 取下丁字架中间的单个螺
丝。 取下夹扣和支柱。 应用
并紧固Aspen LSO。 ( 说明
请见aspenmp.com)
B. 将支柱和胸板保持在患者
身上正确位置。 如需要, 弯
曲支柱以适合患者体型。
并非采用天然胶乳制造。
Advertisement
Table of Contents

Related Manuals for Aspen Medical Products TLSO


Summary of Contents for Aspen Medical Products TLSO
- Page 1 No está hecho con látex Non realizzato con lattice Pas fabriqué avec du latex Ohne Naturkautschuklatex. rubber latex. de goma natural. di gomma naturale. de caoutchouc naturel. © 2017 Aspen Medical Products. All Rights Reserved. Pat. aspenmp.com/patents. TL0009G revised 09/17...
- Page 2 These directions are guidelines only and are not offered as medical recommendations. in material and workmanship. The sole obligation of Aspen Medical Products in the event of breach of warranty shall be to repair CONSEQUENTIAL DAMAGES. THIS WARRANTY IS IN LIEU OF ALL OTHER WARRANTIES, EXPRESSED OR IMPLIED, INCLUDING THE or replace the defective product or part(s).
Need help?
Do you have a question about the TLSO and is the answer not in the manual?
Questions and answers