Table of Contents
Advertisement
Quick Links
OPERATION MANUAL FOR
CIRCULAR KNIFE SHARPENING
RMS-NC
MACHINE
Original operation manual
Please keep for further use!
Kaindl-Schleiftechnik REILING GmbH, Remchinger Str. 4, D-75203 Königsbach-Stein, Germany
Tel.: +49 7232/4001-0, Fax.: +49 7232/4001-30, Internet: www.kaindl.de, E-Mail: info@kaindl.de
Advertisement
Table of Contents

Related Manuals for Kaindl RMS-NC

Summary of Contents for Kaindl RMS-NC
- Page 1 OPERATION MANUAL FOR CIRCULAR KNIFE SHARPENING RMS-NC MACHINE Original operation manual Please keep for further use! Kaindl-Schleiftechnik REILING GmbH, Remchinger Str. 4, D-75203 Königsbach-Stein, Germany Tel.: +49 7232/4001-0, Fax.: +49 7232/4001-30, Internet: www.kaindl.de, E-Mail: info@kaindl.de...
-
Page 2: Table Of Contents
CONTENT EC-Declaration of conformity Transport / Environmental conditions / Set up / Safety advice / Directed use Construction Technical data Operation Clamping of the circular knife Alignment of the circular knife Interactive menu control Explanation of the control Basic information about grinding (Important information - please read!) Standard values for grinding operation Refering of the machine... -
Page 3: Ec-Declaration Of Conformity
DECLARATION OF CONFORMITY The manufacturer: Kaindl-Schleiftechnik Reiling GmbH Remchinger Straße 4 75203 Königsbach-Stein Germany declares that the machine Circular knife sharpening machine described hereafter: Type: RMSNC are conform the following EC safety ECMachine instruction (2006/42/EC) and health regulations: ECInstruction EMV (2004/108/EC) Applied harmonised norms: EN ISO 12100-1 and EN ISO 12100-2; EN 294; EN ISO 13732-1;... -
Page 4: Safety Advice / Directed Use
TRANSPORT The circular knife sharpening machine RMS-NC is delivered in a wooden box on pallet. The gross weight of the machine is 210 Kg. The transport is done with the pallet by a lifting cart or fork-lift truck. ENVIRONMENTAL CONDITIONS FOR SET UP Place and use the circular knife sharpening RMS-NC only in dry rooms. -
Page 5: Construction
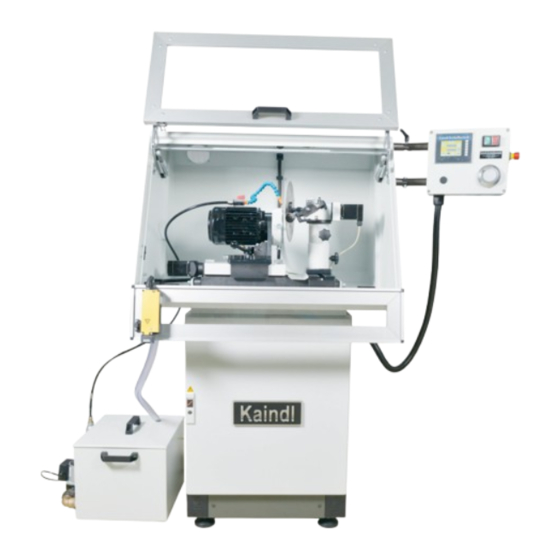
STRUCTURE Grinding motor Cooling Safety cover Grinding wheel protection Support for circular knife Drive motor for circular knife Touchscreen control Digital handwheel Driving motor Handlever adjustment grinding motor Adkustment Adjustment column Lynette bridge... -
Page 6: Technical Data
TECHNICAL DATA Dimensions Length: 700 mm Depth: 900 mm Height: 1540 mm Weight net: Automatic 180 Kg Clamping range / Basic: Ø 100 mm to Ø 400 mm Grinding wheel: Ø 125x32x20x5x30 mm Noise emission: <70 dB(A) Spacer rings: 20x22, 20x30, 20x32, 20x40, 20x30 with face Electronical Data Drive of grinding spindle: Motor:... -
Page 7: Operation
OPERATION CLAMPING OF THE CIRCULAR KNIFE Center the circular knife with the appropriate spacer ring on the fixation flange. Now fix the circular knife with the supplied pressure disk and the fixation nut on the fixation flange (see Picture). When fixing or loosing the fixation nut, keep pressed down the shaft locking mechanism. Turn the shaft by using the supplied spanner wrench till the shaft locking snaps in. -
Page 8: Alignment Of The Circular Knife
ALIGNMENT OF THE CIRCULAR KNIFE After loosening the star knob screw (1) you can now adjust the grinding angle. Scale Star knob screw for fixation of the adjustment column Hand lever for Star knob screw for adjustment of the fixation of the grinding grinding motor angle After you have adjusted the cutting angle, now open the star knob screw (2) and move... -
Page 9: Interactive Menu Control
OPERATION OF THE CONTROL UNIT Emergency stop On - Off switch Display Digital jogwheel Press the green on switch to start up the machine. The display is activated automatically. EXPLANATION OF THE DISPLAY Automatic - Start Reference point Keyboard input Manual mode... -
Page 10: Basic Information About Grinding (Important Information - Please Read!)
IMPORTANT INFORMATION PLEASE READ BASICS REGARDING GRINDING Please keep in mind, that grinding basically is a form of soft treatment. For getting optimal results, please pay attention to some elementary rules. Physically grinding is a interaction between material of the workpiece, the suitable abrasive, binding of the abrasive, grit size, cooling liquid and finally the well matched feeding size as well as halt- and grinding cycles without feeding. -
Page 11: Standard Values For Grinding Operation
STANDARD VALUES FOR THE SHARPENING PROGRAM Scrub treatment Finishing treatment Material: Carbide Material: Carbide Abrasive: Diamond Abrasive: Diamond Grit size: D 76 Grit size: D 252 Feeding: 8-12 Feeding: Halt time: 16 s Halt time: 25 s Spark time: 80 s Spark time: 120 sec - 150 s Knife speed:... -
Page 12: Refering Of The Machine
REFERING OF THE MACHINE By pressing the reference point button, the machine is refering automatically. INPUT OF SETTING VALUES By pressing the keyboard input button you arrive at the menu to enter the data for the feeding values as: feeding, halt steps, spark time. Data input button In menu 1 you can enter the max. - Page 13 In menu 2, you can enter the halt steps and the sparking time. Halt time (Feeding - halt - feeding) (min. 10 sec. / max. 300 sec.) Sparking time (min. 30 sec. / max. 300 sec.) During halt time, feeding is stopped to reduce pressure on the knife.
-
Page 14: Sampling Of The Circular Knife
SAMPLING OF CIRCULAR KNIFE By pressing the button manual operation you will get to sampling mode. Manual operation Back to Take over sampling main menu value Directly to automatic mode Cooling On/Off Select sampling speed Grinding Circular knife On/Off On/Off By turning the digital jogwheel you can move in direction of the circular knife. -
Page 15: Starting
STARTING Back to main menu Zero point offset Starting Stop By pressing the start button, the machine starts grinding the circular knife. By pressing the stop button, the grinding procedure will be interrupted. At the end of the sharpening operation you have the possibility to sharpen the circular knife again without a new sampling. -
Page 16: Change Of Grinding Wheel
CHANGE OF THE GRINDING WHEEL First unplug from electric current! Imperatively also remove the circular knife before! Open the hexagon screw M6 Screw in the lifting screw M8 for lifting the grinding wheel support with the grinding wheel Unscrew the allen screw M6 with the supplied allen wrench SW 5. Screw in the lifting screw M8 for lifting the grinding wheel support with the grinding wheel. -
Page 17: Description Of Cooling Unit / Basic Information About Lubricating Coolant
DESCRIPTION ON THE COOLING UNIT Pipe connection Pipe connection Connection to return flow to pistol to the machine Vent screw Tank of cooling liquid Cooling pump Before the first start, please vent the cooling liquid pump! Please fill up the tank to the top level of the pump Electric plug for cooling unit (on the back of the cabinet) Important information regarding cooling liquid: Only use water-soluble emulsions on mineral oil base. -
Page 18: Changing The Battery On The Control Unit / Wiring Diagram
CHANGE OF THE SUPPORT FOR THE CIRCULAR KNIFE Allen screw For changing the support, loosen with the supplied allen wrench SW 5 the allen screw M6. Screw in the provided allen screw M8 and lift the support from the cone. FREQUENCY CONVERTER The rotational speed m/sec is set directly in the program input of the display menu item 5 (see page 13) -
Page 19: Motor Protection Switch / Frequency Inverter (Optional)
MOTOR CIRCUIT BREAKER In case this sign appears, the built-in motor circuit breaker has triggered. The motor turned too hot and due to this fact, has switched off. In the automatic mode, the machine moves back orderly and switches off after that. Before you can restart the machine, the bimetal has to cool down correspondingly. -
Page 20: Maintenance / Cleaning / Repair / Waste Disposal
REPAIRS Repairs on the machine can only be carried out in our company Kaindl or by persons authorized by us. The change of wear parts, as the diamond wheel, can be replaced by user. -
Page 21: Warranty
WARRANTY The warranty is 12 months from date of shipment and refers to a one shift work. For Multi-shift work, the warranty is 6 months from date of shipment under condition of a appropriate use of the machine. The guarantee includes the costs for replacing of defect parts and assembly groups, including the required working time. -
Page 22: Spare Part List
RMS-NC SPARE PART LIST 15 16 1. Drive motor of grinding wheel 9. Drive motor for circular knife 2. Coolant pipe with gate valve 10. Drive motor for feeding 3. Grinding wheel protection 11. Complete feeding unit 4.
Need help?
Do you have a question about the RMS-NC and is the answer not in the manual?
Questions and answers