
Subscribe to Our Youtube Channel
Related Manuals for Xylem YSI EXO PAR


Summary of Contents for Xylem YSI EXO PAR
- Page 1 EXO PAR PHOTOSYNTHETICALLY ACTIVE RADIATION WITH THE EXO PLATFORM USER MANUAL XA00014...
- Page 2 Consult YSI.com for the most up-to-date version of this manual. Thank you for purchasing a YSI EXO PAR System. This manual covers setup, operation, and functionality of the EXO PAR system. EXO PAR features include: • Simple setup and operation •...
-
Page 3: Table Of Contents
TABLE OF CONTENTS 1. Introduction PAR Sensor Overview Components 2. Installation Attach EXO Calibration Cup Extender Attach the EXO PAR System Frame 3. Setup Setup the Kor Software Setup the EXO Handheld Display 4. Ordering Ordering Replacement Components Ordering THIS IS AN INTERACTIVE DOCUMENT When viewing this document as an Adobe PDF, hovering your cursor over certain phrases... -
Page 4: Introduction
1. Introduction PAR Sensor Some users of the YSI EXO sonde may wish to incorporate a photosynthetically active radiation (PAR) sensor into their field monitoring equipment. This sensor can be added to the YSI EXO2 sonde in the form of a special adapter engineered by YSI’s Integrated System &... -
Page 5: Components
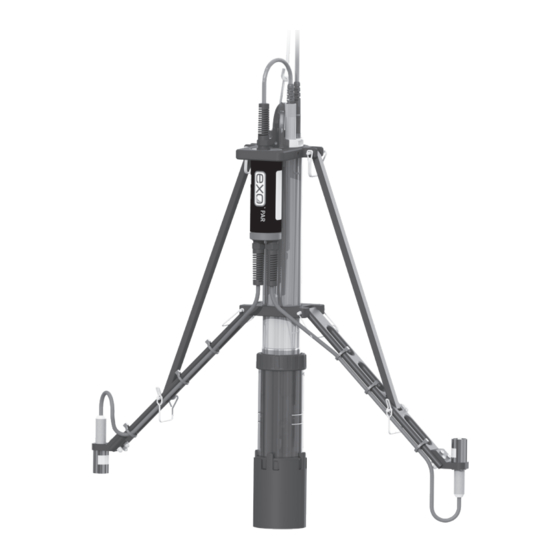
Components The EXO PAR Systems consists of 3 main parts: The EXO PAR adapter cylinder and cables, the black plastic frame system and calibration cup extender, and the Li-Cor PAR sensors. The EXO PAR system attaches to the EXO2 sonde via an upper and lower clamp system. The EXO PAR adapter attaches to the AUX port on the top bulkhead of the EXO2 sonde. -
Page 6: Installation
2. Installation Attach EXO Calibration Cup Extender Once you’ve unpacked the EXO PAR system, attach the EXO calibration cup extender to the bottom of your calibration cup. It simply clicks on by inserting the bottom of the calibration cup into the top of the extender and pushing down on a hard surface (figure 3). - Page 7 1. The top of the upper clamp should align with the yellow bulkhead of the sonde (where the blue meets the yellow). Proper alignment is necessary so that the PAR sensor arms are deployed at the correct angle NOTICE: Proper alignment of clamps is necessary to prevent damage. Figure 5 Align the upper clamps with the yellow bulkhead of the sonde 2.
- Page 8 3. Once you have the EXO PAR system secured to the EXO2 sonde body it is time to deploy the sensor arms. To do so simply lift the arms and install the pins where the two arms meet, as shown (figure 7). Figure 7 Lift the arms and install the pins where the two arms meet CAUTION: Potential pinch hazard, be mindful of fingers.
-
Page 9: Setup
3. Setup Now that your EXO PAR system is installed, it’s time to connect your EXO PAR Sonde to either your PC running KOR or your EXO handheld system. For PC applications, you can use the Bluetooth functionality of the EXO to connect with KOR. -
Page 10: Setup The Kor Software
Setup the Kor Software In the following steps we will cover the setup of the PAR sensor utilizing the YSI Kor software. 1. You will first need to enable the PAR(s) sensor in Kor. To do so you will need to select File, and then select Settings, and from the list of parameters select PAR and you will see figure 8 if done correctly. - Page 11 Figure 11 Enter the multipliers into YSI’s Kor software. 3. Now your PAR sensor(s) are ready to use. You can now see PAR data begin to show up in your Kor Dashboard (example shown in figure 12). Figure 12 PAR data will begin to show up in your Kor Dashboard Setup...
-
Page 12: Setup The Exo Handheld Display
Setup the EXO Handheld Display In the following section we will cover setting up EXO PAR utilizing the EXO Handheld Display. 1. You will first need to enable the PAR(s) sensor in the EXO Handheld. To do so you will need to select Handheld, and then select Display, and from the list of Units select PAR and you will see figure 13. - Page 13 Figure 16 Enter the multipliers Figure 15 Select calibration, then exactly as they are on the certificates PAR from the list of sensors 3. Now your PAR sensor(s) are ready to use. You can now see PAR data begin to show up in your EXO Handheld Display (example shown in figure 17).
-
Page 14: Ordering
4. Ordering Ordering Replacement Components YSI Item # Description 351070 EXO PAR Adapter Assembly 351073 EXO PAR, Upper Clamp 351074 EXO PAR, Lower Clamp 351075 EXO PAR, Wide Extension Arm (Lower) 351076 EXO PAR, PAR Sensor Bracket 351077 EXO PAR, Narrow Extension Arm (Upper) 351087 EXO PAR, Clip on Calibration Cup Extender Ordering... - Page 15 This page intentionally left blank...
- Page 16 Our products and services move, treat, analyze, monitor and return water to the environment, in public utility, industrial, residential and commercial building services settings. Xylem also provides a leading portfolio of smart metering, network technologies and advanced analytics solutions for water, electric and gas utilities. In...
Need help?
Do you have a question about the YSI EXO PAR and is the answer not in the manual?
Questions and answers