Carl's Place Pro Enclosure Kit Assembly Instructions & User Manual
Hide thumbs
Also See for Pro Enclosure Kit:
- Assembly instructions & user manual (20 pages) ,
- Assembly instructions & user manual (20 pages)

Subscribe to Our Youtube Channel
Related Manuals for Carl's Place Pro Enclosure Kit


Summary of Contents for Carl's Place Pro Enclosure Kit
- Page 1 Pro Enclosure Kit Assembly Instructions & User Manual Thank you for purchasing Carl’s Pro Enclosure Kit! In this guide you will find everything you need to complete the assembly of your kit plus a few helpful tips to help you make the best use of it.
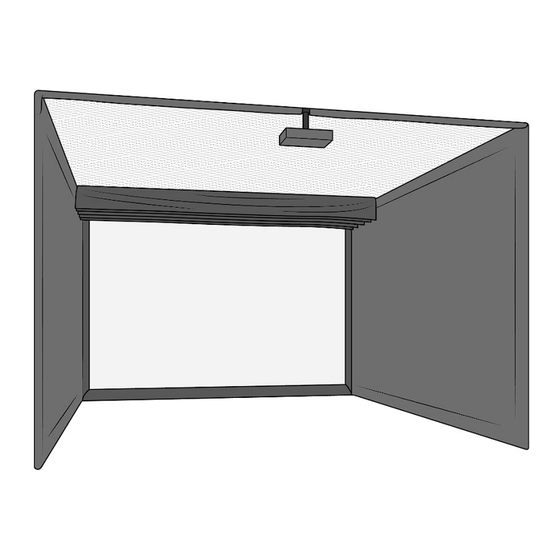
- Page 2 Included in this kit: • Frame Components Pre-cut and marked structural 1.5” pipes Steel pipe connector fittings Fabric Panels • (1) Ceiling panel (2) Wall panels (left and right) (1) Impact screen • Safety Guards (1) Large floor bumper (1) Ceiling bumper (2) Mitered wall bumpers •...
- Page 3 Assemble Frame: Included in this manual is an insert that shows the dimensions of your frame. Construct your frame to the specifications in the insert. The enclosure frame consists of aluminum pipes held together with steel pipe fittings forming a cube shape.
- Page 4 Using Ball Bungees: Throughout the installation, you will be using ball bungees to attach panels to the frame. To install the bungees, insert the loop end of the bungee into a grommet, threading it through until the ball stops it. Wrap the cord loop around the frame tubing and hook it over the ball to create a loop.
- Page 5 Attach Ceiling Panel: The ceiling panel attaches to the frame using included 6” ball bungees. Orient the ceiling panel so that the hook-and-loop faces up and the attached flaps are located on the underside of the panel, facing down. The side without a flap aligns with the screen side or back of the frame. Working diagonally, begin by attaching the ceiling to the frame only at the four corners.
- Page 6 Check the spacing. You should see an equal amount of space between the edge of the ceiling panel and the pipe frame all the way around (approximately 1-2”). If you have pulled it too far to one side, adjust it now.
- Page 7 Zip ties are provided and can be used to pull the panel one way or the other or to close gaps between panels and the frame. Tip: Use a zip tie anywhere the gap is over 2-inches for a better fit. If needed at all, this should only be necessary at the corners of a panel.
- Page 8 Fold the attached flap over the front of the frame and attach it to the top of the ceiling panel using the integrated hook-and-loop fasteners. The side flaps will be attached at a later step.
- Page 9 Install (Optional) Baffles: If you purchased vinyl baffles, they will attach to the top of the frame. If you have not purchased baffles you may skip this step. Insert the loop of cord on the baffle through the netting near the edge of the frame and attach using a bungee.
- Page 10 Attach the Wall Panels: Un-install the “L” fitting at the bottom front of the frame and thread the bottom pipe and front vertical pipe through the fabric sleeves of the wall panel. The wall panels have a left/right orientation. (images below depict the right wall panel) Orient the wall panels so that the sleeves are closest to the bottom and front pipes and the attached flap that runs the length of the top of the enclosure will hang on the outside of the frame.
- Page 11 Once the material is over both the bottom and front pipes, re-install the “L” fitting and attach the hook-and- loop that wraps around it.
- Page 12 Once the L fitting is reinstalled, attach the front sleeve to the top of the frame and secure with one bungee. Next, stretch the bottom sleeve to the back and secure with one bungee. Then, stretch the corner grommet to the frame corner using two bungees (one connecting in each direction.) Alternate from top to side, adding more bungees to continue to stretch the panel until all grommets are attached with bungees.
- Page 13 When attaching the flaps around the frame, the order in which you do so is important. First, use the flaps attached to the underside of the ceiling panel to stretch and attach to the wall panels using the hook-and-loop fasteners. Next, use the flap attached to the outside of the wall to cover the frame by stretching it over and attaching it to the top of the ceiling panel.
- Page 14 This flap includes a formed cover to wrap around the front corner of the frame.
- Page 15 Attach the Impact Screen The impact screen attaches to the frame using the same technique that was used to attach the ceiling panel. Begin by stretching the screen to the frame using the corner grommets and continue by alternating from corner to corner to keep the panel centered in the frame.
- Page 16 Install Impact Cushions There are three different sizes of impact cushions included with the enclosure. The widest of the cushions is attached to the bottom of the screen using hook-and-loop. The remaining square-cut cushion closes the top corner between the screen and ceiling. Tip: Hold the two square end cushions back to back if you have trouble telling which is bigger.
- Page 17 Safety Tips: Please make sure to take proper safety precautions and keep children, pets and spectators out of swing range. Additionally, take every precaution to protect ceilings, walls, windows, cars and neighboring homes. Carl's Place is not responsible for damage to property &/or personal injury.
Need help?
Do you have a question about the Pro Enclosure Kit and is the answer not in the manual?
Questions and answers