
Related Manuals for Body Rider BR1970


Summary of Contents for Body Rider BR1970
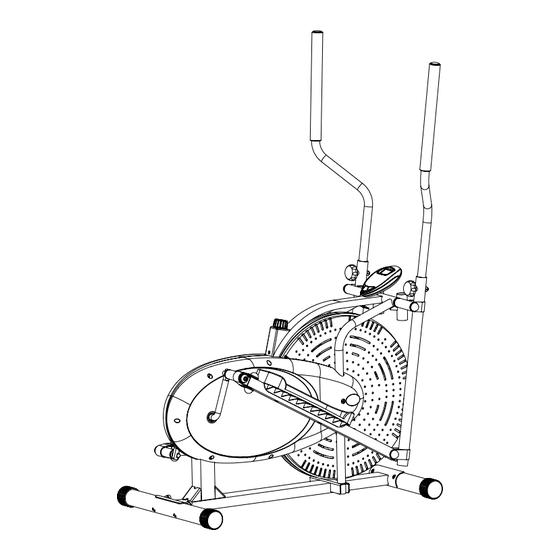
- Page 1 BR1970 BR1958 ELLIPTICAL TRAINER This product is intended for indoor, home use only and is not to be used in a commercial setting. OWNER’S MANUAL...
- Page 2 The diagram below highlights and reviews many of the important Safety and Warning labels also found on the unit. Please ensure any user of the unit familiarizes themselves with these Safety and Warning guidelines before use. BR1970 BR1958 Page 1...
-
Page 3: General Information
21717 Ferrero Parkway, Walnut, CA 91789 - 1 x Philips (”Crosshead”) Screw Driver Telephone: 1 (888) 266 - 6789 Fax: 1 (909) 598 - 6707 Weight Limit Email: info@bodyflexsports.com Your product is suitable for users weighing : 250 pounds or less BR1970 BR1958 Page 2... -
Page 4: Before Assembly
Use to measure the length or size of hardware including QTY: 1 bolts to ensure you are using the correct part. Adjustable or flat wrenches Use to securely install parts including nuts and bolts. QTY: 2 BR1970 BR1958 Page 3... -
Page 5: Hardware And Tool List
[4 Pieces] [1 Piece] [1 Piece] Others #13 Handlebar Axle [1 piece] #10 Knob Bolt (M8x36mm) [2 pieces] Cap (17mm) Cap (13mm) [8 pieces] [2 pieces] Tools (Included) Tool 1 (S8) Tool 2 [1 piece] [2 pieces] BR1970 BR1958 Page 4... -
Page 6: Assembly Step
#43 Arc Washer (M10) #47 Nut (M10) (#43) and two Nuts (#47). [4 Pieces] [4 Pieces] Note: Please note that the Front Stabilizer (#02) has Front Rollers (#18) that spin for ease of relocating the unit. BR1970 BR1958 Page 5... - Page 7 Note: Make sure Left /Right Coupler Bar (04L/04R) are placed on the correct side when its horizontal Pivot Tube (which is welded at the top) faces the REAR of the machine as seen from the user BR1970 BR1958 Page 6...
- Page 8 (Right Pedal Hinge Bolt (#62) = turn CLOCKWISE Left Pedal Hinge Bolt (#63) = turn COUNTER-CLOCKWISE). Make sure to use a tool (not just hands) to fully tighten Right/Left Pedal Hinge Bolt (#62/63) to pass through Right/Left Nylon Nut (#49/48). BR1970 BR1958 Page 7...
- Page 9 Pedal (#12) onto the Left Pedal Tube (#05). #44 Hex Bolt (M10x45 mm) [4 Pieces] Attach Caps (#42) on each end of Bolts (#09) as illlustration below. Cap (17mm) #45 Nylon Nut (M10) [4 pieces] [4 Pieces] BR1970 BR1958 Page 8...
- Page 10 [2 pieces] repeat this process on the other side using Left Handlebar (#07L), Left Coupler Bar (#04L), and one Knob Bolt (#10). If you encounter too much friction, try using WD40 or Vaseline as a lubricant. BR1970 BR1958 Page 9...
- Page 11 However, for your own safety, please make sure to read this entire Owner’s Manual which includes safety instructions and warnings, as well as any safety/warning labels affixed to the product before use. For your safety , please visually and functionally inspect and test the unit after assembly is complete. BR1970 BR1958 Page 10...
-
Page 12: Tension Adjustment
Friction Belt (#35). NOTE: It is normal for the Friction Belt (#38) to periodically loosen due to regular use. Repeat the below process anytime you feel it may be necessary to recalibrate the tension adjustment system. BR1970 BR1958 Page 11... -
Page 13: Computer Operation
OPERATING TEMP 32°F - 104°F or be used for medical purposes. Please consult a physician before beginning any STORAGE TEMP 32°F - 160°F workout program. BR1970 BR1958 Page 12... -
Page 14: Part Listing
62 Right Pedal Hinge Bolt (1/2"x115 mm) 30R Right Crankshaft Bearing Collar 63 Left Pedal Hinge Bolt (1/2"x115 mm) 31 Crankshaft Bearing Set 64 Wavy Washer (M16) 32 Bearing Brace 65 Washer (M10) 66 Tool 1 33 Nut 67 Tool 2 BR1970 BR1958 Page 13... -
Page 15: Exploded View
: : Not all of the parts and hardware you see here will be used while you are assembling the machine because some of these items are already pre-installed. Please use this page only as a reference guide for parts and hardware. BR1970 BR1958 Page 14... -
Page 16: Safety And Maintenance
1 (888) 266-6789 or 1 (909) 598-9876, or mail in a written request to: Body Flex Sports Inc. 21717 Ferrero Parkway Walnut, CA 91789 More detailed information about how to reach our CUSTOMER SUPPORT may be found on Page 2 of the Owner’s Manual under the “CUSTOMER SUPPORT” section. BR1970 BR1958 Page 15... -
Page 17: Troubleshooting
2. Check to ensure the AC Adapter* or Batteries* are properly plugged in or fully charged. 3. Check your product manual to determine if your model uses either AC Adapter or batteries to power your unit. BR1970 BR1958 Page 16... - Page 18 Keep your left leg straight. 2. Return to the starting position slowly. 2. Gently pull your right leg toward your trunk without raising your upper body. Switch leg positions and repeat. BR1970 BR1958 Page 17...
- Page 19 Repeat on the other leg. muscles in your left calf stretch. other. Switch leg positions and repeat. Reverse arm positions and BR1970 BR1958 Page 18...
- Page 20 THANK YOU FOR YOUR PURCHASE MODEL NO.: BR1970 / BR1958 Please fill in the information below and keep this manual along with your sales receipt as proof of purchase. Serial Number : Date of Purchase : Retailer : Body Flex Sports Inc.
Need help?
Do you have a question about the BR1970 and is the answer not in the manual?
Questions and answers