Advertisement
Table of Contents
- 1 Table of Contents
- 2 1.Safety Instructions
- 3 2.Name of each Component
- 4 3.Check before Use
- 5 4.Starting the Generator
- 6 5.Petrol Generator Set Using Method
- 7 6.Stop Step
- 8 7.Maintenance
- 9 8.Storage
- 10 9.Trouble Shooting
- 11 10.Wheel Component Description
- 12 11.Battery Assembly Instructions
- 13 12.Electric Principle Diagram
- Download this manual
Advertisement
Table of Contents

Subscribe to Our Youtube Channel
Related Manuals for Bohmer-AG WX-2500K


Summary of Contents for Bohmer-AG WX-2500K
- Page 2 PREFACE Thank you for your purchase of the Böhmer-AG Petrol Generator. The Böhmer-AG Petrol Generator is a Powerful, low fuel consumption, low pollution, low noise, simple to operate and easy to move. Widely used for household, outdoor, shops, banks, fishing and other general power requirements, with a beautiful shape and design. The operation and maintenance methods of the generator are described in this manual.
- Page 3 IMPORTANT NOTICE Please read this manual carefully before using this unit. The contents of this specification are particularly important to indicate the following directions. Danger: to be alert to a high degree of danger. Warning: to be alert to moderate risk. Note: to pay attention to the mild risk.
-
Page 4: Table Of Contents
CATALOG 1.Safety instructions ························································································· 4 2.Name of each component ················································································ 6 3.Check before use ·························································································· 7 4.Starting the generator ···················································································· 11 5.Petrol generator set using method ···································································· 13 6.Stop step ···································································································· 18 7.Maintenance ································································································ 19 8.Storage ······································································································ 23 9.Trouble shooting ··························································································· 25 10.Wheel component description ········································································... -
Page 5: 1.Safety Instructions
SAFETY INSTRUCTIONS 1.1 Do not use indoors. 1.2 Do not connect to the home circuit. 1.3 Do not use in damp environment. 1.4 Please keep 1m away from fuel. - Page 6 1.5 Do not smoke when filling fuel. 1.6 Stop when filling the fuel. 1.7 Don't let fuel overflow when filling.
-
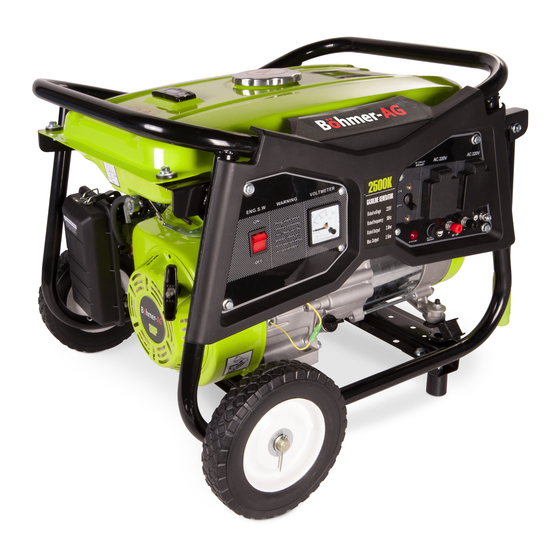
Page 7: 2.Name Of Each Component
THE NAME OF EACH COMPONENT... -
Page 8: 3.Check Before Use
CHECK BEFORE USE 3.1 Oil level Note: The Generator must be run on a flat surface the unit will shut down on an uneven surface. 2. Insert the dipstick 1. Clean dipstick into the oil inlet with the cavity, please do not rotate the oil gauge. - Page 9 3.2 Fuel level 1. Open the fuel tank cap. 2. Check the fuel level. 3. Fill the fuel to the fuel filter. 4. Replace fuel tank cap.
- Page 10 3.2.1 Fuel recommended 1. Petrol is very flammable, under certain The use of lead free petrol can reduce the conditions it will explode. accumulation of carbon in the engine, and 2. Only refuel in a well-ventilated room. extend the life of the generator. 3.
- Page 11 3.3 Air cleaner 1. Open air filter cover. 2. Check the air filter element to ensure that it is clean and well. 3. If dirty, remove the filter and clean. a) Use solvent cleaning solution. b) Squeeze clean. c) Add a few drops of oil d) Squeeze clean.
-
Page 12: 4.Starting The Generator
4. Starting gasoline generator 4.1 Make sure the AC circuit breaker is closed. 4.3 Put choke switch in the "OFF" position. 4.2 Turn the fuel switch on。 Note: When the starting a warm engine, do not close the choke. - Page 13 4.5 Turn the ignition switch on。 4.6 Gently pull the handle until you feel resistance, and then pull up. Note: When finishing do not let the chord snap back, but gently put the handle back to its original position. 4.7 When the generator, chokes switch to "ON"...
-
Page 14: 5.Petrol Generator Set Using Method
5. Gasoline generator using method Note: If you want to keep the petrol generator in the best mechanical and electrical state, please follow the below. 5.1 Warning: in order to prevent the use of electrical errors, please be sure earth the Generator. - Page 15 5.2 The following table is used to connect these devices to the generator. Such as type Typical device start rated device start rated The incandescent Incandescent lamp Incandescent lamp lamp 100W 100VA 100VA ×1 ×1 The heating device The fluorescent lamp The fluorescent lamp 80VA...
- Page 16 5.3 When connecting two or more loads on to the generator, please turn on the high current load.
- Page 17 5.4 Schematic diagram of connection method 3. This connection method is correct. 1. This connection method is correct. 2. This connection method is incorrect. Danger: if the generator is connected to the household power supply, it should be connected by a person who is familiar with electric power.
- Page 18 5.5 AC output 1. Starting the generator. 2. Connected load device. 3. Switch on AC circuit breaker. Note: The output of the engine is designed for high altitude areas, but it operates at a low altitude, which can cause a drop in output power, overheating, and even severe damage due to the mixture of air and fuel.
-
Page 19: 6.Stop Step
6. Stop step 6.1 Switch off AC circuit breaker. 6.2 Switch off the ignition. 6.3 Switch off fuel switch. Note: if you want use an emergency stop for the Generator, the ignition switch can be placed in the "OFF" position. -
Page 20: 7.Maintenance
7. Maintenance In maintaining the Böhmer-AG Petrol Generator, please follow the maintenance cycle.。 According to time the number of Item Or first month Or every Or every six Or every year pages of the first use. three months months Check oil inspect Oil change replace... - Page 21 7.1 Oil Change 1. Unscrew the oil dipstick. 2. Undo the oil plug and drain the oil. 3. Install and tighten the drain plug. 4. Add oil to the upper limit of the oil cap. 5. Install dipstick. Recommended oil: 4 stroke Petrol engine oil - API class of SE, SF or equivalent to SG class SAE10W - 30 oil...
- Page 22 7.2 Spark plug 1. Remove the spark plug cap. 2. Remove the spark plug 3. Clean up carbon. 4. Measure and adjust the spark plug gap. 5. Install spark plug and spark plug cap.
- Page 23 7.3 Fuel filter cup 1. Switch off the fuel switch. 3. Cleaning sedimentation cup and filtering net. 2. Removing sedimentation cup and filtering net. 4. Installed filter cup and precipitation.
-
Page 24: 8.Storage
8. Storage If you do not use the Böhler-AG Generator for a long period, please follow the steps to keep the storage. 8.1 Remove the fuel from the fuel tank. 8.3 The carburetor fuel on the net 8.2 Clean the fuel filter and precipitation cup installed。... - Page 25 8.5 Tighten the drain plug, and add new oil to the oil 8.6 Pull the handle gently until you feel a resistance. foot ceiling, and then install dipstick. 8.7 Put the Böhmer-AG Generator in a clean area.
-
Page 26: 9.Trouble Shooting
9. Trouble shooting 9.1.3 Check fuel. 9.1 The generator will not start. 9.1.4 Remove the spark plug, check if there is a 9.1.1 Check whether the ignition switch is in the spark. "ON" position. 9.1.5 If the generator still will not start. Please 9.1.2 Check oil. - Page 27 9.2 Unit will not generate electricity. 9.2.2 AC circuit breaker is located in the "ON" 9.2.1 Check bulb. position. 9.2.3 If you are unable to generate electricity, please contact the Böhmer-AG after-sales service department.
-
Page 28: 10.Wheel Component Description
10. Wheel component description 10.1 With the wheel flange and the cotter pin four wheels fixed on the wheel axle. 10.2 The wheel shaft is fixed on the generator by the bolt and the nut. 1. Inside 2. Shorter side 3. -
Page 29: 11.Battery Assembly Instructions
Union Mart Ltd Declares that Date: 10/02/2017 Description: Petrol Generator Signed: Identification code: WX-2500K, WX-3800K Conforms to the following directives and standards: • MD 2006/42/EC Machinery Directive • EMC 2014/30/EU Electromagnetic Compatibility Directive And Complies with the provisions of the following...
Need help?
Do you have a question about the WX-2500K and is the answer not in the manual?
Questions and answers
Should the tank of the bohmer 2500 be filled to maximum capacity