
Related Manuals for ComNav Technology G100


Summary of Contents for ComNav Technology G100
- Page 1 SinoGNSS G100/G200 User Guide ComNav Technology User Guide G100--G200 GNSS Receiver 2018 January...
- Page 2 People’s Republic of China, EU, USA and Canada. Copyright Notice This is the V1.01 (April, 2018) revision of the G100/G200 GNSS Receiver User Guide. It cannot be copied or translated into any language without the written permission of ComNav Technology.
- Page 3 CAUTION- A Caution alerts you to a possible risk of damage to the equipment and/or data loss. Warranty Notice ComNav Technology does not warranty devices damage because of force majeure (lighting, high voltage or collision). ComNav Technology does not warranty the disassembled devices.
-
Page 4: Table Of Contents
3.2.1 Log Static to Controller ......................14 3.4 G200 ....................15 WORK WITH MORE SOFTWARE 3.3.1 G200 work with SurvCE ......................15 3.3.2 G200 work with FieldGenius ....................17 4 GIS DATA COLLECTION WITH G100 ....................20 4.1 O NMEA ........................20 UTPUT DATA 4.2 C... - Page 5 SinoGNSS G100/G200 User Guide 2. NMEA D ............................. 29 3. SBAS M ........................29 OMMAND APPENDIX B AT330 ANTENNA SPECIFICATION ................. 30...
-
Page 6: Introduction
Positioning System (GPS) receivers before. 1.1 About the receiver The G100 integrates with an antenna inside, and can connect to device via Bluetooth, which means you can easily conduct your GIS work. For G200 GNSS receiver, you need connect with an external antenna, it is easy to achieve RTK performance with your handheld device or tablet. -
Page 7: Basic Supply Kit
SinoGNSS G100/G200 User Guide 1.3.1 Basic Supply kit Items Picture 1*G100/G200 GNSS receiver 1*Battery 1*AC adapter (input 110-220VAC) 1*9-pin Fischer to DB9 cable and to DCIN cable Fischer to TNC cable (external antenna cable) 1*Armbag 1.3.2 Optional accessories Items Picture... -
Page 8: Using G100/G200 Gnss Receiver
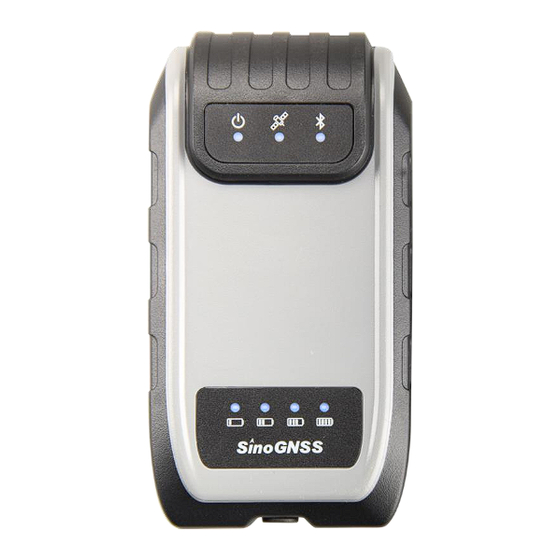
AT330 GNSS antenna (for G200) 2 Using G100/G200 GNSS receiver This chapter provides general information of using the G100/G200 GNSS receiver, such as LED status information, power button and connectors. 2.1 LED status information The G100/G200 receiver contains several indicator lights showing the status of power, satellite tracking, Bluetooth®... -
Page 9: Power On And Power Off
SinoGNSS G100/G200 User Guide GNSS antenna: G100 has antenna inside, need keep it has an open sky view Bluetooth LED: The LED will be on when connected with your device Satellites LED: Flash N times per five-second indicating satellites the receiver have searched. -
Page 10: Battery Charging
SinoGNSS G100/G200 User Guide 2.3 Battery Charging Below shows how to charge G100/G200 battery, during charging, the battery capacity LED will flash. Tip: There is a red point on the 9-pin male connector, need correspond during connection. 3 Field Data collection with G200 This section shows you how to do RTK and Static survey with G200 receiver. -
Page 11: Start A New Project
SinoGNSS G100/G200 User Guide 3.1.2 Start a New Project Click Project to build a new project, select predefined (or add the user defined) coordinate system. 3.1.3 Bluetooth Connection Switch to the Device interface, click Connection -> choose the serial number of the receiver and allow PAIR to complete the connection. -
Page 12: Measure A Point
SinoGNSS G100/G200 User Guide User and Password to get Source List -> save the mode, click Apply, you can see fixed result. 3.1.4 Measure a point Click Topo Survey-> enter point name, ->click to collect point data. -
Page 13: Stake Out A Point
SinoGNSS G100/G200 User Guide 3.1.5 Stake out a point Click Stake point in survey interface -> Choose point and click stake. You also can Enter or Import points for staking. 3.1.6 PPK survey PPK (post processing kinetic) is the unique function of survey master, which is used for post-processing dynamic measurements. -
Page 14: Static Data Connection
SinoGNSS G100/G200 User Guide 1. Click PPK in survey interface -> choose or create a PPK file 2. Go to Settings, configure PPK settings based on your requirements. 3. To get stable epoch, click to initialize -> to start PPK survey. -
Page 15: G200 Work With More Software
SinoGNSS G100/G200 User Guide The raw data is in *.cnb format, you can convert to RINXE format through CRU software. Also we provide Compass Solution Software which is professional for post-processing. 3.4 G200 work with more software This section shows how to use SurvCE and FieldGenius to do RTK with G200 receiver. - Page 16 SinoGNSS G100/G200 User Guide In Comms tab, choose Bluetooth, choose Windows Mobile, and then click select Bluetooth device. In Receiver tab, add AT330 antenna type, parameters as below. Select AT300 antenna type, select Vertical and enter Antenna Height.
-
Page 17: G200 Work With Fieldgenius
SinoGNSS G100/G200 User Guide In RTK tab, choose Data Collector Internet, Choose NTRIP, and click second input IP Address, Port, User name and Password. Choose correction data format and click to start to work. 3.3.2 G200 work with FieldGenius Go into Select Instrument, choose GNSS Rover->Edit, choose Model and... - Page 18 SinoGNSS G100/G200 User Guide Choose ComNav -> G200 -> Bluetooth -> click Bluetooth Device List -> search G200 receiver and select the SN ->click Connect In Link Configure, select Data Collector Internet as device type, click Press to Setup to setup your CORS info, including Address, Port, Username, Password.
- Page 19 SinoGNSS G100/G200 User Guide Click Connect, Request Sourcetable, you can see the RTK Fixed in the Map interface. Click Antenna, add AT330 antenna parameters as below, and enter antenna height (from bottom of antenna to ground point).
-
Page 20: Gis Data Collection With G100
SinoGNSS G100/G200 User Guide 4 GIS Data Collection with G100 G100 receiver is designed for GIS application while G200 receiver is designed for RTK, but G200 can also work in GIS application. G100/G200 can work fluently with third-party GIS software, this section take Collector for ArcGIS for example. -
Page 21: Connect With Gis Software
Refer to Appendix for detailed explain for the message. 4.2 Connect with GIS Software Firstly pair Bluetooth of your controller and receiver, then operate as below. 1. Run the Collector software 2. Settings--Location provider--Add a receiver you paired 3. Choose G100/200 GNSS receiver 4. Start your work... - Page 22 SinoGNSS G100/G200 User Guide...
-
Page 23: Mock Location
SinoGNSS G100/G200 User Guide 5 Mock Location This chapter shows how to access RTK grade result from G200 to your GIS Software with third-party Ntrip Software( here take Lefebure NTRIP Client for Android device as an example, and it is available from Google Play ). -
Page 24: Ntrip Client Tool
SinoGNSS G100/G200 User Guide 5.3 Ntrip Client Tool Below shows you how to use the Ntrip Client tool Lefebure NTRIP Client to get accuracy positioning for your Android device. Receiver Settings: Connect receiver via Bluetooth and enable GPS Mock... - Page 25 SinoGNSS G100/G200 User Guide NTRIP Settings: Choose NTRIP v1.0 as protocol, enter Caster IP, Port, Username, Password and select Data Stream.
-
Page 26: Start Gis Software
SinoGNSS G100/G200 User Guide Back to the main interface, click Connect, and you can check position information as shown below. 5.4 Start GIS Software Now you have RTK grade positioning accuracy for your phone, then connect to GIS software. -
Page 27: Firmware Upgrade
2. Open the firmware program, choose “Setting”, select the right Serial Port to connect with receiver and then click “OK”. 3. Click “Link” icon to build the connection (This is important to check if the G100 is connected to PC successfully). - Page 28 SinoGNSS G100/G200 User Guide...
-
Page 29: Appendix A Frequently Used Command
SinoGNSS G100/G200 User Guide Appendix A Frequently Used Command 1. G100/G200 COM Port COM1 – Serial port(RS232); COM3 – Bluetooth 2. NMEA Data For NMEA Data output, input like below, take gga message as example: log <port> gpgga ontime <frequency>... - Page 30 SinoGNSS G100/G200 User Guide For more command, pls refer to ComNav OEM Board Reference Manual_V1.5 : http://comnavtech.com/download.asp?bigclassid=27 Appendix B AT330 Antenna Specification Antenna Antenna Type Geodetic GPS: L1, L2, L5 GLONASS: L1, L2 Frequency Range BeiDou: B1, B2, B3 GALILEO: E1, E2, E5...
Need help?
Do you have a question about the G100 and is the answer not in the manual?
Questions and answers