Table of Contents
Advertisement
Advertisement
Table of Contents

Related Manuals for Duratech LINK Touch DLT10-RGB


Summary of Contents for Duratech LINK Touch DLT10-RGB
- Page 1 Manual (Other languages available online www.duratech.be) DLT10-RGB/TW...
-
Page 2: Table Of Contents
Table of contents Technical specifications Page 3 Page 4 Box contents About the LinkTouch Page 4 Installation instructions Page 5 Page 6 Control functions: pool lights Control functions: heat pump & pool cover Page 7 Advanced control functions: pool lights Page 8 Display: Status icons Page 9... -
Page 3: Technical Specifications
Technical specifications General specifications Input Voltage: 5 V DC 0,5A Interface: LoRa 868 MHz USB-C Ambient Air Temperature: 0°C to +40°C Humidity 10% to 90% RH - non condensing Ingress protection rate: IP20 IEC Protection Class: Class II Size (in mm): 89,5 (Height) 186,5 (Width) 17,5 (Depth) -
Page 4: Box Contents
Box contents About the LinkTouch The LinkTouch is the remote of your pool control system. By using the Link Touch, you can control the lights, the heat pump and cover of your swimming pool. The LinkTouch includes an integrated Li-Ion battery which can be charged automatically when mounted onto the wall mount. -
Page 5: Installation Instructions
Installation instructions The LinkTouch is powered using the included AC power adapter and USB power cord Plug the USB power cord into the power adapter Plug the other end of the USB power cord into the USB-C connector of the wall mount. Plug the power adapter in a power outlet. -
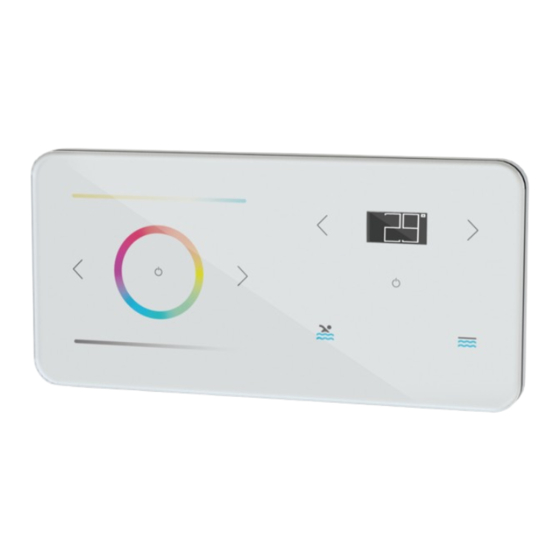
Page 6: Control Functions: Pool Lights
Control functions: pool lights Colour temperature: Slide to the right to adjust the pool light from “warm white” to “cool white” ON/OFF Lights: Press to switch all Lights ON/OFF Colour wheel: Slide to change colour of Pool Lights (only DLT10-RGB) Colour program: Press for next colour program. -
Page 7: Control Functions: Heat Pump & Pool Cover
Control functions: heat pump & pool cover Pool water Temperature DOWN: Pool water Temperature UP: Press to decrease desired Press to increase desired temperature temperature ON/OFF heat pump: Press to switch pool heat pump ON/OFF Pool cover OPEN: Press and hold to open the pool cover. When finger is removed from button the cover will stop immediately Pool cover CLOSE:... -
Page 8: Advanced Control Functions: Pool Lights
Advanced control functions: pool lights Activate the settings menu (*), then use left arrow key to select the desired setting. Activate the settings menu (*), then use right arrow key to select the desired setting (*) Touch the display for 3 seconds to activate the settings menu. -
Page 9: Display: Status Icons
Display: Status icons Battery: Battery capacity Battery is charging Battery error (p.19) Signal: LinkTouch is communicating wirelessly Heat pump: Pool heat pump is ON (idle) Pool heat pump is ON and heating/cooling Pool heat pump has an error (p.19) Pool lights: Pool lights are connected Pool lights are ON There is an error with the pool lights (p.19) -
Page 10: Safety Information
Safety information Intended use This device has been developed as a remote control for swimming pool accessories. The LinkTouch should be used only for this purpose, as described in this user guide. Precautions for Setup The LinkTouch can only be mounted indoor. Do not mount outdoors. The power adapter is designed for 100 - 240V, 50/60 Hz. -
Page 11: First Use
Safety information Precautions for Cleaning, Transport and Storage Use a soft, damp cloth to clean the exterior of the LinkTouch Do not use cleaning tissues or chemical substances which might damage the surface. This LinkTouch contains no user serviceable parts. Do not attempt to service the LinkTouch yourself. -
Page 12: How To Use The Settings Menu
How to use the Settings Menu Touch the display on the LinkTouch SETTINGS for 3 seconds to go into the settings menu. SETTINGS Use arrow keys to select the desired setting. SETTINGS Touch the display once to confirm the setting. -
Page 13: Connecting To
Connecting to ... SETTINGS Select “Pair Start”-mode from the Pair settings menu. start Touch the screen once to put the Pairing LinkTouch in pairing mode. This “Pairing”-mode will allow the LinkTouch to establish a wireless connection with other devices such as : - PLP-REM, PLP-REM-300, PLP-REM-450, linking per functionality (lights, cover) - The heat pump... -
Page 14: Cover Operation Settings
Cover operation settings There are 2 modes: Deadman switch operation enabled: The cover operation will run when pressing and holding the finger on the button and will stop when releasing the finger from the button. Deadman switch operation disabled: The cover operation will run with a single touch of the button and will stop when touching the button again. -
Page 15: Buzzer Settings
LinkTouch . The beep will also sound when the House of Duratech’s DuraCover is in operation. In case of a third party cover, the beeping sound will not be active. -
Page 16: Temperature Units Display Setting
Temperature units display setting The temperature units on the display can be set to Celsius or Fahrenheit SETTINGS Go to “TEMP °C/°F” in the settings Temp °C/°F menu. °C Touch the screen to select the SETTINGS Temp °C/°F required units. (note that default °C setting is set to “°C”. -
Page 17: Aux Setting
Aux setting This setting will allow the installer to change the cover function to an ON/OFF function for a different device. The “Aux Setting” can be set to “Cover” or “Auxiliary”. If set to “Cover” then the LinkTouch is considered to control a cover system. If set to “Auxiliary”... -
Page 18: Factory Reset
Factory reset You can reset the LinkTouch to the factory default settings. Resetting the LinkTouch reverts all settings to the factory default settings. Any settings, including wireless connections, that have been changed are lost. The factory reset can be found in the setting menu. SETTINGS Go to “FACTORY RESET”... -
Page 19: Caring For The Linktouch
LinkTouch . If you need further assistance, please contact your installer or distributor or go to the support section of the House of Duratech website at www.duratech.be/duracare Battery error remove from heat source or take out of sunlight... -
Page 20: Plp-Rem(-300) Compatibility
PLP-REM(-300) compatibility To control the lights and the cover system, the LinkTouch™ communicates with the PLP-REM(-300). If your PLP-REM(-300) has the sticker “ LinkTouch™ ready”, then you do not need to take any action. In this case the LinkTouch™ can work with the PLP- REM(-300). -
Page 21: How To Upgrade The Plp-Rem(-300)
How to upgrade the PLP-REM(-300) control board To upgrade the PLP-REM(-300), the following steps need to be taken: Switch of the power of the PLP-REM(-300). Remove the Lora module from the control board. Insert the SD card into the SD Card slot on the control board. Power up the PLP-REM(-300) The green LED will be lit and the blue led will start flashing. -
Page 22: Resetting The Linktouch
Resetting the LinkTouch You can reset (=reboot) the LinkTouch without loosing the preferred settings. To reset the Link touch: Press the “Reset” button on the back of the LinkTouch , using a paperclip. RESET... -
Page 23: Environment / Disposal Of Old Equipment
They are gladly willing to assist you! You can find more information at www.duratech.eu We warrant all parts to be free from manufacturing defects in materials and workmanship for a period of two years from the date of retail purchase. - Page 24 Contact details Propulsion Systems bvba Dooren 72 1785 Merchtem, Belgium Tel +32 2 461 02 53 www.duratech.be info@propulsionsystems.be We reserve the rights to change all or part of the contents of this document without prior notice...
Need help?
Do you have a question about the LINK Touch DLT10-RGB and is the answer not in the manual?
Questions and answers