Intermatic Grasslin talento smart B15 Operating Instructions Manual
Din-rail timer
Hide thumbs
Also See for Grasslin talento smart B15:
- Operating instructions manual (773 pages) ,
- Operating manual (173 pages)
Table of Contents
Advertisement
Vor Beginn aller Arbeiten Anleitung lesen!
Bedienungsanleitung
DE
Operating instructions
EN
Notice d'utilisation
FR
Manuale operativo
IT
Instrucciones de manejo
ES
Instruções de uso
PT
Bedieningshandleiding
NL
Návod k obsluze
CS
Användningsinstruktion
SV
Betjeningsanvisning
NO
Betjeningsvejledning
DA
Käyttöopas
FI
Instrukcja obsługi
PL
Kezelési utasítás
HU
Registration numbers
2
57
112
167
222
277
332
387
442
497
552
607
662
717
772
talento smart
B15 / B25 / C15 / C25 / S25
Zeitschaltuhr
Thermostat
Advertisement
Table of Contents

Related Manuals for Intermatic Grasslin talento smart B15


Summary of Contents for Intermatic Grasslin talento smart B15
- Page 1 Vor Beginn aller Arbeiten Anleitung lesen! Bedienungsanleitung Operating instructions Notice d'utilisation Manuale operativo Instrucciones de manejo Instruções de uso Bedieningshandleiding Návod k obsluze Användningsinstruktion Betjeningsanvisning Betjeningsvejledning Käyttöopas Instrukcja obsługi Kezelési utasítás Registration numbers talento smart B15 / B25 / C15 / C25 / S25 Zeitschaltuhr Thermostat...
- Page 2 This manual ensures safe and efficient use of the DIN-rail timer (referred to as “device” in the following). This manual is a component of the device and must remain accessible at all times for everyone who uses the device. Everyone who uses the device must have read and understood this manual before commencing any work. The basic prerequisite for working safely is compliance with all safety instructions and usage instructions specified in this manual.
-
Page 3: Table Of Contents
Overview ................60 Design and function ........................60 Safety ................... 65 Installation ................68 Configuration ............... 70 Initial commissioning ......................70 Setting the language ......................71 Setting the date and time .......................72 Selecting summer/winter time ....................74 Setting the location information ....................75 Setting astro correction ......................76 Setting the backlight.......................77 Reading the hour counter......................78 Resetting the hour counter .....................79... - Page 4 Viewing, editing or deleting elements ..................107 Viewing, editing or deleting a programme ................ 107 Viewing, editing or deleting switching times ..............108 Viewing, editing or deleting a date list ................109 Deleting all programmes ....................110 Disposal ................111...
-
Page 5: Overview
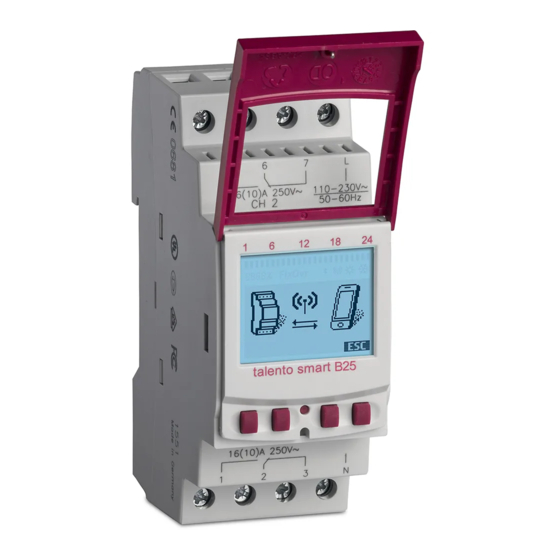
Overview Design and function Fig. 1: DIN-rail timer 110 – 230 V 1 or 2-channel DIN-rail timer 12/24 V DIN-rail timer Click system for installation on a DIN rail Terminals for channel 2 (only for 2-channel variant) Terminal for phase Sealable housing Display Control buttons Terminal for neutral conductor... - Page 6 Technical data (DIN EN 60730-1) Mode of operation Pollution degree Rated impulse voltage 4000 V The technical data for the devices described in this manual can be found at: http://qrc.graesslin.de/talento-smart-specs. Possible uses These functions can be programmed on the DIN-rail timer: •...
- Page 7 Display and control elements 3 4 5 C H 1 Ov r 1 3 . 0 3 . 2 0 1 6 0 9 :0 0 F IX Menu Fig. 2: Display layout Channel Programmed switching times Bluetooth Summer time Winter time Function displays of the buttons on the right...
- Page 8 Function of the two buttons on the left (Fig. 2/ Display Function Operating mode ON (FIX) – the channel is switched on permanently. Operating mode OFF (FIX) – the channel is switched off permanently. Override mode – the current programme is overwritten up to the next automatic command. Automatic mode ON –...
- Page 9 Menu structure Menu Date/Time Program Config Su/Wi-Time Language Light 24 hours Auto English AM/PM Astro* Calibrate 1 Deutsch View/Edit Hour counter Calibrate 2 Français Delete All Español Mode* Português Bluetooth Italiano … Fig. 3: Menu structure * These functions depend on the variant. The menu structure appears on the display when you press the menu button (Fig. 2/ Downloading the app The DIN-rail timer can be programmed using a mobile device.
-
Page 10: Safety
Safety Safety instructions Safety instructions are indicated in this manual by symbols. The safety instructions are introduced by signal words that express the extent of the danger. This combination of symbol and signal word indicates a potentially dangerous situation that may result in death or severe injuries if the situation is not avoided. - Page 11 Any use other than the intended use is considered incorrect use. The legal warranty is voided by any inter- ference with, or modifications to, the device. Danger due to insufficient wire cross-section! If wires with an insufficiently large cross-section are used, short circuits or fires may occur. WARNING! −...
- Page 12 Personnel requirements Qualified electrician Professional training, knowledge and experience, and knowledge of the relevant standards and regulations allows the qualified electrician to perform work on electrical systems and to identify, and avoid, potential dangers of their own accord. A qualified electrician is specifically trained for the work environment in which they work, and are familiar with the relevant standards and regulations.
-
Page 13: Installation
Installation Connecting the electricity Risk of fatal electric shock! Improper assembly and installation of the device can lead to life-threatening electrical WARNING! voltages. − Only allow a qualified electrician to install and connect the device. Personnel: • Qualified electrician Material: •... - Page 14 Connecting the electricity Strip the insulation from the wires. • Stripping length: 8 mm Tightening torques To avoid damage and faulty contacts, tighten the terminals using a torque of 1.2 – 1.4 Nm. NOTE! ~+ ~- Fig. 5: Circuit diagram 110 – 230 V 1-channel DIN-rail timer 110 –...
-
Page 15: Configuration
Configuration Back-up battery Reduced power reserve in the back-up battery! When operated without being connected to the mains, the power reserve in the back-up NOTE! battery is reduced. After eight years of storage without being connected to the mains, the back-up battery will be fully discharged. -
Page 16: Setting The Language
Commissioning wizard The first time you press the menu button, a wizard takes you through the basic settings, which you can check and adjust as necessary during initial commissioning. Menu Language Time Zone English +1.00h Date/Time Countries *United Kingdom 12/24 hours Germany *24 hours *City... -
Page 17: Setting The Date And Time
Setting the date and time Menu Date/Time 12/24 hours *24 hours Date 2015.09.28 …day Time 12:10 …minute Time Zone +1.00h First day of week *Monday Fig. 8: Setting the date and time Press the button. Menu Select and confirm with Date/Time Select the desired time display (Ä... - Page 18 Selecting the day of the week Example: − 1st day = Sunday... 1 – 5 = Sun – Thu − 1st day = Monday... 1 – 5 = Mon – Fri Possible time displays Setting Effect 24 hours The time is displayed in 24 hour format. AM/PM The time is displayed in 12 hour format.
-
Page 19: Selecting Summer/Winter Time
Selecting summer/winter time You can activate automatic calculation of summer and winter time with the relevant settings (Ä „Possible settings“ on page 74) or you can deactivate it. Possible settings Setting Effect EU (factory setting) The time changes on the last Sunday in March and the last Sunday in October. It is recalculated every year. -
Page 20: Setting The Location Information
Setting the location information The location information is specified in the menu. Astro Once the location has been defined, the programmes can adjust to sunrise and sunset at the location in question. Menu Config Astro Country Coordinates Countries *United Kingdom Germany *City Fig. -
Page 21: Setting Astro Correction
Setting astro correction In the menu, you can correct the sunrise and sunset-specific programming in reference to the Correction actual programming. Menu Config Astro Correction Fig. 11: Setting astro correction The correction function depends on the variant. If multiple sunrise and sunset-specific programmes are set, only the first sunrise and the last sunset are taken into consideration. -
Page 22: Setting The Backlight
Setting the backlight In the menu, you can set how long the backlight stays on after the last key press. Light Menu Config Light Light *2 min Fig. 12: Setting the backlight Press the button. Menu Select and confirm with Config Select and confirm with... -
Page 23: Reading The Hour Counter
Reading the hour counter The device’s operating hours are displayed in the menu. Read hour counter Menu Config Hour counter Hour counter Read out Channel 01000.0 h Fig. 13: Reading the hour counter Press the button. Menu Select and confirm with OK. Config Select and confirm with OK. -
Page 24: Resetting The Hour Counter
Resetting the hour counter In the menu, you can set the hour counter to 0. Reset Menu Config Hour counter Hour counter Read out Channel 01000.0 h Reset? Fig. 14: Resetting the hour counter Press the button. Menu Select and confirm with Config Select and confirm with... -
Page 25: Setting The Service Counter
Setting the service counter In the menu, you can set the number of operating hours that pass before a service Service hour counter message is displayed for a channel. The display appears in automatic mode, alternating Service CHX with the time. Menu Config Hour counter... -
Page 26: Setting The Pin
Setting the PIN Menu Config Set PIN Set PIN 1234 Set PIN PIN saved Fig. 16: Setting the PIN Press the button. Menu Select and confirm with Config Select and confirm with Select and confirm with Enter PIN Enter the PIN and confirm with All configurations, manual operations and programming are protected by PIN and cannot be ð... -
Page 27: Selecting The Mode
Selecting the mode In the menu, you specify whether the standard functions or the advanced functions are available. Mode Menu Config Mode Mode *Standard Fig. 17: Selecting the mode Press the button. Menu Select and confirm with Config Select and confirm with Mode Select the desired setting (Ä... -
Page 28: Selecting The Operating Mode
Selecting the operating mode C H 1 Ov r 1 3 . 0 3 . 2 0 1 6 09 :0 0 OV R Menu Fig. 18: Operating mode Use the function keys on the left to select the operating mode for the device. Possible settings Permanently ON (FIX) Channel is permanently switched on. - Page 29 Possible settings Override mode OFF (OVR) In override mode, the current programme is temporarily overwritten. • End the current programme with “Override mode OFF”. The override function only applies to the current programme and remains active until the next automatic command. Then the device returns to automatic mode.
-
Page 30: Reading The Bluetooth Settings
Reading the Bluetooth settings Menu Config Bluetooth Bluetooth Smart Link General Fig. 19: Bluetooth settings Press the button. Menu Select and confirm with Config Select and confirm with Bluetooth Select and confirm with OK. Smart Link General You can read the settings (Ä „Bluetooth settings“ on page 85). ð... -
Page 31: Connect Din-Rail Timer To Channel Extension
Connect DIN-rail timer to channel extension The possible uses listed here can be programmed on the DIN-rail timer and executed on the chan- nel extension on the desired channel. To do this, the DIN-rail timer must be connected to the channel extension. - Page 32 Menu Config Bluetooth BLE devices Fig. 21: Bluetooth settings Press the button. Menu Select and confirm with Config Select and confirm with Bluetooth Select and confirm with BLE devices C H 3 1 3 . 0 3 . 2 0 1 6 09 :0 0 Menu Fig.
- Page 33 Establishing the connection BL E G er ä te BLE devices CE 2 00 2 D 0 2 /0 5 ∧ ∨ Fig. 23: Selecting the channel extension On the DIN-rail timer, use the keys on the left (⋀/⋁) to select from the list the channel extension to be connected, and confirm with The connected channel extension is indicated by #.
-
Page 34: Disconnecting Channel Extensions From The Din-Rail Timer
Disconnecting channel extensions from the DIN-rail timer BL E G er ä te BLE devices CE 2 00 2 D 0 2 /0 5 ∧ ∨ – Fig. 25: Selecting the channel extension On the DIN-rail timer, use the keys on the left (⋀/⋁) to select from the list the channel extension to be disconnected, and confirm with The connected channel extensions are indicated by #. -
Page 35: Operating And Programming The Din-Rail Timer Via Mobile Devices
Operating and programming the DIN-rail timer via mobile devices Connection to mobile devices The functions “FIX ON/OFF” and “Override mode (OVR)” for the DIN-rail timer can be controlled directly via a Bluetooth connection. Fig. 26: Display during data transmission The settings and programming can be defined via the mobile device and executed on the desired channel of the DIN-rail timer. - Page 36 Preparing for the connection Switch on Bluetooth on the mobile device. C H 1 1 3 . 0 3 . 2 0 1 6 09 :0 0 Menu Fig. 27: Establishing a Bluetooth connection to the DIN-rail timer Press the Bluetooth button (Fig. 27/ ) on the DIN-rail timer.
-
Page 37: Programming
Programming Information relating to programming Reduced power reserve in the back-up battery! When operated without being connected to the mains, the power reserve in the back-up NOTE! battery is reduced. Prioritisation Switch-off commands have priority over switch-on commands. Programming steps Prerequisite: •... -
Page 38: Date-Dependent/Date-Independent Programming
DATE-DEPENDENT/DATE-INDEPENDENT PROGRAMMING The DIN-rail timer can be programmed with or without a date range. Menu Menu Program Program With Date? With Date? Select FNC Date … 2015.10.02 …day Date? Select FNC … Fig. 28: Programming without or with date Option Entry Result Programme the DIN-rail timer without... -
Page 39: Using Wildcards
USING WILDCARDS You can use wildcards when entering the date. This allows you to programme recurring switching times to be carried out; for example, always on the first of the month. Instead of the year or month figures, you can use the wildcards **** for the year and ** for the month. -
Page 40: Prioritising Programmes
PRIORITISING PROGRAMMES You can use prioritisation to specify the order that the programmes on the device run in. For example, a daily switching command can be executed but a higher priority can be defined so that on certain days or periods, other switching times apply. -
Page 41: Creating A New Switching Programme
Creating a new switching programme PROGRAMMING AN COMMAND Menu Program Select FNC Channels –– Time 09:01 switching time? Hour Yes/No With Date? Time Priority Yes/No 9:50 High Minutes Days 12345-- Mon – Fri Fig. 29: Programming command ON Press the button. - Page 42 If astro correction is activated, select the desired setting and confirm with Possible settings for astro correction Setting Effect hh:mm -- Correction is deactivated. hh:mm The switching command is only executed if sunrise takes place after the set time. hh:mm The switching command is only executed if sunrise takes place before the set time.
-
Page 43: Programming An Off Command
PROGRAMMING AN COMMAND Menu Program Select FNC Channels –– Time 09:01 switching time? Hour Yes/No With Date? Time Priority Yes/No 9:50 High Minutes Days 12345-- Mon – Fri Fig. 30: Programming command OFF Press the button. Menu Select and confirm with Program Select and confirm with... - Page 44 If astro correction is activated, select the desired setting and confirm with Select the specification of the desired astro correction setting (Ä Chapter „Programming an ON command“ on page 96) and confirm with Set the day(s) of the week (⋀/⋁) on which the switching time should apply, and confirm with The days of the week 1 –...
-
Page 45: Programming Pulse Switching
PROGRAMMING PULSE SWITCHING Pulse switching is only possible for certain variants. 15:00 h Fig. 31: Pulse switching Components of a pulse switching command: • (Fig. 31/ ) Start time • (Fig. 31/ ) Duration = switching ON − Shortest ON switching duration: 1 second −... - Page 46 Press the button. Menu Select and confirm with Program Select and confirm with The number of available programme memory slots is displayed briefly (PXXX). ð The number of available switching programme memory slots is displayed briefly (dXXX). In menu item , specify whether the switching programme is to be programmed with a With Date? date (Ä...
-
Page 47: Programming Cycle Switching
PROGRAMMING CYCLE SWITCHING Cycle switching is only possible for certain variants. 9:00 h 19:00 h Fig. 33: Cycle switching Components of a cycle switching command: • (Fig. 33/ ) Start time ) Period ON = switching ON • (Fig. 33/ • (Fig. 33/ ) Period OFF = switching OFF To end the cycle, an independent “OFF”... - Page 48 Menu Program Select FNC Days Cycle 12345-- Mon – Fri Time Channels 09:00 –– …minutes With Date? Period ON Yes/No 00:10:00 switching time? …minutes Yes/No Period OFF Priority 00:30:00 High …minutes Fig. 34: Programming cycle switching Press the button. Menu Select and confirm with Program...
- Page 49 To end the cycle, you have to set an command. 12. Execute the commands for a switch-off time for cycle switching Ä Chapter „Programming an OFF command“ on page 98. 13. To create a new switching time, select NO. 14. Adopt the automatically suggested priority and confirm with or adjust the priority.
-
Page 50: Programming Random Switching
PROGRAMMING RANDOM SWITCHING Random switching is only possible for certain variants. Menu Program Time Days 06:00 12345-- Hours Mon – Fri Time Channels 06:30 –– Minutes With Date? Offset Yes/No 00:00 switching time? Hours Yes/No Select FNC Offset Priority Random ON/OFF 00:30 Very low…... - Page 51 Enter the hours and minutes for the switching time (+/-) and confirm with Enter hour and minute of the period for the random programming (+/-) and confirm each with Set day of the week (⋀/⋁) on which the device should randomly switch, and confirm with The days of the week 1 –...
- Page 52 Viewing, editing or deleting elements VIEWING, EDITING OR DELETING A PROGRAMME Menu Program View/Edit PRG List Prg X (1|1) PRG 1 List Times Fig. 36: Viewing, editing, deleting a programme Press the button. Menu Select and confirm with Program Select and confirm with View/Edit Select the programme and confirm with...
- Page 53 VIEWING, EDITING OR DELETING SWITCHING TIMES Menu Program Time 1 Change View/Edit Select FNC Time PRG List 11:30 Prg X (1|1) …hour PRG 1 Days List Times 12345-- Mon – Fri Time 1/1 Channels 11:30 Time 1/2 12:30 Fig. 37: Viewing, editing, deleting switching times Press the button.
- Page 54 VIEWING, EDITING OR DELETING A DATE LIST Menu Program Date 1 Change View/Edit Date from 2015.11.22 PRG List Date to 2016.11.24 Prg X (1|1) …day PRG 1 Date 1/1 Date list 2015.11.22 2016.11.24 Date 1/1 Date 1 2015.11.22 Change 2016.11.23 Fig.
- Page 55 DELETING ALL PROGRAMMES Menu Program Delete All Delete all? Yes/No Fig. 39: Deleting all programmes Press the button. Menu Select and confirm with Program Select and confirm with Delete all Select and confirm with...
- Page 56 Disposal Improper disposal Incorrect disposal presents an environmental danger. Incorrect disposal could result in environmental dangers. ENVIRON- − Electric scrap and electronic components must be disposed of correctly, i.e. the parts MENTAL for disposal must be sorted into material groups. PROTECTION! −...
- Page 57 Grässlin GmbH Bundesstraße 36 78112 St. Georgen Germany +49 7724 933-0 +49 7724 933-240 info@graesslin.de www.graesslin.de 80.10.1504.7/0818/V03...
Need help?
Do you have a question about the Grasslin talento smart B15 and is the answer not in the manual?
Questions and answers