Table of Contents
Advertisement
Advertisement
Table of Contents

Related Manuals for Rockford Fosgate PRIME R2-200X2


Summary of Contents for Rockford Fosgate PRIME R2-200X2
- Page 1 010820 1230-72210-02-C Printed In China...
- Page 2 ©2019 Rockford Corporation. All Rights Reserved. ROCKFORD FOSGATE and associated logos where applicable are registered trademarks of Rockford Corporation in the United States and/or other countries. All other trademarks are the property of their respective owners.
- Page 3 * Rated power when amplifier is wired in a bridged configuration. CEA 2006 Power ratings on Rockford Fosgate amplifiers conform to CEA-2006 industry standards. These guidelines mean your amplifier’s output power ratings are REAL POWER numbers, not inflated marketing ratings.
- Page 4 Dimensions Length (Longueur, Longitud, Länge, Lunghezza) ur totale, Length e total, (Longueur, änge, Longitud, za totale) Länge, Lunghezza) Overall Lengt Length (Longue (Longueur totale, Longitud Longitude total, Länge, Gesamtlänge, Lunghez Lunghezza totale) Overall Length (Longueur totale, Longitude total, Gesamtlänge, Lunghezza totale) illus.-1.1 Width (Largeur,...
- Page 5 Dimensions 1.49” 38mm 1.97” 50mm .12” .91” 23mm 1.57” .59” 15mm 40mm 1.14” 29mm NEW TECHNOLOGIES C.L.E.A.N. – Calibrated Level Eliminated Audible Noise – Auto Remote Turn ON Switch – Utilizes the DC offset of Allows for accurate setup of an amplifier’s input and output the source units front LEFT speaker to turn the amplifier ON WITHOUT the need of additional measurement devices.
- Page 6 Design Features Infra-Sonic Variable Crossover A 12dB filter to prevent frequencies A built-in 12dB/octave Butterworth filter with a below the audio range from being crossover point variable from 50Hz to 250Hz. All Mono applied to the sub woofer from amps (R2-250X1, R2-500X1, R2-750X1 & R2-1200X1) the amplifier giving you better utilize a 24dB/octave.
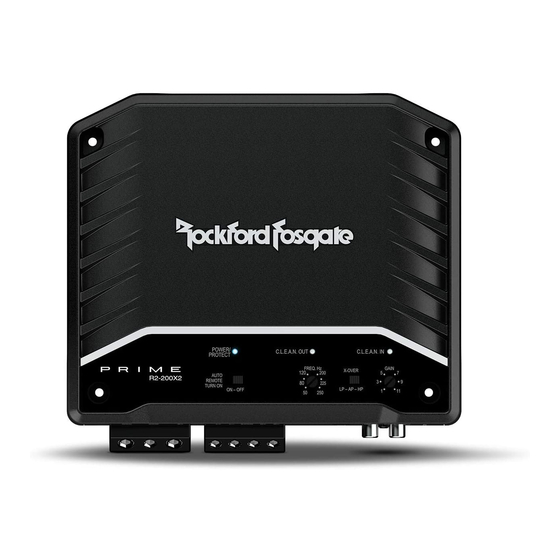
- Page 7 Design Features Input Switch Crossover Switch Setting the switch to 5, Selectable switch for 4 or 2 lets the amp know Low-Pass (LP) or All Pass how many inputs are being (AP) or High-Pass (HP) used. Match this to the Note: All mono amps are amount of inputs in either fixed at LP.
- Page 8 3. Route all of the RCA cables close together and away from any high current wires. 4. Use high quality Rockford Fosgate connectors for a reliable installation and to minimize signal or power loss. 5. Think before you drill! Be careful not to cut or drill into gas tanks,...
- Page 9 6. Prepare the Remote turn-on wire for attachment to the amplifier wiring your new unit, please see your by stripping 1/2” of insulation from the end of the wire. Insert local Authorized Rockford Fosgate the bared wire into the REMOTE terminal and tighten the set Dealer for installation.
- Page 10 Installation High Level Inputs 7” 180mm Connector side PIN 2 PIN 4 PIN 1 PIN 3 FRONT REAR PIN 1 - Blue PIN 1 - White PIN 1 - Green PIN 2 - Blue/Black PIN 2 - White/Grey PIN 2 - Green/Black PIN 3 - Brown PIN 3 - Grey PIN 3 - Violet...
- Page 11 Setup Setting the Crossover C.L.E.A.N. OUT Complete the following steps for each channel. Before you adjust the gain: Place the X-OVER switch in the correct position for the Make sure that the speakers are not connected to the amplifier speaker type. outputs.
- Page 12 Troubleshooting Troubleshooting Check Amplifier if you experience Turn-on Pop. NOTE: If you are having problems after installation follow the Troubleshooting procedures below. 1. Disconnect input signal to amplifier and turn amplifier on and off. Check Amplifier for proper connections. Verify that POWER light is on.
- Page 13 GAUCHE avant et en connectant le pôle négatif à la terre de des fils à haute intensité. châssis et en allumant l'unité de source. 4. Utiliser des connecteurs de haute qualité Rockford Fosgate pour une installation fiable et pour minimiser la perte de signal ou d'alimentation.
- Page 14 Installation Avant l'installation, débrancher la borne ou le câblage électrique lors de toute opération sur un véhicule. négative (-) de la batterie pour prévenir 6. Ne jamais acheminer les fils sous le véhicule. Acheminer les fils à tout dommage matériel, tout incendie l'intérieur du véhicule fournit la meilleure protection.
- Page 15 Installation tension commutée est généralement prise de l'ampli à distance Configuration de la transition de l'unité de source sur fil. Si l'unité de source n'a pas cette sortie disponible, la solution recommandée est de câbler un Compléter les étapes suivantes pour chaque canal. commutateur mécanique en ligne avec une source de 12 volts pour activer l'ampli.
- Page 16 Dépannage C.L.E.A.N. SORTIE dans la position correcte. Si en position OFF, s'assurer que le fil REM est connecté. Consulter le tableau 4 pour des tests Avant d'ajuster le gain : complémentaires. Le voyant de protection est allumé. S'assurer que les haut-parleurs ne sont pas connectés aux sorties de l'ampli.
- Page 17 Instalación Índice Para obtener el manual completo en todos los • Amplificador Prime canales monoaurales) idiomas, vaya a https://rockfordfosgate.com/products/selector/ • Accesorios para el • Conectores Molex de montaje 4 calvijas con cables car-amplifiers/ flexibles de conexión • Llave Allen • Manual de Instalación y •...
- Page 18 Si no se siente seguro haciendo el cableado de su nueva unidad, del cable Remoto a una fuente de alimentación conmutada de consulte con su distribuidor local Autorizado de Rockford Fosgate 12 voltios. El voltaje conmutado normalmente se toma del cable para que le haga la instalación.
- Page 19 Instalación la unidad de fuente no tiene esta salida disponible, la solución Configuración del cruce remendada es cablear un interruptor mecánico en línea con una fuente de 12 voltios para activar el amplificador. Haga lo siguiente individualmente para cada canal. Coloque el interruptor X-OVER en la posición correcta para 7.
- Page 20 Identificación de fallas C.L.E.A.N. OUT use un multímetro para comprobar si hay un corto en el cableado de los altavoces. Una impedancia de altavoz demasiado baja Antes de ajustar la ganancia: también puede causar que se ilumine la luz de protección. Asegúrese de que los altavoces no estén conectados a las salidas del Compruebe la salida de sonido del amplificador.
- Page 21 Volt, die vom positiven Lautsprecherkabel des Source- Hochstromkabeln entfernt verlegen. Geräts kommen. Dies kann mit einem auf Gleichspannung 4. Nur Qualitätsstecker von Rockford Fosgate verwenden, um eingestellten DMM (Digital-Multimeter) getestet werden, einen zuverlässigen Einbau zu gewährleisten und Signal- und indem das positive Kabel des Messgeräts an das vordere Stromverlust zu minimieren.
- Page 22 7. Verlegen der Kabel über oder durch scharfe Kanten vermeiden. Sie dies bitte von einem qualifizierten Gummi- oder Plastik-Dichtungshülsen verwenden, um Kabel zu Rockford Fosgate Techniker ausführen. schützen, die durch Metall verlegt werden, insbesondere durch die Feuerwand. Vor dem Einbau den negativen Batteriepol trennen, um Schäden am 8.
- Page 23 Einbau vorbereiten. Das freigelegte Kabel in den Anschluss für die Crossover einrichten FERNBEDIENUNG einführen und die Befestigungsschraube anziehen, um das Kabel zu befestigen. Das andere Ende des Folgende Schritte für jeden Kanal ausführen. Fernbedienungskabels an eine schaltbare positive 12-Volt-Quelle Den X-OVER-Schalter in die richtige Position für den anschließen.
- Page 24 Fehlerbehebung C.L.E.A.N. OUT Sicherstellen, dass der automatische SCHALTER in der richtigen Position ist. Sicherstellen, dass das Ihr Fernbedienungskabel in der Bevor Sie die Verstärkung einstellen: AUSGESCHALTETEN Position angeschlossen ist. Siehe Schritt 4 für weitere Tests. Stellen Sie sicher, dass die Lautsprecher nicht an den Das Schutzlicht ist an.
- Page 25 SINISTRO dell’altoparlante 4. Usare connettori Rockford Fosgate di alta qualità per e collegando il cavo negativo alla messa a terra del telaio e un'installazione affidabile e per minimizzare la perdita di segnale ACCENDENDO l’unità...
- Page 26 6. Mai passare i cavi sotto il veicolo. Si ottiene la protezione migliore rivolgetevi ad un tecnico qualificato facendo scorrere i cavi all’interno del veicolo. locale della Rockford Fosgate. 7. Evitare di passare i cavi sopra o attraverso bordi taglienti. Usare Prima dell'installazione staccate il...
- Page 27 Installazione Impostare il Crossover 6. Preparate il filo Auto Turn ON per poterlo fissare nell'amplificatore, rimuovendo 1,27 cm di guaina dall'estremità del filo. Inserite il Completare i seguenti punti per ogni canale. filo spellato nel terminale REMOTE e stringete la vite di arresto per fissare il cavo.
- Page 28 Risoluzione dei problemi C.L.E.A.N. OUT 1. Se l'indicatore di protezione è acceso, ciò può indicare un corto circuito nel collegamento con gli altoparlanti. Controllare che Prima di regolare il gain: i collegamenti agli altoparlanti siano corretti e utilizzare un misuratore di resistenza Volt/Ohm per controllare che non Accertarsi che gli altoparlanti non siano connessi alle uscite ci siano cortocircuiti nei cavi dell'altoparlante.
- Page 29 NOTES...
- Page 30 NOTES...
- Page 31 NOTES...
- Page 32 Some states do not allow limitations on the length of an implied warranty, so this limitation may not apply. No person is authorized to assume for Rockford Fosgate any other liability in connection with the sale of the product.
Need help?
Do you have a question about the PRIME R2-200X2 and is the answer not in the manual?
Questions and answers