Table of Contents
Advertisement
Quick Links
Advertisement
Table of Contents

Subscribe to Our Youtube Channel
Related Manuals for DSIC Mobilebase DS4A


Summary of Contents for DSIC Mobilebase DS4A
-
Page 1: Ds4A User Manual
DS4A USER MANUAL Android 9.0 ISO 9001 Certified Quality Management System... - Page 2 Revision History Changes to the original Manual are listed below Date Version Description Jan 2020 Initial release...
- Page 3 While reasonable efforts were made to ensure that the information in this document was complete and accurate at the time of printing, DSIC Co., Ltd. can assume to no liability for any errors. Changes and corrections to the information in this document might be incorporated in future release.
-
Page 4: Table Of Contents
Contents DS4A User Manual ........................1 Safety Instruction ........................6 Chapter 1: Introduction ......................7 Overview of terminal features ..................8 Front View ....................... 8 Back View ........................ 9 Hand Strap Removal and Replacement ..............10 Battery ..........................10 Battery power source ................... 10 Chapter 2: Getting Started ....................... - Page 5 Keyboard dictionaries ..................... 27 Keypad Features ......................27 Enter characters on Numeric Keypad ..............28 Chapter 5: Try some apps ......................29 All Apps ........................... 29 Phone ..........................30 Camera ........................... 31 Gallery ..........................32 Contacts .......................... 33 Chapter 6: Settings ........................34 Chapter 7: Accessibility ......................
-
Page 6: Safety Instruction
SAFETY INSTRUCTION Read this instruction carefully to keep yourself safe and to avoid loss of property. Make sure that battery terminals (metal part) should not contact with any conductive materials like a necklace or coin. Also make sure that batteries should not be damaged by teeth or a nail. Impact may cause an explosion of batteries ... -
Page 7: Chapter 1: Introduction
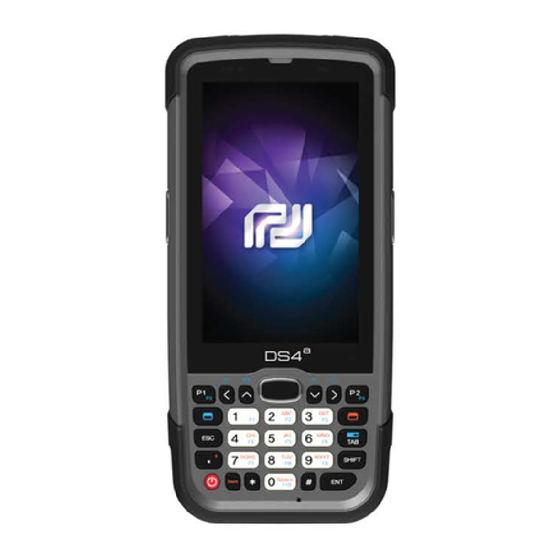
CHAPTER 1: INTRODUCTION DS4A is a rugged mobile computer that provides the best data capture and automation experience through ergonomic design for workers working in retail, field service and transportation. The DS4A supports WWAN and WLAN networks, enabling real-time connectivity to enterprise applications, and applied with high-end scanner and camera for outstanding data capture performance. -
Page 8: Overview Of Terminal Features
Overview of terminal features Front View Receiver LED indicator (Blue) LED indicator (Red/ Green) 4inch WVGA touch screen Scan trigger Micro phone Power button Pogo Micro USB port... -
Page 9: Back View
Back View Barcode scanner Hand belt hook Speaker Camera Battery lock Battery Scanner trigger Hand belt hook... -
Page 10: Hand Strap Removal And Replacement
Hand Strap Removal and Replacement To remove hand strap: 1. Rip the Velcro strap off 2. Remove the battery from the terminal 3. Remove the bottom / upper Strap hook 4. Install the new hand strap in reverse order. Installing upper strap hook Installing bottom strap hook Insert the upper strap hook into the groove on the Insert the lower strap hook into the groove on the... -
Page 11: Chapter 2: Getting Started
CHAPTER 2: GETTING STARTED This chapter will describe how to install and charge battery, mount micro SD card and start up the terminal. To start up the terminal: Installation Micro SD card Battery Mounting and Operation Connecting power source ... -
Page 12: Installation Micro Sd Card
Installation micro SD card Insert the micro SD card carefully as shown in the following illustrations. Make sure the micro SD card terminal position before insert the micro SD card. Push the back end of the micro SD card to fix it at the last step. Note ... -
Page 13: Battery Mounting And Operation
European Guideline 2006/66/EC, defective or used battery packs/ batteries, must be collected separately and disposed of in an environmentally correct manner. Batteries no longer suitable for use can be directly returned at DSIC Co., Ltd. PDA Dept. DSIC Bldg. 205-28, Gasan digital 1-ro, Guemchun-gu, Seoul, Korea Tel: +82-2-2107-5178 Fax: +82-2-2107-5178 Email: dsic_pda@dsic.co.kr... -
Page 14: Connecting Power Source
Connecting Power Source Connect power, using one of the methods listed below. Caution Verity that the terminal battery is installed prior to connection. If the battery is not properly installed and the wall charger is connected, the terminal may power off and on continuously, preventing proper operation. Note Failure to unplug the wall charger before you remove the battery, can cause damage to the terminal To use mini USB Travel Charger... -
Page 15: Operating Power Of The Terminal
Operating power of the terminal Power on / off Make a long press Power button at the right bottom side of the keyboard. When you firstly turn on your device, you’ll see a Welcome screen. Choose the language & time you want and touch Start or the Start icon. To turn off the device, make a long press Power button and select Power off. -
Page 16: Organize Your Home Screens
DS4A navigation buttons At the bottom of DS4A screen, you’ll always find the navigation bar with three buttons: Back Opens the previous screen you were working in, even if it was in a different app. Once you back up to Home screen, you can’t go back any further. Home Opens the central Home screen. -
Page 17: Touch & Type
Touch & type To select or activate something, touch it. To type something, such as a name, password, or search terms, just touch where you want to type. A keyboard pops up that lets you type into the field. Other common gestures include: ... -
Page 18: Chapter 3: Basic Use
CHAPTER 3: BASIC USE Notifications & settings Notifications alert you to the arrival of new messages, calendar events, and alarms, as well as ongoing events. When a notification arrives, its icon appears at the top of the screen. Icons for Pending notifications appear on the left, and system icons showing things like Wi-Fi signal, mobile carrier signal, or battery strength on the right: TIP: Wi-Fi and mobile signal strength are indicated at the top of the screen by white bars. -
Page 19: Quick Settings
Quick Settings Use Quick Setting to easily access Wi-Fi settings, manage display brightness, open the main Settings menu, and more. To open Quick Settings, swipe down from the top of the screen twice with one finger. Data Sync How to Connect with PC To connect the device with PC, follow the steps below. -
Page 20: Wi-Fi
Wi-Fi Go to Settings > Network & Internet > Wi-Fi You can activate Wi-Fi by touching ON/OFF switch. Connecting to Wi-Fi Access point From the list, select an AP to connect If the AP needs password, enter it to complete the access. -
Page 21: Bluetooth
Bluetooth Go to Settings > Connected devices > Connection preferences > Bluetooth. You can activate Bluetooth by touching ON/OFF switch. Pairing via Bluetooth Go to Bluetooth menu and touch Pair new device. After select the device, enter or check PIN number to pair to the device. -
Page 22: Lock Screen
Lock screen If a lock is set for your screen, the screen goes dark and locks when the display goes to sleep or if you press the Power button. You can set locks of different strengths using lock settings: 1. Go to Settings > Security & location > Device Security > Screen lock. 2. -
Page 23: File Storage
File Storage Android 9.0 makes it easy to store and browse through pictures, videos, and other files on your device and attach them to an email, Hangout message, and so on. You can also use stored images as your Home screen wallpaper. To find the file, go to Menu >... -
Page 24: Screenshots
Screenshots To take a screenshot from DS4A: 1. Make sure the image you want to capture is displayed on the screen. 2. Press the Power button and Volume down button simultaneously. (Volume down: The screenshot is automatically saved in your Gallery. TIP: To easily share your screenshot via message, or Bluetooth, and email, swipe down the notification shade and touch the Share icon, and select application you want to share with. -
Page 25: Chapter 4: Use The Keyboard
CHAPTER 4: USE THE KEYBOARD Enter & edit text Use the onscreen keyboard to enter texts. Here’s what it looks like on a DS4A device: To make the keyboard go away, touch the Back button at the bottom of screen. Some apps open the keyboard automatically. -
Page 26: Emoji
Emoji Android 9.0 vastly expands the variety of emoji available at your fingertips. Touch and hold the Enter key to display emoji. You will see a panel like this. To move between categories, swipe left or right or touch the symbols in the top row. To type an emoji, touch it: Use next-word suggestions 1. -
Page 27: Keyboard Dictionaries
Keyboard dictionaries To manage keyboard dictionaries, go to Setting > System > Languages & input. Personal dictionary You can add your own words to your personal dictionary so that your device remembers them. To add a word or phrase, including an optional shortcut, touch Personal Dictionary, then the Add icon. Keypad Features DS4A features Numeric Keypad with Function keys (Fn 1~10), and programmable keys (P1~P4) Numeric Keypad (28 keys) -
Page 28: Enter Characters On Numeric Keypad
Enter characters on Numeric Keypad Following explains how to make continuous character input. For single character input, please refer Strokes. You need to use orange modifier key and blue modifier key to access all characters and functions on Numeric Keypad. Input lower character continuously Press twice... -
Page 29: Chapter 5: Try Some Apps
CHAPTER 5: TRY SOME APPS All Apps To see all your apps, touch the All Apps icon in the Favorites tray on any Home screen. This is where you can see all your apps. You can move app icons to any of your Home screens. -
Page 30: Phone
Phone Using a DS4A, you can place calls from the Phone app, the People app, or other apps or widgets that display contact information. Wherever you see a phone number, you can usually touch it to dial. To place a call to one of your contacts: 1. -
Page 31: Camera
Camera The Camera app lets you take photos, panoramic photos, videos, and immersive 360- degree photo sphere shots, including what’s above and below you. To open Camera: From the lock screen, swipe the Camera icon. From the Home screen, touch the Camera icon. The first time you open Camera, you may be asked if you want it to remember photo locations. -
Page 32: Gallery
Gallery The Gallery app gives you an easy way to browse pictures and videos you’ve taken with Camera. It also displays screenshots and auto backups from other devices. To open Gallery from the: Camera app. Touch the thumbnail image at the bottom. ... -
Page 33: Contacts
Contacts The Contacts app gives you quick access to everyone you want to reach. To open it, touch the Contacts icon on a Home or All Apps screen. When using a new device, you can import contacts via “.vcf” file When you open the Contact app, you can: ... -
Page 34: Chapter 6: Settings
CHAPTER 6: SETTINGS Most apps include their own settings, typically available from Menu > Settings on DS4A devices. The fastest way to adjust system settings that you access frequently, such as Wi-Fi or brightness, is through Quick Settings. Here are the Quick Settings for a DS4A : To open Quick Settings, swipe down from the top of the screen the Settings icon. -
Page 35: Chapter 7: Accessibility
CHAPTER 7: ACCESSIBILITY To use the accessibility options, open Settings > System > Accessibility. Accessibility settings let you modify your device’s display and sound options, such as increasing the text size, changing the speed at which text is spoken, and more. You can also try magnification gestures which allow you to zoom in and out, as well as temporarily magnify what’s under your finger. -
Page 36: Chapter 8: Device Management
CHAPTER 8: DEVICE MANAGEMENT Barcode Tray To activate Barcode Tray program, touch barcode tray icon at your screen. Scan Test It is to test the barcode, and check the barcode type and data. Barcode Module Setting You can change the setting of the barcode module. Scan Setting You can set how you will scan the barcode such as max scan time / data receive method / prefix or suffix and so on. - Page 37 Barcode Module Setting : Setting to enable, or Scan Test disable barcode types. Scan Setting : Setting scanning feature, such as Image Capture : View image and capture the view time out, prefix and suffix, scanner key setting, from the imager scanner notification options and etc.
- Page 38 Setting Export / Import : Set up barcode Information : Demonstrate the installed barcode configuration by programming, or export the set up scanner to your device and application version to file. information of your barcode scanner. Manual...
-
Page 39: Key Mapping
Key Mapping It is enabling you to create a shortcut for repeating a sequence of keys or commands. Go Settings > Key Mapping Belows are the list of keys which is programmable to be set as your sequenced key or short cut to execute application. 28key –... - Page 40 3) Or, swipe the screen to left to set sequence. When 4) To reset the function key, press the icon. Then you you select No use, then the key has no function. can reset the config. Press Menu icon to import, export, remove, or reset your key mapping configuration.
-
Page 41: Os Update
OS Update You shall need to download file as “DS4A-p-XXX.zip” from the FTP server. Update Instruction Download your OS and install on your device as below Copy the firmware file to root folder of the SD card Input micro SD card into your device WHILE pressing and holding ESC + 2 simultaneously, make a long press of Reset key to start your device and enter OS update screen. -
Page 42: Kiosk Mode
KIOSK MODE Kiosk mode is enabling to lock down unwanted device misuse. It is to control which application and device features can be used by user such as blocking access to games, social media apps and etc. When you allow access to business application apps, KIOSK MODE will ensure that the user cannot access anything other than those allowed application. - Page 43 Set Background & Icon Front color Admin Setting Settings Go to “Setting” Block USB connection Limit access by USB connection Block Storage Limit access to storages not allowed. Block App install and update Limit installation and update the apps. Export You can export KIOSK setting information of the device by email, or xml file, such as allowed APP List, KIOSK On, KISOK Off and new password.
-
Page 44: Edm (Enterprise Device Management)
EDM (Enterprise Device Management) Enterprise Device Management (EDM) is an application that provides useful features to help IT managers use Mobilebase products to effectively deploy, use, and manage devices. Main menu EDM features 4 main menus for IT manager. Menu Description Device management tools for administration... -
Page 45: Utilities
Utilities Utilities provides IT administrators with access to useful features for device management. Menu Description Allows you to use your PDA's hardware keys for Key Mapping functions other than the original or as a shortcut for launching an application. To prevent misuse of your device during business KIOSK hours, you can make it accessible only to business applications. -
Page 46: Tools
Tools Tools gives you the ability to test all the devices in your device. It allows IT administrators to diagnose whether the inner device such as Wi-Fi, BT, speakers, etc. are working correctly, and quickly identify problems with the device to minimize downtime due to device failure. Menu Description Audio... -
Page 47: Appendix Ⅰ Auto Setting
APPENDIX Ⅰ AUTO SETTING DS4A’s Auto Setting is PC-based program. It can create barcodes and apply the DS4A setting quickly. Below are the functions you can set by Auto Setting. Wifi Set APK Install OTA Update Sound volume Radio Set General Mobile APN Keymap Set... -
Page 48: Common Interface
Common Interface You can add the functions you need and create the barcode. List Description Add the needed function on the list. Delete Delete the selected item from the list. Load Load the selected item from the list. You can do double-click instead of clicking this. -
Page 49: Autosetting 2 - Apk Install
List Description SSID · Duplicate SSID is over-written automatically. · Password cannot be “null” when Security setting is ‘WEP’ or ‘ WPA/WPA2 PSK’ Password · Password should be more than 8 digits when Security setting is ‘WPA/WPA2 PSK’ Security · Choose Security – None, WEP, WPA/WPA2 PSK ·... -
Page 50: Autosetting 3 - Ota Update
AutoSetting 3 – OTA Update Put HTTP or FTP address and create the barcode. When you scan the barcode, OS update is executed automatically. List Description Category · Choose HTTP or FTP · In HTTP, put URL to download OS Address ·... -
Page 51: Autosetting 4 - Sound Volume
AutoSetting 4 – Sound volume You can control the volume sound or vibration as you need. List Description System Volume · Choose Don’t care, Level 1~7 or Vibration · It includes ring, system and notification · Choose Don’t care or Level 0~7 Alarm Volume ·... -
Page 52: Autosetting 5 - Radio Set
AutoSetting 5 – Radio Set You can ON/OFF GPS, Bluetooth or Wifi automatically List Description · Choose Don’t care / Enable / Disable Bluetooth · Choose Don’t care / Enable / Disable WIFI · Choose Don’t care / Enable / Disable... -
Page 53: Autosetting 6 - General
AutoSetting 6 – General Set time or date. Also, you can set security for unknown source. List Description Locale · Choose your Language TimeZone · Choose your local Time zone AutoTime · Set the time automatically. Use Internet time zone. AutoTimeZone ·... -
Page 54: Autosetting 7 - Mobile Apn
AutoSetting 7 – Mobile APN You can set APN automatically. Put the APN information according to your use. List Description Name · Enter the APN Name · Ex) SKT · Enter APN info · Ex) lte.sktelcom.com · Enter only numbers. Max. 3 digits ·... -
Page 55: Autosetting 8 - Keymap Set
Mmsc · Enter Mmsc info · Ex) http://omms.nate.com:9082/oma_mms Mms Proxy · Enter Mms Proxy info · Ex) lteoma.nate.com · Enter Mms port number Mms Port · Enter only numbers. Number range is 0~65535 · Ex) 9093 Auth type · Choose Auth type – None / PAP / CHAP / PAP_CHAP Type ·... - Page 56 - You can enter the Key code and search directly · Select the Application from Data list Applications · You can input the Application directly Example : com.dsic.test/com.dsic.test.MainActivity · You can select the application from dialog box. APK Load · The file extension is ‘.apk’...
-
Page 57: Autosetting 9 - Kiosk Set
· The length of Password is 4~10 digits · Select the Application from the list · You can input the Application directly Apps Example : com.dsic.test/com.dsic.test.MainActivity · You can select the application from dialog box. APK Load · The file extension is ‘.apk’... -
Page 58: Autosetting 10 - Barcode Set
AutoSetting 10 – Barcode Set You can import Barcode Tray configuration automatically. First, export the barcode setting file from ‘Setup Export/Import’ menu of Barcode Tray. (ex. SE4500_SETTINGS.xml). Then, apply this setting to other devices by AutoSetting barcode. List Description Path ·... -
Page 59: Autosetting 11 - Block Set
AutoSetting 11 – Block Set This function is to block incoming/outgoing call and message. List Description Block Outgoing Call · Choose Enable/Disable whether you block outgoing-call Block Incoming Call · Choose Enable/Disable whether you block incoming-call Block Send Message · Choose Enable/Disable whether you block sending message Block Receive ·... -
Page 60: Barcode Form
Barcode Form Select the item you want to create barcode, and click Barcode button. The barcode pops up as below. List Description File · The barcode can be saved or printed Save · Save the barcode image file. You can save as jpg, bmp, gif, or png ·...
Need help?
Do you have a question about the Mobilebase DS4A and is the answer not in the manual?
Questions and answers
Hi. Once I assign a com port to a specific device I cannot assign the same com port to a different device. How do I clear com ports so as to use them again? TY