Table of Contents
Advertisement
Quick Links
Multi-Effects Processor
Operation Manual
You must read the Usage and Safety Precautions before use.
© 2020 ZOOM CORPORATION
Copying or reprinting this manual in part or in whole without permission is prohibited.
Product names, registered trademarks and company names in this document are the property of their respective companies. All trademarks and reg-
istered trademarks in this document are for identification purposes only and are not intended to infringe on the copyrights of their respective owners.
Proper display is not possible on grayscale devices.
Advertisement
Table of Contents

Related Manuals for Zoom G11


Summary of Contents for Zoom G11
- Page 1 Operation Manual You must read the Usage and Safety Precautions before use. © 2020 ZOOM CORPORATION Copying or reprinting this manual in part or in whole without permission is prohibited. Product names, registered trademarks and company names in this document are the property of their respective companies. All trademarks and reg- istered trademarks in this document are for identification purposes only and are not intended to infringe on the copyrights of their respective owners.
-
Page 2: Notes About This Operation Manual
Notes about this Operation Manual You might need this manual in the future. Always keep it in a place where you can access it easily. The contents of this document and the specifications of the product could be changed without notice. ◎... -
Page 3: Introduction
DAW, as well as the re-amplification of recorded performances. Remote operation from iOS/iPadOS devices Guitar Lab can be used with an iOS/iPadOS device by connecting a ZOOM wireless adapter (e.g. BTA-1). -
Page 4: Terms Used In This Manual
Terms used in this manual Patch memory Combinations of amps and effects with their on/off settings and parameter values can be saved as “patch memories” for easy recall. Effects are saved and recalled in patch memory units. A single patch memory can include up to nine effects and one amp model, and up to 240 patch memories can be saved. -
Page 5: Table Of Contents
Contents Notes about this Operation Manual �����������2 Managing banks ����������������������46 Changing the bank order ����������������46 Introduction ��������������������������3 Deleting banks ����������������������47 Terms used in this manual �����������������4 Creating banks ����������������������49 Contents ����������������������������5 Using expression pedals �����������������51 Using the built-in pedal �����������������51 overview �������������������������7 Adjusting the pedal �������������������53 Using the touchscreen �������������������9... - Page 6 Making unit settings ��������������������94 Setting the reference output level ����������94 Setting the AUTOSAVE function �����������95 Setting the PRESELECT function �����������96 Adjusting the display brightness and contrast ��97 Setting the ECO mode �����������������98 Managing the firmware ������������������99 Checking the firmware versions �����������99 Checking license information ������������...
-
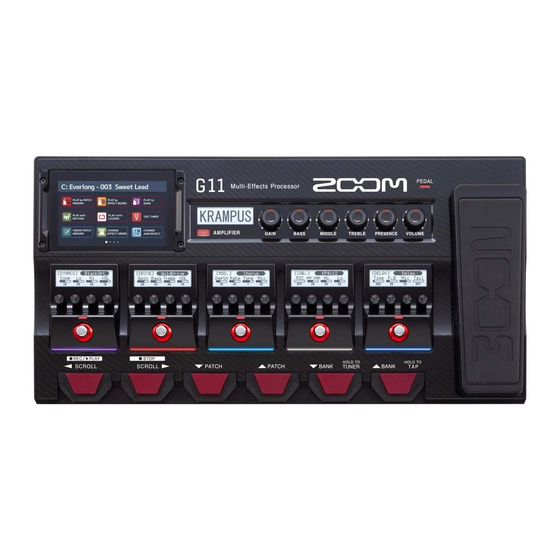
Page 7: G11 Overview
overview █ Signal flow ⑦ INPUT SEND IN/OUT ③ ② Patch memory Looper Send/ Speaker Patch return cabinet level Effect Effect ① PC REAMP USB DRY DATA REC DATA ③ ④ ⑤ ⑥ Tuner Looper Rhythm Master POST volume PC REAMP DATA REC DATA ⑧... - Page 8 ⑥ This function is for tuning the connected guitar. ( → “Using the tuner” on page 57) ⑦ Up to two external effects can be used. ( → “Using the sends and returns” on page 77) ⑧ Audio data can be exchanged with a computer using the audio interface function. ( →...
-
Page 9: Using The Touchscreen
Using the touchscreen Operating and setting the can be done using the touchscreen. This section explains touchscreen operations. █ Home Screen overview This appears on the touchscreen when the power is turned on. All the functions are arranged as icons, so each one can easily be accessed by touch. Current bank Current patch memory Touch an icon to... - Page 10 █ Using the function screens Touch and drag to operate. Touch an item to select it. Drag an item to move or adjust it (slide finger left, right, up or down). █ Returning to the Home Screen To return to the Home Screen from a function screen, swipe down from the toolbar at the top edge of the touchscreen.
-
Page 11: Functions Of Parts
Functions of parts █ Top ❶ Touchscreen ❷ Amplifier Section ❸ Expression pedal ❹ Effects Section ❺ Footswitches ❶ Touchscreen Operate the touchscreen to select and set patch memories as well as to make settings, for example. For details about operation procedures, see “Using the touchscreen”... - Page 12 ⑥ TREBLE knob This adjusts the volume of high frequencies. ⑦ PRESENCE knob This increases the gain particularly around high frequencies. ⑧ VOLUME knob This adjusts the volume. NOTE Items that can be adjusted depend on the selected amp. ❸ Expression pedal Use the expression pedal to adjust the volume or a wah effect, for example.
- Page 13 • OUT connector: Connect the MIDI IN connector of a MIDI device here. • IN connector: Connect the MIDI OUT connector of a MIDI device here. ❺ DC 12V AC adapter connector Connect the dedicated AC adapter (ZOOM AD-19) here. ❻ Power switch This turns the power ON/OFF.
- Page 14 ❿ CONTROL IN jack Connect an expression pedal (ZOOM FP02M) to adjust a pedal effect. ⓫ REMOTE connector Connect a ZOOM BTA-1 or other dedicated wireless adapter here. This enables wireless control of the from an iPhone/iPad using the iOS/iPadOS Guitar Lab app.
- Page 15 █ Home Screen This list introduces the functions of the icons shown on the Home Screen. Icon Explanation Icon Explanation Show patch memory names in large Show the effects used in the patch characters on the touchscreen to memory on the touchscreen. use for selection.
- Page 16 Icon Explanation Icon Explanation Make specific tuner settings. Make USB audio settings. ( → page 58) ( → page 91) Make MIDI settings. Make specific pedal settings. ( → page 83) ( → page 53, page 55) Change and check system settings. ( → page 94, page 95, Turn the AUTOSAVE function on/off.
-
Page 17: Connecting
Guitar Lab. Monitor speakers Headphones HINT The computer or iOS/iPadOS Guitar Lab app can be used to manage patch memories and to edit and add effects. Guitar Lab can be downloaded from the ZOOM website (www.zoom.co.jp). -
Page 18: Turning The Power On/Off
Turning the power on/off Turning the power on Minimize the volume of the amp/monitor speakers. to ON. This turns the power on and opens the Home Screen on the touchscreen. Raise the volume of the amp/monitor speakers. ECO mode overview •... -
Page 19: Adjusting The Overall Volume
Adjusting the overall volume The volume output from the can be adjusted. Lower Raise NOTE • The setting range is −∞ to +6 dB. • When the knob is centered the setting is 0 dB. HINT output level can be set to suit the output device. ( → “Setting the reference output level”... -
Page 20: Showing The Patch Memory Name While Performing
Showing the patch memory name while performing Patch memory names can be shown with large characters on the touchscreen to use for selection. Touch on the Home Screen. Current patch memory Swipe up or down on the touchscreen to select patch memories. •... -
Page 21: Showing The Entire Effects Chain While Performing
Showing the entire effects chain while performing Patch memories can be selected using the footswitches while checking the effects and amps that they use. Touch on the Home Screen. All the effects and the amp used in the patch memory can be seen at a glance. Current patch memory Effects that can be operated in the Effects Section are shown. -
Page 22: Showing The Bank Name While Performing
Showing the bank name while performing A bank can be shown on the touchscreen, and the four patch memories in it can be selected with one touch. Touch on the Home Screen. Touch at either end of the bank name to select the desired bank. Current bank Select lower bank Select higher bank... -
Page 23: Adjusting Effects
Adjusting effects Turning effects on and off Use the Effects Section to turn on and off the individual effects used in a patch memory. Category Effect type Effects Section Press This turns the effect on/off. The effect indicator lights when it is on. If a patch memory uses six or more effects, press to scroll the effects. -
Page 24: Changing Amps And Effects
Changing amps and effects The amp and effects in a patch memory can be changed as you like. Select the patch memory with the amp or effects that you want to change. Touch on the Home Screen. Touch the amp or effect that you want to change. The touched amp or effect is shown in a list. - Page 25 Touch a category to select it. Touch an amp or effect to select it. Then, touch OK. This changes it to the selected amp or effect.
- Page 26 Number of effects in patch memories allows you to combine up to 10 effects freely. However, you must select effects that do not cause the processor to exceed 100%. The processing status can be checked on screens where categories and effects are selected. Processing status If the processing power is exceeded, the following message will appear and that effect will be bypassed.
-
Page 27: Adjusting The Amp
Adjusting the amp Use the Amplifier Section to adjust the amp selected with the patch memory. AMPLIFIER display Press This turns the amp on/off. (It lights when on.) The name of the selected amp is shown on the AMPLIFIER display. Turn These knobs adjust, from the left, the gain, bass frequencies, middle frequencies, treble frequencies, presence and volume. -
Page 28: Adjusting Effects
Adjusting effects Use the Effects Section to adjust the individual effects used in a patch memory. Category Effect type Effects Section Turn to adjust an effect parameter. The knob adjusts the parameter shown above it on the display. Parameters that can be adjusted and their current settings If a patch memory uses six or more effects, press... - Page 29 NOTE • When the AUTOSAVE function is ON, changes to patch memories will be automatically saved. (This function is ON by default.) ( → “Setting the AUTOSAVE function” on page 95) • Patch memories will not be saved automatically if the AUTOSAVE function is OFF. When the content of a patch memory has been changed, the icon will appear at the top right of the touch- screen, showing that it is different from the saved settings.
-
Page 30: Changing Effect Order
Changing effect order Effects in a patch memory can be reordered as desired. Select the patch memory that you want to reorder. Touch on the Home Screen. Drag an effect icon to move it to the desired position. -
Page 31: Adding Effects
Adding effects Effects can be added to patch memories as desired. Select the patch memory in which you want to add an effect. Touch on the Home Screen. Drag the TAP icon to the position where you want to add an effect. Then, touch the TAP icon. This opens the category selection screen. - Page 32 Touch an amp or effect to select it. Then, touch OK. The selected effect will be added. The TAP icon will appear again, so more effects can be added as necessary by repeating steps 3–5. NOTE . ( → Up to 10 effects can be combined freely using the “Number of effects in patch memories”...
-
Page 33: Deleting Effects
Deleting effects Unneeded effects can be removed from patch memories. Select the patch memory that has an effect you want to delete. Touch on the Home Screen. Touch the icon for the effect that you want to delete. The selected effect will be deleted. -
Page 34: Making All Effect Settings On One Screen
Making all effect settings on one screen Patch memory editing operations can be conducted on a single screen. Select the patch memory that you want to edit. Touch on the Home Screen. Edit the patch memory. █ Turning amps and effects on/off Touch the indicator above an amp or effect to turn it on/off. - Page 35 █ Changing effect order Drag an effect type icon to move it to the desired position. █ Adding effects Touch ADD EFFECTS. The TAP icon will appear. Follow the procedures in “Adding effects” on page 31 to add an effect. █ Deleting effects Touch DELETE EFFECTS.
- Page 36 █ Adjusting the amp Continue touching the amp for a while to open the amp settings screen. Follow the procedures in “Adjusting the amp” on page 27 to adjust the amp. █ Making patch memory settings Touch PATCH SETTINGS. The following settings can be made. Touch to change the patch memory name.
-
Page 37: Setting The Patch Memory Level
Setting the patch memory level The level can be set separately for each patch memory. Select the patch memory for which you want to set the level. Touch on the Home Screen. Drag the LEVEL knob to set the volume. HINT The level can be set from 0 to 120. -
Page 38: Changing Patch Memory Names
Changing patch memory names The names of patch memories can be changed. Select the patch memory for which you want to change the name. Touch on the Home Screen. Touch to open a keyboard. Patch memory name Touch the keyboard and input the patch memory name. Character input area A cursor shows the input position Delete characters... -
Page 39: Adjusting The Master Tempo
Adjusting the master tempo The tempo used by rhythms, the looper, delay effects and some modulation effects can be adjusted. Touch on the Home Screen. Adjust the tempo. This shows the current tempo. Touch to open a keyboard that allows direct input of the tempo. -
Page 40: Managing Patch Memories
Managing patch memories Saving patch memories When the AUTOSAVE function is OFF (it is ON by default), effect and amp adjustments, level settings and other changes are not saved automatically. In this case, they can be saved manually. Patch memories can also be saved to different locations. HINT “Setting the AUTOSAVE function”... - Page 41 Touch the save destination. Save destination is highlighted Touch SAVE. Touch SAVE to save in the selected location. HINT When the AUTOSAVE function is OFF, if the content of a patch memory has been changed, the icon will appear at the top right of the touchscreen, showing that it is different from the saved settings. Touch this icon to open a screen where patch memories can be saved.
-
Page 42: Changing The Order Of Patch Memories
Changing the order of patch memories The order of patch memories can be changed. Touch on the Home Screen. Drag the icon of a patch memory up or down to change its order. -
Page 43: Deleting Patch Memories
Deleting patch memories Unneeded patch memories can be deleted. Touch on the Home Screen. Touch the patch memory that you want to delete. A deletion icon appears next to the touched patch memory. HINT • Patch memories are shown in banks. •... -
Page 44: Creating Patch Memories
Creating patch memories New patch memories can be created. Touch on the Home Screen. This opens a screen for patch memory creation. Select effects Select a speaker cabinet Select an amp The CREATE PATCH MEMORY screen starts with 4 effect categories, an amp and a speaker cabinet ready for selection. - Page 45 Select a category. The category selection screen only appears when DYNMCS/FILTER or DELAY/REVERB is selected. Touch an amp or effect to select it. Then, touch OK. The selected effect or amp will be enabled. Repeat steps 2–4 to select amps and effects. If the AUTOSAVE function ( →...
-
Page 46: Managing Banks
Managing banks Changing the bank order The order of banks can be changed. Touch on the Home Screen. Drag the icon of a bank up or down to change its order. -
Page 47: Deleting Banks
Deleting banks Unneeded banks can be deleted. Touch on the Home Screen. Touch ○ for the bank that you want to delete. A deletion icon appears next to the touched bank. HINT • Multiple banks can be selected for deletion. •... - Page 48 Touch DELETE. When a bank is deleted, the banks after it will move up in order. NOTE Deleting a bank also deletes the patch memories in it. Be sure this is okay before deleting.
-
Page 49: Creating Banks
Creating banks New banks can be created. Touch on the Home Screen. NOTE If “All banks are full. Please delete a bank and try again.” appears on the touchscreen, there are no empty banks. Delete an unneeded bank. ( → “Deleting banks”... - Page 50 Touch the patch memory you want to assign, and touch OK. The selected patch memory will be assigned. Repeat steps 4–5 to select other patch memories.
-
Page 51: Using Expression Pedals
Using expression pedals If an effect in the PEDAL category (pedal effect) is selected in a patch memory, the application of the effect can be controlled by an expression pedal. Using the built-in pedal The built-in expression pedal can be used to change the application of the effect. Select a patch memory that has a pedal effect you want to adjust. - Page 52 Adjust the pedal effect shown in the Effects Section. Use the Effects Section parameter knobs to make adjustments. ( → “Adjusting effects” on page 28) The PEDAL category contains pedal effects. Parameters that can be adjusted and their current settings Use the expression pedal. This changes the application of the effect.
-
Page 53: Adjusting The Pedal
Adjusting the pedal Calibrate the built-in expression pedal to adjust its sensitivity. Touch on the Home Screen. Touch START next to PEDAL CALIBRATION. This starts pedal calibration. When the pedal is in its unpressed state (the front of the pedal is at its highest point), touch OK. When the pedal is in its most pressed state, touch OK. - Page 54 Touch OK to complete calibration. NOTE • Adjust the pedal sensitivity in the following cases. – Stepping on the pedal has little effect. – The volume and tone changes greatly even when the pedal is only pressed lightly. • If the following message appears on the touchscreen, touch OK and start calibration again.
-
Page 55: Using An External Pedal
Using an external pedal When an external pedal is connected, two effects from the PEDAL category can be used. You can set a pedal effect to be assigned to the connected pedal. Touch on the Home Screen. Touch the EXTERNAL PEDAL switch to turn it ON. Touching this toggles it ON/OFF. - Page 56 Adjust the added pedal effect. Use the Effects Section parameter knobs to make adjustments. ( → “Adjusting effects” on page 28) The PEDAL category contains pedal effects. Parameters that can be adjusted and their current settings...
-
Page 57: Using The Tuner
Using the tuner Enabling the tuner Enable the tuner to use the to tune a guitar. 1, 2 Press and hold , or touch on the Home Screen. This enables the tuner and opens the USE TUNER screen. Play the open string that you want to tune and adjust its pitch. Touch to mute the sound. -
Page 58: Changing Tuner Settings
Changing tuner settings The standard pitch used by the tuner and the tuner type can be changed. Flat tuning is also possible. Touch on the Home Screen. Changing tuner settings █ Changing the standard pitch of the tuner Drag the CALIBRATION knob up and down to change the standard pitch. Standard pitch HINT The setting range is 435–445 Hz for middle A. - Page 59 █ Using flat tunings All strings can be tuned flat from an ordinary tuning by one ( ♭ ×1), 2 ( ♭ ×2) or 3 ( ♭ ×3) semitones. Touch the desired flat tuning. NOTE Flat tuning cannot be used when the tuner type is CHROMATIC.
-
Page 60: Using Rhythms
Using rhythms You can play along with built-in rhythms. Enabling rhythms When this function is enabled, rhythms can be set and played. Touch on the Home Screen. This enables the rhythm function and opens the rhythm control screen. Rhythms can be played, stopped and set using the touchscreen and footswitches. -
Page 61: Setting Rhythms
Setting rhythms Various rhythm settings can be made. Selecting rhythm patterns The rhythm pattern played can be selected. Touch the rhythm pattern name on the rhythm control screen ( → page 60). Rhythm pattern name Touch the desired rhythm pattern. Then, touch BACK. The selected rhythm pattern will be enabled. - Page 62 Setting the precount This sets whether were not a count sound is played before looper recording starts. Touch COUNT on the rhythm control screen ( → page 60). Touching this toggles it ON/OFF. Setting Explanation A precount is not played. A precount is played.
- Page 63 Adjusting the tempo The rhythm tempo can be adjusted. Drag the BPM knob up or down on the rhythm control screen ( → page 60). Tempo HINT • This can be set from 40 to 250. • The tempo set here will be shared by the effects and the looper. •...
- Page 64 Adjusting the volume The rhythm volume can be adjusted. Drag the VOL knob up or down on the rhythm control screen ( → page 60). Volume HINT This can be set from 0 to 100.
-
Page 65: Starting/Stopping Rhythm Playback
Starting/stopping rhythm playback Rhythm playback can be started and stopped. Touch PLAY or STOP on the rhythm control screen ( → page 60). Start playback Stop playback HINT • When the rhythm control screen is open, rhythm playback can be started and stopped using footswitches. Start Stop •... -
Page 66: Rhythm Patterns
Rhythm patterns Pattern name Time Sig. Pattern name Time Sig. Pattern name Time Sig. GUIDE R&B1 Jazz2 8Beats1 R&B2 Fusion 8Beats2 70's Soul Swing1 8Beats3 90's Soul Swing2 16Beats1 Motown Bossa1 16Beats2 HipHop Bossa2 16Beats3 Disco Samba1 Rock1 Samba2 Rock2 PopRock Breaks1 Rock3... -
Page 67: Using The Looper
Using the looper You can record your playing and create stereo loop phrases that are up to 5 minutes long. Activating the looper When this function is enabled, the looper can be set and played. Touch on the Home Screen. This enables the looper and opens the looper control screen. -
Page 68: Setting The Looper
Setting the looper Various looper settings can be made. Setting the recording time The length of the recorded phrase can be set. Drag the TIME knob up or down on the looper control screen ( → page 67). Recording time Setting Explanation Recording will continue until stopped manually or the maximum... - Page 69 Adjusting the volume The looper volume can be adjusted. Drag the VOL knob up or down on the looper control screen ( → page 67). Volume HINT This can be set from 0 to 100.
- Page 70 Changing the looper position The looper position can be changed. Touch LOOPER SETTINGS on the looper control screen ( → page 67). Touch the desired looper position. Place looper before effects Place looper after effects HINT By placing the looper before the effects, the sound of a looped performance can be altered to craft the sound without continuing to play.
- Page 71 Setting the STOP MODE How the looper behaves when stopped can be set. Touch LOOPER SETTINGS on the looper control screen ( → page 67). Touch the desired STOP MODE. The loop will stop immediately after a stop operation. The loop will stop after playing to its end. The loop will stop after fading out.
- Page 72 Turning the UNDO function ON/OFF The UNDO function ( → page 75) can be set to ON or OFF. Touch LOOPER SETTINGS on the looper control screen ( → page 67). Touch UNDO to turn it ON/OFF. Touching this toggles it ON/OFF. Setting Explanation This disables the UNDO function.
-
Page 73: Recording And Playing Loops
Recording and playing loops This shows the looper status. Press when the looper control screen is open. This starts loop recording. Press when recording to cancel recording. Stop recording and start loop playback. If the recording time is set to Manual Pressing again or allowing the maximum recording time to be reached will stop recording and start loop playback. - Page 74 Start loop playback of the recorded phrase. Press when stopped. NOTE • If the pre-count function is ON ( → “Setting the precount” on page 62), recording will start after the pre-count. • Changing the tempo of a RHYTHM during loop playback will erase the recorded phrase. •...
-
Page 75: Overdubbing Loops
Overdubbing loops Additional performances can be added to the recorded loop. This shows the looper status. Press during loop playback. This starts overdubbing. When the end of the loop is reached, loop playback will continue from the beginning, and overdubbing can be repeated. -
Page 76: Clearing The Loop
Clearing the loop When loop playback is stopped, press and hold This clears the recorded loop. -
Page 77: Using The Sends And Returns
Using the sends and returns External effects can be used by connecting them to the send and return jacks. The send/return positions can be set as desired and saved in each patch memory. Since there are two pairs of send/return jacks, two effects or a stereo effect can be used. NOTE The send/return is counted as one of the maximum number of the effects in the patch memory. - Page 78 █ FxLoop 1, FxLoop 2 A signal will be sent to the external effect from the position set on the USE SEND/RETURN screen and a signal will be returned to the same position. • FxLoop 1: A signal is sent from the SEND-1 jack and a signal is returned to the RETURN-1 jack. •...
- Page 79 █ St.Send A stereo signal will be sent to the external effect from the position set on the USE SEND/RETURN screen. • A stereo signal will be sent from the SEND-1/2 jacks. █ Return 1, Return 2 A signal will be returned from the external effect to the position set on the USE SEND/RETURN screen. •...
-
Page 80: Connecting Midi Devices
Connecting MIDI devices What can be done with connected MIDI devices By connecting the with a MIDI device, they can operate and interact with each other. External MIDI device To MIDI OUT connector To MIDI IN connector █ What can be done from the •... -
Page 81: Making Patch Memory Midi Transmission Settings
Making patch memory MIDI transmission settings MIDI transmission settings can be made for each patch memory. Select the patch memory for which you want to set MIDI transmission. Touch on the Home Screen. Set the MIDI data sent when a patch memory is selected █... - Page 82 When set to PC, make the following specific settings. Touch to set the BANK LSB. Touch to set the program change. Touch to set the BANK MSB. When set to CC, make the following specific settings. Touch to set the CC value. Touch to set the CC number.
-
Page 83: Making Other Midi Settings
Making other MIDI settings Other MIDI settings can be made. Touch on the Home Screen. █ Setting the channel used to receive MIDI data Touch BASE CHANNEL, and then touch the desired MIDI channel. Set it to OMNI to receive data on all channels. █... - Page 84 █ Setting whether or not clock data is received from external MIDI devices Touch the RECEIVE MIDI CLOCK switch to set it to ON/OFF. Setting Explanation Data is not received. Data is received. (The will synchronize to the tempo of the external device.) █...
- Page 85 █ Setting whether or not program change messages are received from external MIDI devices Touch the MIDI PROGRAM CHANGE RECEIVE switch to set it to ON/OFF. Setting Explanation Messages are not received. Messages are received. █ Setting whether or not program change messages are transmitted to external MIDI devices Touch the MIDI PROGRAM CHANGE SEND switch to set it to ON/OFF.
-
Page 86: Using Impulse Responses
Using impulse responses (IR) Impulse responses capture the acoustic characteristics of spaces and quantify them as data. By capturing the acoustic characteristics of a guitar sound output from a speaker cabinet recorded by a micro- phone, the characteristics of various speaker cabinets can be quantified as data and used for effects. Real guitar sounds can be re-created without output from speaker cabinets. -
Page 87: Loading Impulse Response (Ir) Data
Loading impulse response (IR) data You can load your own impulse response data and impulse response data from third parties. NOTE Impulse response data in the following format can be loaded. • Format: WAV • Sampling frequency: 44.1–192 kHz Copy the impulse response data to a USB flash drive. Connect the USB flash drive to the USB HOST port. - Page 88 Touch to open a keyboard, and input a name for the impulse response. Character input area A cursor shows the input position Delete characters Input characters Move the cursor Shift key Use to change between upper- case and lowercase characters and to change the character type.
-
Page 89: Using Audio Interface Functions
NOTE The latest ZOOM G11 Driver can be downloaded from the above website. Launch the installer and follow its instructions to install the ZOOM G11 Driver. NOTE See the Installation Guide included in the driver package for detailed installation procedures. -
Page 90: Connecting To A Computer Or Ios/Ipados Device
Connecting to a computer or iOS/iPadOS device Use a USB cable to connect the with the computer or iOS/iPadOS device. USB Type-C port NOTE Use a Lightning to USB Camera Adapter (or Lightning to USB 3 Camera Adapter) to connect to an iOS/iPadOS device with a lighting connector. -
Page 91: Making Audio Interface Settings
Making audio interface settings The recording levels can be adjusted and the monitoring balance can be set, for example. Touch on the Home Screen. Make audio interface settings. █ Adjust the volume (recording levels) sent to the computer Drag the RECORDING GAIN (audio after effects) and RECORDING GAIN (DRY) (audio before effects) knobs up and down to adjust the recording levels. - Page 92 █ Adjusting the monitoring balance This adjusts the balance between the computer output and the direct ( audio) signals. Drag the MONITOR BALANCE knob up and down to adjust the balance. The setting value is shown above the knob. HINT The setting range is 0–100.
-
Page 93: Connecting To Ios/Ipados Devices Wirelessly
ZOOM BTA-1 or other dedicated wireless adapter. • Download the dedicated app from the App Store. While the power is off, connect a ZOOM BTA-1 or other dedicated wireless adapter. ZOOM BTA-1 or other dedicated wireless adapter to ON. -
Page 94: Making Unit Settings
Making unit settings Setting the reference output level The level of the output can be set according to the connected output device. Touch on the Home Screen. Touch AUDIO OUTPUT LEVEL. Touch the desired setting. Setting Explanation INST Use when connected to a guitar amp LINE Use when connected to monitor speakers, PA systems or other line input devices... -
Page 95: Setting The Autosave Function
Setting the AUTOSAVE function When the AUTOSAVE function is ON, patch memories will be saved automatically when their contents are changed. Touch on the Home Screen. Touch the AUTOSAVE switch to set it to ON/OFF. Touching this toggles it ON/OFF. Setting Explanation This turns on the AUTOSAVE function. -
Page 96: Setting The Preselect Function
Setting the PRESELECT function When the PRESELECT function is ON, switching banks with will not change the patch memory immediately. Selecting a new patch memory will confirm the change. This makes it possible to switch directly to a patch memory that is not near the current one during live performance. Touch on the Home Screen. -
Page 97: Adjusting The Display Brightness And Contrast
Adjusting the display brightness and contrast The brightness of the touchscreen and the contrast of the amplifier and effects section displays can be adjusted. Touch on the Home Screen. Adjust the brightness of the touchscreen. Drag left and right to adjust the brightness. Adjust the contrast of the displays. - Page 98 Setting the ECO mode This function can be used to turn the power off automatically if unused for 10 hours. Touch on the Home Screen. Touch the ECO switch to set it to ON/OFF. Touching this toggles it ON/OFF. Setting Explanation The power will automatically turn off if unused for 10 hours.
-
Page 99: Managing The Firmware
Managing the firmware Checking the firmware versions The firmware versions used by the can be checked. Touch on the Home Screen. Touch VERSION/INFO. This shows the firmware and preset versions. firmware version DSP version Preset version BOOT version... -
Page 100: Checking License Information
Checking license information The license information for the can be checked. Touch on the Home Screen. Touch VERSION/INFO. Touch LICENSE/INFO. This shows license information. -
Page 101: Updating
Updating firmware can be updated to the latest versions. Files for the latest firmware updates can be downloaded from the ZOOM website (www.zoom.co.jp). -
Page 102: Restoring Factory Default Settings
Restoring factory default settings The factory default settings can be restored. Touch on the Home Screen. Touch ALL INITIALIZE. Touch ALL INITIALIZE. Initialization will be executed, restoring default settings. Then, the will start up normally. NOTE Initialization will overwrite all settings, including patch memories, to their factory defaults. Be certain before using this function. -
Page 103: Troubleshooting
“Using the tuner” on page 57) There is a lot of noise • Confirm that a shielded cable is not the cause. • Use a genuine ZOOM AC adapter. ( → “Connecting” on page 17) Effects are not working • If the effect processing power is being exceeded, “PROCESS OVERFLOW” will appear on the display. When “PROCESS OVERFLOW”... -
Page 104: Specifications
5-pin DIN connectors Control input FP02M input Power AC adapter: 12V DC, center plus, 2000 mA (ZOOM AD-19) Port: USB 2.0 Type-C/Supported cable type: Type-C Guitar Lab: USB 1.1 Full Speed Audio interface: USB 2.0 High Speed, 44.1kHz/32-bit, 4 in, 4 out •... -
Page 105: Midi Implementation Chart
MIDI implementation chart Multi-Effects Processor Model: G11 Date: March 16, 2020 MIDI implementation chart Version: 1.00 Transmitted Recognized Remarks Function... Basic Default 1 - 16 1 - 16 Memorized Channel Changed 1 - 16 1 - 16 Default Mode Messages... - Page 106 ZOOM CORPORATION 4-4-3 Kanda-surugadai, Chiyoda-ku, Tokyo 101-0062 Japan www.zoom.co.jp Z2I-3886-01...
Need help?
Do you have a question about the G11 and is the answer not in the manual?
Questions and answers