Table of Contents
Advertisement
Advertisement
Table of Contents

Related Manuals for Matrix PRASAR UCS


Summary of Contents for Matrix PRASAR UCS
- Page 2 PRASAR UCS The Unified Communication Server for Modern Enterprises System Manual...
- Page 3 Neither Matrix Comsec nor its affiliates shall be liable to the purchaser of this product or third parties for damages, losses, costs or expenses incurred by the purchaser or third parties as a result of: accident, misuse or abuse of this product or unauthorized modifications, repairs or alterations to this product or failure to strictly comply with Matrix Comsec's operating and maintenance instructions.
-
Page 4: Table Of Contents
Applications of PRASAR UCS .......................... 14 Technical Specifications of SPARK200 ......................18 Compatibility Versions of Extended Clients ...................... 20 Licenses Supported in PRASAR UCS ......................21 Installing SPARK200 ............................ 29 Before You Start ..............................29 Verify the Packaging Contents .......................... 30 Protecting the System and Yourself ........................ - Page 5 Configuring Matrix VARTA ADR100/AMP100 UC Clients ................235 Configuring SIP Extensions using Bulk Configuration ..................250 Auto Sign-In Parameters ..........................262 VARTA License Management ......................... 265 Configuring Standard SIP Phones ........................267 Standard SIP Authorization Profile ........................308 Third Party IP-Phone General Parameters ..................... 311 Device Management ............................
- Page 6 Call Budget on Trunk ............................608 Call Chaining ..............................613 Call Cost Calculation (CCC) ..........................615 Call Cost Display ............................. 640 Call Duration Control (CDC) ..........................641 Call Duration Display ............................649 Call Forward ..............................650 Call Forward-Remote ............................657 Call Forward-Scheduled ..........................
- Page 7 Floor Service ..............................899 Follow Me ................................ 904 Forced Answer ..............................906 Forced Call Disconnection ..........................907 Gain Settings ..............................909 Handover and Handoff ............................ 911 Help Desk ................................ 912 Holiday Table ..............................913 Hotline ................................917 Incoming CLI Modification ..........................922 Intercom ................................
- Page 8 Static Routing Table ............................1075 Station Message Detail Recording (SMDR) ....................1079 Station Message Detail Recording-Storage ....................1080 Station Message Detail Recording-Report ....................1085 Station Message Detail Recording-Online ....................1098 Station Message Detail Recording-Posting ....................1103 System Activity Log ............................1124 System Activity Log Display ..........................
- Page 9 PRASAR UCS Features Supported in Terminals ..................1312 Features at a Glance ............................. 1319 SA Commands .............................. 1326 PRASAR UCS Features tested on IP Phones of different Brands ..............1330 PRASAR UCS Features supported with RTP/Direct RTP ................1332 Acronyms ..............................1333 Warranty Statement ............................
-
Page 10: Introduction
This System Manual provides information and instructions for installing, configuring and using the PRASAR UCS. You may also refer to PRASAR UCS Quick Start, for quick installation. To view or download the Quick Start, scan the QR Code printed on the Product Label/Packaging Label. - Page 11 How to Read this System Manual This document is organized in a manner to help you get familiar with the SPARK200 Platform and PRASAR UCS Application, learn how to install the platform, load application on platform, connect it to the various networks and interfaces, start the system and use the features.
- Page 12 Acronyms have been defined in the text and a list of the same is appended. Some of the terms specific to this Manual that you will encounter are defined below: The words 'UCS', ‘PRASAR UCS’, ‘Server’ and ‘System’ are used interchangeably and synonymously to mean Unified Communication Server.
- Page 13 PSTN, PLMN, ITSP, etc. • Internal Calls: calls made from and received by one extension to another extension of the PRASAR UCS. • External Calls: calls made by users of PRASAR UCS to subscribers of PSTN, PLMN, ITSPs, etc.
-
Page 14: Product Description
SPARSH desk-phones or Matrix VARTA applications on smartphones of their choice. With Embedded UC Platform and advanced call management, Matrix PRASAR UCS improves organization's agility and productivity. The SPARK200 is the common hardware platform that supports both, the PRASAR UCS SME Application as well as the PRASAR UCS ENT Application. - Page 15 PRASAR UCS supports UC communication which includes Instant Messaging, Call Management, Smart Directory and Video Calling using a variety of IP phones such as the Standard SIP Phones and Matrix UC Clients — VARTA WIN200 Desktop UC Client, VARTA ADR100 and VARTA AMP100 Mobile UC Clients.
- Page 16 Logical Partitioning for restricting toll bypass • Priority • Syslog (for easy maintenance) • System Activity Log • System Fault Log • Toll Control • Trusted IP Address to avoid unauthorized access • Voice Mail • Web-based Programming Matrix PRASAR UCS System Manual...
-
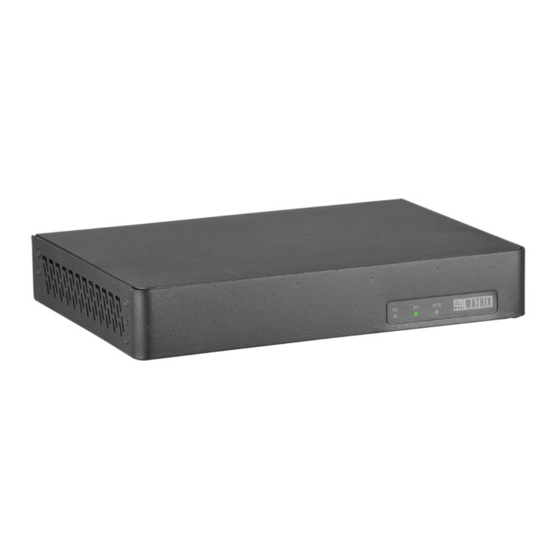
Page 17: Know Your Spark200
Know Your SPARK200 Matrix provides the SPARK200 hardware platform to run the PRASAR UCS Application. SPARK200 This is the enclosure and it consists of the following ports and connectors. Ports and Connectors Port Connector Description 24VDC-2.5A (Max) DC Jack1 To connect 24VDC, 2.5A Power Adapter. - Page 18 During Redundancy, the Status LED of the Active System blinks Green, whereas the Status LED of the Standby System blinks Orange. SPARK200 can be rack mounted or placed on a table. You will be able to use PRASAR UCS only after you have activated the PRASAR UCS Application license. For further details, refer “Licenses Supported in PRASAR UCS”.
-
Page 19: The Interfaces
'SIP Extension' of PRASAR UCS. The SIP Extension users can make and receive calls to any extension user of the PRASAR UCS as well as any external numbers over VoIP. With SIP Extensions, organizations can communicate and stay connected at the lowest cost without any geographical restrictions. - Page 20 SIP Extension users can make and receive calls from and to other extensions of System and external numbers over SIP trunks. You can also connect the Standard and Extended IP Phones offered by Matrix as SIP Extensions. A SIP Extension can be registered with PRASAR UCS from three different locations. This helps the organization to overcome geographical distances and reduce call costs.
- Page 21 The VMS Application — VMS configuration files, voice messages for prompts and greetings — is uploaded in the internal Pen Drive in the PRASAR UCS. The Pen Drive is also the storage device for mailbox messages. Both PRASAR UCS SME or PRASAR UCS ENT offers 4 pre-activated VMS channels. For more channels, you must purchase the channel license according to your requirement.
- Page 22 Call Forward to Voice Mail • Department Calls - Mailbox for Department Groups Computer You can also connect PRASAR UCS to a standalone computer or to a LAN Switch over the LAN/WAN Port of the PRASAR UCS. PC connectivity is required to: •...
-
Page 23: Applications Of Prasar Ucs
Applications of PRASAR UCS The Matrix PRASAR UCS can be deployed in small to large enterprises and institutions: manufacturing units, corporate offices, banking and financial institutions, software firms, shopping malls, hospitals, hotels-motels, call centers and in institutions. Illustrated in the following are various scenarios where the PRASAR UCS finds application. - Page 24 If connecting to a Private Network (Behind a NAT Router), Plug one end of the RJ45 Ethernet cable into the WAN Port of the system and the other end into the LAN Switch/ Hub. Matrix PRASAR UCS System Manual...
- Page 25 Hotel Application VoIP Administration Phones Front Desk User Hotel Reports PRASAR UCS Guest Room Phones Activity Log VoIP Administration Phones PMS Interface PRASAR UCS Hotel Reports Guest Room Phones Activity Log Matrix PRASAR UCS System Manual...
- Page 26 Closed User Group Application Gateway Application for ITSP Matrix PRASAR UCS System Manual...
-
Page 27: Technical Specifications Of Spark200
Concurrent Voice Mail sessions Concurrent calls management with Voice Mail Auto- with IVR attendant. The maximum number of extensions supported are Maximum call legs supported 1100 2100 but the maximum call legs supported are 1100. Matrix PRASAR UCS System Manual... - Page 28 AC-DC Adapter based (Dual Adapter Connectivity with Failover) Configuration Web Based Intuitive GUI Mounting Option Rack Mount, 1U Size 0° C to +40 ° C Operating Temperature Dimensions (WxHxD) 275x43.75x185.6 mm Unit Weight 1.5 Kg (Approx.) Shipping Weight 2.3 Kg (Approx.) Matrix PRASAR UCS System Manual...
-
Page 29: Compatibility Versions Of Extended Clients
V5R22 MATRIX SPARSH VP310 V1R11 MATRIX SPARSH VP330 V1R11 MATRIX SPARSH VP510 V1R9 MATRIX EXTENDED V1R3 SPARSH VP710 It is recommended to use the above mentioned client version with PRASAR UCS for the overall functionality. Matrix PRASAR UCS System Manual... -
Page 30: Licenses Supported In Prasar Ucs
If no application license is activated in the system, you can register and configure 2100 SIP extensions with SPARK200. If you have not activated PRASAR UCS SME/ENT Application License and you do not start the Demo Period, the system will disconnect all the connected calls (internal or external, incoming or outgoing) after 60 seconds. - Page 31 This license permits the configuration and registration of SIP Extensions with SPARK200. By default, PRASAR UCS SME Application License supports configuration and registration of 100 SIP Extensions only. You can configure and register a maximum of 250 SIP Extensions with SPARK200, but you need to purchase IP Subscriber License.
- Page 32 VMS call request. Conference Participant License By default, PRASAR UCS SME / ENT Application license allows you to conduct a conference with a maximum of 8 participants. You can either conduct a single conference with maximum 8 participants or multiple conferences with total 8 participants overall.
- Page 33 “Supported Licenses”. When you purchase PRASAR UCS SME2ENT license, it allows you to configure and register 5 additional VARTA clients with SPARK200. To register a VARTA Client with SPARK200, you need to purchase both IP Subscriber and VARTA License.
- Page 34 Click to Call To know more about Matrix VARTA WIN200 refer to the Matrix VARTA WIN200 User Guide and for VARTA UC Clients for Mobile refer to the respective User Guide — Matrix ADR100 User Guide and Matrix AMP100 User Guide.
- Page 35 Front Desk User GUI (web interface) Hospitality E911 If you are using the system in the Hospitality mode, the PRASAR UCS supports the Hospitality E911 license. You will be able to dial the Emergency number 911 from the system only if you buy this license.
- Page 36 License for upgrading the System Firmware. Validity of this license PRASAR AUP is one year. HOSPITALITY License License for Hospitality functions suite for PRASAR UCS ENT to PRASAR HOSPITALITY SME support hospitality functions and features used in Hotel-Motel. License for PRASAR UCS SME to enable dialing of emergency PRASAR HOSPITALITY ENT number 911 in the Hospitality Mode.
- Page 37 Hotel-Motel. To activate the above supported licenses in the system, refer to “How to activate your License”. PRASAR UCS also offers a Demo mode for detailed information, refer to “Demo Provision”. Matrix PRASAR UCS System Manual...
-
Page 38: Installing Spark200
The system should be installed away from any source of electromagnetic noise such as any radio equipment, heavy transformers, faulty electric chokes of tube-lights, any device having faulty coil, etc. Read “Protecting the System and Yourself”. Matrix PRASAR UCS System Manual... -
Page 39: Verify The Packaging Contents
SPARK 200 • 2 RJ45 Cables • 1 Vocoder Module factory fitted • 1 8GB USB 2.0 Pen-Drive (Flash Drive) factory fitted • A Power Adapter • A Power Cord (country specific) • Two Side Clamps Matrix PRASAR UCS System Manual... - Page 40 The system supports a maximum of 248 VOCODER channels and one NX DBM VOCODER64 module supports 64 channels. To activate additional VOCODER channels, you must purchase other modules separately. Matrix provides two licenses — PRASAR VOCODER CHNL4 and PRASAR VOCODER CHNL16. To know more, refer “License...
- Page 41 By default, one VOIP module is factory fitted, this is with the label M1, VOIP #1 on the board. • Locate the label M2, VOIP#2 to affix the second module. • Remove the screws on the studs for the module and keep them aside. Matrix PRASAR UCS System Manual...
- Page 42 Press the Module with a finger and match the mounting holes perfectly with the stud holes. Make sure you do not touch the PCB area of the module except the yellow line provided for grounding at the front end of the module. • Do not apply excessive pressure. Matrix PRASAR UCS System Manual...
- Page 43 VMS Interface and the Internal USB Ports The System supports a maximum of 64 VMS channels. By default, both PRASAR UCS SME/ PRASAR UCS ENT offers 4 pre-activated VMS channels. To activate additional VMS channels, you must purchase — PRASAR VMS CHNL4 or PRASAR VMS CHNL16.
- Page 44 Management”. External USB Ports (Device Port) 3.0 PRASAR UCS supports two external USB ports — USB1, USB2 on the fascia of SPARK200. Both USB ports can be used as COM Ports by connecting the USB to COM Converters. The USB to COM Converter will not be provided by Matrix.
-
Page 45: Protecting The System And Yourself
But when such a person touches any of the electronic parts, the static charge finds its way through the electronic components thereby causing damage to the system. Matrix PRASAR UCS System Manual... - Page 46 When you connect external devices like headset, telephone instruments, cables, connectors, etc., ensure that they are of standard make and good quality, so that the functioning of the system is not affected. • Matrix does not guarantee the performance of external devices that are not supplied by it. Cleaning and maintenance •...
- Page 47 2.0mm. The Battery is located on the Board. The Battery should be replaced only by authorized dealers of Matrix. End Users must not attempt to replace it. Caution: There is risk of explosion if the Battery is replaced in an incorrect manner. Please dispose-off used Batteries.
-
Page 48: Connecting Sip Extensions
SIP/UC Users. SIP/UC Users can make and receive calls to any extension user of the system and to external numbers. You may register any SIP enabled device — a Matrix UC Client, an IP-phone, a Soft phone, Analog Phone Adapter — as the SIP User of the system. - Page 49 When you register the Matrix Extended IP Phone with the system, the WAN/LAN port is used for Auto Configuration as well for Registration of the Extended IP Phones. • When you register a SIP device other than the Matrix Extended IP Phone on the public network as SIP Extension, do the following: •...
- Page 50 If the PRASAR UCS is connected to a Private Network (Behind the NAT). Matrix PRASAR UCS System Manual...
- Page 51 Extensions”. For the SIP User ID you assigned to the Extended IP Phone, you must configure the necessary parameters in PRASAR UCS so that Extended IP Phone can register as a SIP Extension. For instructions, see the topic “Configuring SIP Extension Settings as per the Extended Phone Type”...
- Page 52 • When you mount the phone on a desk, • You can attach the Foot Stand in two ways as illustrated in the following. Foot Stand attached at 30° Angle Matrix PRASAR UCS System Manual...
- Page 53 Plug the long straightened end of the phone cord into the handset jack at the bottom of the phone marked with the handset symbol. • Plug the other (short straight) end of the phone cord into the jack at the bottom of the handset. Matrix PRASAR UCS System Manual...
- Page 54 Plug the connector of the Power Adapter in to the power jack at the back of the phone . Use only the adapter provided with the phone to prevent any damages that may arise from the use of other adapters. 7. The SPARSH VP248 does not have a power switch. Matrix PRASAR UCS System Manual...
- Page 55 The phone makes DHCP Discovery and fetches its IP Address and Server Address from the DHCP Server. On getting the IP Address and Server Address, the phone initiates Auto Configuration to download the configuration files from PRASAR UCS. Matrix PRASAR UCS System Manual...
- Page 56 As the phone downloads the configuration files, the file names will appear one by one. • On successful download of all configuration files, the phone attempts to register with PRASAR UCS. • On successful registration, the phone will display the current day, date and time, the extension number and name assigned to the Extended IP Phone.
- Page 57 G a t e w ay A d d r es s • Use the Down/Up key to reach the desired network parameter and press Enter key to select and change the settings. • You can configure all network parameters described below, except the MAC Address. Matrix PRASAR UCS System Manual...
- Page 58 DNS Address, select Static and configure the DNS Address. DNS Address • If you select DNS Server as Static, enter the DNS Address here. To enter dot/period in the IP Address, press the Star ‘*’ key. Matrix PRASAR UCS System Manual...
- Page 59 For PPPoE and Static Connection Types, you need to enter the Server Address. Server Port • Enter the SPARSH Port of PRASAR UCS here. The phone sends the request for configuration files to this port. Valid range of the port is: 80 or 1025–65535. Default: 80.
- Page 60 PCAP on the phone. The phone captures up to 1 MB of packets. For more information and for instructions on how to use PCAP Trace on the phone, see “Using PCAP Trace for Matrix SPARSH VP248 Extended IP Phone”, under PCAP Trace.
- Page 61 GW: The current Gateway IP Address assigned to the phone. • DNS: The Domain Name Server address assigned to the phone. • S. ADD: The LAN or WAN IP Address / Domain Name of the PRASAR UCS. • S. PORT: The SPARSH Port PRASAR UCS. •...
- Page 62 Extensions”. For the SIP extension number you assigned to the Extended IP Phone, you must configure the necessary parameters in PRASAR UCS so that Extended IP Phone can register as a SIP Extension. For instructions, see the topic “Configuring SIP Extension Settings as per the Extended Phone Type”...
- Page 63 If you attach the Foot Stand at 50°, the phone will be placed in an almost upright position on your desk. • Decide which of these positions would work for you best and accordingly attach the Foot Stand. Matrix PRASAR UCS System Manual...
- Page 64 Ethernet cable. To connect your phone to a computer on your desk, use an Ethernet cable (not supplied with this phone) to connect the PC Port of the phone to the LAN Port of the computer. Matrix PRASAR UCS System Manual...
- Page 65 5VDC-2A at the bottom of the phone. Plug in the power adapter into a power outlet The IP phone should be used with Matrix original power adapter (5V/2A) only. The use of any third-party power adapter may cause damage to the phone.
- Page 66 The Network Parameters submenu appears. • Use the Down/Up key to reach the desired network parameter and press Enter key to select and change the settings. • You can configure all network parameters described below, except the MAC Address. Matrix PRASAR UCS System Manual...
- Page 67 If you select DNS Server as Static, enter the DNS Address here. To enter dot/period in the IP Address, press the Star ‘*’ key. DNS Domain Name • If you select DNS Server as Static, enter the DNS Domain Name here. DNS Domain Name is optional. Matrix PRASAR UCS System Manual...
- Page 68 For PPPoE and Static Connection Types, you need to enter the Server Address. Primary Server Port • Enter the SPARSH Port of PRASAR UCS here. The phone sends the request for configuration files to this port. Valid range of the port is: 80 or 1025–65535. Default: 80.
- Page 69 PCAP on the phone. The phone captures up to 1 MB of packets. For more information and for instructions on how to use PCAP Trace on the phone, see “Using PCAP Trace for Matrix SPARSH VP310 Matrix Extended IP Phone”, under PCAP Trace.
- Page 70 Domain Name of the PRASAR UCS or the Secondary Server IP Address (if configured) or any Fallback Server. • S. PORT: This displays the port of the Active Server. It may be the SPARSH Port of PRASAR UCS or the Secondary Server Port (if configured) or the Fallback Server Port. Matrix PRASAR UCS System Manual...
- Page 71 If you want to use the DHCP Server for assigning IP Address to the Extended IP Phone, select DHCP option 224 and Data Type as ‘String’ and program the LAN or WAN IP Address /Domain Name of PRASAR UCS and SPARSH Port in the format “IP_Address:Port” in your LAN DHCP Server as per your installation scenario.
- Page 72 Push the handset wall mount tab upwards to remove it from the slot. Rotate it 180 degrees clockwise and push it downwards into the slot. When you mount the phone on a desk, you can attach the Foot Stand in two ways at 35° Angle or at 50° Angle. Matrix PRASAR UCS System Manual...
- Page 73 You may plug a headset with an RJ9 connector into the headset port on the side panel of the phone, marked with the symbol Connect the LAN Port of SPARSH VP330 to the IP Network — A Router or LAN Switch — using the Ethernet Cable. Matrix PRASAR UCS System Manual...
- Page 74 Connect the Wi-Fi USB Adapter into the USB port of the phone. You can purchase the Wi-Fi USB Adapter from Matrix as an optional peripheral device to support wireless network. To connect your phone to a computer on your desk, use an Ethernet cable (not supplied with this phone) to connect the PC Port at the bottom of the phone to the LAN Port of the computer.
- Page 75 Extensions”. For the SIP extension number you assigned to the Extended IP Phone, you must configure the necessary parameters in PRASAR UCS so that Extended IP Phone can register as a SIP Extension. For instructions, see the topic “Configuring SIP Extension Settings as per the Extended Phone Type”...
- Page 76 You can attach the Foot Stand in the following ways — at an angle of 45 degrees or 55 degrees Stand attached at 45 degree angle Stand attached at 55 degree angle • Decide which of these positions would work for you best and accordingly attach the Foot Stand. Matrix PRASAR UCS System Manual...
- Page 77 • Plug the other (short straight) end of the Spring Cord into the jack at the bottom of the handset. Connect the Headset (not supplied by Matrix). • To use a Headset (not supplied with the phone), plug any standard stereo headset with 3.5mm single...
- Page 78 PRASAR UCS. • As the phone downloads the configuration files, the file names will appear one by one. • On successful download of all configuration files, the phone attempts to register with PRASAR UCS. Matrix PRASAR UCS System Manual...
- Page 79 You must press Yes key and access network settings. When the phone is making Network discovery, downloading configuration files, attempting registration. You must press the Menu key to access network settings. When the phone is in idle state, press the Down key Matrix PRASAR UCS System Manual...
- Page 80 To delete previous characters from the cursor position 2Ab - Alphanumeric Mode 2Ab/123 123 - Numeric Mode Connection Type • Select the Connection Type as DHCP, PPPoE or Static according to the IP Addressing scheme of your network. Matrix PRASAR UCS System Manual...
- Page 81 This is the password provided by your Internet Service Provider for the PPPoE User ID. If you have selected PPPoE as Connection Type, you must enter the password provided by your Internet Service provider here. Matrix PRASAR UCS System Manual...
- Page 82 For PPPoE and Static Connection Types, you need to enter the Server Address. Primary Server Port • Enter the SPARSH Port of PRASAR UCS here. The phone sends the request for configuration files to this port. Valid range of the port is: 80 or 1025–65535. Default: 80.
- Page 83 If you want to restrict unauthorized clients from connecting to your LAN, you need to enable 802.1x Authentication. Using EAP MD5 protocol the PC connected to the LAN port of the IP Phone is first authenticated and then it gets connected to LAN. You need to configure the following 802.1x Authentication parameters: Matrix PRASAR UCS System Manual...
- Page 84 Domain Name of the PRASAR UCS or the Secondary Server IP Address (if configured) or any Fallback Server. • S. PORT: This displays the port of the Active Server. It may be the SPARSH Port of PRASAR UCS or the Secondary Server Port (if configured) or the Fallback Server Port. •...
- Page 85 Installing DSS532 with SPARSH VP510 Once you have installed SPARSH VP510 with PRASAR UCS, you can install the DSS532 by following the steps given below: Unpack the box and verify the package contents Four clamps are provided with the phone — 2 DSS-Phone Clamps and 2 DSS-DSS Clamp.
- Page 86 Now attach the clamps. To do so, • Remove the screws to attach the clamps. • Place the DSS-Phone Clamps between the DSS532 and the phone. • Insert the screws back to fix the clamps. Matrix PRASAR UCS System Manual...
- Page 87 Remove the Foot Stand Remove the Foot Stand of attached DSS532. To do so, • Firmly slide the Foot Stand of the attached DSS532 downward to unlock. • Now, slide down the attached DSS Extender in downward direction. Matrix PRASAR UCS System Manual...
- Page 88 Insert the hooks on the Extender into the slots provided on both the DSS532. Firmly slide both the DSS Extenders upward consecutively (attach the second extender first followed by the existing one attached to the phone) and lock them in place. Matrix PRASAR UCS System Manual...
- Page 89 Attach the Clamps Attach the DSS-DSS Clamps between both the DSS532. Attach the Foot Stand Attach the Foot Stand of both the DSS532. Make sure both, the DSS532 and the phone are mounted at the same angle. Matrix PRASAR UCS System Manual...
- Page 90 “Programming DSS Console Keys”. Connecting Extended SPARSH VP710 as Extended SIP Extension You are recommended to complete the following steps before connecting the Matrix Extended SPARSH VP710 to PRASAR UCS: • Decide the location where you want to place Matrix Extended SPARSH VP710 within your LAN.
- Page 91 Inserting the camera It is recommended to use only the Matrix original Camera, supplied with the IP Phone for video calling. The use of any third-party camera may cause damage to the phone. Damages to the phone caused by using third-party camera is not covered by Matrix warranty.
- Page 92 Attaching the optional wall mounting bracket Connect the handset and optional headset. A headset is not included in the packaging contents. Contact your dealer/reseller for more information. Matrix PRASAR UCS System Manual...
- Page 93 Connect the DC plug on the power adapter to the DC5V port on the phone and connect the other end of the power adapter into an electrical power outlet. Power over Ethernet (PoE) With the included or a regular Ethernet cable, the IP Phone can be powered from a PoE-compliant switch or hub. Matrix PRASAR UCS System Manual...
- Page 94 On successful download of all configuration files, the phone attempts to register with PRASAR UCS. • On successful registration, the Home screen appears. The phone will register successfully, only if the SIP Extension parameters in PRASAR UCS have been correctly configured as per your installation scenario. Matrix PRASAR UCS System Manual...
-
Page 95: Switching On The System
System is in the Thermal Sleep Mode. OFF – 2 sec ON – 5000 msec OFF continuously During Redundancy, the Status LED of the Active System blinks Green, whereas the Status LED of the Standby System blinks Orange. Matrix PRASAR UCS System Manual... -
Page 96: Configuring Basic Prasar Ucs Settings
These passwords can be changed using Jeeves only. It is possible to configure PRASAR UCS from any location using Jeeves. You can use Jeeves to configure the system On-site (where it is installed) and Off-site, from a remote location. - Page 97 Click Login. Before you start configuring the system, if you wish to view or download the PRASAR UCS Quick Start or any other related documents, you can click or scan the QR Code present in the login page of Jeeves.
- Page 98 0 to 9. You cannot set 1234 as the New SE Extension Password as it is the default SE Extension Password. • In Confirm New Password, re-enter the new password to confirm. Matrix PRASAR UCS System Manual...
-
Page 99: System Administrator Mode
Ethernet Port of SPARK200 must be connected with a stand-alone PC or in a LAN. • a web-browser, either Internet Explorer 7 or later or Mozilla Firefox 3.5.1 or later, must be installed on the To log into the SA Mode, Matrix PRASAR UCS System Manual... - Page 100 • To set the password for SA Web Login, FDU Web Login and SA Extension Login, click on the link. For Accessing Jeeves • Under For Web Interface of SA User and Front Desk User, Matrix PRASAR UCS System Manual...
- Page 101 • Keep the password secret. • Select a complex password that cannot be easily guessed. • Change the password regularly. See “System Security”. • Not to use the “Remember Password” property of your Web Browser. Matrix PRASAR UCS System Manual...
-
Page 102: Front Desk User Mode
Click Login. Front Desk User Mode The Front Desk Mode is relevant only for the Hospitality Application of the PRASAR UCS. This mode is meant for the personnel at the Front Desk of the Hotels/Motels, allowing them access to and... - Page 103 The Front Desk User mode too is password protected. Refer the PRASAR UCS Hospitality System Manual to know more. • If you select the language on the Welcome page or on any of the Login pages, it is valid for the current session only.
-
Page 104: Using Configuration
To configure the Configuration parameters, • Login as System Engineer. • Click Configuration to configure the desired parameters. • You can also use Search bar to search for the desired parameter page you wish to configure. Matrix PRASAR UCS System Manual... - Page 105 The page opens. Configure the parameters. The maximum number of search results that will be displayed are 25. The system does not support search of user configured data. For example Feature Access Code, Extension number, Name, SIP ID etc. Matrix PRASAR UCS System Manual...
-
Page 106: Configuring System Pre-Requisites
To make the task of configuring for such users easier, PRASAR UCS allows you to specify the number of trunks and extension ports you want to configure. Accordingly all the relevant pages of Jeeves will show only as many trunk and extension ports that you have specified, instead of showing all the ports supported by PRASAR UCS. -
Page 107: Configuring 'Region
Date and Time Settings will only change as per the selected region. The other parameters are country-specific. India is selected as the default Region. So, if you are installing PRASAR UCS in a country other than India, change the Region. -
Page 108: Configuring Network Parameters
PRASAR UCS has a LAN and WAN Port. The network parameters must be configured according to your network scenario. PRASAR UCS may be installed typically, in a Public IP Network or in a Private Network, behind a NAT Router. When the PRASAR UCS is installed in a Public IP Network, •... - Page 109 Preferred DNS Server — IPv4 or IPv6. Default: IPv4 LAN Port (IPv4 settings) Make sure that the Redundancy LAN IP Address configured in “Configuring Redundancy Parameters” LAN Port IP Address are in the same subnet if you wish to use Redundancy. Matrix PRASAR UCS System Manual...
- Page 110 Program the Service Name only if it has been provided. You must set DNS address. Configure the following PPPoE parameters: • User ID: Enter the User ID provided by the Internet Service Provider. The User ID may be a maximum of 64 characters. Matrix PRASAR UCS System Manual...
- Page 111 DNS Address: This field will be editable only if you have selected DNS Address Assignment as 'Static'. Enter the DNS Address here. If you have selected DNS Address Assignment as 'Auto', the DNS Address will be assigned by the DHCP/PPPoE server. Matrix PRASAR UCS System Manual...
- Page 112 Valid characters 0 to 9, a to f, A to F and : (colon). It can be a maximum of 21 characters. WAN Port (IPv6 Settings) Make sure that the Redundancy WAN IP Address configured in “Configuring Redundancy Parameters” and WAN Port IP Address are in the same subnet if you wish to use Redundancy. Matrix PRASAR UCS System Manual...
- Page 113 IPv6 Scope Preference: IPv6 includes support of Global as well as Non-Global Addresses(Unique). Select the scope of preference — Global or Unique. Default: Global. • User ID: Enter the User ID provided by the Internet Service Provider. The User ID may be a maximum of 64 characters. Matrix PRASAR UCS System Manual...
- Page 114 The Prefix Length range is from 1 to 128 bits. Default: Blank. Domain Name Server (DNS) for IPv6 Click Domain Name Server (DNS) for IPv6 to expand. • Configure the following DNS Connection settings for the WAN Port: Matrix PRASAR UCS System Manual...
- Page 115 Select the check box to enable cloning of the MAC Address of the WAN Port. Default: Disabled. • Clone MAC Address for WAN Interface: If you have enabled MAC Cloning, enter the MAC Address to be cloned here. Matrix PRASAR UCS System Manual...
- Page 116 SIP Extensions need to change their configuration whenever a new IP Address is assigned to the WAN port. Dynamic DNS resolves this. PRASAR UCS supports Dynamic DNS Server client of the Service Provider Dynamic DNS.org. If you want to use the DNS Service of DynDNS.org, configure these parameters: •...
- Page 117 Simple Traversal of UDP through NAT (STUN): This parameter is to be configured only if the WAN port is located behind a NAT Router and SIP Messages need to be forwarded to the public internet. Matrix PRASAR UCS System Manual...
- Page 118 VARTA clients/ Standard SIP IP Phones. Valid range: 80 or any value ranging from 1025 to 60000. Default: 80. • Secure SPARSH Port: Enter the Secure SPARSH port number if you want to auto configure the VARTA Matrix PRASAR UCS System Manual...
- Page 119 Layer 2 VLAN/CoS: This parameter is to be configured if the WAN port is to be connected in VLAN network. This parameter enables the PRASAR UCS to add VLAN header to the packets generated by it. The VLAN header consists of the VLAN ID (12-bit) and Class of Service (CoS, 3-bit) for prioritization of traffic VLAN Tag is applied on all packets generated by system (SIP, RTP, DNS, ARP, etc.), whereas CoS bits are...
- Page 120 Network Address Traversal (NAT) allows multiple hosts in the network to share the single public routable IP address. Means all the hosts in the private network shall be identified by single public IP address in the global IP cloud. Matrix PRASAR UCS System Manual...
- Page 121 WAN. Similarly, to re-initialize the LAN parameters, click the IPv4 Network Reinitialization or IPv6 Network Reinitialization button. You can also view the Network Status from the Status link. To view, click the Network link under Status. Matrix PRASAR UCS System Manual...
-
Page 122: Configuring Redundancy Parameters
It is recommended to configure the Primary Server first and then configure the Backup Server. To know more, refer to “Configuring the Servers”. PRASAR UCS supports redundancy only when the Connection Type configured for the WAN Port is Static, if WAN is selected as the Redundancy On Option. Configuring the Servers •... - Page 123 Enable Redundancy: By default, this check box is disabled. To use Redundancy feature, select the check box. • Server Mode: To configure the first system as Primary Server, select Primary. This is the main server that responds to the client requests. Default: Primary. Matrix PRASAR UCS System Manual...
- Page 124 Session Manager - Synchronization Port: This port is responsible for synchronization between the Primary Server and Backup Server. The Active server sends configuration to the Standby server through this port. The value of this port is 873 and is fixed. Matrix PRASAR UCS System Manual...
- Page 125 Connect the WAN port to a switch/router for communication with the client devices. Viewing Redundancy Status To view the Redundancy status, • Login as System Engineer. • Click Status. • Under Status, click Redundancy Status. • Server Status: Displays current systems mode, status and uptime. Matrix PRASAR UCS System Manual...
- Page 126 The Redundancy status is also displayed in the top banner, • It displays the current Server Mode — Primary or Backup and the Status — Active or Standby depending upon the availability of the server. Matrix PRASAR UCS System Manual...
-
Page 127: Configuring Extensions
Wi-Fi mobile handset can be registered with the PRASAR UCS and function as the 'SIP Extension' of the PRASAR UCS. SIP Extensions users can make and receive calls to any extension user of the PRASAR UCS as well as any external numbers over VoIP, depending on the “Logical Partition”... - Page 128 Feature Template with the common set of features and apply it on these extensions. The PRASAR UCS offers 50 such Station Basic Feature Templates. A Station Basic Feature Template is assigned to all the types of extensions, namely SIP Extensions and Virtual Extensions.
- Page 129 Time Zone, you must customize the COS group first and then assign the number of the COS group in the Station Basic Feature Template. Refer the topic “Class of Service (COS)” to know more and for instructions on how to enable or disable a feature in a COS group. Matrix PRASAR UCS System Manual...
- Page 130 Calls, Regional Calls, National Calls, International Calls, All Calls, Limited Calls. The Toll Control levels on this page are based on the allowed and denied number lists of Local, Regional, National, International, and Limited Call numbers you configured in the “Toll Control”. Matrix PRASAR UCS System Manual...
- Page 131 Working Hours. The extension will be allowed to make outgoing calls through the trunks in this group. The Call Privilege types are: No Calls, Local Calls, Regional Calls, National Calls, International Calls and Limited Calls. Matrix PRASAR UCS System Manual...
- Page 132 Select the check box to enable and clear it to disable. Refer the topic “Station Message Detail Recording-Storage” for more details. • Click Submit. Customizing Station Basic Feature Template using Jeeves • Login as System Engineer. • Under Configuration, click Station Basic Feature Templates. Matrix PRASAR UCS System Manual...
- Page 133 Now, apply this Station Basic Feature Template 10 on the SIP / Virtual Extensions. To apply the customized Station Basic Feature Template on SIP Extensions, • Under Configuration, click VoIP Configuration. • Click SIP Extension Settings. Matrix PRASAR UCS System Manual...
- Page 134 Station Advanced Feature Template with the common set of features and apply it on these extensions. The PRASAR UCS offers 50 such Station Advanced Feature Templates. A Station Advanced Feature Template is assigned to SIP extension and Virtual extensions.
- Page 135 Select the radio button of the desired option: • Display Number of Transferring Extension when call is transferred by this extension. • Display Number of Party kept on Hold when call is transferred by this extension. • Click Submit. Matrix PRASAR UCS System Manual...
- Page 136 When Busy or No Reply Default: None • Destination: Select the Destination — SIP, Vocie Mail or Dept Group — to which the calls are to be forwarded for Preset Call Forward (WH). Default: 21. Matrix PRASAR UCS System Manual...
- Page 137 DDI IC Routing: By default this check box is selected, that is it is enabled. The system will land incoming calls with the same DDI number on the extension user who is assigned this number. Default: Enabled. Clear the check box, if you want to disable. Matrix PRASAR UCS System Manual...
- Page 138 (extensions) in this routing group. Save your changes by clicking Submit. You can configure a different Routing Group repeating these steps. Make sure to enter the number of the Routing Group you configured. Refer the feature description for “Alarms” to know more. • Click Submit. Matrix PRASAR UCS System Manual...
- Page 139 Internal Calls Storage: Select the type of internal calls to be stored. You can select from the following options: • Made/received by this extension: the system will store all calls made to and received from this extension. • Made by this extension: the system will store outgoing calls made from this extension. Matrix PRASAR UCS System Manual...
- Page 140 You can configure 8 different CDC tables. By default, CDC Table No. 1 is assigned to all extensions. If CDC is to be applied on extensions of the PRASAR UCS, simply enter the default CDC Table No. 1. Matrix PRASAR UCS System Manual...
- Page 141 CSF Key is pressed. Disable this check box if you do not want the Ringer LED to glow. Supported on SPARSH VP510 only. Matrix PRASAR UCS System Manual...
- Page 142 Click Submit to save your changes. • Now, apply this Template 02 on the SIP and Virtual Extensions. To apply the customized template on SIP Extensions, • Under Configuration, click VoIP Configuration. • Click SIP Extension Settings. Matrix PRASAR UCS System Manual...
- Page 143 Go to the SIP Extensions, for example SIP Extension 1, to which this Template is to be assigned and enter the Template number. • Click Submit. • Repeat the same steps to customize another template and apply it on the extension ports. Matrix PRASAR UCS System Manual...
-
Page 144: Configuring Sip Extensions
“PRASAR UCS Features tested on IP Phones of different Brands” in the Appendix. SIP Extensions can make and receive calls to any extension user of the PRASAR UCS as well as to external numbers, depending on the “Logical Partition” configured in the System. - Page 145 The valid range of this timer is from 10 to 99999 seconds. By default, it is set to 45 seconds. The Timers will be applicable only after System Restart. • Click Submit. Matrix PRASAR UCS System Manual...
- Page 146 Configuring SIP Extension Settings as per the Extended Phone Type • If you have registered the Matrix Mobile UC Clients as SIP Extensions, for configuration instructions see “Configuring Matrix VARTA ADR100/AMP100 UC Clients”. • If you have registered the MATRIX VARTA WIN200 Desktop UC Client as SIP Extensions, for configuration instructions see “Configuring Matrix VARTA WIN200 UC Client”.
- Page 147 Registration status; whether the SIP Extension is registered or not. • Contact 1 • Contact 2 • Contact 3 You can also view the SIP Extension Status from the Status link. To view, click the SIP Extension link under Status. Matrix PRASAR UCS System Manual...
-
Page 148: Configuring Matrix Sparsh Vp248
Configuring Matrix SPARSH VP248 SPARSH VP248 , the proprietary SIP-based IP Phone for PRASAR UCS, supplied by Matrix, is a feature-rich phone, providing voice communication over IP network. To know the list of features supported, refer to “PRASAR UCS Features Supported in Terminals”. - Page 149 Registrar of the system. It is the number with which you can call the SIP Extension. Any extension user of the PRASAR UCS can call a SIP Extension by dialing the SIP ID assigned to the SIP extension. SIP ID of each SIP Extension must be a unique number string of a maximum of 6 digits.
- Page 150 • Forced: PRASAR UCS uses only SRTP (SAVP) for transporting the speech packets. If the remote user does not support SRTP, PRASAR UCS will reject incoming calls from and drop outgoing calls made to such users. The calls that are routed through the system will depend on the number of Vocoder channels available. The channels supported depends on the license purchased.
- Page 151 Customize Template number 05 and click Submit. • Return to the SIP Extension Settings page. • Select the number of the Template you customized, Template 05, in the Station Basic Feature Template field. • Click Submit to save changes. Matrix PRASAR UCS System Manual...
- Page 152 You can create as many as 50 groups numbered from 00 to 50. Users who are assigned COSEC Door Group ‘00’ are not a part of any group. Matrix PRASAR UCS System Manual...
- Page 153 Select a Priority Level for the SIP Extension from 1 to 9. Default; 5-Normal. Each extension of the PRASAR UCS is assigned a Priority Level starting from 1, 2, 3... to 9, with '1' being lowest Priority and '9' being highest Priority. Whenever an extension (phone) with higher priority calls an...
- Page 154 If you have connected the Matrix Extended SPARSH VP710 as SIP Extensions, for configuration instructions see “Configuring Matrix Extended SPARSH VP710”. If you have registered Matrix VARTA ADR100 and VARTA AMP100 Mobile UC Clients in any of the locations, refer “Configuring Matrix VARTA ADR100/AMP100 UC Clients”.
- Page 155 • Click Location 1. • The settings of the phone at Location 1 appear. Matrix PRASAR UCS System Manual...
- Page 156 Registrar Server IP Address. • If the SPARSH VP248 is connected in the Global Network and PRASAR UCS is located behind a Router, or behind a NAT Router and STUN is programmed, select Use Router/STUN's IP Address as Registrar Server IP Address.
- Page 157 Select the Display Language for the SPARSH VP248. Default: English. PRASAR UCS provides language support for English, French, German, Spanish, Portuguese, and Italian on the SPARSH VP248. When you select any of these languages, all the prompts and command strings will appear in the selected language.
- Page 158 Set the Back Light Off Timer (sec) to the desired value, if required, from 000 to 999 seconds. Default: 10 seconds. • Set the LCD Contrast Level to a level from 1 to 4 that is comfortable to you. Default: 3. Matrix PRASAR UCS System Manual...
- Page 159 Select Personalized as the Key Template option. • Click Key Settings. • The key map of the Extended Phone opens in a new window on your screen. • Click the key you want to configure. For example, SIPEXTN 1. Matrix PRASAR UCS System Manual...
- Page 160 The Operator function is a Feature, so select the option FEATURE from the Select Function Type list box. From the Select Offset drop down list, all the features that can be assigned to keys are listed. • Select Operator from the list of features in the Select Offset box. Matrix PRASAR UCS System Manual...
- Page 161 • Click OK. The Operator feature appears on the key label. • To take a second example, if you want to assign Remote DND to the key currently assigned SIPEXTN 2 key, click the key. Matrix PRASAR UCS System Manual...
- Page 162 If you want assign a feature, select FEATURE as function type, and select the desired feature as Offset. If you want to use the key to call a SIP extension, select SIP Extension as Function Type and select the number of the extension as Offset. Matrix PRASAR UCS System Manual...
- Page 163 SIP INVITE Timer (sec): This is the time in seconds that the phone waits for a response from the called party after sending INVITE message. This timer starts after sending INVITE message to the called party and stops on receipt of the provisional response or the final response or when the user Matrix PRASAR UCS System Manual...
- Page 164 SPARSH VP248 at Location 2 and Location 3. When you change any of the parameters listed below in the SIP Extension at Location 1, 2, 3, the phone will restart automatically, if registered: • Use SIP Extension Matrix PRASAR UCS System Manual...
- Page 165 • RTP Ports • NAT Keep Alive • SIP Timers • The SE Password of PRASAR UCS is changed • Specific parameters in VoIP Parameters are changed • Specific parameters Network Port parameters are changed • You restart the System •...
-
Page 166: Configuring Matrix Sparsh Vp310
SPARSH VP310, the Executive IP Phone is engineered to offer a contemporary design with crystal-clear audio and feature-rich capabilities at economical price. It functions like SPARSH VP248, the proprietary SIP-based IP Phone for PRASAR UCS, of Matrix. To know the list of features supported, refer to “PRASAR UCS Features Supported in Terminals”. - Page 167 Registrar of the system. It is the number with which you can call the SIP Extension. Any extension user of the PRASAR UCS can call a SIP Extension by dialing the SIP ID assigned to the SIP extension. SIP ID of each SIP Extension must be a unique number string of a maximum of 6 digits.
- Page 168 Disable: PRASAR UCS uses normal RTP for transporting the speech packets. • Optional: PRASAR UCS uses SRTP for transporting the speech packets. If the remote user does not support SRTP, PRASAR UCS will use normal RTP for transporting the speech packets.
- Page 169 • Forced: PRASAR UCS uses only SRTP (SAVP) for transporting the speech packets. If the remote user does not support SRTP, PRASAR UCS will reject incoming calls from and drop outgoing calls made to such users. By default, SRTP Mode is Disabled.
- Page 170 You can create as many as 99 groups numbered from 01 to 99. Enter the number of the Call Pick-Up Group you created for this SIP Extension in this field. Matrix PRASAR UCS System Manual...
- Page 171 If you are using the system in the Hotel Mode, by default Guest is selected as Station Type. You may select the Station Type as Administrator for the Hotel Administrative Staff. To know more refer to the PRASAR UCS Hospitality System Manual. •...
- Page 172 Select a Priority Level for the SIP Extension from 1 to 9. Default; 5-Normal. Each extension of the PRASAR UCS is assigned a Priority Level starting from 1, 2, 3... to 9, with '1' being lowest Priority and '9' being highest Priority. Whenever an extension (phone) with higher priority calls an extension with lower priority, a triple ring is placed on the called extension.
- Page 173 • Click Location 1. • The settings of the phone at Location 1 appear. • Select the Enable Device check box. Default: Disabled. Matrix PRASAR UCS System Manual...
- Page 174 Registrar Server IP Address. • If the SPARSH VP310 is connected in the Global Network and PRASAR UCS is located behind a Router, or behind a NAT Router and STUN is programmed, select Use Router/STUN's IP Address as Registrar Server IP Address.
- Page 175 When you select Scheduled as the DST option, the Real Time Clock of PRASAR UCS is advanced and set backward automatically according to the DST convention of the country/region where the IP Phone is installed. Scheduled DST Adjustment is useful in countries/regions where DST Time is fixed, such as in Europe, USA and Canada, without yearly variations.
- Page 176 Select the Display Language for the SPARSH VP310. Default: English. PRASAR UCS provides language support for English, French, German, Spanish, Portuguese, and Italian on the SPARSH VP310. When you select any of these languages, all the prompts and command strings will appear in the selected language.
- Page 177 DSS Key Settings • You can select the desired key template — Operator, Executive1, Executive2, Executive3, Hotel Attendant, Guest or any other template you added. See “Customizing Extended IP Phone Templates using Jeeves” for more details. Matrix PRASAR UCS System Manual...
- Page 178 Select Personalized as the Key Template option. • Click Key Settings. • The key map of the Extended Phone opens in a new window on your screen. • Click the key you want to configure. For example, CA 1. Matrix PRASAR UCS System Manual...
- Page 179 From the Select Offset drop down list, all the features that can be assigned to keys are listed. • Select Operator from the list of features in the Select Offset box. • Click OK. Matrix PRASAR UCS System Manual...
- Page 180 In the Select Function Type list box, select the option SA Command, as Remote DND is a System Administrator (SA) Command. • In the Select Offset box, select the option Set DND for remote station. Matrix PRASAR UCS System Manual...
- Page 181 You can reinstate default key assignment any time, by clicking the Default button at the bottom of the window. • When you complete assigning functions to keys, close the window. • If you assign/re-assign functions to the following keys, the Phone will restart: • Speaker • Headset • Ringer Acknowledge Matrix PRASAR UCS System Manual...
- Page 182 On expiry of the timer, the phone terminates the call process and gives an error tone to the user. The range of the SIP INVITE TIMER is 10-180 seconds. Default: 30 seconds. Matrix PRASAR UCS System Manual...
- Page 183 When you change any of the parameters listed below in the SIP Extension at Location 1, 2, 3, the phone will restart automatically, if registered: • Use SIP Extension • SIP ID • Authentication ID Matrix PRASAR UCS System Manual...
- Page 184 RTP Ports • NAT Keep Alive • SIP Timers • The SE Password of PRASAR UCS is changed • Specific parameters in VoIP Parameters are changed • Specific parameters in Network Port parameters are changed • You restart the System •...
-
Page 185: Configuring Matrix Sparsh Vp330
Configuring Matrix SPARSH VP330 SPARSH VP330 is the proprietary Extended IP Phone with graphical touch-screen user interface, supplied by Matrix. The feature-rich SIP based phone support most of the features and function, to know the list of features supported, refer to “PRASAR UCS Features Supported in Terminals”. - Page 186 Registrar of the system. It is the number with which you can call the SIP Extension. Any extension user of the PRASAR UCS can call a SIP Extension by dialing the SIP ID assigned to the SIP extension. SIP ID of each SIP Extension must be a unique number string of a maximum of 6 digits.
- Page 187 • Forced: PRASAR UCS uses only SRTP (SAVP) for transporting the speech packets. If the remote user does not support SRTP, PRASAR UCS will reject incoming calls from and drop outgoing calls made to such users. By default, SRTP Mode is Disabled.
- Page 188 There are 50 different templates to choose from. Each template can also be altered to suit your requirement and preferences. Check if the default template fulfills the feature requirements of the SIP Extension by clicking the Station Advanced Feature Template link. Matrix PRASAR UCS System Manual...
- Page 189 You can create as many as 50 groups numbered from 00 to 50. Users who are assigned COSEC Door Group ‘00’ are not a part of any group. Matrix PRASAR UCS System Manual...
- Page 190 Select a Priority Level for the SIP Extension from 1 to 9. Default; 5-Normal. Each extension of the PRASAR UCS is assigned a Priority Level starting from 1, 2, 3... to 9, with '1' being lowest Priority and '9' being highest Priority. Whenever an extension (phone) with higher priority calls an...
- Page 191 SPARSH VP510, SPARSH VP330, Matrix VARTA ADR100 Mobile UC Client, Matrix VARTA AMP100 Mobile UC Client or MATRIX VARTA WIN200 Desktop UC Client — at each location. In this case we assume that SPARSH VP330 is connected at Location 1, 2 and 3.
- Page 192 Enter the Location Name for the phone to identify the phone. Location name may be the place where the phone is located (e.g.: Head office, branch, residence). The Location Name may consist of 18 characters (maximum). Default: Blank. Matrix PRASAR UCS System Manual...
- Page 193 If you want to enable Daylight Saving Time (DST) on the phone, set Apply DST? to either Manual or Scheduled as per your requirement. When you select Scheduled as the DST option, the Real Time Clock of PRASAR UCS is advanced and set backward automatically according to the DST convention of the country/region where the IP Phone is installed.
- Page 194 Zone in “Default Settings”. When you select Manual as the DST option, the Real Time Clock of PRASAR UCS is advanced manually and set backward automatically according to the DST convention of the country/region where the IP Phone is installed.
- Page 195 Select the Display Language for the SPARSH VP330. Default: English. PRASAR UCS provides language support for English, French, German, Spanish, Portuguese, and Italian on the SPARSH VP330. When you select any of these languages, all the prompts and command strings will appear in the selected language.
- Page 196 The Functions to be Performed by the key opens in a new window. • In the Select Function Type list, select the function to be performed by the key. For example, you want to use the key to call the Operator. Matrix PRASAR UCS System Manual...
- Page 197 The Operator function is a Feature, so select the option FEATURE from the Select Function Type list box. From the Select Offset drop down list, all the features that can be assigned to keys are listed. • Select Operator from the list of features in the Select Offset box. Matrix PRASAR UCS System Manual...
- Page 198 To assign direct access to a SIP Trunk, select SIP as Function Type and the desired trunk number from 1 or any other trunk number as Offset. Click OK, each time you select a Function Type and Offset in the dialog box. Matrix PRASAR UCS System Manual...
- Page 199 For secure conversations over SIP, select the Enable SRTP? check box. The SIP messages will be transported over SRTP only. RTP Port • Define RTP Port: SPARSH VP330 supports TLS Version V1.0 only. To configure the TLS version, refer “Advance Options” in Security Settings. Matrix PRASAR UCS System Manual...
- Page 200 SPARSH VP330 Phone at Location 2 and Location 3. When you change any of the parameters listed below in the SIP Extension at Location 1, 2, 3, the phone will go in Auto Configuration mode automatically, if registered: Matrix PRASAR UCS System Manual...
- Page 201 • Emergency Numbers The SIP Extension registered at Location 1, 2, 3, will also restart, if: • The SE Password of PRASAR UCS is changed • Specific parameters in Network Port parameters are changed • Specific parameters in VoIP Parameters are changed •...
-
Page 202: Configuring Matrix Sparsh Vp510
You may select the SIP Extension number you want to configure. The parameters of the SIP Extension number you selected will appear on this page. PRASAR UCS supports only IPv4 Addresses for registering SPARSH VP510. Matrix PRASAR UCS System Manual... - Page 203 Registrar of the system. It is the number with which you can call the SIP Extension. Any extension user of the PRASAR UCS can call a SIP Extension by dialing the SIP ID assigned to the SIP extension. SIP ID of each SIP Extension must be a unique number string of a maximum of 6 digits.
- Page 204 Disable: PRASAR UCS uses normal RTP for transporting the speech packets. • Optional: PRASAR UCS uses SRTP for transporting the speech packets. If the remote user does not support SRTP, PRASAR UCS will use normal RTP for transporting the speech packets.
- Page 205 • Forced: PRASAR UCS uses only SRTP (SAVP) for transporting the speech packets. If the remote user does not support SRTP, PRASAR UCS will reject incoming calls from and drop outgoing calls made to such users. By default, SRTP Mode is Disabled.
- Page 206 You can create as many as 50 groups numbered from 00 to 50. Users who are assigned COSEC Door Group ‘00’ are not a part of any group. Matrix PRASAR UCS System Manual...
- Page 207 Select a Priority Level for the SIP Extension from 1 to 9. Default; 5-Normal. Each extension of the PRASAR UCS is assigned a Priority Level starting from 1, 2, 3... to 9, with '1' being lowest Priority and '9' being highest Priority. Whenever an extension (phone) with higher priority calls an...
- Page 208 If you have connected the Matrix Extended SPARSH VP710 as SIP Extensions, for configuration instructions see “Configuring Matrix Extended SPARSH VP710”. If you have registered Matrix VARTA ADR100 and VARTA AMP100 Mobile UC Clients in any of the locations, refer “Configuring Matrix VARTA ADR100/AMP100 UC Clients”.
- Page 209 • Click Location 1. • The settings of the phone at Location 1 appear. • Select the Enable Device check box. Default: Disabled. Matrix PRASAR UCS System Manual...
- Page 210 If you want to enable Daylight Saving Time (DST) on the phone, set Apply DST? to either Manual or Scheduled as per your requirement. When you select Scheduled as the DST option, the Real Time Clock of PRASAR UCS is advanced and set backward automatically according to the DST convention of the country/region where the IP Phone is installed.
- Page 211 Zone in “Default Settings”. When you select Manual as the DST option, the Real Time Clock of PRASAR UCS is advanced manually and set backward automatically according to the DST convention of the country/region where the IP Phone is installed.
- Page 212 Select the Display Language for the SPARSH VP510. Default: English. PRASAR UCS provides language support for English, French, German, Spanish, Portuguese, and Italian on the SPARSH VP510. When you select any of these languages, all the prompts and command strings will appear in the selected language.
- Page 213 DSS Key Settings • You can select the desired key template — Operator, Executive1, Executive2, Executive3, Hotel Attendant, Guest or any other template you added. See “Customizing Extended IP Phone Templates using Jeeves” for more details. Matrix PRASAR UCS System Manual...
- Page 214 • Click Submit. • Click Key Settings. • The key map of the Extended Phone opens in a new window on your screen. • Click the key you want to configure. For example, CA 1. Matrix PRASAR UCS System Manual...
- Page 215 The Operator function is a Feature, so select the option FEATURE from the Select Function Type list box. From the Select Offset drop down list, all the features that can be assigned to keys are listed. Matrix PRASAR UCS System Manual...
- Page 216 • Select Operator from the list of features in the Select Offset box. • Click OK. Matrix PRASAR UCS System Manual...
- Page 217 In the Select Function Type list box, select the option SA Command, as Remote DND is a System Administrator (SA) Command. • In the Select Offset box, select the option Set DND for remote station. Matrix PRASAR UCS System Manual...
- Page 218 You can reinstate default key assignment any time, by clicking the Default button at the bottom of the window. • When you complete assigning functions to keys, close the window. • If you assign/re-assign functions to the following keys, the Phone will restart: • Speaker Matrix PRASAR UCS System Manual...
- Page 219 Define as Interval (sec), the time period, from 001 to 999 seconds, after which the phone should send Keep Alive message. Default: 120 seconds. The time period you define should be less than the binding timer of the router. Matrix PRASAR UCS System Manual...
- Page 220 IP network. For example, if the debug log of 'Call's is required, you can select this option, and disable all others. • Click Submit to save settings. Matrix PRASAR UCS System Manual...
- Page 221 RTP Ports • NAT Keep Alive • SIP Timers • The SE Password of PRASAR UCS is changed • Specific parameters in VoIP Parameters are changed • Specific parameters in Network Port parameters are changed • You restart the System •...
-
Page 222: Configuring Matrix Extended Sparsh Vp710
You may select the SIP Extension number you want to configure. The parameters of the SIP Extension number you select will appear on this page. Check for availability. PRASAR UCS supports only IPv4 Addresses for registering Extended SPARSH VP710. Matrix PRASAR UCS System Manual... - Page 223 Registrar of the system. It is the number with which you can call the SIP Extension. Any extension user of the PRASAR UCS can call a SIP Extension by dialing the SIP ID assigned to the SIP extension. SIP ID of each SIP Extension must be a unique number string of a maximum of 6 digits.
- Page 224 • Forced: PRASAR UCS uses only SRTP (SAVP) for transporting the speech packets. If the remote user does not support SRTP, PRASAR UCS will reject incoming calls from and drop outgoing calls made to such users. By default, SRTP Mode is Disabled.
- Page 225 There are 50 different templates to choose from. Each template can also be altered to suit your requirement and preferences. Check if the default template fulfills the feature requirements of the SIP Extension by clicking the Station Advanced Feature Template link. Matrix PRASAR UCS System Manual...
- Page 226 You can create as many as 50 groups numbered from 00 to 50. Users who are assigned COSEC Door Group ‘00’ are not a part of any group. See “COSEC Integration” for more information. Click Close to close the window. Matrix PRASAR UCS System Manual...
- Page 227 If you are using the system in the Hotel Mode, by default Guest is selected as Station Type. You may select the Station Type as Administrator for the Hotel Administrative Staff. To know more refer to the PRASAR UCS Hospitality System Manual. •...
- Page 228 Each extension of the PRASAR UCS is assigned a Priority Level starting from 1, 2, 3... to 9, with '1' being lowest Priority and '9' being highest Priority. Whenever an extension (phone) with higher priority calls an extension with lower priority, a triple ring is placed on the called extension. To know more, read the feature description “Priority”.
- Page 229 • Click Location 1. • The settings of the phone at Location 1 appear. Matrix PRASAR UCS System Manual...
- Page 230 PRASAR UCS validates the Extended Phone on the basis of the MAC Address, and provides configuration on validation. As PRASAR UCS allows registration of the SIP Extension from three different locations, it identifies the SIP Extension in each location by the programmed MAC address.
- Page 231 SIP INVITE Timer (sec): This is the time in seconds that the phone waits for a response from the called party after ending INVITE message. This timer starts after sending INVITE message to the called party and stops on receipt of the provisional response or the final response or when the user Matrix PRASAR UCS System Manual...
- Page 232 SIP Timers • Class of Service • Trunk Access Code • The SE Password of PRASAR UCS is changed • Specific parameters in VoIP Parameters are changed • Specific parameters in Network Port parameters are changed • You restart the System •...
-
Page 233: Configuring Matrix Varta Win200 Uc Client
To know the list of featured supported, refer to “PRASAR UCS Features Supported in Terminals”. For detailed product information and operation instructions, refer to the MATRIX VARTA WIN200 User Guide. Configuring MATRIX VARTA WIN200 using Jeeves To be able to register and use the Desktop Client, you must configure the following: •... - Page 234 Registrar of the system. It is the number with which you can call the SIP Extension. Any extension user of the PRASAR UCS can call a SIP Extension by dialing the SIP ID assigned to the SIP extension. SIP ID of each SIP Extension must be a unique number string of a maximum of 6 digits.
- Page 235 By default, the SIP Message Options INVITE and SUBSCRIBE are enabled. The calls that are routed through the system will depend on the number of Vocoder channels available. The channels supported depends on the license purchased. For details refer to “License Management”. Matrix PRASAR UCS System Manual...
- Page 236 • Forced: PRASAR UCS uses only SRTP (SAVP) for transporting the speech packets. If the remote user does not support SRTP, PRASAR UCS will reject incoming calls from and drop outgoing calls made to such users. By default, SRTP Mode is Disabled.
- Page 237 You may edit the parameters. For details, see “Extension Voice Mail Settings”. The Voice Mail Settings link will be visible only if you have configured the respective SIP ID. • Assign the SIP Extension to a Call Pick-up Group, if required. Matrix PRASAR UCS System Manual...
- Page 238 If you are using the system in the Hotel Mode, by default Guest is selected as Station Type. You may select the Station Type as Administrator for the Hotel Administrative Staff. To know more refer to the PRASAR UCS Hospitality System Manual. Matrix PRASAR UCS System Manual...
- Page 239 Select a Priority Level for the SIP Extension from 1 to 9. Default; 5-Normal. Each extension of the PRASAR UCS is assigned a Priority Level starting from 1, 2, 3... to 9, with '1' being lowest Priority and '9' being highest Priority. Whenever an extension (phone) with higher priority calls an extension with lower priority, a triple ring is placed on the called extension.
- Page 240 • Click Location 1. • The settings of the phone at Location 1 appear. • Select the Enable Device check box. Default: Disabled. Matrix PRASAR UCS System Manual...
- Page 241 • In MAC Address enter the Device ID here. Default: blank. PRASAR UCS validates the desktop/PC on which you have installed the UC Client on the basis of the Device ID, and provides configuration on validation. As PRASAR UCS allows registration of the SIP Extension from three different locations, it identifies the SIP Extension in each location by the programmed Device ID.
- Page 242 On expiry of the timer, the client terminates the call Matrix PRASAR UCS System Manual...
- Page 243 SIP Timers • Class of Service • Trunk Access Code • The SE Password of PRASAR UCS is changed • Specific parameters in Network Port parameters are changed • Specific parameters in VoIP Parameters are changed • You restart the System •...
-
Page 244: Configuring Matrix Varta Adr100/Amp100 Uc Clients
MATRIX VARTA ADR100 is a proprietary SIP (Session Initiation Protocol) based UC Client Application running on Android Phones/Tablets, delivering full-array of Matrix PRASAR UCS features to the user on-the-go along with an added advantage of UC features. Through tight integration with the enterprise mobility features of the PRASAR UCS, VARTA ADR100 provides advance call capabilities including Conferencing, Corporate Directory Access (Global Directory), Call Logs and Conversation Recording with one-touch access. - Page 245 MATRIX VARTA AMP100 is a proprietary SIP (Session Initiation Protocol) based UC Client Application running on iPhones, delivering full-array of Matrix PRASAR UCS features to the user on-the-go along with an added advantage of UC features. Through tight integration with the enterprise mobility features of the PRASAR UCS, VARTA AMP100 provides advanced call capabilities including Conferencing, Corporate Directory Access (Global Directory), Call Logs and Conversation Recording with one-touch access.
- Page 246 Registrar of the system. It is the number with which you can call the SIP Extension. Any extension user of the PRASAR UCS can call a SIP Extension by dialing the SIP ID assigned to the SIP extension. SIP ID of each SIP Extension must be a unique number string of a maximum of 6 digits.
- Page 247 The Mail Status will display either sent, failed or sending. The calls that are routed through the system will depend on the number of Vocoder channels available. The channels supported depends on the license purchased. For details refer to “License Management”. Matrix PRASAR UCS System Manual...
- Page 248 • Forced: PRASAR UCS uses only SRTP (SAVP) for transporting the speech packets. If the remote user does not support SRTP, PRASAR UCS will reject incoming calls from and drop outgoing calls made to such users. By default, SRTP Mode is Disabled.
- Page 249 In the Station Advanced Feature Template field, select the number of the template you customized. • Click Submit to save changes. Also see the topic “Station Advanced Feature Template” for instructions on customizing these templates and applying them on the extensions. Matrix PRASAR UCS System Manual...
- Page 250 50. Users who are assigned COSEC Door Group ‘00’ are not a part of any group. Advanced Configuration Parameters • If you want to provide other features like Personal Directory, Priority, or assign a Station Type to the SIP Extension, click the Advanced button at the bottom of the page. Matrix PRASAR UCS System Manual...
- Page 251 Select a Priority Level for the SIP Extension from 1 to 9. Default; 5-Normal. Each extension of the PRASAR UCS is assigned a Priority Level starting from 1, 2, 3... to 9, with '1' being lowest Priority and '9' being highest Priority. Whenever an extension (phone) with higher priority calls an extension with lower priority, a triple ring is placed on the called extension.
- Page 252 If you want to use more than one Matrix UC Clients as a SIP Extension, configure their settings at Location 1, Location 2 and Location 3. If you want to use the IM functionality in the MATRIX VARTA ADR100/AMP100, you must configure it at Location-1 only.
- Page 253 If you are using an iPhone, enter the Device ID here. Default: blank. PRASAR UCS validates the phone/tablet on which you have installed the application on the basis of the IMEI/ESN Number or Device ID, and provides configuration on validation.
- Page 254 External Registrar Server Address. • If the application is connected in the Public Network and PRASAR UCS is located behind a Router, or behind a NAT Router and STUN is programmed, select Use Router/STUN's IP Address as External Registrar Server Address.
- Page 255 001 100 001 110 010 000 010 010 010 100 010 110 011 000 011 010 011 100 011 110 100 000 100 010 100 100 100 110 101 000 101 110 110 000 111 000 Matrix PRASAR UCS System Manual...
- Page 256 Authentication ID • Authentication Password • Internal Registrar Server Address • External Registrar Server Address • MAC Address/IMEI/ESN Number • Enable Matrix Extended Phone Mode • Extended Phone Type • Transport Mode • Enable SRTP Matrix PRASAR UCS System Manual...
- Page 257 SIP Timers • Class of Service • Trunk Access Code • The SE Password of PRASAR UCS is changed • Specific parameters in Network Port parameters are changed • Specific parameters in VoIP Parameters are changed • You restart the System •...
- Page 258 • Contact 2 - same as above. • Contact 3 - same as above. You can also view the SIP Extension Status from the Status link. To view, click the SIP Extension link under Status. Matrix PRASAR UCS System Manual...
-
Page 259: Configuring Sip Extensions Using Bulk Configuration
So, to overcome this concern of the organizations, PRASAR UCS supports Bulk configuration. Bulk configuration allows you to configure a large number of SIP Extensions by simply uploading a CSV File in the Server. - Page 260 5002, 5003..for other extensions. Enter the total number of extensions you want to configure. Total Extensions For example: You want to configure 100 extensions, then enter 100 as the Total Extensions. Matrix PRASAR UCS System Manual...
- Page 261 If a different set of features are to be allowed to the extensions, then prepare another template and enter that template number in this field. To know how to customize the template, refer to “Station Basic Feature Template”. Matrix PRASAR UCS System Manual...
- Page 262 To know more about the feature, refer to “Priority”. You can connect/ register three Matrix Extended IP Phones / UC clients/ Standard SIP Phones at three different location as a single SIP extension. You can register the same or different types of Extended IP Phones/ UC clients/ Standard SIP Phones —...
- Page 263 If extensions are connected on the LAN network, select Use LAN Port IP Address as the Registrar Server IP Address. If extensions are connected in the Global Network and PRASAR UCS is Registrar Server Address located behind a Router, or behind a NAT Router and STUN is configured, select Use Router/STUN's IP Address as the Registrar Server IP Address.
- Page 264 If you want the UC clients to register using the WAN network, select Use WAN Port IP Address as the External Registrar Server Address. If the UC clients is connected in the Public Network and PRASAR UCS External Registrar Server...
- Page 265 Similarly you can configure Location Name and MAC Address / Device ID in location 2 and location 3, if required. You can also modify the CSV File by editing or deleting the values of the parameters as per your requirement. Matrix PRASAR UCS System Manual...
- Page 266 Click the Save CSV File button present at the top of the CSV File. • The CSV File with the name format CSV-Exported-File-DD-Mmm-YYYY HH-MM-SS, where DD-Mmm- YYYY signifies the current date and HH-MM-SS signifies the current time, will be exported on your desktop. Matrix PRASAR UCS System Manual...
- Page 267 Click the Browse button to select the CSV File from the local disk on the computer. • After selecting the required CSV File, click Open. The system displays the name of the CSV File. • Click Submit to upload the CSV File. Matrix PRASAR UCS System Manual...
- Page 268 Copy button present at the bottom of the SIP Extension Settings page. For an instance, you can configure the parameters like DSS Key Settings, Quality of Service (QoS) for an extension and copy the configuration of this extension to other extensions. To do so, Matrix PRASAR UCS System Manual...
- Page 269 Select All. • Click Next. The Select Extensions window opens. • The number and/or name of the current extension is displayed in Copy from. Matrix PRASAR UCS System Manual...
- Page 270 To select all the extensions from the List, • Click << button. All the extensions will appear on the left side box. • Click Submit. The settings of the current extension is copied to all the selected extensions. Matrix PRASAR UCS System Manual...
-
Page 271: Auto Sign-In Parameters
The information you configure in Auto Sign-In Parameters will be sent in the mail to the Mobile Client user, when you click the Send Auto Sign-In Configuration Mail button. • Log into Jeeves as System Engineer. • Under Configuration, click VoIP Configuration. Matrix PRASAR UCS System Manual... - Page 272 If you want the application to register using the WAN network, select Use WAN Port IP Address as External Server Address. • If the application is connected in the Public Network and PRASAR UCS is located behind a Router, or behind a NAT Router and STUN is programmed, select Use Router/STUN's IP Address as External Server Address.
- Page 273 If you select Don’t Send in both Internal as well as External Server Address, the server will send the Auto Sign-In mail but the VARTA Mobile Clients will not get registered. Make sure that the SMTP settings are configured correctly.For more information, refer “SMTP Settings”. Matrix PRASAR UCS System Manual...
-
Page 274: Varta License Management
Total Used Licenses: This displays the total number of VARTA users registered as SIP extensions. VARTA License Assignment After registering and configuring MATRIX VARTA WIN200/VARTA ADR100/VARTA AMP100 as a SIP Extension, you must select the desired license in the Assigned License field below. You can also filter the SIP Extensions as per the license assigned. - Page 275 Assigned License: Select the license you wish to assign to the SIP Extension and click Submit. • Location 1, 2, 3: This displays the Device Type selected on the SIP Extension Location 1, 2 and 3. Matrix PRASAR UCS System Manual...
-
Page 276: Configuring Standard Sip Phones
For detailed product information and operational instructions, refer to the product documentation supplied with the Standard SIP Phone/device. PRASAR UCS supports two separate methods of Provisioning the Standard SIP Phones. These two methods are: • Manual Provisioning: In Manual Provisioning, the user must configure the required parameters of the Standard SIP Phone manually. - Page 277 Enter the SIP ID for the extension. The SIP ID is necessary for registering the SIP Extension with the Registrar of the system. It is the number with which you can call the SIP Extension. Any extension user of PRASAR UCS SME Application supports 250 SIP Extensions. Matrix PRASAR UCS System Manual...
- Page 278 Generate to automatically generate a unique password. This password will be used by the system to authenticate the Standard SIP Phone connected to the system. PRASAR UCS validates the Standard SIP Phone on the basis of the SIP ID and HTTP Authentication Password (Third Party IP-Phone) and provides configuration on validation.
- Page 279 “License Management”. PRASAR UCS allows you to register SIP Extension with the same SIP ID at three different locations. Busy Lamp Field (BLF), a typical feature supported by the system and Key Telephone Systems, is also supported on SIP Exten- sions.
- Page 280 When extension's state is changed from Ringing (early state as defined in BLF) to Mature (confirm state, as defined in BLF) state, because of implementation of PRASAR UCS, it will send 'Terminate' state while moving from ringing to mature state. The interpretation of terminate message will vary from terminal to terminal.
- Page 281 In the Station Advanced Feature Template field, select the number of the template you customized. • Click Submit. Also see the topic “Station Advanced Feature Template” for instructions on customizing these templates and applying them on the extensions. Matrix PRASAR UCS System Manual...
- Page 282 If you want to provide other features like Personal Directory, Priority, or assign a Station Type to the SIP Extension, click the Advanced button at the bottom of the page. • Enter the Mobile Number of the extension user you wish to store. The Number can be a maximum of 16 digits. Matrix PRASAR UCS System Manual...
- Page 283 Select a Priority Level for the SIP Extension from 1 to 9. Default; 5-Normal. Each extension of the PRASAR UCS is assigned a Priority Level starting from 1, 2, 3... to 9, with '1' being lowest Priority and '9' being highest Priority. Whenever an extension (phone) with higher priority calls an extension with lower priority, a triple ring is placed on the called extension.
- Page 284 Htek 802 • Any Standard SIP Phone Connecting the Standard SIP Phone To be able to configure and register the Standard SIP Phone with PRASAR UCS using Auto Provisioning, • Connect and reboot the Standard SIP Phone. • Make sure that DHCP is selected as the Connection Type in the Standard SIP Phone.
- Page 285 Default: Blank. Panasonic Address UTG200B PRASAR UCS validates the phone on the basis of the MAC Address and provides configuration on validation. Select the Authenticate HTTP Provisioning request check box to authenticate HTTP request for security reason.
- Page 286 General Parameters”. If the Standard SIP phone is in the same network (LAN) as PRASAR UCS, select Use LAN Port IP Address as Registrar Server Address. If the Standard SIP phone is in the Global Network and PRASAR UCS is connected to Internet over WAN, select Use WAN Port IP Address as Registrar Server Address.
- Page 287 • Configure the SIP Extension Settings in PRASAR UCS. For details, see “Configuring SIP Extension Settings using Jeeves” • Configure the device specific settings applicable to your Grandstream at any one of the Location1, 2 or 3 on the SIP Extensions page. To do so, •...
- Page 288 Server Address 3. Grandstream GXP21xx/116x/14xx the Standard SIP Phone with the SIP Registrar of 4. Grandstream GXV3140/3175 PRASAR UCS. Default: Use WAN Port IP Address. 1. Grandstream GXP110x Standard SIP Select the desired Standard SIP Authorization 2. Grandstream GXP2200 Authorization Profile from the list of profiles.
- Page 289 If the Standard SIP phone is in the same network (LAN) as PRASAR UCS, select Use LAN Port IP Address as Registrar Server Address. If the Standard SIP phone is in the Global Network and PRASAR UCS is connected to Internet over WAN, select Use WAN Port IP Address as Registrar Server Address.
- Page 290 Enter the MAC Address of the Yealink phone to be connected at this location. Default: Blank. 1. Yealink SIP-T19P/SIP- T21P/T22P/T26P/T28P/T4X MAC Address PRASAR UCS validates the phone on the 2. Yealink SIP-T20P basis of the MAC Address, and provides 3. Yealink SIP-T3XG configuration on validation.
- Page 291 DST by Date 2. Yealink SIP-T20P corresponding list boxes respectively. 3. Yealink SIP-T3XG 1. Yealink SIP-T19P/SIP- Offset Configure the DST Offset timer value in T21P/T22P/T26P/T28P/T4X (minutes) minutes. Valid Range:-300 to +300. 2. Yealink SIP-T20P 3. Yealink SIP-T3XG Matrix PRASAR UCS System Manual...
- Page 292 1. Yealink SIP-T19P/SIP- Time of the Standard SIP Phone. Default: T21P/T22P/T26P/T28P/T4X None. Make sure you configure the desired 2. Yealink SIP-T20P NTP Server Address/es in the “Third Party IP- 3. Yealink SIP-T3XG Phone General Parameters”. Matrix PRASAR UCS System Manual...
- Page 293 If the Standard SIP phone is in the same network (LAN) as PRASAR UCS, select Use LAN Port IP Address as Registrar Server Address. If the Standard SIP phone is in the Global Network and PRASAR UCS is connected to Internet over WAN, select Use WAN Port IP Address as Registrar Server Address.
- Page 294 Enter the MAC Address of the Cisco phone to be connected at this location. Default: Blank. 1. Cisco SPA50xG/51xG SIP Phone MAC Address PRASAR UCS validates the phone on the 2. Cisco SPA525G SIP basis of the MAC Address, and provides Phone configuration on validation.
- Page 295 Select the Month when DST should end. Month 2. Cisco SPA525G SIP Phone 1. Cisco SPA50xG/51xG Select the Day of Week when DST should SIP Phone DST Stop end. 2. Cisco SPA525G SIP Day of Week Phone Matrix PRASAR UCS System Manual...
- Page 296 Phone Phone General Parameters”. If the Standard SIP phone is in the same network (LAN) as PRASAR UCS, select Use LAN Port IP Address as Registrar Server Address. If the Standard SIP phone is in the Global Network and PRASAR UCS is connected to Internet over WAN,...
- Page 297 “Using any third party DHCP Server in your LAN”. • Configure the SIP Extension Settings in PRASAR UCS. For details, see “Configuring SIP Extension Settings using Jeeves” • Configure the device specific settings applicable to your Polycom at any one of the Location1, 2 or 3 on the SIP Extensions page.
- Page 298 Server Polycom IP Phone scenario to register the Standard SIP Phone Address with the SIP Registrar of PRASAR UCS. Default: Use WAN Port IP Address Standard SIP Select the desired Standard SIP Authorization Authorization Profile from the list of the profiles. Default:...
- Page 299 Phone General Parameters”. If the Standard SIP phone is in the same network (LAN) as PRASAR UCS, select Use LAN Port IP Address as Registrar Server Address. If the Standard SIP phone is in the Global Network and PRASAR UCS is connected to Internet over WAN,...
- Page 300 “Using any third party DHCP Server in your LAN”. • Configure the SIP Extension Settings in PRASAR UCS. For details, see “Configuring SIP Extension Settings using Jeeves” • Configure the device specific settings applicable to your Snom at any one of the Location1, 2 or 3 on the SIP Extensions page.
- Page 301 Authenticate option. HTTP Snom IP Phone Provisioning PRASAR UCS validates the Standard SIP Phone on request the basis of the SIP ID and HTTP Authentication Password and provides configuration on validation. Make sure, you have configured SIP ID as HTTP User Name and HTTP Authentication Password as HTTP Password in the Standard SIP Phone.
- Page 302 “Third Party IP-Phone General Parameters”. If the phone is in the same network (LAN) as PRASAR UCS, select Use LAN Port IP Address as Registrar Server Address. If the phone is in the Global Network and PRASAR UCS is connected to Internet over WAN, select Use WAN...
- Page 303 • Configure the device specific settings applicable to your Matrix SPARSH VP110 at any one of the Location1, 2 or 3 on the SIP Extensions page. To do so, • Under Configuration, click VoIP Configuration. • Click SIP Extension Settings link.
- Page 304 Server Matrix SPARSH VP110 scenario to register the Standard SIP Phone Address with the SIP Registrar of PRASAR UCS. Default: Use WAN Port IP Address. Standard SIP Select the desired Standard SIP Authorization Authorization Profile from the list of profiles. Default:...
- Page 305 Select the type of contacts (Extension or/and Global Directory Contacts) the phone must download from the PRASAR UCS. Local Phone Matrix SPARSH VP110 These will be stored in the phone’s Local Book Phone Book. Default: Do not send Select the type of contacts (Extension or/and Global Directory Contacts) the phone must download from PRASAR UCS.
- Page 306 DST Stop Day of Select the DST Stop Day of Week Last in Matrix SPARSH VP110 Week Last Month. in Month End Hour of Select the DST End Hour of the Day. Matrix SPARSH VP110 Matrix PRASAR UCS System Manual...
- Page 307 Phone General Parameters”. If the Standard SIP phone is in the same network (LAN) as PRASAR UCS, select Use LAN Port IP Address as Registrar Server Address. If the Standard SIP phone is in the Global Network and PRASAR UCS is connected to Internet over WAN,...
- Page 308 “Using any third party DHCP Server in your LAN”. • Configure the SIP Extension Settings in PRASAR UCS. For details, see “Configuring SIP Extension Settings using Jeeves”. • Configure the device specific settings applicable to the Standard SIP at any one of the Location 1, 2 or 3 on the SIP Extensions page.
- Page 309 If the phone is in the same network (LAN) as PRASAR UCS, select Use LAN Port IP Address as Registrar Server Address. If the phone is in the Global Network and PRASAR UCS is connected to Internet over WAN, select Use WAN Port IP Address as Registrar Server Address If the phone is connected in the Global Network and PRASAR UCS is located behind a NAT Router, and STUN is programmed, select Use Router/STUN's IP Address as Registrar Server Address.
- Page 310 “Configuring SIP Extension Settings using Jeeves” • Configure the device specific settings applicable to your Matrix SPARSH VP710 at any one of the Location1, 2 or 3 on the SIP Extensions page. To do so, • Under Configuration, click VoIP Configuration.
- Page 311 Server Matrix SPARSH VP710 scenario to register the Standard SIP Phone Address with the SIP Registrar of PRASAR UCS. Default: Use WAN Port IP Address. Standard SIP Select the desired Standard SIP Authorization Authorization Profile from the list of profiles. Default:...
- Page 312 Default: 443 Select the type of contacts (Extension or/and Global Directory Contacts) the phone must Local Phone download from the PRASAR UCS. Matrix SPARSH VP710 Book These will be stored in the phone’s Local Phone Book. Default: Do not send Enable this check box if you want to allow usage of Personal Directory.
- Page 313 Select the Day when DST should end. Matrix SPARSH VP710 End Hour Select the Hour when DST should end. Matrix SPARSH VP710 Configure the DST Offset timer value in Offset minutes. Valid Range:-300 to +300. Default: Matrix SPARSH VP710 (minutes) Blank Matrix PRASAR UCS System Manual...
- Page 314 Phone General Parameters”. If the Standard SIP phone is in the same network (LAN) as PRASAR UCS, select Use LAN Port IP Address as Registrar Server Address. If the Standard SIP phone is in the Global Network and PRASAR UCS is connected to Internet over WAN,...
- Page 315 If you want to apply the rules of the Dial Plan configured in PRASAR UCS, see “Dial Plan for SIP Extension”. You can also configure rules for the Dial Plan from each phone. To do so, refer to the SPARSH VP710 User Guide.
- Page 316 If you select the Device Type as Any Standard SIP, then you are recommended to configure the Standard SIP Authorization Profile to prevent any unauthorized access and misuse of the system. Matrix PRASAR UCS System Manual...
-
Page 317: Standard Sip Authorization Profile
Configuring Standard SIP Authorization Profile using Jeeves • Login as System Engineer. • Under Configuration, click VoIP Configuration. • Click Standard SIP Authorization Profile. The list of default profiles supported by the system is displayed. Matrix PRASAR UCS System Manual... - Page 318 MAC. This parameter is applicable only if you have selected the option Custom Header in Fetch MAC Address From. • Click Submit. Similarly, you can configure the Standard SIP Authorization Profile of any Standard SIP Phone. Matrix PRASAR UCS System Manual...
- Page 319 • Click and enter the details as per your requirement. • Click Submit. The newly added Profile will get updated in the list. To delete a Profile, • Select the corresponding check box and click Matrix PRASAR UCS System Manual...
-
Page 320: Third Party Ip-Phone General Parameters
Click Third Party IP-Phone General Parameters. The Third Party IP-Phone General Parameters page opens. Primary NTP Server for all Third Party IP-Phones and Matrix SPARSH VP110/VP710 • Under NTP Server Address, configure the Primary NTP Server Address with which you want to synchronize the Date and Time of the Standard SIP Phones. - Page 321 Web user. Default: Blank. You may configure maximum 5 different Paths. • Click Submit. The Server Addresses/Path you configure on this page will appear in the Combo box of the respective parameter on the SIP Extension page. Matrix PRASAR UCS System Manual...
-
Page 322: Device Management
Device Management PRASAR UCS supports Auto Detection and Auto Provisioning of third party IP Phones as well as Extended Clients. Device Management is a touch-free, plug and play feature and is an ideal solution for a large deployment of phones. To use this feature you must plug all the IP phones in same network (recommended) and also make sure that these phones are registered as SIP Extensions at Location 1 only. - Page 323 Extension with the Registrar of the system. It is the number with which you can call the SIP Extension. Any extension user of the PRASAR UCS can call a SIP Extension by dialing the SIP ID assigned to the SIP extension. SIP ID of each SIP Extension must be a unique number string of a maximum of 6 digits.
- Page 324 • Registrar Server Address: Select the appropriate Registrar Server Address to register the device with the SIP Registrar of PRASAR UCS, according to your installation scenario. • Click Submit. The window closes and the details are displays on the Device Management page.
-
Page 325: Black List Ip Address - Sip Extensions
(SNMP)”. If you want to allow access of PRASAR UCS to such black listed IP Address, you must remove it from the Black List IP Address - SIP Extensions table. If this IP Address is a Trusted IP Address, you can configure it in the Trusted IP Address/es table to avoid further black listing. - Page 326 • Click the Clear Selected button. The selected entries will be removed from the table. • Click Clear All button to clear all the entries stored in the table. Matrix PRASAR UCS System Manual...
-
Page 327: Dss Keys Programming
The DSS (Direct Station Selection) Keys when personalized, provides you quick access to Stations, Trunks, Features/Functions of the PRASAR UCS. A few DSS Keys are provided on the phone itself. The number of DSS Keys provided on the phone depends on the type of phone. For details, “Extended IP Phone/VARTA UC Client -... - Page 328 The keys in the Key Templates are numbered only for the purpose of locating the keys when programming. Key numbers do not appear on the key labels on the phone body. Default Key Maps SPARSH VP248 Key Template (default) SPARSH VP310 Key Template (default) Matrix PRASAR UCS System Manual...
- Page 329 SPARSH VP330 Key Template (default) The default Key Template is same for the Operator, Executive, Hotel Attendant and Guest. SPARSH VP510 Key Template (default) Matrix PRASAR UCS System Manual...
- Page 330 Key Templates. For example, if you have assigned a common Executive Key Template to 12 IP Phones, but you want to reassign some of the keys on two of these IP Phones, PRASAR UCS allows you to selectively personalize the key maps of these two IP Phones.
- Page 331 Click Key Template to select the desired key template — Operator, Executive1, Executive2, Executive3, Hotel Attendant and Guests — you want to customize. Let us attempt to configure the sample Operator template for VP248. Click VP248 to open the page. Select Operator as the Key Template. Matrix PRASAR UCS System Manual...
- Page 332 All features that can be assigned to keys will appear in the Select Offset list. • In the Select Offset list, click Hotline. • Click on OK in the dialog box. The box will close. Matrix PRASAR UCS System Manual...
- Page 333 • The Hotline feature will appear on the key label. • To assign direct access to SIP Trunk 1, click CA 2 key. Matrix PRASAR UCS System Manual...
- Page 334 When you have completed assigning functions to keys, click submit to save the settings. Similarly, you can customize the other templates — Executive, Hotel Attendant, Guest. To customize the templates for other phone models, follow the instructions as given above. Matrix PRASAR UCS System Manual...
- Page 335 There are separate links for each model of IP Phone. Click the desired phone model.The respective phone model is displayed. • Click Add Template. The Add Template window opens. • Assign a name to the template. This template appears as one of the Key Template options. Matrix PRASAR UCS System Manual...
- Page 336 To delete the template, click Remove Template. If you are customizing the key maps of SPARSH VP110, you can customize the following keys only — History, Directory, DND, Menu, Up, Down, Right, Left, OK, Mute, Transfer. Matrix PRASAR UCS System Manual...
- Page 337 Select the desired SIP Extension Number, click the desired Location 1 or 2 or 3. • On the Location Page make sure you have selected SPARSH VP510 as the Device Type. Scroll to DSS Key Settings. Matrix PRASAR UCS System Manual...
- Page 338 • By default None is assigned to all the DSS keys, you can now personalize the DSS Key map as per your requirement. • Click the key on which you want to assign a feature/function. Matrix PRASAR UCS System Manual...
- Page 339 Consoles whose keys you wish to swap and then click Interchange DSS Keys. • If you wish to remove a DSS Console, click Remove DSS. • Click ADD DSS again to add another Console. • To view the status of all the DSS Consoles, click “DSS Status”. Matrix PRASAR UCS System Manual...
- Page 340 Device Type displays SPARSH VP510, to which the DSS Console is connected. • DSS532 displays the status of the console, that is Assigned or Connected. • DSS Key Settings provides the link to Key Settings. Click this link if you wish to configure the DSS Keys. Matrix PRASAR UCS System Manual...
-
Page 341: Configuring 'Operator
Define the Time Table to be followed for the Operator selection. The Time Table may be the same as the Time Tables assigned to trunks and extensions of the PRASAR UCS or may be configured to match with the timings of the persons who work as Operators. For example if Operators in the Enterprise are working in shifts, the Time Table can be configured to match their timings. - Page 342 Select the When member rejects the call, place the call again check box, if you want the system to place the call again on the extension. • To configure Members in the Group, Matrix PRASAR UCS System Manual...
- Page 343 This parameter is not relevant, if there is only one member extension in a routing group. • Click Submit. • Repeat the same steps to configure another Routing Group. If you have finished configuring Routing Groups for Operator, configure the Time Table for Operator. Matrix PRASAR UCS System Manual...
- Page 344 If you want to assign different Time Tables to different Operators, repeat the above steps to prepare the other Time Tables. If you have completed configuring the Time Table, • Under Configuration, click Operators to open the page. Matrix PRASAR UCS System Manual...
- Page 345 Operator (1-20) in the “Station Basic Feature Template” applied on these extensions. Similarly, you may assign the 'Operator' groups you have configured to the trunks in the “Trunk Feature Template” applied on these Trunks. Matrix PRASAR UCS System Manual...
-
Page 346: Extension Search
Software Ports not assigned Extension Numbers: If you select this option, select the type of extension— Department Group, SIP Extension, Virtual Extension —for which software ports are not assigned any extension numbers. • Click Search. The search result appears on the screen. Matrix PRASAR UCS System Manual... -
Page 347: Configuring Voip Parameters
SIP messages on the WAN IP address and LAN IP address. But if domain is not programmed, the system will listen for SIP messages only on the WAN IP Address and LAN IP address. Matrix PRASAR UCS System Manual... - Page 348 RTP Mode • Click RTP Mode to expand. • RTP Mode: Select the desired RTP mode using which you want PRASAR UCS to route speech in SIP to SIP calls. You can select from the following: • Transcoding: When this option is selected, RTP packets will be routed using Vocoder channels SIP to SIP calls.
- Page 349 Use 100rel: Select this check box, if you want to support reliable transmission of (SIP) provisional responses and if you want the Vocoder module to use 100rel for reliable transmission of SIP provisional responses and to use PRACK (Provisional Acknowledgment). Default: Disabled. Matrix PRASAR UCS System Manual...
- Page 350 Click SIP/RTP Ports to expand. • SIP UDP Port: This port defines the port on which PRASAR UCS listens for SIP messages transported over UDP. This port is also used as the source port for sending SIP messages to the remote peer. The valid range for this port is 1025-65535.
- Page 351 On expiry of the timer, the call process is terminated by the PRASAR UCS and an error tone is played to the user. The range of the SIP Invite Timer is 010-180 seconds. Default: 30 seconds.
- Page 352 Make sure the PBX connected on both the ends is Matrix. Only then the Check User-Agent for routing call parameter will be applicable. Matrix PRASAR UCS System Manual...
-
Page 353: Configuring Trunks
Template, you can configure SIP Trunks and Extensions to have the same set of features at one go. PRASAR UCS offers 32 SIP Hardware Templates, which can be customized as per the requirement and applied on SIP Trunks and Extensions. - Page 354 Vocoders Preference 1 to 7: You can set 7 Vocoder options in the order of preference for a SIP trunk. The Vocoders supported by the system of the PRASAR UCS in the order of preference, from 1st to 7th, by default are: G.723, G.729AB, GSM FR, iLBC - 30 ms, iLBC - 20 ms, G.
- Page 355 DTMF Type: This parameter will determine how the DTMF digits will be sent over the IP Network, when a DTMF digit is pressed. The PRASAR UCS supports three DTMF options: i) RTP (RFC 2833), ii) SIP Info, and iii) In-Band. You may select the appropriate option. By default, RTP (RFC 2833) is selected.
- Page 356 Click Jitter Buffer to expand. • Type: PRASAR UCS supports two types of Jitter Buffer: Static and Dynamic. Static Jitter Buffer's internal delay is static, whereas, the Dynamic Jitter Buffer's internal delay adapts itself to the jitter in the network.
- Page 357 If you select 'Pass through' as Fax type, you must disable 'Silence Suppression'. • If the fax sent using T.38 is rejected, PRASAR UCS will use Pass Through for sending the Fax. • FAX is not supported when Transcoding is set as the RTP Mode.
- Page 358 Click Others to expand. Enter the number of the Template you customized, 02, in SIP Hardware Template of each of these SIP Trunks. • Click Submit to save your template. To apply the customized template on SIP Extensions, Matrix PRASAR UCS System Manual...
-
Page 359: Trunk Feature Template
Repeat the same steps to customize another template and apply it on the SIP Trunks and Extensions. Trunk Feature Template The Trunk Feature Template is a set of general features that define the behavior of a Trunk port. PRASAR UCS offers 50 such Templates. - Page 360 Trunks may be assigned to a single Operator, or different groups of Trunks may be assigned to different Operators, so that call management is more efficient. For instance certain Trunks may be assigned to Operator 1, while some may be assigned to Operator 2 and the rest to Operator 3. Matrix PRASAR UCS System Manual...
- Page 361 “Delayed Auto Attendant” on the trunk. When you enable Delay Auto Attendance, PRASAR UCS routes the incoming call on the trunk to the Trunk Landing Group assigned to this trunk. It waits for the duration of the Auto Attendant Delay Time for any of the extensions in the Trunk Landing Group to answer the call.
- Page 362 CLI Auth.-One call: Select this option if you want to enable DISA session with CLI Authentication, and allow only a single call to be made during the DISA login session. This form of DISA is used when PRASAR UCS is installed in a Gateway application. By default, DISA is disabled for all Time Zones.
- Page 363 Call Cost Calculation PRASAR UCS can calculate the cost in amount for the external calls made by the extension users. You need to configure the following parameters: • Click Call Cost Calculation to expand. • Call Cost Calculation Pulse Rate Option: This parameter is to be configured only if you want to apply “Call Cost Calculation (CCC)”...
- Page 364 Apply Call Taping: By default, this check box is selected, Call Taping will be allowed.Clear the check box to disable. To know more refer “Call Taping”. • Priority: Select a Priority Level for the trunks on which the template will be applied. Matrix PRASAR UCS System Manual...
- Page 365 Each trunk of the PRASAR UCS can be assigned a Priority Level starting from 1, 2, 3... to 9, with '1' being lowest Priority and '9' being highest Priority. Whenever there are incoming calls on multiple trunks, the call on the trunk with higher priority will be answered by the Operator extension first.
- Page 366 To apply the template on SIP Trunks, • Under VoIP Configuration, click SIP Trunk Parameters. • Select the desired SIP Trunk number to which this Template you customized is to be assigned, for instance SIP Trunk No.1. Matrix PRASAR UCS System Manual...
- Page 367 • Click Submit to save changes. • Repeat the same steps to create another template and apply it on the desired SIP Trunk. • Remember to click Submit to save your settings on each page. Matrix PRASAR UCS System Manual...
-
Page 368: Configuring Sip Trunks
Outbound Proxy Server Address and Port as provided by your ITSP. The maximum number of SIP trunks supported by PRASAR UCS is 99. If you have installed a single NX DBM VOCODER64 module, you can configure all SIP trunks on the same module. - Page 369 Blank. • Registrar Server Port: Enter the Registrar Server Listening Port. The valid range is from 1025 to 65535. By default, 5060 is set as the Listening Port of the Registrar Server. Matrix PRASAR UCS System Manual...
- Page 370 SIP ID configured on the SIP Trunk. If you do not want PRASAR UCS to check the SIP ID received in the Request URI of the INVITE message, clear the Check SIP ID During Incoming Call check box.
- Page 371 Server Port is 5060. Trusted IP Address/es • You must configure IP Address table to allow incoming calls from specific IP addresses on this SIP Trunk. Both IPv4 and IPv6 addresses are supported. Matrix PRASAR UCS System Manual...
- Page 372 Enter the IP Address and the corresponding Port from which you want to allow incoming calls. Do not configure the port, if you want to allow incoming calls from all the ports for a particular IP Address. • Click Submit. Matrix PRASAR UCS System Manual...
- Page 373 When only number is received in the “To:” field or the Request URI (configurable, default: Request URI) of the INVITE message, PRASAR UCS will check the number in the Closed User Group Table. If a match is found in the CUG table the call will be routed as per the corresponding Outgoing Trunk Bundle Group.
- Page 374 Station Basic Feature Templates to choose from. Each template can also be altered to suit your requirement and preferences. Default: Station Basic Feature Template number 01 assigned to all SIP trunks. To comply with the Indian Government Laws and Regulation, this parameter is not applicable for India Region. Matrix PRASAR UCS System Manual...
- Page 375 You may select this option if you wish to send any of your trunk line numbers as CLI on the SIP Trunk so as to enable the called party to call back the calling party using this CLI. Matrix PRASAR UCS System Manual...
- Page 376 FROM field’ option, the system will send the number of the caller as CLI. • Send Called Party Number In: PRASAR UCS provides you the option to Send Called Party Number in “To” or “Request URI” field. You may select — “To, Request URI”, “To”, “Request URI”. Default: To, Request URI.
- Page 377 Use WAN Port IP Address: Select this option, if the WAN Port is connected directly to the public Internet. • Use LAN Port IP Address: Select this option, if the LAN Port is connected within the LAN network. Matrix PRASAR UCS System Manual...
- Page 378 Disable: PRASAR UCS uses normal RTP for transporting the speech packets. • Optional: PRASAR UCS uses SRTP for transporting the speech packets. If the remote user does not support SRTP, PRASAR UCS will use normal RTP for transporting the speech packets.
- Page 379 • A/AAAA Record: Select this option, if you want PRASAR UCS to send the query to the DNS Server to fetch the IP Address of the Target Server on which further SIP messages are to be sent.
- Page 380 With this option enabled the Operator will be able to handle calls more efficiently. When there is an incoming call, PRASAR UCS matches the number with the numbers in the Global Directory. If a match is found PRASAR UCS displays the company name configured for that entry to the Operator, that is, the CLI will display the called party number and name.
- Page 381 If you select Self, the system will send SIP Trunks' Identity and if you select Received the system will send the received CLI to the target. Call Budget Call Budget: If you want to enable Call Budget on Trunk feature on this SIP trunk, configure the following parameters: Matrix PRASAR UCS System Manual...
- Page 382 Call Back Mode: Select from the following options how a ‘Call Back’ call answered by the remote party should be routed: • PIN Authentication - Multiple Calls • CLI Authentication - Multiple Calls • CLI Authentication - Single Call • Operator By default, Operator is selected as the Call Back Mode. Matrix PRASAR UCS System Manual...
- Page 383 By default, OGTBG 01 is assigned to all SIP trunks. If you want the system to select the lowest cost trunk for making the call back, enable Least Cost Routing on the OGTBG that you define here for Call Back. Matrix PRASAR UCS System Manual...
- Page 384 051 to 255 milliseconds. By default, ON Time is defined as 102 msec. • DTMF Inter Digit Pause (ms): This is the time for which the PRASAR UCS will wait before dialing the successive digits. •...
- Page 385 DTMF String: Program the DTMF digits to be sent to signal call maturity to the source port. The default template is applied on all SIP trunks supported by PRASAR UCS. Changes to the default template will be applied on all trunks also. So, you are advised to prepare a new template and apply it to the desired trunks.
- Page 386 Reset Consumed Budget (this is not a status indicator. It is for resetting the Consumed Call Budget manually) You can also view the SIP Trunk Status from the Status link. To view, click the SIP Trunk link under Status. Matrix PRASAR UCS System Manual...
-
Page 387: Configuring Lcr
When a call is made from an extension of the PRASAR UCS, LCR recognizes where the call is going. Depending upon how the LCR is programmed, the system routes the call through the assigned trunks. - Page 388 'Service Provider-based LCR table', and routes the call according to the trunk programmed for that number. PRASAR UCS also supports LCR based on Carrier Pre-Selection. This type of LCR is useful where there exist different service providers for local and long distance calls. Refer the topic “Least Cost Routing-...
- Page 389 SIP-001, that is, 01 as Preference 1, 2, 3, and 4. When calls are made during this time period, they will be routed through SIP-001 only. • If you have finished defining Time Zones and the preferred trunks for the time zones, configure the Time- based LCR using Jeeves. Matrix PRASAR UCS System Manual...
- Page 390 For example, you want all numbers starting with the number '9', which is prefixed with a '0' when making long distance calls, so enter '9' and '09' as the number strings. For '9' as well as '09', select the SIP trunks through which the calls should be made in order of preference. Matrix PRASAR UCS System Manual...
- Page 391 • Login as System Engineer. • Under Configuration, click Least Cost Routing (LCR). • Click Number-based. • Enter the values of the Number-based LCR you prepared on the sheet of paper in the appropriate fields. Matrix PRASAR UCS System Manual...
- Page 392 Characters”) in this field. Valid characters: 0 to 9, *, #, X, T, Comma [,], Hyphen [-], Caret [^ ]. Default: Blank. • Click Submit. Wildcard Characters PRASAR UCS supports following characters. Character Description X (letter X) X represents any single digit from 0 to 9.
- Page 393 Cost Factor Cost Factor Cost Factor Prefe Prefe Prefe Prefere Prefe Prefe Prefe Prefere Prefe Prefe Prefe Prefere Number rence rence rence nce 4 rence rence rence nce 4 rence rence rence nce 4 Index Matrix PRASAR UCS System Manual...
- Page 394 Under Configuration, click Least Cost Routing (LCR). • Click Time + Number based. • Enter the values of the Time+Number-based LCR you prepared on the sheet of paper in the appropriate fields. • Click Submit. Matrix PRASAR UCS System Manual...
- Page 395 Cost Factor to trunks. • If you have finished entering the number strings, their corresponding area codes and the Ignore Digit Count, and the preferred trunks, configure Service Provider-based LCR using Jeeves. Matrix PRASAR UCS System Manual...
- Page 396 Enter the Area Codes and the corresponding Ignore Digit Counts from the sheet you prepared for Service Provider based-LCR. You may also enter the respective name for each area code, if desired. • Click Submit. • Now, click the Least Cost Routing (LCR). Matrix PRASAR UCS System Manual...
- Page 397 Number-based, Service Provider-based - you must now apply the desired LCR Type on the Outgoing Trunk Bundle Group (OGTBG) allotted to the extensions. Configuring LCR Type in OGTB using Jeeves • Login as System Engineer. Matrix PRASAR UCS System Manual...
- Page 398 For each OGTBG number assigned to extensions, select the desired LCR Type: Time-based, Number- based, Time+Number based, Service Provider-based (Cost Factor). • Click Submit. You can find the OGTBG number assigned to each extension from the Station Basic Feature Template assigned to the extension. Matrix PRASAR UCS System Manual...
-
Page 399: Configuring Emergency Number Dialing
“License Management”. PRASAR UCS supports dialing of Emergency Numbers immediately without any blocking. The system will disregard features such as Toll Control, Call Budget, Automatic Number Translation, Call Duration Control on the extensions when dialing out Emergency Numbers. To know more, refer the topic “Emergency... - Page 400 OGTB Group Number India OGTB Group Number Indonesia OGTB Group Number Italy OGTB Group Number Jordan OGTB Group Number Kazakhsta OGTB Group Number Kenya OGTB Group Number Kuwait OGTB Group Number Malaysia OGTB Group Number Matrix PRASAR UCS System Manual...
- Page 401 Group Number Mexico OGTB Group Number Namibia OGTB Group Number Nepal OGTB Group Number Zealand OGTB Group Number Oman 9999 OGTB Group Number Pakistan OGTB Group Number Philippine OGTB Group Number Poland OGTB Group Number Matrix PRASAR UCS System Manual...
- Page 402 1022 Africa OGTB Group Number Spain OGTB Group Number Sri Lanka OGTB Group Number Sudan OGTB Group Number Sweden OGTB Group Number Taiwan OGTB Group Number 1669 Thailand OGTB Group Number Turkey OGTB Group Number Matrix PRASAR UCS System Manual...
- Page 403 Index Emergency Number OG Trunk Bundle Group If you selected Australia as Region, the default Emergency Number Table would look like this: Default Emergency Number Table for Australia Index Emergency Numbers OG Trunk Bundle Group Matrix PRASAR UCS System Manual...
- Page 404 Emergency Numbers of your country (which you selected as Region). If the Emergency Numbers loaded by default are applicable for your region/country, all you need to do is re-assign, if required, the Outgoing Trunk Bundle Group assigned by default to each number. Matrix PRASAR UCS System Manual...
- Page 405 Emergency Number for the SIP Trunk. So, make sure that the SIP Trunk to be used for dialing this number is included in the OGTBG you assign to this number in the Table. • Click Submit. Matrix PRASAR UCS System Manual...
-
Page 406: Configuring Voice Mail System
Voice Mail Auto Attendant (VMAA) Menu to the trunks in their Trunk Feature Template. • The prompts used to route the call using the Voice Mail Auto Attendant can be customized as per your requirement. Refer to “Prompts Management”. Matrix PRASAR UCS System Manual... -
Page 407: Configuring Vms General Parameters
Login as System Engineer. • Under Configuration, click VMS Configuration. • Click VMS General Parameters. • Check the default values of the following parameters, and change them, if required, to the desired values. General Settings Matrix PRASAR UCS System Manual... - Page 408 If no match is found, the VMS responds with a message “Invalid Number”. By default, Extension Number Validation is enabled when PRASAR UCS is operating in the Enterprise mode. This flag is disabled when PRASAR UCS is operating in the Hospitality mode.
- Page 409 Click the Add Language button. A window will pop up, asking you the language name. • Enter the language name in the field. The allowed characters are A to Z, a to z, 0 to 9, - and _. Matrix PRASAR UCS System Manual...
- Page 410 You can define the Filename format for Mailbox (Personal) and General Mailbox by setting the sequence of the various parameters — None, Date, Time, Message Type, Calling Number, Called Number and Mailbox Extension Number — as per requirement. The Mailbox Extension Number parameter is only applicable for General Mailbox Filename Format. Matrix PRASAR UCS System Manual...
- Page 411 (SM), Call forward with LCS – No reply, all (LS), Redirect Message (RM), Message forward (MF). The default sequential Filename Format is as given below: • For Mailbox (Personal): Date-Time-Message Type-Calling Number-Called Number.wav • For General Mailbox: Date-Time-Message Type-Calling Number-Called Mailbox Extension Number- Number.wav Matrix PRASAR UCS System Manual...
- Page 412 This email will be sent to the User, when 80% Mailbox is 80% [VMS] Warning! Mailbox <ext> is 80% of the personal mailbox memory has been consumed consumed consumed, along with the Extension Number (if configured). Matrix PRASAR UCS System Manual...
- Page 413 If Caller Number is unavailable, Caller Name will be displayed. If both are unavailable, ‘Unknown’ will be dis- played. The CLI Number can be an External Caller Number or an Internal Caller Number. Message Type may be Normal or Urgent. Matrix PRASAR UCS System Manual...
-
Page 414: General Mailbox Settings
<, >, :, ", /, \, |, ? and * characters are not allowed. • Mailbox Password: If you have selected the Ask Password to access Mailbox check box in Extension Voice Mail Settings, extensions users can access the General Mailbox by dialing the default Password-1111. Matrix PRASAR UCS System Manual... - Page 415 By default, the General Mailbox with access code-1176 will open. For information regarding the configuration, see “Extension Voice Mail Settings”. • Click Submit to save the settings. For more information and instructions on how to access the General Mailbox, see “Accessing the General Mailbox”. Matrix PRASAR UCS System Manual...
-
Page 416: Extension Voice Mail Settings
For Department Group, select the desired Department Group Number from the drop down list. • For Operator, select the desired Operator from the drop down list. • Click OK. You may now configure the respective VMS parameters. Matrix PRASAR UCS System Manual... - Page 417 Extension is a member of the Department Group. • VMAA Menu: Select the VMAA Menu Number which you want to assign to the respective Extension or Department Group. For more information, see “Voice Mail Auto-Attendant Menu”. Matrix PRASAR UCS System Manual...
- Page 418 • Deliver to General Mailbox, if you want the system to deliver the new message to the General Mailbox when Personal Mailbox is full. Not applicable when you select Operator as the “Select Number” option. Matrix PRASAR UCS System Manual...
- Page 419 In Message Profile, select the Message Profile you want to assign. For more information, see “Message Profile”. • In Mailbox Menu, select the Mailbox Menu you want to assign. For more information, see “Mailbox Menu”. Matrix PRASAR UCS System Manual...
- Page 420 Silence: No indication will be provided to the extension user for Message Wait Notification, when s/he goes OFF-Hook. Default: Silence. Not applicable when you select General Mailbox as the “Select Number” option. Not applicable when you select Operator as the “Select Number” option. Matrix PRASAR UCS System Manual...
- Page 421 Make sure the email ID is configured. The attachment will be Applicable only when you select Extension as the “Select Number” option. Not applicable when you select Operator as the “Select Number” option. Matrix PRASAR UCS System Manual...
- Page 422 For multiple extensions, select Extension Numbers from and enter the Extension Number range. For all extensions, select All Extensions. The Voice Mail Settings — Abbreviated Name, Message Wait Notification via Call parameters and Message Wait Notification via Email parameters will not be copied. Matrix PRASAR UCS System Manual...
-
Page 423: Voice Mail Auto-Attendant Menu
You may add a new menu, edit the default menus or delete a VMAA menu. To add a new VMAA Menu, • Click Add New Menu. A new VMAA Menu xxx will be created. You may now configure this as per your requirement. Matrix PRASAR UCS System Manual... - Page 424 In Evening Prompt, select the prompt which you wish to play to the caller as the Evening Greeting. Select Do Not Play, if you do not wish to play any prompt. • Click Settings . The Prompts Management page opens. Matrix PRASAR UCS System Manual...
- Page 425 For more information, see “Language Selection Profile”. From here, the caller can select a different language other than the Menu Language configured. All the VMS prompts henceforth will be played in the language selected here. Matrix PRASAR UCS System Manual...
- Page 426 Select None, if you do not wish to play any prompt. You may add a new Prompt. To do so, • Click Settings . The Prompts Management page opens. You may add a new prompt from here. For further details, see “Prompts Management”. Matrix PRASAR UCS System Manual...
- Page 427 Once the files are uploaded these appear as options for Confirm Name Prompt. The system will place the call only when the entered name matches with the Abbreviated Name in Extension Voice Mail Settings. To know more, refer to “Extension Voice Mail Settings”. Matrix PRASAR UCS System Manual...
- Page 428 To delete an Auto-Attendant action, mouse over on the respective action and click To add/edit an Auto-Attendant action, • Click on the Add Action button to add a new action or click to edit an action. Matrix PRASAR UCS System Manual...
- Page 429 If you select Go to Previous Menu, the system will provide an option to the caller to go back to the previous VMAA Menu. • If you select Disconnect, the system will disconnect the call. Matrix PRASAR UCS System Manual...
- Page 430 Operator number/Department Group number or enter the desired extension number. • In Call Transfer Profile, select the desired Call Transfer Profile as per your requirement. By default, As configured for Transfer Number is selected. Matrix PRASAR UCS System Manual...
- Page 431 In Call Transfer Profile, select the desired Call Transfer Profile as per your requirement. By default, As configured for Transfer Number is selected. Click Settings to configure the parameters of the selected profile. For more information, see “Call Transfer Profile”. Matrix PRASAR UCS System Manual...
- Page 432 The prompt will be played repeatedly till the Retry Count expires. • In Retry Count Expiry Prompt, select the prompt you wish to play when the Retry Count expires. Select None, if you do not wish to play any prompt. Matrix PRASAR UCS System Manual...
- Page 433 In No Match Found Retry Count, select the number of times you wish to prompt the caller for dialing the extension number. The prompt will be played repeatedly till the Retry Count expires. • In Retry Count Expiry Prompt, select the prompt you wish to play when the Retry Count expires. Matrix PRASAR UCS System Manual...
- Page 434 For more information, see “Call Transfer Profile”. • If you select Go to VMAA Menu, select the desired VMAA Menu. • If you select Disconnect, the system will disconnect the call. Multiple Match Found Settings Matrix PRASAR UCS System Manual...
- Page 435 Once the files are uploaded these appear as options for No Name Selected Prompt. • In No Name Selected Action, you can select — Transfer to Operator, Transfer to Extension, Transfer to Department Group, Go to VMAA Menu, Go to Previous Menu or Disconnect. Matrix PRASAR UCS System Manual...
- Page 436 • If you select Go to Previous Menu, the system will go back to the previous menu. • If you select Disconnect, the system will disconnect the call. • Click Close to close the window. Matrix PRASAR UCS System Manual...
- Page 437 Operator number/Department Group number or enter the desired extension number. • In Call Transfer Profile, select the desired Call Transfer Profile as per your requirement. By default, As configured for Transfer Number is selected. Matrix PRASAR UCS System Manual...
- Page 438 • If the conditional greeting is not recorded or is unavailable, no prompt will be played. • Conditional Greeting will be applicable only if your mailbox is defined as the destination for Call Transfer Unsuccessful. Matrix PRASAR UCS System Manual...
- Page 439 You can assign the Digits (0-9, *, # or None) to each of the options — Re-record, Confirm, Urgent, Private(Confidential), Listen Recorded Message and Append to Recorded Message. Make sure you do not assign the same digit to multiple options. Matrix PRASAR UCS System Manual...
- Page 440 Operator number/Department Group number or enter the desired extension number. • In Call Transfer Profile, select the desired Call Transfer Profile as per your requirement. By default, As configured for Transfer Number is selected. Matrix PRASAR UCS System Manual...
- Page 441 “No Digit Dialed Settings”. • Click Close to close the window. No Digit Dialed Settings • For details, refer “No Digit Dialed Settings”. Invalid Digit Dialed Settings • For details, refer “Invalid Digit Dialed Settings”. Matrix PRASAR UCS System Manual...
- Page 442 • Click Settings . The Prompts Management page opens. You may add a new prompt from here. For further details, see “Prompts Management”. Once the files are uploaded these appear as options for Disconnect Prompt. Matrix PRASAR UCS System Manual...
-
Page 443: Language Selection Profile
To edit a Language Profile, • In Profile Name, you may assign a name to the Language profile. By default, it is Language Selection x, where x is the Language Profile Number from 1 to 8. Matrix PRASAR UCS System Manual... - Page 444 In Retry Count Expiry Prompt, select the prompt you wish to play when the Retry Count expires. Select None, if you do not wish to play any prompt. • Click Settings . The Prompts Management page opens. Matrix PRASAR UCS System Manual...
- Page 445 The language selection options will be played repeatedly till the Retry Count expires. • In Retry Count Expiry Prompt, select the prompt you wish to play when the Retry Count expires. Select None, if you do not wish to play any prompt. Matrix PRASAR UCS System Manual...
- Page 446 Select Disconnect, if you want the system to disconnect the call. • Select a language from the Supported VMS Languages you configured, if you want the system to use the Language you select. See “Supported VMS Language”. Matrix PRASAR UCS System Manual...
-
Page 447: Message Profile
To edit a Message Profile, • In Profile Name, you may configure the name of the Message profile you want. By default, it is Message Profile xx where xx is the Message Profile Number from 01 to 24. Matrix PRASAR UCS System Manual... - Page 448 Select Set as Normal, if you want the system to store the messages received in the mailbox as Normal. The messages left by the external callers or replied by the internal callers will be considered as normal messages. Matrix PRASAR UCS System Manual...
- Page 449 The digit you configure will be played as the digit to be dialed by the caller to select the respective option. The options will be played in the sequence — 1-9, 0, *, #. The option for which the digit selected is None will not be played. Matrix PRASAR UCS System Manual...
- Page 450 This is applicable only if you have enabled the Message Verification check box or selected the Ask Caller as the Message Type and/or Message Sensitivity option. Based on the configuration, you may select the desired action — Normal+Normal, Urgent+Normal, Normal+Private or Urgent+Private. Matrix PRASAR UCS System Manual...
- Page 451 Urgent and then play the old messages with the message type as Normal. • Date Playback Format: Select the Date Playback Format — DD-MM-YYYY or MM-DD-YYYY— you want the system to play while playing the message details to the extension user. Matrix PRASAR UCS System Manual...
- Page 452 The message count has no interaction with the number of old/new/total messages present in the mailbox. If you disable the check box, the system will not play the Message sequence number before playing the message to the extension user. Matrix PRASAR UCS System Manual...
- Page 453 Select the Message Verification check box to allow the recorded message to be verified by the extension user before storing it in the Personal Mailbox or re-record it. If you disable the check box, the system will directly store the recorded message in the Personal Mailbox. Matrix PRASAR UCS System Manual...
- Page 454 Message Type and Message Sensitivity that you configured will be played. If you disable the check box, the system will not play the Message Send Confirmation prompt to the extension user after sending the message. Matrix PRASAR UCS System Manual...
- Page 455 The digit you configure will be played as the digit to be dialed by the extension user to select the respective option. The options will be played in the sequence — 1-9, 0, *, #. The option for which the Digit selected is None will not be played. Matrix PRASAR UCS System Manual...
- Page 456 The options will be played in the sequence — 1-9, 0, *, #. The option for which the digit selected is None will not be played. After the digits have been assigned, the system will proceed further as per the options selected by you. Given below is the brief description of each option: Matrix PRASAR UCS System Manual...
- Page 457 You can assign the Digits (0-9, *, # or None) to each of the options — Request Read Receipt or Ignore Read Receipt. Make sure you do not assign the same digit to multiple options. Matrix PRASAR UCS System Manual...
- Page 458 Click Settings . The Prompts Management page opens. You may add a new prompt from here. For further details, see “Prompts Management”. Once the files are uploaded these appear as options for No Match Found Prompt. Matrix PRASAR UCS System Manual...
- Page 459 Select Go to Previous Menu, if you want the system to provide an option to the extension user to go back to the Mailbox Access Main Menu. • Select Disconnect, if you want the system to disconnect the call. Matrix PRASAR UCS System Manual...
-
Page 460: Call Transfer Profile
Click Add New Profile. A new Transfer Profile xx will be created. You may now configure this as per your requirement. To delete a profile, click Delete. The default Call Transfer Profiles cannot be deleted. Matrix PRASAR UCS System Manual... - Page 461 If the Wait for Answer Timer value is greater than Ring Back Tone timer, then Ring Back Tone Timer will expire first and the next action will be taken as per the Call Transfer Unsuccessful - Unconditional configuration. Matrix PRASAR UCS System Manual...
- Page 462 In Call Transfer Profile, select the desired Call Transfer Profile as per your requirement. By default, As configured for Transfer Number is selected. • If you select Go to VMAA Menu, select the desired VMAA Menu. • If you select Disconnect, the system will disconnect the call. Matrix PRASAR UCS System Manual...
- Page 463 • If the conditional greeting is not recorded or is unavailable, no prompt will be played. • Conditional Greeting will be applicable only if your mailbox is defined as the destination for Call Transfer Unsuccessful. Matrix PRASAR UCS System Manual...
- Page 464 You can assign the Digits (0-9, *, # or None) to each of the options — Re-record, Confirm, Urgent, Private(Confidential), Listen Recorded Message and Append to Recorded Message. Make sure you do not assign the same digit to multiple options. Matrix PRASAR UCS System Manual...
- Page 465 Configure the following parameters, if you want the VMS to process the call immediately when the desired extension is busy, • Busy Prompt • Busy Action Matrix PRASAR UCS System Manual...
- Page 466 You can assign the Digits (0-9, *, # or None) to each of the options — Leave Voice Mail, Transfer to Operator, Transfer to Assistant, Transfer to Alternate/Mobile Number, Dial Extension Number, Go to Main Menu, Go to Previous Menu and Disconnect. Make sure you do not assign the same digit to multiple options. Matrix PRASAR UCS System Manual...
- Page 467 • In Call Transfer Profile, select the desired Call Transfer Profile as per your requirement. By default, Wait for Ring is selected. Click Settings to configure the parameters of the selected profile. Matrix PRASAR UCS System Manual...
- Page 468 Select None, if you do not wish to play any prompt. • Click Settings . The Prompts Management page opens. You may add a new prompt from here. For further details, see “Prompts Management”. Matrix PRASAR UCS System Manual...
- Page 469 Once the files are uploaded these appear as options for Retry Count Expiry Prompt. • In No Digit Dialed Action, you can select — Disconnect, Transfer to Operator, Transfer to Extension, Transfer to Department Group, Go to VMAA Menu. Matrix PRASAR UCS System Manual...
- Page 470 In Busy Hold - Music on Hold, select the prompt you wish to play. This option is applicable only is you have enabled the Hold a Call check box. Select None, if you do not wish to play any prompt. Matrix PRASAR UCS System Manual...
- Page 471 As Configured for Transfer Number is selected. Click Settings to configure the parameters of the selected profile. • If you select Go to VMAA Menu, select the desired VMAA Menu. • If you select Disconnect, the system will disconnect the call. Matrix PRASAR UCS System Manual...
- Page 472 As Configured for Transfer Number is selected. Click Settings to configure the parameters of the selected profile. • If you select Go to VMAA Menu, select the desired VMAA Menu. • If you select Disconnect, the system will disconnect the call. Matrix PRASAR UCS System Manual...
- Page 473 As Configured for Transfer Number is selected. Click Settings to configure the parameters of the selected profile. • If you select Go to VMAA Menu, select the desired VMAA Menu. • If you select Disconnect, the system will disconnect the call. Matrix PRASAR UCS System Manual...
- Page 474 While the Screened Options are being played, if the caller does not select any options, the following parameters will be applicable. • In Prompt if No Option Selected, select the prompt you wish to play to the caller, if no Screened Option is selected by the caller. Matrix PRASAR UCS System Manual...
- Page 475 If you select Transfer to Operator or Transfer to Department Group or Transfer to Extension, select the respective Operator number/Department Group number or enter the desired extension number. In Call Transfer Profile, select the desired Call Transfer Profile as per your requirement. By default, Wait for Ring is selected. Matrix PRASAR UCS System Manual...
- Page 476 Leave Voice Mail • Transfer to Operator • Transfer to Assistant • Transfer to Alternate Number/Mobile Number • Dial Extension Number • Go to Main Menu • Go to Previous Menu • Stay on Hold • Disconnect Matrix PRASAR UCS System Manual...
- Page 477 Clear the check box if you want the system to apply Message Leave Settings configured for the extension or department group number. For details, refer “Leave Voice Mail” Transfer to Operator After you assign the digit, click Settings to configure the parameters. Matrix PRASAR UCS System Manual...
- Page 478 If you assign a digit for this option, make sure you have programmed the Alternate/Mobile Number. For detailed instructions, refer “Number Programming (Assistant/Personal)” “Mailbox Menu”. Dial Extension Number After you assign the digit, click Settings to configure the parameters. Matrix PRASAR UCS System Manual...
- Page 479 Transfer to Department Group, Go to VMAA Menu. • If you select Transfer to Operator or Transfer to Department Group or Transfer to Extension, select the respective Operator number/Department Group number or enter the desired extension number. Matrix PRASAR UCS System Manual...
- Page 480 In Call Transfer Profile, select the desired Call Transfer Profile as per your requirement. By default, As configured for Transfer Number is selected. Click Settings to configure the parameters of the selected profile. • If you select Go to VMAA Menu, select the desired VMAA Menu. Matrix PRASAR UCS System Manual...
- Page 481 You can assign the Digits (0-9, *, # or None) to each of the options — Leave Voice Mail, Transfer to Operator, Transfer to Assistant, Transfer to Alternate/Mobile Number, Dial Extension Number, Go to Main Menu, Go to Previous Menu and Disconnect. Matrix PRASAR UCS System Manual...
- Page 482 Select None, if you do not wish to play any prompt. • Click Settings . The Prompts Management page opens. You may add a new prompt from here. For further details, see “Prompts Management”. Matrix PRASAR UCS System Manual...
- Page 483 As configured for Transfer Number is selected. Click Settings to configure the parameters of the selected profile. • If you select Go to VMAA Menu, select the desired VMAA Menu. • If you select Disconnect, the system will disconnect the call. Matrix PRASAR UCS System Manual...
- Page 484 Go to Main Menu: Assign a digit for this option if you want the system to re-direct the caller to the Main Menu. • Go to Previous Menu: Assign a digit for this option if you want the system to re-direct the caller to the Previous Menu. Matrix PRASAR UCS System Manual...
- Page 485 Operator number/Department Group number or enter the desired extension number. In Call Transfer Profile, select the desired Call Transfer Profile as per your requirement. By default, As configured for Transfer Number is selected. Matrix PRASAR UCS System Manual...
- Page 486 Refer to the details given above under “Advanced Options”. Invalid Digit Dialed Settings (during Advanced Options) Invalid Digit Dialed Settings are applicable when caller has dialed an invalid digit — a digit which is not configured as the Advanced Options. Matrix PRASAR UCS System Manual...
- Page 487 In Invalid Digit Dialed Action, you can select — Disconnect, Go to Voice Mail, Transfer to Operator, Transfer to Assistant, Transfer to Alternate Number, Go to Main Menu, Go to Previous Menu, Stay on Hold. Refer to the details given above under “Advanced Options”. Matrix PRASAR UCS System Manual...
-
Page 488: Notification Via Call-Profile
The next notification call will be made only when another new message arrives in the mailbox of the user between the start and end time of the configured time zone. Matrix PRASAR UCS System Manual... - Page 489 Message Notification Retry Count, Message Notification Interval and Message Notification Ring. See “System Timers and Counts”. Configuring Notification via Call - Profile • Login as System Engineer. • Under Configuration, click VMS Configuration. Matrix PRASAR UCS System Manual...
- Page 490 Click Submit to save changes. • Now, assign the profile numbers to the desired extensions. Make sure the Message Wait Notification via Call parameters have been configures in the Extension Voice Mail Settings of these extensions. Matrix PRASAR UCS System Manual...
-
Page 491: Mailbox Menu
• Click Add New Menu. A new Mailbox Menu xx will be created. You may now configure this as per your requirement. To delete a menu, click Delete. The default Mailbox Menus cannot be deleted. Matrix PRASAR UCS System Manual... - Page 492 The Destination Number may include a Distribution List. The Message will be send as per the Message Send/Forward Settings configured in the Message Profile. For details, refer “Message Send/Forward Settings”. Matrix PRASAR UCS System Manual...
- Page 493 The Message will be sent as per the Message Send/Forward Settings configured in the Message Profile. For details, refer “Message Send/Forward Settings”. After forwarding the message, the Mailbox Access menu will be played again. Matrix PRASAR UCS System Manual...
- Page 494 • The Mailbox Greetings options will be played asking the caller to select the type of greetings — Personal or Conditional — which he wishes to Record, Play or Erase. For details, refer “Mailbox Greetings”. Matrix PRASAR UCS System Manual...
- Page 495 Cancel: The system will clear the Message Redirect Number programmed by the caller. • Go to Previous Menu: The system will provide an option to the caller to go back to the “Mailbox Management” menu. Matrix PRASAR UCS System Manual...
- Page 496 Record, Play or Erase a personal greeting for the Non-Working Hour Timezone. • Go to Previous Menu: The system will provide an option to the caller to go back to the Record Mailbox Greetings Menu. For details, refer “Record Greetings/Name”. Matrix PRASAR UCS System Manual...
- Page 497 Erase: The system will clear the recorded Mailbox Name or the Personal/Conditional Greeting. • Go to Previous Menu: The system will provide an option to the caller to go back to the Previous Menu — Record Mailbox Name, Personal Greeting Timezone Selection or Conditional Greeting. Matrix PRASAR UCS System Manual...
- Page 498 Clear Number: The system will clear the Assistant Number or Personal Number programmed by the caller. • Go to Previous Menu: The system will provide an option to the caller to go back to the “Mailbox Management”. Matrix PRASAR UCS System Manual...
-
Page 499: Distribution List
To add a new List, • Click Add New List. A new List xx will be created. You may now configure this as per your requirement. To delete a list, click Delete. The default Distribution List cannot be deleted. Matrix PRASAR UCS System Manual... - Page 500 Place your cursor on the desired Extension and click delete key from your keyboard. The selected extension will be deleted. It is also possible to select a range of extensions at a time by pressing 'SHIFT’ and 'Down' arrow keys. • Click Submit. Matrix PRASAR UCS System Manual...
-
Page 501: Recording Voice Messages
Recording Voice Messages The VMS of PRASAR UCS supports voice messages for different functions, which are broadly classified as: • System Greetings: These messages are played to the caller when a new call lands on the VMS. Callers are greeted according to the time of the day - morning, afternoon, evening (Time Zone). You can customize the Time Zones as per your requirement. - Page 502 • The audio file is recorded in the prescribed format (.wav) and attributes. • The PRASAR UCS is connected to a computer (standalone or LAN). • You can upload a single prompt or the entire folder. For detailed instructions, see “Prompts Management”...
-
Page 503: Prompts Management
The following table defines the maximum number of prompt files supported in each folder. Maximum Prompt files Maximum length allowed for each Folder Name supported folder (seconds) Greeting Auto-Attendant Matrix PRASAR UCS System Manual... - Page 504 Click Prompts Management. • In Select Prompt type to manage, select the desired folder. • Click OK. All the prompt files present in the respective language folders of the selected Prompt Type will be displayed. Matrix PRASAR UCS System Manual...
- Page 505 Make sure the prompt files within the folder are in .wav format and have the following attributes: • Audio Format: u-law • Channel: 1 (mono) • Sampling Frequency: 8 KHz • Audio Sample Size: 8 bit Matrix PRASAR UCS System Manual...
- Page 506 The allowed characters for the filename are A to Z, a to z, 0 to 9, . , - and _. To download all the prompts of the respective prompt type and language selected, click Matrix PRASAR UCS System Manual...
- Page 507 • If you are using Mozilla Firefox (version 3.5 recommended), before you save the configuration files, set the Downloads option of your browser as Always ask me where to save files. Matrix PRASAR UCS System Manual...
- Page 508 • Save the file on the local disk. • To view the files, • Open the Prompt Type_Language folder. Matrix PRASAR UCS System Manual...
- Page 509 You may now upload, download or delete a prompt file to/from a folder. The files present in the Fixed Folders cannot be deleted or added, but the existing files can be overwritten by a new one. Matrix PRASAR UCS System Manual...
- Page 510 The filename can be a maximum of 64 characters. • The allowed characters for the filename are A to Z, a to z, 0 to 9, - and _. • To download a prompt, click Matrix PRASAR UCS System Manual...
- Page 511 • If you are using Mozilla Firefox (version 3.5 recommended), before you save the configuration files, set the Downloads option of your browser as Always ask me where to save files. Matrix PRASAR UCS System Manual...
- Page 512 • Save the file on the local disk. • To delete a prompt, click Matrix PRASAR UCS System Manual...
-
Page 513: Mailbox Status
Select Number: You may select — Extension, Department Group or General Mailbox — whose mailbox status you wish to view. enter the Extension Number/Name and then select the same from the drop • For Extension, down list. Matrix PRASAR UCS System Manual... - Page 514 New Messages / Total Messages: It displays the number of New Messages out of the Total Messages available in the respective mailbox. • Urgent New / Urgent Old Messages: It displays the number of New Urgent Messages as well as the Old Urgent Messages available in the respective mailbox. Matrix PRASAR UCS System Manual...
- Page 515 USB Status will be updated only after these messages have been cleared. • You can also view the Mailbox Status from the SE Mode. To view, click the Mailbox Status under the Status link and follow the steps described above. Matrix PRASAR UCS System Manual...
-
Page 516: Voicemail Backup
Mailbox— voicemail messages on the Network Drive. For details regarding the Network Drive configuration, see “Network Drive Settings”. PRASAR UCS allows you to take the voicemail backup of a single extension, range of extensions, all extensions or selected extensions. You can take Voicemail Backup, either •... - Page 517 To backup voicemail of a range of Department Group mailboxes, enter the starting and ending Department Group Numbers and then select the same from the drop down list. • To backup voicemail of the General Mailbox, enable this check box. Matrix PRASAR UCS System Manual...
- Page 518 In Notification Text: Failure, enter the text you would like to receive as subject line in email when the Voicemail Backup has failed. By default, the text is Voicemail Backup failed on <date> at <time>. Matrix PRASAR UCS System Manual...
- Page 519 To backup voicemail of a range of Department Group mailboxes, enter the starting and ending Department Group Numbers and then select the same from the drop down list. • To backup voicemail of the General Mailbox, enable this check box. Matrix PRASAR UCS System Manual...
- Page 520 If you click Backup and a Scheduled Backup is in progress, then Manual Backup will not be taken and an error is displayed. Matrix PRASAR UCS System Manual...
- Page 521 Where, DDMonthname_YYYY represents the Date, HHMMSS represents the Time in 24 Hour format and HHMMSS_PM/ AM represents the Time in 12 Hour format. The sub-folders with the Extension Names contain the respective extension’s voicemail files. Matrix PRASAR UCS System Manual...
-
Page 522: Vms Debug
If you disable the check box, the system will not send the VMS Debug to the Syslog Server. The PRASAR UCS supports Syslog Client, which enables the VMS to send debug messages in syslog format to the remote 'Sys- log Server' on the IP network. You can view the system debug messages on the remote Syslog server or any other application which can capture the Syslog debug messages. - Page 523 Select the Extended check box to view the debug for data received in raw hex format. • Click Submit. You can also configure the VMS Debug from the Maintenance link. To do so, click VMS under Debug. Matrix PRASAR UCS System Manual...
-
Page 524: Features And Facilities
'directories'. These directories may be 'personal' or 'global'. PRASAR UCS supports two types of Abbreviated Dialing based on the type of directory used: Personal Abbreviated Dialing and Global Abbreviated Dialing. - Page 525 This variation of Abbreviated Dialing makes use of a system-wide list of numbers stored in the memory of the PRASAR UCS, known as the Global Directory. Being a system-wide list, the Global Directory can be accessed by any extension connected to the system.
- Page 526 You may draw five-column tables on paper and enter the Numbers and corresponding names, email ids and trunk access codes against each Index number. For example: Personal Directory 01 Email ID Index No. Number Name TAC ID (optional) Matrix PRASAR UCS System Manual...
- Page 527 Sean Gilbert is the Contact Name (optional) Sean@hotmail.com is the Email ID (optional) (optional) 0 is the Trunk Access Code (TAC) to route the call To upload Personal Contacts CSV file using Jeeves, see “Upload Personal Directory CSV files” Matrix PRASAR UCS System Manual...
- Page 528 • Login as System Engineer. • Under Configuration, click Abbreviated Dialing. • Click Personal Directory. You can configure upto 50 Personal Directories. Select the directory number by clicking the required number tab above the table. Matrix PRASAR UCS System Manual...
- Page 529 Click the Advance button. • Scroll to Personal Directory, and select the Personal Directory number you want to assign to this extension. • Click Submit. It is possible to assign the same personal directory to multiple extensions. Matrix PRASAR UCS System Manual...
- Page 530 Click the Browse button to Select the .csv file to be uploaded from the location on the local disk. • Click the Upload button. • All the contacts of the CSV file will be uploaded in the selected Personal Directory. To view, click the respective Personal Directory link. Matrix PRASAR UCS System Manual...
- Page 531 Under Configuration, click Abbreviated Dialing. • Click Upload/Download. • Click Download Personal Directory Contacts to expand. • In Personal Directory Number, select the number of the personal directory from which you want to download the contacts. Matrix PRASAR UCS System Manual...
- Page 532 • To Open the Personal_Directory_01.csv file from the location on the local disk, follow the steps given below: • DO NOT OPEN THE CSV FILE DIRECTLY WITH EXCEL! • Open a New worksheet in Excel. Matrix PRASAR UCS System Manual...
- Page 533 Open the Data tab and select From text button in the Get External Data. • Select your CSV file from the location on the local disk to import. • In Original data type section, select Delimited radio button and click Next. Matrix PRASAR UCS System Manual...
- Page 534 • In Delimiters select the Comma check box (column dividers will appear in preview) and click Next. • Select the column with leading zeros and in Column data format select the Text radio button. Matrix PRASAR UCS System Manual...
- Page 535 • Click Finish. • The leading zeros will still be there in the new worksheet with the imported data. Configuring Global Directory using Jeeves • Login as System Engineer. • Under Configuration, click Abbreviated Dialing. Matrix PRASAR UCS System Manual...
- Page 536 Global Directory numbers using OGTBG you configured here, make sure you have selected OGTBG configured in the Global Dir. in the Route Global Directory Calls using parameter of the Station Advanced Feature Template. • Configure the Alternate Number Group, if required. • Click Submit. Matrix PRASAR UCS System Manual...
- Page 537 Toll Control level in the Global Directory Part 1, inadvertently or intentionally. • Hence, the System Engineer is advised to exercise caution when allowing this feature to the extension users • Click Submit. Matrix PRASAR UCS System Manual...
- Page 538 The contacts will be uploaded through .csv file only in the Global Directory that is not synchronized for LDAP. Download Global Directory CSV files • Login as System Engineer. • Under Configuration, click Abbreviated Dialing. Matrix PRASAR UCS System Manual...
- Page 539 To Open the Global_Directory.csv file from the location on the local disk, make sure you follow the steps given below: • DO NOT OPEN THE CSV FILE DIRECTLY WITH EXCEL! • Open a New worksheet in Excel. Matrix PRASAR UCS System Manual...
- Page 540 Open the Data tab and select From text button in the Get External Data. • Select your CSV file from the location on the local disk to import. • In Original data type section, select Delimited radio button and click Next. Matrix PRASAR UCS System Manual...
- Page 541 • In Delimiters select the Comma check box (column dividers will appear in preview) and click Next. • Select the column with leading zeros and in Column data format select the Text radio button. Matrix PRASAR UCS System Manual...
- Page 542 • Press 'Enter' key. • Enter Name of the contact. • Press 'Enter' key. • Enter Trunk Access Code. • Press 'Enter' key. • You get confirmation tone and the message on your phone's display Matrix PRASAR UCS System Manual...
- Page 543 To edit a contact, • Scroll to ‘Contacts’ in the phone menu and press Enter key. • Select ‘Edit’ and press Enter key. • You get the prompt: 'Name:' • Enter the initial letters of the contact's name. Matrix PRASAR UCS System Manual...
- Page 544 Dial 8 (users world wide) • Dial 6 (users in USA) • You get the message 'Give Index' • Enter Personal Directory Index number: 0001 to 0025. • The desired number will be dialed out. Matrix PRASAR UCS System Manual...
- Page 545 Dial 8 (users world wide) • Dial 6 (users in USA) • You get the message 'Give Index' • Enter Global Directory Index number: 0100 to 2999. • The desired number will be dialed out. Matrix PRASAR UCS System Manual...
-
Page 546: Access Codes
• Feature Codes: Codes used for invoking a feature. Default feature codes: there are different feature codes for every feature/function of the PRASAR UCS, e.g.: '2' for Auto Call Back, '5' for Raid, '13' for Call Forward, etc. Access codes may consist of single digits or a sequence of a maximum of 6 digits. - Page 547 Call Forward and Redial, since both these features are invoked in the 'Dial' phase. Call forwarding options: Unconditional, When Busy, When No Reply, When Busy or No Reply. Matrix PRASAR UCS System Manual...
- Page 548 How to configure PRASAR UCS provides default Access Codes for logical groups - department and trunk groups - and features. It also provides country-specific default Access Codes which are applied automatically when you select the 'Region' to configure the system.
- Page 549 Live Call Supervision 1098 Forced Answer Change Room Clean Status 1054 Guest Number Prefix 1055 Minibar Details 1056 Mute 1052 Emergency Conference 1177 Self Ring Test 1057 Call Chaining 1050 SA Command Prefix 1072 COSEC Door Open Matrix PRASAR UCS System Manual...
- Page 550 Voice Mail 3931 You can either use the default Access Codes or change them to suit your preferences. Changing Feature Access Codes using Jeeves • Login as System Engineer. • Under Configuration, click Access Codes. Matrix PRASAR UCS System Manual...
- Page 551 Click Default to default all Access Codes. To change Station Access Codes (for extensions), Department Groups, Trunks and Trunk Groups, and General Mailbox Access Code refer the topics “Flexible Numbers”, “Department Call”,“OG Trunk Bundle Group” “General Mailbox Settings”. Matrix PRASAR UCS System Manual...
-
Page 552: Account Codes
This way, the organization can know the details of calls made to and on behalf of each client. • The PRASAR UCS supports as many as 999 Account Codes. How it works For example, an advertising media agency makes nearly 100 calls every day to and on behalf of its clients that includes 'Midas Business Solutions', 'Jet-Set Holidays', 'Bacchus Vineyard'. - Page 553 Set Holidays. Forced Account Code The PRASAR UCS can be programmed to prompt extension users to dial the Account Code whenever they grab a trunk to dial out a number. Hence the feature name Forced Account Code. To apply Forced Account Code, this feature must be enabled on the extensions and trunks from which calls using Account Codes are to be made.
- Page 554 You may assign any code to any client. For instance, you can assign code '111' to Midas Business Solutions, '222' to Jet-Set Holidays, '333' to Bacchus Vineyard. Configuring Account Codes using Jeeves After preparing the Account Name list, • Login as System Engineer. Matrix PRASAR UCS System Manual...
- Page 555 If Forced Account Code is to be used, enable ‘Do not allow outgoing calls without Account Code' check box in “Station Advanced Feature Template” of the extensions and ‘Forced Account Code’ check box in the “Trunk Feature Template” assigned to the trunks. Matrix PRASAR UCS System Manual...
- Page 556 • when grabbing a trunk (if Forced Account Code check box is enabled). Print and hand out copies of the Account Code List to everyone in the organization for reference while making calls. Matrix PRASAR UCS System Manual...
- Page 557 Go ON-hook and then go OFF-hook. Now follow the same steps in the sequence mentioned above. Dialing Account Code by Name For Extended IP Phone Users To enter Account Code Name before making the call: • Press DSS Key assigned to Account Code by Name. Matrix PRASAR UCS System Manual...
- Page 558 Printing Call Reports of Clients You can print the call details of your clients using their account codes as filter. Refer the section “Station Message Detail Recording-Report”, for more detailed instructions on printing reports using filters. Matrix PRASAR UCS System Manual...
-
Page 559: Alarms
Alarms What's this? Alarms are an efficient and user-friendly feature available to all extensions of the PRASAR UCS. Alarms can be set and canceled by the extension users for themselves. Alarms can be set as: • Once Only - A one-time call, where the extension phone rings at the set time. - Page 560 An improperly placed receiver may also be the cause for the busy tone on the extension phone. In that case, the system will notify the Operator Phone with the 'OFF-Hook Alert'. This event is recorded in the Hotel-Motel Activity Log as "Alarm not Served, <phone number> is Busy". Matrix PRASAR UCS System Manual...
- Page 561 To view the log from any Extended IP Phone, • Press the DSS Key assigned to Wakeup Call Log. • The phone displays the logs — Unanswered Alarm Calls, Pending Alarm Calls, Served Alarm Calls. The logs will also display the Reminders. Matrix PRASAR UCS System Manual...
- Page 562 • PRASAR UCS can register as many as 960 Alarm requests set by the Operator and extension users. • Multiple Alarms can be set for an extension by the Operator and/or by the extension user. For example, Daily Alarm at 09:00am is set for an extension.
- Page 563 Music-On-Hold, Live Music, Pre-recorded Voice Message, Weather information, Date and Time, etc. The system supports four types of Alarm Notifications: • Music-On-Hold: Selecting this option would play music-on-hold to the extension user when s/he answers the Alarm call. Matrix PRASAR UCS System Manual...
- Page 564 Viewing and Printing Alarm Reports The Operator can view the status of Alarms that are yet to be served from the System Administrator mode and if required print them. • Login as System Administrator. • Click the Reports link. Matrix PRASAR UCS System Manual...
- Page 565 Press 'Enter' key. • Select 'Personalized' or 'Automated'. • Press 'Enter' key to set Alarm. • You get a confirmation tone and a text message with the phone number for which the alarm is set. Matrix PRASAR UCS System Manual...
- Page 566 In Select Extension, enter the Number or the Name of the extension on which you want to set the alarm. • The page of the Extension will open. • Now set the desired type of alarm on this extension. • Click Submit. Matrix PRASAR UCS System Manual...
- Page 567 If there are multiple alarms set, alarms cannot be canceled selectively. Only the Operator can cancel alarms selectively from SA mode using Jeeves. • Alarms set on an extension will be served, even if DND is also set on the same extension. Matrix PRASAR UCS System Manual...
-
Page 568: Alternate Number Dialing
The number of auto redial attempts depends on the Auto Redial Count programmed in the system. By default, the system will make 5 redial attempts if Auto Redial 'normal' is set. If Auto Redial 'Priority' is set, the system will make 20 redial attempts. Matrix PRASAR UCS System Manual... - Page 569 In consultation with the user, you may: • Draw a two-column table on a paper. • Write the name of the contact on one column and the Alternate Numbers for the contact on the other column. Matrix PRASAR UCS System Manual...
- Page 570 Global directory, program them in the Global Directory first. Refer the topic “Abbreviated Dialing” instructions on programming the Global Directory. To create Alternate Number Groups and program them in the Global Directory, • Login as System Engineer. • Under Configuration, click Abbreviated Dialing. Matrix PRASAR UCS System Manual...
- Page 571 Midas Biz 0102 2635589 Midas Biz 0103 2565590 Midas Biz 0104 2788856 GoodLife Inn 0105 022281110001 Jet Set 0106 022281110002 Jet Set 0107 033298765432 R. Mendez 0108 2640075 Bacchus 0109 2640076 Bacchus 0129 2788896 GoodLife Inn Matrix PRASAR UCS System Manual...
- Page 572 However, if Alternate Number Dialing is to be allowed to select extensions only, define a new CoS group and prepare a new Template with this CoS group and apply it to the desired extensions. Refer the topics “Class of Service (COS)” “Station Basic Feature Template” for detailed instructions. Matrix PRASAR UCS System Manual...
- Page 573 Alternate Number Groups are programmed in the Global Directory allowed to your extension. • 'Basic Features' (these include Redial) are enabled in the Class of Service allowed to your extension. Now, follow the instructions for using the feature “Last Number Redial”. Matrix PRASAR UCS System Manual...
-
Page 574: Apple Push Notification Service Support
“Configuring Matrix VARTA ADR100/AMP100 UC Clients” Let us see how the notifications will be sent by the server when MATRIX VARTA AMP100 application is registered with the server as a SIP Extension and it is in the background. There is an incoming call or message: •... - Page 575 A connectivity between the system and the APNS Server is required so that the Push notifications can be sent to the clients. To check the APNS connectivity status, • Log into Jeeves. • Click Maintenance. Matrix PRASAR UCS System Manual...
- Page 576 Timeout - if there is no connectivity. If the Connectivity Test of either of the servers (APNS or FCM) with PRASAR UCS is not successful, then Push Notifications will not be sent to the Mobile Clients — MATRIX VARTA ADR100 / AMP100 application.
-
Page 577: Authority Codes
Make sure it is strong and is kept confidential. The PRASAR UCS supports as many as 999 Authority Codes. Each Authority Code has an associated Class of Service and Toll Control, which is configured in the Station Basic Feature Template assigned to the Code. - Page 578 Change the Retry Counts for the Authority Code, if required. Configuring Authority Code Table • Make a list of users you want to assign Authority Codes to and their respective passwords. • Login as System Engineer. Matrix PRASAR UCS System Manual...
- Page 579 Refer to “Station Basic Feature Template” “Station Advanced Feature Template” for detailed instructions. • Click Submit. You can assign/change the Name and Password from the SA mode also. To do this, • Login as System Administrator. Matrix PRASAR UCS System Manual...
- Page 580 'budget' limit for outgoing calls, which is automatically reloaded at the start of every month. To assign a Call Budget to the Authority Code, • Login as System Administrator. • Under Reports, click Call Budget. Matrix PRASAR UCS System Manual...
- Page 581 900 (Available Balance + New = 400 + 500). • The Allotted Amount column displays the amount allotted to the user for making outgoing calls. • The Consumed Amount column displays the call budget amount consumed by the user. • Click Submit. Matrix PRASAR UCS System Manual...
- Page 582 Calls made using Authority Code filter in Outgoing Call Report. • configure the destination port for SMDR-Outgoing Call Report. Refer the section “Station Message Detail Recording-Report”, for detailed instructions on printing reports using filters. Matrix PRASAR UCS System Manual...
-
Page 583: Auto Attendant
If Auto Attendant is enabled on a trunk, whenever an external call lands on that trunk, the Voice Mail Auto Attendant of PRASAR UCS greets and prompts the caller to dial the desired extension number. The call is then placed to the extension number dialed by the caller. - Page 584 For more information and instructions, see the “Configuring Voice Mail System”. To use Delayed Auto Attendant on trunks, do the following: Make a list of the SIP trunks and their port numbers on which you want to enable Delayed Auto Attendant. Matrix PRASAR UCS System Manual...
- Page 585 • set the desired time option in Auto Attendant - Delay Auto Attendance and complete the voice mail related configurations. For more information and instructions, see the “Configuring Voice Mail System”. Matrix PRASAR UCS System Manual...
-
Page 586: Auto Answer
“How to use” Auto Answer later in this topic. This timer defines the time in seconds that the phone should wait before going OFF-Hook to answer incoming calls. Beep is not supported on Extended IP Phones. Matrix PRASAR UCS System Manual... - Page 587 Configuring Auto Answer using Jeeves To configure auto answer for Extended IP Phones, see “Configuring Matrix SPARSH VP248” and “Configuring Matrix SPARSH VP310”. How to use Extension users can set/cancel Auto Answer and enable Headset connectivity from their Extended IP Phone or by navigating the Phone Menu.
- Page 588 Headset Not Connected Headset Connected • Scroll to select 'Headset Connected' and press Enter key. Matrix PRASAR UCS System Manual...
-
Page 589: Auto Call Back (Acb)
• Each extension of the PRASAR UCS can set only one Auto Call Back request at a time. If you set another Auto Call Back request, before the first one has been served, the system will override the first request and serve the second. - Page 590 Basic Feature Template 01 has the features 'Auto Call Back Busy' and 'Auto Call Back No Reply' enabled in the default CoS group 01. So, all extensions of the PRASAR UCS can set/cancel Auto Call Back if the called number is busy or does not reply.
- Page 591 • Go idle or you get dial tone after 3 seconds. To cancel Auto Call Back on Busy: • Press the Call Back' Key / DSS Key assigned to Auto Call Back again. Matrix PRASAR UCS System Manual...
- Page 592 To cancel Auto Call Back: • Dial 102. • You get confirmatory message 'Auto Call Back Canceled' on the phone's display. The LED of the DSS key assigned to Auto Call Back will be turned off. Matrix PRASAR UCS System Manual...
- Page 593 Go idle or you get dial tone after 3 seconds. If you hear an error tone while setting an Auto Call Back request, it is likely that the system already has 300 pending requests and is unable to accept yours. Matrix PRASAR UCS System Manual...
-
Page 594: Auto Redial
Auto Redial until the extension becomes idle again. After which it dials the requested number again. Two types of Auto Redial are supported by the PRASAR UCS - Auto Redial (normal) and Auto Redial 'Priority' - that differ from each other in terms of the number of redial attempts and the interval between attempts. - Page 595 Basic Feature Template 01 does not have the feature Auto Redial and Auto Redial Priority in the default CoS group 01. Thus none of the extensions of the PRASAR UCS have this feature. If the user wants to allow all extensions the Auto Redial and /or the Auto Redial Priority feature, then you can simply enable this feature in the default CoS group 01.
- Page 596 Click Submit. • If the PRASAR UCS is installed in Australia, please ensure that: The Timer for Auto Redial Normal as well as Priority must be set to more than 5 seconds. The Auto Redial Priority Count should be set to less than 15.
- Page 597 Dial 17. • Go Idle or you get dial tone after 3 seconds. To cancel Auto Redial: • Pick up the handset. • Dial 1070. • Go Idle or you get dial tone after 3 seconds. Matrix PRASAR UCS System Manual...
-
Page 598: Automatic Number Translation
When PRASAR UCS is connected with such VoIP networks, outgoing calls need to be routed through these trunks. However, when extension users dial local number they cannot be expected to dial numbers with area codes. - Page 599 Enable the Automatic Number Translation check box in the Outgoing Trunk Bundle (OGTB) of the trunk. • Assign the Automatic Number Translation Table you configured to the OGTB of the trunk. Configuring Automatic Number Translation using Jeeves • Login as System Engineer. • Click Configuration. Matrix PRASAR UCS System Manual...
- Page 600 Enabling Automatic Number Translation on Trunks • Under Configuration, click Outgoing Trunk Bundle to open the page. • In the OG Trunk Bundle of the desired trunk, select the Automatic Number Translation (ANT) Apply check box to enable. Matrix PRASAR UCS System Manual...
- Page 601 • In the ANT Table No. list, select the table number you configured for this trunk. • Repeat the steps to apply the feature on another OGTB. • Click Submit. Matrix PRASAR UCS System Manual...
-
Page 602: Barge-In
Barge-In can be used by a Boss to interrupt the secretary's busy extension. PRASAR UCS offers flexibility to allow/deny Barge-In feature to an extension user, that is, allow the extension user to barge into on-going conversations. It also provides the flexibility to prevent conversations of extension users from being barged in, referred to as Privacy against Barge-In. - Page 603 In the default factory settings, Station Basic Feature Template Number 01 is assigned to all the extensions of PRASAR UCS. The Station Basic Feature Template 01 is assigned CoS group 01. The default CoS group 01 has both Barge-In and Privacy from Barge-In are disabled. So, none of the extensions of the PRASAR UCS can use these features.
- Page 604 Wait for the system to connect you to the called extension. • Talk. • Replace the handset after the conversation has ended. This default feature access code can be changed to suit your preference. Refer the topic “Access Codes”. Matrix PRASAR UCS System Manual...
-
Page 605: Busy Lamp Field For Trunks
With BLF subscription and BLF key configured, whenever, there is a change in the state of the monitored trunk, PRASAR UCS sends a NOTIFY message to the SIP Extension. The NOTIFY message contains the Call State. On receiving the NOTIFY message, the SIP Extension updates the LED indication of the BLF key on the SIP phone. - Page 606 LED indication supported by the SIP phone for this call state. • When the SIP Extension 3301 disconnects the call, the PRASAR UCS will disconnect the call of external number and the BLF key will display the call state of the SIP as “Terminated” according to the LED indication supported by the SIP phone for this call state.
-
Page 607: Call Back On Trunk Ports
PRASAR UCS. When Call Back feature is enabled on a trunk port, and there is a missed call on that trunk port, the PRASAR UCS determines if the calling number is eligible for a call back or not. It calls back the same number or an alternative number programmed for that number, either from the trunk on which it was received or from a different trunk, depending on the programming. - Page 608 • A gets dial tone of PRASAR UCS. • A can now reach any station or trunk of PRASAR UCS from DISA Mode. 'CLI Authentication - Single Call’ is enabled as Call Back Mode on SIP Trunk -1. • A gets dial tone of another trunk of PRASAR UCS.
- Page 609 • For call back requests made from an OGTBG, if any of its trunks is busy, PRASAR UCS will support only the last call back request in the OGTBG. Previous requests will be processed as per the normal incoming call management logic.
- Page 610 CLI is programmed in the Call Back Incoming Number List. For example, for the received CLI number string programmed at Index 15 in the Call Back Incoming Number List, the Matrix PRASAR UCS System Manual...
- Page 611 If you want the system to select the lowest cost trunk for making the call back, enable Least Cost Routing on the OGTBG that you define here for Call Back. To know more, refer “Call Back” “Configuring SIP Trunks”. Matrix PRASAR UCS System Manual...
-
Page 612: Call Budget On Extension
Until a new Call Budget is allocated to the extension user, the extension user can make calls only as per Toll Control assigned for the Call Budget Consumed state. • Once a new Call Budget is allocated, the extension user can make calls as per the “Toll Control” assigned to the extension. Matrix PRASAR UCS System Manual... - Page 613 Calls allowed when Call Budget is consumed in the Station Basic Feature Template assigned to the extensions. In the default Station Basic Feature Template 01 assigned to all extensions of the PRASAR UCS, the Call Budget check box is disabled and Calls allowed when Call Budget is consumed is set to 'No Calls'.
- Page 614 The currency symbol will not be displayed on the Operator's phone, on account of the limited number of characters that can be displayed. • The local currency symbol will appear at the relevant places in the outgoing SMDR reports. Applicable only for the Hotel Mode. Matrix PRASAR UCS System Manual...
- Page 615 Click Extension. • In Select Extension, enter the Number or the Name of the extension on which you want to set this feature • Click Submit. • The searched extension user details appear on your screen. Matrix PRASAR UCS System Manual...
- Page 616 The Call Budget Alloted/Used displays the amount allotted to the user as well as the call budget amount consumed by the user for making outgoing calls. • Click Submit. • To allot call budget to another extension, follow the same instructions as above. Matrix PRASAR UCS System Manual...
-
Page 617: Call Budget On Trunk
Call Budget on Trunk What's this? Call Budget on Trunks is an expense control feature of PRASAR UCS that allows you to keep track of the cost of phone calls made from the different SIP Trunks of PRASAR UCS. With this feature, each trunk can be allotted a 'budget' limit for outgoing calls. This budget limit can be programmed to be reloaded manually each time it is exceeded or at a scheduled date, either daily or at a particular date of the month. - Page 618 Thus for each matured call, the Number of Calls-Count is incremented, irrespective of the actual duration of the matured call. When the assigned 'cost' or 'minutes' or 'number of calls' assigned to trunk is exhausted, PRASAR UCS will: • print 'system activity log'.
- Page 619 • The PRASAR UCS will calculate cost of phone calls made by the trunks even when no call budget is allocated How to configure Call Budget on Trunks is to be programmed in the SIP Trunk Parameters on which you want to enable this feature.
- Page 620 Amount/Minutes/Number of Calls to be reset every month. You may select 'Daily' if your plan suggests • Click Submit. The consumed Call Budget on trunk can be reset from the System Engineer mode as well as the System Administrator mode manually at any time, referred to as Manual Reset. Matrix PRASAR UCS System Manual...
- Page 621 Call Budget. Similarly, you can reset Call Budget on Trunks from the SA mode. You can also view the SIP Trunk Status from the Status link. To view, click the SIP Trunk link under Status. Matrix PRASAR UCS System Manual...
-
Page 622: Call Chaining
How it works • A is an External Caller • B is an extension. • A calls a Trunk of PRASAR UCS. • The Operator answers the call. • The Operator sets Call Chaining and transfers the call to B. •... - Page 623 Go ON Hook to transfer the call. • When extension/trunk disconnects, your extension rings. • Go OFF Hook. You get connected with the caller. • Go Idle after the conversation ends, or you get dial tone after 3 seconds. Matrix PRASAR UCS System Manual...
-
Page 624: Call Cost Calculation (Ccc)
Call Cost Calculation (CCC) What’s this? PRASAR UCS can calculate the cost in amount for the external calls made by the extension users. The call cost is calculated according to the tariffs offered by the ITSP’s. Different types of tariffs are provided by different ITSP’s. - Page 625 First unit and the Additional units configured in the Discounted Pulse Rate Table. PRASAR UCS uses the Cost of the Call for SMDR. This cost is deducted from the Call Budget (Amount), if allotted to the trunk and also from the Call Budget, if assigned to the extension users.
- Page 626 Rate Option for SIP Trunk-1 is ‘1’. • PRASAR UCS will match the dialed number ‘2630555’ in the Area Code table. A best match is found with the entry configured at index 001 in the Area Code Table. As per the Area Code Table, the Pulse Rate Type ‘03’ is programmed in ‘Pulse Rate Option 1’ for the matching entry (at Index 001).
- Page 627 Area Code Table) • Finally, for Pulse Rate Type ‘03’ PRASAR UCS will check the Normal Pulse Rate Table. PRASAR UCS will consider the Cost for the First Unit as 001.00 (As ` or $ as per applicable currency) for the duration of 30 seconds and for the additional unit also, the cost will be considered as 001.00 for the...
- Page 628 Configuring Pulse Rate Types Generally service providers offer discounted call rates for special days. To take care of this, PRASAR UCS provides two types of Pulse Rate Tables: Normal and Discounted. If your service providers do not offer any special rates, you may skip configuring the Discounted Pulse Rate table.
- Page 629 Zones, from 1 to 4, as required, to match the time of the pulse rates offered by your service provider. If you have configured Time Zones for the Call Cost Schedule on a trunk, you may define the different Pulse Rate Types for each Time Zone. • Click Submit. Matrix PRASAR UCS System Manual...
- Page 630 To configure the Discounted Pulse Rate table, • Click the Discounted Pulse Rate Table. • Configure the Discounted Pulse Rate Type with rates for the First Unit and the Additional Unit, as required. • Click Submit. Matrix PRASAR UCS System Manual...
- Page 631 Configuring Area Code Table The pulse rate of a call depends on the destination number dialed. Generally, pulse rate varies according to the type of the call: Local, national, international. PRASAR UCS enables you to configure Pulse Rates according to Area codes.
- Page 632 • Different service providers offer different pulse rates for the same type of calls. To take care of this, PRASAR UCS allows you to assign different Pulse Rate Options for each area code. • For each area code, configure the Pulse Rate to be followed for the desired Pulse Rate Options in the Pulse Rate Type for Pulse Rate (Option 1 to 4) column.
- Page 633 1214 1215 1216 1217 1218 1219 1224 1225 1226 Ontario 1228 1229 1231 1234 1239 1240 1242 Bahamas 1246 Barbados 1248 1250 1251 1252 1253 1254 1256 1260 1262 1264 Anguilla 1267 1268 Antigua 1269 Matrix PRASAR UCS System Manual...
- Page 634 1281 1284 1289 Ontario 1301 1302 1303 1304 1305 1306 Saskatchewan 1307 1308 1309 1310 1312 1313 1314 1315 1316 1317 1318 1319 1320 1321 1323 1325 1330 1331 1334 1336 1337 1339 1340 USVI Matrix PRASAR UCS System Manual...
- Page 635 1352 1360 1361 1386 1401 1402 1403 Alberta 1404 1405 1406 1407 1408 1409 1410 1412 1413 1414 1415 1416 Ontario 1417 1418 Quebec 1419 1423 1424 1425 1430 1432 1434 1435 1438 Quebec 1440 Matrix PRASAR UCS System Manual...
- Page 636 1469 1473 Grenada 1478 1479 1480 1484 1500 NANParea 1501 1502 1503 1504 1505 1506 NewBrunswick 1507 1508 1509 1510 1512 1513 1514 Quebec 1515 1516 1517 1518 1519 Ontario 1520 1530 1540 1541 1551 Matrix PRASAR UCS System Manual...
- Page 637 1561 1562 1563 1567 1570 1571 1573 1574 1575 1580 1585 1586 1600 Canada 1601 1602 1603 1604 1605 1606 1607 1608 1609 1610 1612 1613 Ontario 1614 1615 1616 1617 1618 1619 1620 1623 Matrix PRASAR UCS System Manual...
- Page 638 1647 Ontario 1649 T&CIsland 1650 1651 1660 1661 1662 1664 Montsrat 1670 CNMI 1671 1678 1682 1684 1700 NANParea 1701 1702 1703 1704 1705 Ontario 1706 1707 1708 1709 Newfoundland 1710 1712 1713 1714 1715 Matrix PRASAR UCS System Manual...
- Page 639 1727 1731 1732 1734 1740 1754 1757 1758 St.Lucia 1760 1762 1763 1765 1767 Dominica 1769 1770 1772 1773 1774 1775 1778 1779 1780 Alberta 1781 1784 St. V&G 1785 1786 1787 PrtoRico 1800 NANParea Matrix PRASAR UCS System Manual...
- Page 640 1804 1805 1806 1807 Ontario 1808 1809 DomRepub 1810 1812 1813 1814 1815 1816 1817 1818 1819 Quebec 1828 1829 DomRepub 1830 1831 1832 1843 1845 1847 1848 1850 1856 1857 1858 1859 1860 1862 Matrix PRASAR UCS System Manual...
- Page 641 St. K&N 1870 1876 Jamaica 1877 NANParea 1878 1888 NANParea 1900 NANParea 1901 1902 N Scotia 1903 1904 1905 Ontario 1906 1907 1908 1909 1910 1912 1913 1914 1915 1916 1917 1918 1919 1920 1925 1928 Matrix PRASAR UCS System Manual...
- Page 642 1971 1972 1973 1978 1979 1980 1985 1989 0117 Kazkhstan 01120 Egypt 01127 South Africa 01130 Greece 01131 Netherlands 01132 Belgium 01133 France 01134 Spain 01136 Hungary 01139 VaticanCity 01140 Romania 01141 Switzerland 01143 Austria Matrix PRASAR UCS System Manual...
- Page 643 Indonesia 01163 Philippines 01164 01165 Singapore 01166 Thailand 01181 Japan 01182 Korea 01184 VietNam 01186 China 01190 Turkey 01191 India 01192 Pakistan 01193 Afghanistan 01194 Sri Lanka 01195 Myanmar 01198 Iran 011212 Morocco 011213 Algeria Matrix PRASAR UCS System Manual...
- Page 644 Nigeria 011235 Chad 011236 CenAfrica 011237 Cameroon 011238 CapeVerde 011239 SaoTome 011240 Equtl_Guinea 011241 Gabonese 011242 Congo 011243 CongoDem 011244 Angola 011245 GuineaBissa 011246 DiegoGarcia 011247 Ascension 011248 Seychelles 011249 Sudan 011250 Rwandese 011251 Ethiopia Matrix PRASAR UCS System Manual...
- Page 645 Comoros 011290 StHelena 011291 Eritrea 011297 Aruba 011298 FaroeIsland 011299 Greenland 011350 Gibraltar 011351 Portugal 011352 Luxembourg 011353 Ireland 011354 Iceland 011355 Albania 011356 Malta 011357 Cyprus 011358 Finland 011359 Bulgaria 011370 Lithuania 011371 Latvia Matrix PRASAR UCS System Manual...
- Page 646 011500 Falklands 011501 Belize 011502 Guatemala 011503 El Salvador 011504 Honduras 011505 Nicaragua 011506 CostaRica 011507 Panama 011508 St.Pierre 011509 Haiti 011590 Guadeloupe 011591 Bolivia 011592 Guyana 011593 Ecuador 011594 FrenchGuyana 011595 Paraguay 011596 Martinique Matrix PRASAR UCS System Manual...
- Page 647 WSamoa 011686 Kiribati 011687 NewCaledonia 011688 Tuvalu 011689 FrenchPolyne 011690 Tokelau 011691 Micronesia 011692 MarshalIslnd 011850 Korea North 011852 Hong Kong 011853 Macau 011855 Cambodia 011856 Laos 011870 SatIndlOcn 011871 SatEastAtl 011872 SatPacific 011873 SatIndianOcn Matrix PRASAR UCS System Manual...
- Page 648 011964 Iraq 011965 Kuwait 011966 SaudiArabia 011967 Yemen 011968 Oman 011971 011972 Israel 011973 Bahrain 011974 Qatar 011975 Bhutan 011976 Mongolia 011977 Nepal 011992 Tajikistan 011993 Turkmenistan 011994 Azerbaijani 011995 Georgia 011996 Kyrgyzstan 011998 Uzbekistan Matrix PRASAR UCS System Manual...
-
Page 649: Call Cost Display
2 . 8 0 F r i 2 2 J A N 1 2 : 1 9 • The display is retained till the extension remains OFF-Hook. • Go Idle or you get dial tone after 3 seconds. Matrix PRASAR UCS System Manual... -
Page 650: Call Duration Control (Cdc)
The system checks the CDC Table applied to A. • PRASAR UCS will check whether the CDC is applicable on Extension of A as well as the Trunk used for making the outgoing call. To check whether CDC is applicable on Extension A •... - Page 651 Disconnect Call after CDC Timer check box is enabled in the CDC Table assigned to A. • a match is found for the B’s number in the Apply CDC for calls matching with numbers List. Matrix PRASAR UCS System Manual...
- Page 652 Raid: CDC is not applicable when you raid an extension as the conversation is converted into a 3 party conference. • Emergency Number Dialing: Emergency calls are not affected by this feature, i.e. CDC will not be applied on the dialing of Emergency Numbers. Matrix PRASAR UCS System Manual...
- Page 653 The CDC Table will open. There are 8 CDC Tables. By default CDC Table No. 1 is assigned to all extensions of PRASAR UCS. If the same CDC is to be assigned to all extensions, configure this table. If different CDC is to be applied to different extensions, configure separate CDC tables for these extensions.
- Page 654 By default, Number List 08 is assigned to this parameter. You must configure this list with numbers which you want to be exempt from CDC. To configure the list, click Do Not Apply CDC for calls matching with numbers. Matrix PRASAR UCS System Manual...
- Page 655 CDC Timer. By default the check box is disabled, which means that calls will not be disconnected on expiry of the CDC Timer. Enable the check box if required. • Click Submit. Matrix PRASAR UCS System Manual...
- Page 656 If selected extensions are to be allowed CDC or if different CDC parameters are to be allowed to selected extensions (for example, 160 seconds duration timer for a few extensions, 360 duration timer for some other extensions), then follow these steps: Define a new CDC table. Matrix PRASAR UCS System Manual...
- Page 657 Apply the new Station Advanced Feature Template now configured with a different CDC table on the selected extensions which are to be allowed this feature. CDC on Trunk • You must enable CDC in the Trunk Feature Template assigned to the trunks. For instructions, see “Configuring Trunks”. Matrix PRASAR UCS System Manual...
-
Page 658: Call Duration Display
Dials an external number. • The remote party answers the call. • The dialed external number with duration (5-digits in the format of MM:SS) is displayed on the LCD of the phone, when the call is answered. Matrix PRASAR UCS System Manual... -
Page 659: Call Forward
So, they need to be able to attend their calls even when they are not present at their desks. The 'Call Forward' feature of PRASAR UCS ensures this. Using this feature, calls landing on an extension can be forwarded to another extension, an external number, Voice Mail, or a Department Group. - Page 660 When an incoming call is routed to the Routing Group and if any member has set Call Forward to the Department Group, then only first extension of that Department Group will ring. • Call Forward when set/canceled from the SA mode, will not depend on the assigned CoS. Matrix PRASAR UCS System Manual...
- Page 661 Call Forward in Class of Service By default, Station Basic Feature Template Number 01 is assigned to all the extensions of PRASAR UCS. Station Basic Feature Template 01 is assigned COS group 01 in which Call Forward is enabled. So, all extensions of PRASAR UCS can use Call Forward.
- Page 662 Changing Call Forward No-Reply Timer using Jeeves • Login as System Engineer. • Under Configuration, click Station Advanced Feature Template. • Select an Advanced Feature Template from Template No. (By default, Template 01 is assigned to all extensions) Matrix PRASAR UCS System Manual...
- Page 663 'Call Forward No-Reply Timer' programmed in the routing group for this member phone. Call Forward No-Reply Timer, programmed in Station Advanced Feature Template will not be applied in this case. Matrix PRASAR UCS System Manual...
- Page 664 You get a confirmatory text message and confirmation tone. • Go Idle or you get dial tone after 3 seconds. To set Call Forward-Dual Ring, • First, set the desired Call Forward type. • Press the 'Forward' key. Matrix PRASAR UCS System Manual...
- Page 665 • Press 'Forward' Key again. • Dial 13. • Select 'Cancel'. • You get a confirmatory text message and confirmation tone. • Replace Handset on the cradle or you get dial tone after 3 seconds. Matrix PRASAR UCS System Manual...
-
Page 666: Call Forward-Remote
The feature 'SA Extension' allows entry into SA mode, without a password. By default, Station Basic Feature Template Number 01 is assigned to all the extensions of PRASAR UCS. This Station Basic Feature Template is assigned CoS group 01 by default. The default CoS group 01 has both 'SA Mode' and ‘SA Extension’... - Page 667 • Select the type of Call Forward you want to set for the extension: • To forward calls to voice mail, select Forward Calls to Voice Mail and the type of call forward. Default: Unconditionally. Matrix PRASAR UCS System Manual...
- Page 668 You can also forward the calls of all extensions at one go to the same destination. To do this, • Click Call Forward-All Extensions. • Select the Forward Calls of all Extensions and select the Call Forward type. • In to Extension, enter the Call Forward destination number. • Click Submit. Matrix PRASAR UCS System Manual...
- Page 669 Go Idle or you get dial tone after 3 seconds. If call is to be forwarded to an extension of the PRASAR UCS, dial the extension number. If call is to be forwarded on an external number, dial Trunk Access Code, then dial the external phone number and terminate the command with #*.
-
Page 670: Call Forward-Scheduled
In addition to “Call Forward”, PRASAR UCS supports 'Call Forward - Scheduled', which allows extension users to set call forward for desired Time Zones at one time, and the system automatically forwards the calls to the destination defined for each Time Zone. - Page 671 “Station Advanced Feature Template” applied on the extensions which are allowed Call Forward-Scheduled. You may select from 'Internal Calls', 'Trunk Calls' and 'Internal + Trunk Calls'. By default, only trunk calls are forwarded to external numbers. Matrix PRASAR UCS System Manual...
- Page 672 To set Call Forward for the extension for the Working Hours, under Working Hours, select the type of Call Forward: • To forward calls to voice mail, select Forward Calls to Voice Mail and the type of call forward. Default: Unconditionally. Matrix PRASAR UCS System Manual...
- Page 673 Scroll to the desired Call Forward type for the selected Time Zone. • Press Enter key to select Call Forward type. • Enter Destination Number on prompt. • You get confirmation tone and message showing extension to which Call Forward is set. Matrix PRASAR UCS System Manual...
- Page 674 Press DSS key assigned to Call Forward-Scheduled - Remote. • Enter extension number (for which it is to be canceled) • Scroll to 'Cancel Call Forward'. • Press Enter key. • You get confirmation tone and message. Matrix PRASAR UCS System Manual...
-
Page 675: Call Forward-When Not Registered
Call Forward-When Not Registered What's this? SIP Phones connected as extensions may fail to register with PRASAR UCS when the network link is down or when there is power failure. Using the Call Forward-When Not Registered feature, the extension users can have their calls forwarded even when their extension phone is not registered with PRASAR UCS. - Page 676 Select the destination for forwarding calls when the SIP Extension fails to register from the following: • Forward Calls to Voice Mail. • Forward Calls to Extension Number. If you select this option, you must enter the desired Extension Number in the corresponding box. Matrix PRASAR UCS System Manual...
- Page 677 Call Forward-When Not Registered set/canceled by SIP Phone Users SIP extension users can set/cancel Call Forward-When Not Registered from their SIP phones. The SIP phone may be a Matrix Extended IP Phone or any Standard SIP phone. Matrix PRASAR UCS System Manual...
- Page 678 • Press DSS key assigned to Call Forward-When Not Registered (if programmed). • Dial *13. • Select the desired time-zone ‘Working Hours’/’Break Hours’/’Non-Working Hours’, and press ‘Enter’ key. • Select ‘Cancel’ and press ‘Enter’ key. Matrix PRASAR UCS System Manual...
- Page 679 Dial *13-2-0 for working hours • Dial *13-3-0 for break hours. • Dial *13-4-0 for non-working hours. • Replace handset. To cancel All Call Forward-When Not Registered, • Lift handset. • Dial *13-0. • Replace handset. Matrix PRASAR UCS System Manual...
-
Page 680: Call Hold
Call Hold What's this? Call Hold enables you to put an on-going conversation (with an internal or external number) on hold. PRASAR UCS offers three types of Call Hold: • Exclusive Hold: An on-going conversation is put on hold from an Extended IP Phone and is retrieved from the same Extended IP Phone that put it on hold. - Page 681 The call remains connected in the system. The call remains on hold for the duration of the Global Hold Retrieval Timer (programmable; default: 60 seconds). • Any Extended IP Phone connected to the PRASAR UCS can pick up the call put on Global hold by: • Pressing DSS key assigned to the Trunk put on Global Hold.
- Page 682 To be able to place calls on Global Hold, you must select 'Global Hold' as the Default Call Hold Type in the System Parameters of PRASAR UCS. The Extended IP Phone (which picks up the call) must have a DSS Key to access the Trunk or the Extension which is put on hold.
- Page 683 To put a call on Exclusive Hold using DSS key assigned to Exclusive Hold: • You are in speech with on a Trunk/with an extension. • Press DSS key assigned to Exclusive Hold. • Go idle. • Call with Trunk/extension is put on 'Exclusive Hold'. Matrix PRASAR UCS System Manual...
- Page 684 Press the DSS Key of the Trunk/extension put on Global hold. Consultation Hold For Extended IP Phone Users To put a call on Consultation Hold: • Press the DSS Key assigned to the feature (if configured). • Press Transfer key. Matrix PRASAR UCS System Manual...
-
Page 685: Call Park
LED of the assigned DSS key. Thus, the Operator can now easily park or retrieve the call by pressing the DSS key. PRASAR UCS offers two types of Call Park facility: • Call Park-General Orbit: The calls can be parked either manually or automatically in the General Orbit. - Page 686 After parking a call, the extension user can continue to make and answer other calls and use other system features. For Standard SIP phones, PRASAR UCS supports Call Park and Retrieve using REFER Message. For a list of IP phones on which this feature has been tested, see “PRASAR UCS Features tested on IP Phones...
- Page 687 Assign a separate DSS key for each General Orbit (2-9). For instructions refer to “DSS Keys Programming”. • If required, you may change the duration of the Call Park Timer and the Call Park Release timer. See “System Timers and Counts” for instructions. Matrix PRASAR UCS System Manual...
- Page 688 To retrieve a parked call from your phone, when you are in speech with someone: • Press Transfer Key. • Press DSS Key assigned to 'Call Park - Retrieve'. This key is applicable only for SPARSH VP510. This feature is not applicable for SPARSH VP330. Matrix PRASAR UCS System Manual...
- Page 689 • Dial 116 • Enter Orbit Number where you parked the call (1-9) (Personal Orbit:1; General: 2-9). Matrix PRASAR UCS System Manual...
-
Page 690: Call Logs
Call Logs What's this? PRASAR UCS stores the details of 20 each, of the following types of calls: • Missed calls: incoming calls that were not answered by extension users. • Answered calls: incoming calls answered by extension users. •... - Page 691 The phone will display the call log details. • To view another call log, scroll with the Back Navigation key to return to the previous option. • You may exit the Phone Menu by going ON-Hook or pressing the Cancel key. Matrix PRASAR UCS System Manual...
- Page 692 • The system will dial out the selected number using the Outgoing Trunks assigned for dialing ‘0’. • The dialed number will be logged in the "Dialed" call log and the Last Number Redial List. Matrix PRASAR UCS System Manual...
- Page 693 "Memory Full" will appear on your phone's display and you will get an Error Tone. Refer the topic “Abbreviated Dialing” to know more. Only if there is a free Memory Index in the Personal Directory. Matrix PRASAR UCS System Manual...
-
Page 694: Call Pick Up
UCS Features tested on IP Phones of different Brands” in the Appendix. • PRASAR UCS will send only first 3 ringing call's information in NOTIFY message to the SIP Extension, which has requested Group Call Pickup. This feature has been supported in SIP Phones of CISCO and POLYCOM. - Page 695 Do not assign '00' as Call Pick-Up Group. '00' is the command to de-assign from a Call Pick-Up Group. Assigning Extensions to Call Pick-Up Groups using Jeeves • Login as System Engineer. • Under Configuration, click VoIP Configuration. Matrix PRASAR UCS System Manual...
- Page 696 Click Submit. Call Pick-Up in Class of Service Decide which extensions are to be assigned to Call Pick-Up groups. Ensure that the feature Call Pick-Up is enabled in the Class of Service (COS) of these extensions. Matrix PRASAR UCS System Manual...
- Page 697 By default, Station Basic Feature Template Number 01 is assigned to all the extensions of PRASAR UCS. The Station Basic Feature Template 01 is assigned COS group 01 which has Call Pick-Up feature enabled. Thus, all the extensions of the system can use Call Pick-Up by default.
-
Page 698: Call Progress Tones
Each CPT has a distinctive tone frequency and cadence assigned to it, for which some standards have been established by the International Telecommunication Union (ITU). On the basis of specific frequency, modulating frequency and cadence, the CPTs generated by PRASAR UCS are categorized as:... - Page 699 PRASAR UCS offers the flexibility of setting the Call Progress Tone Generation (CPTG) type to match the country- specific CPT standards established by ITU. India being the default 'Region' for PRASAR UCS, the CTPG for India is set as default in the system. Matrix PRASAR UCS System Manual...
- Page 700 At the time of installation, when you select the Region (according to the geographical location of the site where the PRASAR UCS is installed), PRASAR UCS sets the country-specific CPTG type defined for the selected Region. To see default CPTG types applicable for each region, see “CPTG Region...
- Page 701 How to use It is important that users of PRASAR UCS also get acquainted with the different Call Progress Tones played by the system, so that they understand the meaning of the terms used for various tones. Therefore, PRASAR UCS makes it possible for users to listen to the various Call Progress Tones.
- Page 702 Dial Tone 1 425*25 Continuous Dial Tone 2 425*25 Continuous Ring Back Tone 1000 4000 Busy Tone Error Tone Confirmation Tone Brazil Feature Tone ICWT 2900 CCWT 2700 Dial Tone 1 Continuous Dial Tone 2 Continuous Matrix PRASAR UCS System Manual...
- Page 703 2700 Dial Tone 1 Continuous Dial Tone 2 Continuous Ring Back Tone 1000 4000 Busy Tone Error Tone Confirmation Tone Germany Feature Tone ICWT 2900 CCWT 2700 Dial Tone 1 Continuous Dial Tone 2 Continuous Matrix PRASAR UCS System Manual...
- Page 704 Dial Tone 1 Continuous Dial Tone 2 Continuous Ring Back Tone Continuous Busy Tone 1000 1000 Error Tone Confirmation Tone Iraq Feature Tone ICWT 2900 CCWT 2700 Dial Tone 1 1500 Dial Tone 2 1500 Matrix PRASAR UCS System Manual...
- Page 705 Ring Back Tone 440+480 1000 2000 Busy Tone 480+620 Error Tone 480+620 Confirmation Tone 350+440 Korea Feature Tone 350+440 ICWT 350+440 2900 CCWT 350+440 2700 Dial Tone 1 350+440 Continuous Dial Tone 2 350+440 Continuous Matrix PRASAR UCS System Manual...
- Page 706 2700 Dial Tone 1 Continuous Dial Tone 2 Continuous Ring Back Tone 1000 4000 Busy Tone Error Tone Confirmation Tone Poland Feature Tone ICWT 2900 CCWT 2700 Dial Tone 1 Continuous Dial Tone 2 Continuous Matrix PRASAR UCS System Manual...
- Page 707 Dial Tone 2 Continuous Ring Back Tone 400*33 2000 Busy Tone Error Tone Confirmation Tone 400*33 South Africa Feature Tone 400*33 ICWT 400*33 2900 CCWT 400*33 2700 Dial Tone 1 400*33 Continuous Dial Tone 2 400*33 Continuous Matrix PRASAR UCS System Manual...
- Page 708 Dial Tone 2 350+440 Continuous Ring Back Tone 400+450 2000 Busy Tone Error Tone Confirmation Tone 350+440 Feature Tone 350+440 ICWT 350+440 2900 CCWT 350+440 2700 Dial Tone 1 350+440 Continuous Dial Tone 2 350+440 Continuous Matrix PRASAR UCS System Manual...
- Page 709 On - 100 ms Off, 400 ms On - 100 ms Off (same for all Regions) The meaning of frequency notation is as follows: • f1*f2: f1 is modulated by f2. • f1+f2: The juxtaposition of two frequencies f1 and f2 without modulation. Matrix PRASAR UCS System Manual...
- Page 710 Default CPTG Type Matrix PRASAR UCS System Manual...
-
Page 711: Call Restriction Based On Ip Address
Call Restriction based on IP Address What's this? When PRASAR UCS is connected to a public IP network, it is may be necessary to allow traffic from particular IP address only. With the feature 'Call Restriction based on IP Address', PRASAR UCS makes it possible to entertain requests on its LAN/WAN Ports from predefined IP Addresses only. - Page 712 Enter the IP Address and the corresponding Port from which you want to allow incoming calls. Do not configure the port, if you want to allow incoming calls from all the ports for a particular IP Address. • Click Submit. Matrix PRASAR UCS System Manual...
-
Page 713: Call Taping
Incoming and outgoing internal calls. PRASAR UCS supports tapping of 20 calls simultaneously in a 3-Party Conference. Calls can be taped either in the extension user’s personal mailbox or a common mailbox assigned to this feature. The taped calls are stored along with the call details, that is, the time and date of the call, the calling number and the called number. - Page 714 Mailbox, the taped conversations will be saved in each extension user’s Personal Mailbox. In you select Common Mailbox, you can save the taped conversation either in a single file or in individual files as per your requirement. Matrix PRASAR UCS System Manual...
- Page 715 Number List-Incoming Calls Number List-Outgoing Calls Use this table to program the Number lists. By default Number List 09 is assigned for numbers of incoming calls, and Number List 10 is assigned to numbers of outgoing calls. Matrix PRASAR UCS System Manual...
- Page 716 By default, this check box is enabled. Configuring Call Taping using Jeeves • Login as System Engineer. • Click Configuration. For Call Taping Mailbox, • Under VMS Configuration, click VMS General Parameters. Matrix PRASAR UCS System Manual...
- Page 717 Single File before and after call transfer, the system will generate one single file for saving the conversation taped before and after the call is transferred. • Click Submit. To enable/disable Call Taping Beeps, • Under Configuration, click System Parameters. • Click the System Parameters to expand. Matrix PRASAR UCS System Manual...
- Page 718 Scroll to Play Beep when Raid/Call Taping/Conversation Recording starts, enable/disable beeps by selecting/clearing the check box. • Click Submit. To enable Call Taping on Trunks, • Under Configuration, click Trunk Feature Template. • Click the Miscellaneous to expand. Matrix PRASAR UCS System Manual...
- Page 719 Under Configuration, click Station Advanced Feature Template. By default, Station Advanced Feature Template 01 is assigned to all extensions of the PRASAR UCS. If you want to assign Call Taping facility to all extensions, then program the Call Taping related parameters and Number Lists, in Template 01.
- Page 720 If you want calls between extensions to be taped, click the Call Taping for Internal Calls check box. • Click Submit. • Now, apply the programmed template to the desired extensions to which you want to provide the Call Taping facility. Refer the topic “Station Advanced Feature Template” for programming instructions. Matrix PRASAR UCS System Manual...
- Page 721 • Press ‘Voice Mail’ Key. • Dial 3931-Your Mailbox Password • Follow Voice Mail Prompts to listen to new messages. Only if the mailbox is password protected, you will be prompted to enter the password. Matrix PRASAR UCS System Manual...
-
Page 722: Call Toggle
• A is in speech with D and E is on Consultation Hold. • To talk with E, A dials Flash-1. Speech with E. • To talk with D, A dials Flash-1. Speech with D. Matrix PRASAR UCS System Manual... - Page 723 Call Toggle is a Class of Service (CoS) dependent feature. In the default Station Basic Feature Template 01 assigned to all extensions of PRASAR UCS, Call Toggle is included in the 'Basic Features' assigned to all CoS groups, including the default CoS group 01. So, all extensions of PRASAR UCS can use this feature.
- Page 724 External party 2 on Consultation Hold. • Press DSS Key assigned to Call Toggle. • Speech with External party 2. • Press DSS key assigned to Call Toggle again. • Speech with External party 1. Matrix PRASAR UCS System Manual...
-
Page 725: Call Traffic
Call Traffic What is this? Call traffic measurement feature of PRASAR UCS gives a graphical representation of the time duration for which extensions and trunk ports remained Off-hook. The data is represented in a bar graph format. In the graph, the duration is shown in Hours along the Y-axis while the extension(s) names are shown along the X- axis. - Page 726 If there is no call traffic usage data is available for the extension/ trunk you are currently viewing, the page will not show any bars. Click the Refresh button to get the latest 24hrs call traffic statistics.The graph displays the call data (for last 24hrs) as per the SMDR filters set by you. Matrix PRASAR UCS System Manual...
- Page 727 Click the Export button to export the data you are currently viewing. • The Opening SIP_CallTraffic.csv window will open. You can choose whether to open this file or save it in.xls format as per your requirement. Matrix PRASAR UCS System Manual...
- Page 728 The file contains the date and time when the call traffic data is calculated and the names of the extensions/ trunks for which it is calculated. • You can save this file on your local disk from Excel window also. Matrix PRASAR UCS System Manual...
-
Page 729: Call Transfer
Class of Service of the transferring extension. • PRASAR UCS enables SIP extensions to resume a transferred call before it has been answered by the transfer target (which may be an extension or an external number). For a list of IP phones on which this feature has been tested, see “PRASAR UCS Features tested on IP Phones of different... - Page 730 C is an external caller. D is an external number. Call Transfer from Trunk/Extension to Extension Three scenarios are possible: Screened Transfer: • C calls a Trunk of PRASAR UCS. • The Operator answers the call. • Operator puts C on Consultation Hold. •...
- Page 731 Call Transfer in Class of Service In the default Station Basic Feature Template Number 01 is assigned to all the extensions of PRASAR UCS, the default CoS group 01 in this Station Basic Feature Template has Call Transfer included in the 'Basic Features'. So, all extensions of PRASAR UCS can use this feature.
- Page 732 Scroll to Other Features and change the values as required for Call Transfer related timers. • Click Submit. How to use For Extended IP Phone Users Extension to Extension: • Speech with extension. • Press DSS Key assigned to desired party extension. • Go ON-Hook or press ‘Transfer’ Key. Matrix PRASAR UCS System Manual...
- Page 733 83, and 84. 101.Trunk Access Code: users worldwide may dial a code from 0, 5, 61, 62, 63, and 64. Users in USA may dial a code from 0, 9, 81, 82, 83, and 84. Matrix PRASAR UCS System Manual...
- Page 734 Dial desired party’s extension number. • Go ON-Hook or press ‘Transfer’ Key. • Speech with extension. • Press Transfer key. • Dial 1078. • Dial desired party's extension number. • Go ON-Hook or press ‘Transfer’ Key. Matrix PRASAR UCS System Manual...
-
Page 735: Calling Line Identification And Presentation (Clip)
Calling Line Identification and Presentation (CLIP) What's this? The PRASAR UCS provides the facility of detecting the caller's number and presenting it on the display of the called extension phone. This feature is called Calling Line Identification and Presentation (CLIP). - Page 736 • Select the desired option: Display number of Transferring Extension when call is transferred by this Extension or Display number of Party kept on Hold when call is transferred by this Extension. • Click Submit. Matrix PRASAR UCS System Manual...
-
Page 737: Calling Line Identification Restriction (Clir)
Basic Feature Template 01 is assigned CoS group 01 in which both CLIR and CLIR Override are disabled. Thus, none of the extensions of the PRASAR UCS can suppress their CLI or force any other extension to display its CLI. - Page 738 102. System Engineer is recommended to assign a DSS Key with LED to this feature. When the assigned DSS key is pressed, it will glow red indicating that CLIR is enabled. 103. If a DSS key with LED has been assigned, when you press the key again, the LED will be turned off indicating CLIR is now canceled. Matrix PRASAR UCS System Manual...
-
Page 739: Cancel All Station Features
Cancel All Station Features What's this? For each feature of the PRASAR UCS that extension users have set/enabled on their extension, the system provides access code for cancellation of the feature. Extension users can also cancel all features set on their extension by dialing a feature access code. These set of features can also be canceled for any extension user from the SA Jeeves. - Page 740 Do Not Disturb • Call Forward • Call Forward - Scheduled • Call Forward When Not Registered • Call Forward When Not Registered - Scheduled • Hotline • Auto Answer • Auto Redial • Auto Call Back Matrix PRASAR UCS System Manual...
-
Page 741: Class Of Service (Cos)
PRASAR UCS offers the flexibility to allow or deny extension users access to features of the System, on the basis of their requirement and according to time of the day. For users, access to various features from their extensions is their CoS. - Page 742 Hotline Matrix PRASAR UCS System Manual...
- Page 743 PRASAR UCS. CoS group number 19 and 20 are assigned when the Hospitality Application of PRASAR UCS is used. When this application is being used in CoS group number 20, the SA Mode will be enabled. See PRASAR UCS Hospitality System Manual.
- Page 744 For example: to enable DND-Override in CoS group 01, select the check box against DND-Override in CoS group 01. To disable clear the check box again. • Click Submit. Matrix PRASAR UCS System Manual...
- Page 745 If all extensions to be allowed the same set of features during working hours, break hours, non-working hours, enter the same CoS group number in all time zones in the Template Number applied to all Matrix PRASAR UCS System Manual...
- Page 746 For example: To assign all features to extensions, create a CoS group with all features enabled, CoS group 07. Select a different Station Basic Feature Template, for example 05. Enter CoS Group 07 in all Matrix PRASAR UCS System Manual...
- Page 747 After you have configured the CoS group in the Station Basic Feature Template, you must assign this template to the stations. Refer the topic “Station Basic Feature Template” for instructions on applying templates on SIP extensions. Matrix PRASAR UCS System Manual...
-
Page 748: Cli Based Routing
CLI Based Routing What is this? PRASAR UCS offers the facility to detect the calling party's number and name. This is known as Calling Line Identification. On the basis of CLI, it is possible to land calls from a particular number on a particular extension or group of extensions. - Page 749 Index Phone Number Name Port Type Port Number 2640459 MidasBiz Routing Group 0002 022281110001 Jet Set SIP Extension 0004 2640075 Bacchus Routing Group 0003 Configuring CLI Based Routing using Jeeves • Login as System Engineer. Matrix PRASAR UCS System Manual...
- Page 750 Destination Type, select the VMAA Menu to be assigned to the respective calling party. You may click the Voice Mail Auto Attendant (VMAA) Menu link to edit the parameters of desired VMAA Menu. For details, see “Voice Mail Auto-Attendant Menu”. Matrix PRASAR UCS System Manual...
- Page 751 • Click Submit. • Enable CLI Based Routing for the desired Trunks in their “Trunk Feature Template”. Refer the topic “Customizing Trunk Feature Templates” for instructions. Matrix PRASAR UCS System Manual...
-
Page 752: Closed User Group (Cug)
2001 in System-A as well as in System-B or System-C. • S1 to Sn are extensions. • SIP Trunk 1 to SIP Trunk 3 are SIP Trunks connecting the three Systems. Matrix PRASAR UCS System Manual... - Page 753 This helps to select an alternate route. Whereas if Rotation is ON then the trunks in the OGTBG are selected in round robin fashion. • Strip Digit Count: For this application, configure the parameter as 0. This parameter is relevant when you have the same extension numbers in each system. Matrix PRASAR UCS System Manual...
- Page 754 2001 in System-A as well as in System-B or System-C. • S1 to Sn are extensions. • SIP Trunk 1 to SIP Trunk 3 are SIP Trunks connecting the three Systems. Matrix PRASAR UCS System Manual...
- Page 755 System-C. In this case, System-B dials 212002 on SIP Trunk 3, System-C receive this code and dials out the same code, that is, 212002 on SIP Trunk 2 without striping of any digit. Matrix PRASAR UCS System Manual...
- Page 756 For example in the figure given above, route code for System-B can be defined as ‘3’ and that for System-C can be defined as ‘4’. Matrix PRASAR UCS System Manual...
- Page 757 Apply Call Cost: By default, this check box is enabled and the system will calculate the cost of each call. For certain calls (internal calls) you do not require the call cost calculation, clear the check box corresponding to these entries. • Click Submit. Matrix PRASAR UCS System Manual...
-
Page 758: Communication Ports
In order for each of the above listed facilities to work, Communication Port (USB1 to COM or USB2 to COM) must be assigned first as the 'Destination Port' and the attributes of the USB to COM Port of PRASAR UCS and the Communication Port of the PC to which it is connected must programmed to match. - Page 759 Fail You may change any of the above parameter values or set the page to default to re-initiate the registration process. The status will be updated accordingly. • Click Submit to save changes. Matrix PRASAR UCS System Manual...
-
Page 760: Conference-3 Party
The maximum number of simultaneous 3-Party conferences supported by PRASAR UCS is 21. PRASAR UCS supports a maximum of 8 participants in a single or multiple conference. To increase the number of participants in the conference, you must purchase the Conference Participant License. To know more, refer “License Management”. - Page 761 If extension users at remote locations are to be allowed to initiate the 3-party conference, “Direct Inward System Access (DISA)” “Auto Attendant” must be enabled on the trunk on which their call lands. Matrix PRASAR UCS System Manual...
- Page 762 3-Party Conference in Class of Service By default, Station Basic Feature Template Number 01 is assigned to all the extensions of the PRASAR UCS. The Station Basic Feature Template 01 is assigned CoS group 01 which has 'Conference' enabled. So, all the extensions of the PRASAR UCS can make Conference calls.
-
Page 763: Conference-Multiparty
(If all the conferences involve 3 parties) single conference) PRASAR UCS supports a maximum of 8 participants in a single or multiple conference. To increase the number of participants in the conference, you must purchase the Conference Participant License. To know more, refer “License Management”. - Page 764 Any participant in a conference can dial the Cancel conference code to end the conference. All participants will get Error Tone and the system resource occupied by the conference will be freed. Examples of Multi-party Conferences: A Multiparty conference between extensions. Matrix PRASAR UCS System Manual...
- Page 765 Simultaneous Multi Party conferences between extensions. Multiple Multiparty Conferences between trunks and extensions. Multiparty Conferences between one trunk and a few extensions. Multiparty Conference between a few trunks and one extension. Matrix PRASAR UCS System Manual...
- Page 766 A Multiparty Conference is initiated. Press the ‘Conference’ Key. • The Multiparty Conference menu appears on the LCD. • Select the option Include Party and dial the number. • When you are in speech with the party, press the ‘Conference’ Key. Matrix PRASAR UCS System Manual...
- Page 767 Select the option ‘Terminate Conference’ and press the Enter Key. • Press the DSS key assigned to Terminate Conference. • All the participants will get an Error Tone and the system resource occupied by the conference will be freed. Matrix PRASAR UCS System Manual...
- Page 768 To use Multiparty Conference from DISA mode, you may see the instructions “Dial-In Conference using DISA” under “Conference Dial-In”. Matrix PRASAR UCS System Manual...
-
Page 769: Conference Dial-In
The Conference Number can be: 01 to 15. The Conference Number must correspond with the number of simultaneous Dial-In Conferences supported by the PRASAR UCS. If a user dials a conference number other than this, system will play an Error Tone •... - Page 770 • Rejoin a Dial-In Conference. The participants who leave temporarily can rejoin the conference at a later stage by going Off-Hook and dialing the Rejoin Conference conference code. Matrix PRASAR UCS System Manual...
- Page 771 Press the DSS key assigned for Dial-In Conference. • Dial *19. • The Dial-In Conference menu appears on the LCD. • Select the option ‘Schedule a Conf’ and press the Enter Key. • Enter Conference Number on the prompt. Matrix PRASAR UCS System Manual...
- Page 772 While in Conference, press the ‘Conference’ Key. • The Multiparty Conference menu appears on the LCD. • Select the option ‘Leave Temporary’ and press the Enter Key. • Press the DSS key assigned to Temporary Leave Conference/Rejoin Conference. Matrix PRASAR UCS System Manual...
- Page 773 You can cancel a Dial-In Conference from System Administrator (SA) Mode using Jeeves. To do this, • Login as System Administrator. • Click the Dial-In Conference - Cancel. • Enter the two-digit conference number (01 to 15) which you want to cancel in the Cancel Dial-In Conference Number field. Matrix PRASAR UCS System Manual...
- Page 774 When you enter DISA mode, you get beeps, dial digits before the DISA Inactivity Timer elapses. • Never dial 'Flash' when in DISA mode, you will get disconnected. • Keep dialing any digit to continue the conference. • “Direct Inward System Access (DISA)” to know more. Matrix PRASAR UCS System Manual...
-
Page 775: Conflict Dialing
'Dial' phase. Similarly, Station (Extension) and Logical Group Codes too must be unique and should not match with any of the features invoked in the 'Dial' phase. However, PRASAR UCS allows overlaps within Feature Codes and “Flexible Numbers”... - Page 776 Changing Conflict Dialing Wait Timer using Jeeves • Login as System Engineer. • Under Configuration, click System Timers and Counts. • Scroll to Other Features and set the time in seconds as desired for the Conflict Dialing Timer. • Click Submit. Matrix PRASAR UCS System Manual...
-
Page 777: Conversation Recording
Matrix Comsec is not responsible for any mis-/abuse of this feature by users. • On SIP extensions, PRASAR UCS supports Conversation Recording using INFO Message. For a list of IP phones on which this feature has been tested, see “PRASAR UCS Features tested on IP Phones of different Brands”in the Appendix. - Page 778 Conversation Recording must be enabled in the COS group of the extensions to which this feature is to be allowed. In the default Station Basic Feature Template Number 01 is assigned to all the extensions of PRASAR UCS, CoS group 01 is assigned as default. Conversation Recording is disabled in CoS group 01. So, none of the extensions of the PRASAR UCS can record conversations.
- Page 779 Go Idle or you get dial tone after 3 seconds. 107. This is the default Voice Mail Feature Access Code. Verify with your System Engineer if this has been changed and use the new code. Matrix PRASAR UCS System Manual...
- Page 780 Conversations are recorded as New Messages. So, follow the voice mail prompts for listening to new messages. Matrix PRASAR UCS System Manual...
-
Page 781: Cosec Integration
PRASAR UCS supports integration with COSEC to support Matrix COSEC Door Controllers. However, COSEC Integration can also be used in VIP Apartments and Villa’s, wherein SPARK200 is installed. With this integration, the users of PRASAR UCS can unlock the COSEC Door Controller using their Extended IP Phone. - Page 782 To assign Group IDs to SIP users, see parameter COSEC Door Group in “Configuring Matrix SPARSH VP248”, “Configuring Matrix SPARSH VP310”, “Configuring Matrix SPARSH VP330”, “Configuring Matrix VARTA ADR100/ AMP100 UC Clients”, “Configuring Matrix SPARSH VP510”, “Configuring Matrix Extended SPARSH VP710”, “Configuring Matrix VARTA WIN200 UC Client”...
-
Page 783: Customer Name
Customer Name What's this? Customer Name is the name of the organization/enterprise that has deployed PRASAR UCS. As an user, you can enter the name of your company/organization in the system. When Customer Name is assigned in the system, this name will appear as header on the various System Reports generated and printed by the PRASAR UCS like SMDR Incoming, Outgoing and Internal Call Reports, Alarm Status reports, etc. -
Page 784: Day Night Mode
Time Table, when work is resumed. To cite another example, the office must work for extended hours. You can set the PRASAR UCS to Day Mode and set it back to operate as per the Time Table. - Page 785 • Select the desired option: • Set System in Day Mode (Working Hours) • Set System in Night Mode (Non-Working Hours) • Set System in Break Mode • Operate System as Per Timetable Assignment (default). Matrix PRASAR UCS System Manual...
- Page 786 As per Time Table SPARSH VP310/ Day Mode Blue Continuous ON (Break Hour Mode) SPARSH VP510 Day Mode Night Mode Continuous ON Night Mode Day Mode Blue Continuous ON Break Hour Mode Day Mode Blue Continuous ON Matrix PRASAR UCS System Manual...
-
Page 787: Daylight Saving Time (Dst)
When PRASAR UCS is installed in a country/region where DST is used, it is necessary to synchronize the Real Time Clock of PRASAR UCS with the local time. So, if you are installing PRASAR UCS in a country where DST is used, find out the DST convention currently in use in that country, and adjust DST accordingly. - Page 788 DST at the preset dates and time for the country/region where the system is installed. For example, if PRASAR UCS is installed Spain, the DST Type 01 applicable to this country should be programmed as Scheduled DST. The system will automatically advance the clock on the last Sunday of March at 01.59 to 03:00 am every year (the start date of DST) and set the clock backward on the last...
- Page 789 Set the DST Mode to Manual or Scheduled as per your requirement. Scheduled DST Adjustment • If you have selected Scheduled as DST mode, in the Region list, select the name of the country/region where your system is installed. Matrix PRASAR UCS System Manual...
- Page 790 If 'Date-Month Wise' is selected in Type, you should now select the desired options in each of the following to specify the DST Start details, • Month: Select the month when DST begins (January-December). • Date: The date on which DST begins (1-31). Matrix PRASAR UCS System Manual...
- Page 791 DST begins in the DST Start. • Day: Select the day of the month - Sunday, Monday, Tuesday, Wednesday, Thursday, Friday, Saturday - when DST begins. • Month: Select the month when DST beings (January-December). Matrix PRASAR UCS System Manual...
- Page 792 (that is, "from" time) at 23:59 hrs. • If you synchronize the RTC with the SNTP Server and the Date and Time changes, the DST will be applicable as per the new Date and Time. Matrix PRASAR UCS System Manual...
-
Page 793: Department Call
Callers can also reach individual extensions in a Department group by dialing the extension number. PRASAR UCS supports the formation of 32 department groups. The member extensions of a department group may be SIP Extensions, Virtual Extensions, Outgoing Trunk Bundle Group, Voice Mail Auto Attendant. - Page 794 "You have <x> new Message in your Personal Mail Box. You have <y> new Messages in your Department Group Mail Box" 108. This will depend on the type of Message Wait Indication configured for the Extension’s Voice Mail Settings. Matrix PRASAR UCS System Manual...
- Page 795 • another Department Group For Department Groups, PRASAR UCS does not support Call Forward to an external destination number. You can set Call Forward for Department Group from the SA Mode only. PRASAR UCS supports the following Call Forward options for Department Groups: •...
- Page 796 • Call Forward- if No Reply: when a call is made to the Department group, PRASAR UCS will place the call as per the Rotation configured for the Department Group for the duration of the 'Call Forward No Reply Timer for Department’ (default: 30sec). If none of the member extensions answers the call before the expiry of this timer, the call is forwarded to the destination.
- Page 797 Your table may look like this: Department Extensions to be included as members Access Code Group Name to be assigned SIP Extension Index 3901 3301, 3302 3902 3305 3903 3312, 3317 3904 3315, 3319, 3320 Matrix PRASAR UCS System Manual...
- Page 798 To be able to set Call Forward for the Department Group, member extensions must have this feature enabled in their COS. By default, Station Basic Feature Template Number 01 is assigned to all the extensions of PRASAR UCS, the default COS group 01 in the Station Basic Feature Template has ‘Department Group Call Forward’ enabled. So, all extensions of PRASAR UCS can set Call Forward Department Group.
- Page 799 Click Submit. For example: The Customer Care Department of a company has four extensions: 201, 202, 203 and 204 (on software ports 001, 002, 003, and 004 respectively), which needs to be grouped for Department Calls. Matrix PRASAR UCS System Manual...
- Page 800 • Click Department Group Properties. • Click the desired Department Group Number tab for which you want to set Call Forward. • Click Call Forward to expand. • You have two options for Call Forward: Matrix PRASAR UCS System Manual...
- Page 801 Scroll with the vertical bar to Call Forward No-Reply Timer for Department Group (sec). • Set the timer to the desired value. The range of this timer is 1 to 255 seconds. • Click Submit. Matrix PRASAR UCS System Manual...
- Page 802 Forward when No Reply • Forward when Busy/No Reply • Press Enter key. • Enter Destination number (extension number or voice mail) • You get confirmation tone and message on your phone’s LCD. • Go Idle. Matrix PRASAR UCS System Manual...
-
Page 803: Dial By Name
109. The process of entering the names is the same as when writing text messages (SMS) from a cell phone. The keys must be pressed multiple times in quick succession to enter the desired alphabet. Matrix PRASAR UCS System Manual... - Page 804 110. You may also refer the instructions provided under the topic Configuring Extensions: “Configuring Matrix SPARSH VP330”, “Con- figuring Matrix SPARSH VP248”, “Configuring Matrix SPARSH VP310”, “Configuring Matrix SPARSH VP510”, “Configuring Matrix Extended SPARSH VP710”. Matrix PRASAR UCS System Manual...
- Page 805 You get Ring Back Tone or Busy Tone. Entered the wrong alphabet? • Go ON-Hook. • Go OFF-Hook. • Press the DSS Key labeled 'Names' again. • Enter the name/initial letters of the contact's name. Matrix PRASAR UCS System Manual...
-
Page 806: Dialed Number Directory
It is the list of numbers dialed out from the phone, similar to the call history of recently dialed calls on a cell phone. PRASAR UCS retains up to 16 numbers dialed out from a phone in a directory. These numbers may have been dialed out using features like Abbreviated Dialing, Quick Dial, Redial, Walk-In Class of Service, or may be a simple outgoing call made by directly dialing the external number. - Page 807 Press 'Enter' key. • The desired number is dialed out and appears on your phone's display. • You get ring back tone. • Talk when speech is established. • Go ON-Hook after the conversation has ended. Matrix PRASAR UCS System Manual...
-
Page 808: Dial Plan For Sip Extension
Dial Plan for SIP Extension What's this? PRASAR UCS supports 8 Dial Plans with total 32 entries in each table. The Dial Plan contains a series of digits and/or wild card characters. When a user dials a number, it is compared with the Rule configured in the Dial Plan. If a match is found, the IP Phone routes the call immediately without waiting for End of Dialing and if a match is not found, the IP Phone will wait for the End of Dialing and then route the call. - Page 809 Under VoIP Configuration, click SIP Extension Settings. • Click the location at which you have registered SPARSH VP710, for example, Location 1. • Scroll to Dial Plan. • Select the Dial Plan number you configured. • Click Submit. Matrix PRASAR UCS System Manual...
-
Page 810: Digest Authentication
The Digest Authentication Table is common for all SIP trunks on which this feature is enabled. When you enable this feature on a SIP trunk, for all incoming calls (SIP requests): • PRASAR UCS will challenge the identity of the calling party (the SIP device initiating the request) to send its digest credentials. •... - Page 811 To avoid unauthorized access, we recommend you to change the Password regularly. Make sure it is strong and is kept confidential. • Click Submit. • Now, enable Digest Authentication on the desired SIP trunks. For instructions, see “Configuring SIP Trunks”. Matrix PRASAR UCS System Manual...
-
Page 812: Direct Dialing-In (Ddi)
To assign DDI numbers to the extension users and to route calls as per the DDI numbers, you need to configure the following: • Incoming Reference Table • Outgoing Reference Table • DDI Routing Table Matrix PRASAR UCS System Manual... - Page 813 No Reply and When busy. You may select from the following options - Disconnect, Route to a TLG, or Route to VMS. • If no match is found for the DDI number in the DDI Routing Table, the call is routed as per the Trunk Feature Template assigned in the Incoming Reference Table. Matrix PRASAR UCS System Manual...
- Page 814 Configuring using Jeeves To route incoming calls as per the DDI logic you must configure the following: • Assign the Incoming Reference ID on the respective trunk. • Incoming Reference Table • DDI Routing Table Matrix PRASAR UCS System Manual...
- Page 815 Route the call to Voice Mail, that is to the Mail box of the DDI extension. For this, a mail box must be assigned to the extensions. If the extension is not assigned mail box, the caller will hear the welcome message of the VMS, but will not be able to access the mail box. Matrix PRASAR UCS System Manual...
- Page 816 Department Groups, Routing Groups depending on the organizations requirement. Configure the following for the parameters for the landing destination: • Port Type: Select the port type to place the DDI call from the following: • Department Group • Quick Dial Matrix PRASAR UCS System Manual...
- Page 817 Determine the SIP Trunk on which you want to apply the Reverse DDI logic. • On the SIP Trunk, assign an Outgoing Reference ID number. To do this, • Login as System Engineer. • Under Configuration, click SIP Trunk Parameters. Matrix PRASAR UCS System Manual...
- Page 818 This DDI number is displayed as the CLI to the called party. The DDI numbers will be displayed as CLI to the called party only if the service provider supports this facility over the SIP Trunk. • Click Submit. Matrix PRASAR UCS System Manual...
-
Page 819: Direct Inward System Access (Disa)
All these can be done as if being done from a local extension of the PRASAR UCS. DISA Variants PRASAR UCS offers three types of DISA, each with a different method of authentication and level of access: • PIN Authentication-Multiple Calls •... - Page 820 For this type of DISA, the DISA CLI Authentication Table must be configured first. To make another call, the caller must enter the DISA mode again, by calling the PRASAR UCS from the remote location.
- Page 821 Recording-Report”. • If DISA is disabled, PRASAR UCS will route the call by Auto Attendant logic, if Auto Attendant is enabled. 113. If no match is found for the CLI of the caller in the Table, the call will be routed as per the Incoming Call Routing configured in PRASAR UCS.
- Page 822 Make a list of remote users and their numbers whom you want to allow DISA. • For each remote user’s number on your list, write the Extension number of the PRASAR UCS you want to allow this extension user to log in.
- Page 823 You can configure as many as 999 numbers in this table, by clicking the tabs of the index on the top of the table. • Refer to the list of remote user numbers and the corresponding PRASAR UCS extension numbers you made. •...
- Page 824 A, B, C, D, from your remote device to use the features and facilities of PRASAR UCS. PRASAR UCS will not be able to understand the conventional way of dialing 'flash' key, therefore, the server supports specific codes for specific activities. If these codes are received during a DISA session, PRASAR UCS interprets it and performs the associated activity.
- Page 825 The features listed below are not supported in the DISA mode. • Auto Call Back • Auto Redial • Call Park • Call Chaining • Walk-In Class of Service • Self Ring Test • Live Call Supervision Matrix PRASAR UCS System Manual...
-
Page 826: Direct Station Selection Console
While the DSS Console is generally used by the Operator/receptionist in an organization, it is also meant to be used by anyone who needs to access various features of PRASAR UCS at a touch of a single key. The DSS Console DSS532 is offered by Matrix for SPARSH VP510. - Page 827 Feature like Auto Redial requires an LED to show that it has been set or canceled. So, the LED of the DSS key to which the Auto Redial feature has been assigned will glow Red, when Auto-Redial is set, and the LED is turned off when the feature is canceled. Matrix PRASAR UCS System Manual...
-
Page 828: Distinctive Rings
Triple ring can be set for 'Priority Internal Calls' and long rings can be set for 'Alarm Calls'. Distinctive Rings on SIP Extensions On SIP Extensions, PRASAR UCS supports Distinctive Rings using Alert-INFO field in the INVITE message. To indicate the different call events, PRASAR UCS sends the Ring Text for the respective Ring Type. - Page 829 However, if required, you can change the default Ring Pattern and the Ring Text (for SIP Extensions) loaded by the system. When you change the Ring Texts for the Ring Types in PRASAR UCS, you must configure the same Ring Text in the SIP phones.
-
Page 830: Do Not Disturb (Dnd)
DND-Override will not work if the called phone has ‘Privacy from DND-Override’ enabled in its Class of Service or if the called extension has opted for intercept routing. So, using DND-Override feature, the users can be reached in case of some emergency despite the DND set on the phone. Matrix PRASAR UCS System Manual... - Page 831 This DND text message is displayed on the calling extension, only if the calling extension is an Extended IP Phone. The PRASAR UCS supports 9 different DND Text Messages, out of which 8 messages can be changed as per user requirement by the System Engineer.
- Page 832 Configuring DND in Class of Service In the default Station Basic Feature Template 01 assigned to all extensions of the PRASAR UCS, the default CoS group 01 has DND enabled. So, all extensions of PRASAR UCS can set and cancel DND. DND-Override and Privacy from DND-Override are disabled in the default CoS group 01.
- Page 833 CoS in the Station Basic Feature Template and how to apply this template on extensions. Configuring DND Messages using Jeeves • Login as System Engineer. • Under Configuration, click System Parameters. Matrix PRASAR UCS System Manual...
- Page 834 “System Parameters”. Configuring Intercept Destination for DND By default, the Station Advanced Feature Template 01 is assigned to all extensions of the PRASAR UCS and in this template the Intercept Destination is configured as None. You can either configure the Intercept Destination in this template or you may select another template and customize it as per your requirement.
- Page 835 • Internal calls • External calls • Cancel DND • Select Cancel DND and press 'Enter' key. • Dial 18-0 • You get a text message 'DND Canceled' on the phone's display and confirmation tone. Matrix PRASAR UCS System Manual...
- Page 836 Go Idle or you get dial tone after confirmation tone. DND-Override For Extended IP Phone Users To select a DND-override: • Dial an extension number. • You get routing beeps and a DND Text message (if using Extended IP Phone) Matrix PRASAR UCS System Manual...
- Page 837 Dial '4', the DND-Override Code, during the message or the routing beeps. • The called extension will start ringing. • You will get Ring Back tone. • If the dialed phone is busy, you will get busy tone. Matrix PRASAR UCS System Manual...
-
Page 838: Dss Call Pick-Up
If DSS Call Pick-Up-Trunk is not enabled in the COS assigned to extension user A, the DSS Key blinks fast in Red color to indicate that the there is an incoming ringing call. However, A will not be able to pick-up the incoming ringing call on that trunk. Matrix PRASAR UCS System Manual... - Page 839 When the DSS key assigned to the trunk blinks fast in violet color to indicate that there is an incoming call on the trunk, press the DSS Key. • You are in speech with the calling party. • You may talk. Matrix PRASAR UCS System Manual...
-
Page 840: Dynamic Lock
With this feature, extension users can prevent misuse of outgoing call facility from their extensions, especially in their absence. Dynamic Lock also forms the basis of 'Call Privilege', which is feature of the Hotel Application of PRASAR UCS. Refer the PRASAR UCS Hospitality System Manual to know more. - Page 841 Toll Control Level. For Dynamic Lock - Automatic • The user of extension A sets the Dynamic Lock by entering the User Password, setting the Dynamic Lock Timer, and selecting the desired Toll Control Level. Matrix PRASAR UCS System Manual...
- Page 842 Password. Dynamic Lock in Class of Service In the default Station Basic Feature Template 01 assigned to all extensions of the PRASAR UCS, the default COS group 01 has Dynamic Lock enabled. So, all extensions can set Dynamic Lock. In the default COS group 01, 'Decrement Dynamic Lock Timer for Internal Calls' is disabled.
- Page 843 Toll Control Level at the end of the Timer. • The extension user must change the default User Password to be able to set the Dynamic Lock on his/ her extension. Refer the topic “User Password” for instructions on changing the password. Matrix PRASAR UCS System Manual...
- Page 844 Press DSS Key assigned to Dynamic Lock. • Dial 141. • Enter Phone Menu by pressing 'Enter' key. • You get the prompt: <Enter User Password>. • Enter your User Password. • Select the desired Toll Control Level: Matrix PRASAR UCS System Manual...
- Page 845 To set Dynamic Lock Level: • Press DSS key assigned to Dynamic Lock. • Enter Phone Menu. • You get a text message 'Enter Room/Phone Number'. • Enter the extension number for which you want to set Dynamic Lock. Matrix PRASAR UCS System Manual...
- Page 846 • Toll Control Level 0 • Toll Control Level 1 • Toll Control Level 2 • Toll Control Level 3 • Press 'Enter' key. • You get the confirmatory text message 'OK!' and confirmation tone. Matrix PRASAR UCS System Manual...
-
Page 847: Emergency Calls (911) - Reporting To Psap
“License Management”. The PRASAR UCS allows you to assign Customer Emergency Services Identification (CESID) number to each extension user. When the user dials the Emergency number 911, the system sends the caller’s CESID number to the network and the call is routed to the Public Safety Answering Point (PSAP). - Page 848 • Click Submit. Matrix PRASAR UCS System Manual...
-
Page 849: Emergency Conference
This feature can be used to call and consult with a group of people in emergency situations. The number of parties that can be included in an Emergency Conference group depends on the Multiparty Conference capacity of the PRASAR UCS. For details, see “Conference-Multiparty”. - Page 850 During Ring Back Tone, as the system rings on the extensions of the group, after the initiator of the conference has dialed the feature access code. • To cancel the Emergency Conference, extension H must dial the feature access code for Cancel Conference, 190 (default). Matrix PRASAR UCS System Manual...
- Page 851 • Select the desired Department Group number and press the Enter Key. • Both the conferences will be merged. Emergency Conferences can be merged by an Extended IP Phone users only through the Phone Menu. Matrix PRASAR UCS System Manual...
- Page 852 The initiator or participants can cancel an emergency conference. • PRASAR UCS supports a maximum of 8 participants in a single or multiple conference. To increase the number of participants in the conference, you must purchase the Conference Participant License. To know more, refer “License Management”...
-
Page 853: Emergency Detection And Reporting
Operator extension. How it works When an extension of PRASAR UCS makes an emergency call by dialing an Emergency Number: • The system hunts for a free trunk in the OGTBG selected for routing the emergency number, and dials out the number from a free trunk. - Page 854 You can either customize the default group OR customize and assign a different group. You can select a different group for each time zone, that is Working Hours (WH), Break Hours (BH) and Non-working Hours (NH). • Click Submit. Matrix PRASAR UCS System Manual...
- Page 855 The system plays the Confirmation Tone followed by the Dial Tone. • The acknowledged Emergency call is removed from the Emergency Alarms Log and is logged into the System Activity Log with the details of the extension that acknowledged the call. Matrix PRASAR UCS System Manual...
-
Page 856: Emergency Dialing
Emergency dialing will not work if Mains Power to the PRASAR UCS fails. How to configure The Emergency numbers are fixed as per the Region where PRASAR UCS is installed, you can add emergency numbers, as required. For instructions, see “Configuring Emergency Number... - Page 857 Let us take the example of Australia, where the emergency number is 000 and the trunk access code is 0. Now, when an extension user of PRASAR UCS located in Australia dials ‘0’ of the emergency number, the system will consider it as trunk access code and will apply the trunk access code logic.
-
Page 858: Extended Ip Phone/Varta Uc Client - Operation
SPARSH VP248S - the standard model, with a 2-line x 24-character LCD display. • SPARSH VP248P - the premium model, with a 6-line x 24-character LCD display. It is a powerful extension, supporting a host of phone and PRASAR UCS features, as listed below. IP Phone Features •... - Page 859 Speaker key with LED Date and Time Volume decrease key C u rs o r Dial Pad Touch sense feature keys Programmable feature keys Touch sense navigation keys Handset Volume increase key 4P4C Spring Cord Matrix PRASAR UCS System Manual...
- Page 860 6 lines x 24 LCD display capacity characters characters LCD with backlight Headset Interface Ringer Lamp (LED) Speaker Phone Full duplex Full duplex SPARSH VP248S 2 lines and 24 characters LCD display, full duplex, capsense feature keys Matrix PRASAR UCS System Manual...
- Page 861 Auto Redial Call Long, very slow (2000ms ON, 4000ms OFF) Auto Call Back Call Short, slow (750ms ON, 2250ms OFF) Priority Triple (400ms ON, 200ms OFF, 400ms ON, 200ms OFF, 400ms ON, 2000ms OFF) Programming mode Continuous Matrix PRASAR UCS System Manual...
- Page 862 Back key, used to move the cursor, return from the Sub-menu to the Main Menu. Feature Keys These are 12 capsense keys assigned to important or frequently accessed features of PRASAR UCS. Refer to the table given below: Sr.No.
- Page 863 Direct Station Selection (DSS) Keys These are 16 programmable keys that can be assigned to Stations and Trunks and important or frequently accessed features of PRASAR UCS. For instructions on programming these keys, see “DSS Key Settings” under “Configuring Matrix SPARSH VP248”.
- Page 864 For instructions on customizing the Key Maps, see “Customizing Extended IP Phone Templates using Jeeves”. You can also personalize the key maps for each location, for instructions, see “DSS Key Settings” under “Configuring Matrix SPARSH VP248”. Matrix PRASAR UCS System Manual...
- Page 865 Key Templates. For example, if you have assigned a common Executive Key Template to 12 Extended IP Phones, but you want to reassign some of the keys on two of these Extended IP Phones, PRASAR UCS allows you to selectively personalize the key maps of these two Extended IP Phones.
- Page 866 Configuring SPARSH VP248 For detailed instructions on how to configure SPARSH VP248, see “Configuring Matrix SPARSH VP248”. Operating SPARSH VP248 Please refer the EON48_310_SPARSH VP248_310 User Guide for instructions on operating the features of PRASAR UCS. Matrix PRASAR UCS System Manual...
- Page 867 Elegant design, built-in programmable DSS Keys and plug-n-play connectivity makes SPARSH VP310 an easy to use phone for executives. SPARSH VP310 works in tight integration with PRASAR UCS for speed of operations and better workforce collaboration. Key Features •...
- Page 868 Phone Settings of the SPARSH VP310 Phone Menu. Ringer LED The Ringer LED indicates incoming internal and external calls. The LED Cadence will match with the Ring Cadence of the incoming internal/external call. Matrix PRASAR UCS System Manual...
- Page 869 Back key, used to move the cursor, return from the Sub-menu to the Main Menu. is the Cancel key, used to exit a menu. Feature Keys There are 9 Feature keys assigned to important or frequently accessed features of PRASAR UCS. Sr.No. Feature icon...
- Page 870 Direct Station Selection (DSS) Keys These are 12 programmable keys that can be assigned to Stations and Trunks and important or frequently accessed features of PRASAR UCS. For instructions on programming these keys, see “DSS Key Settings”...
- Page 871 The dial pad consists of 12 fixed keys for the digits 0-9, and the characters * and #. The dial pad is used for dialing numbers of extensions, external parties, and for dialing the programming and feature access codes. Speaker Key The speaker key sets the phone in 'Speaker mode' for hands-free operation. Matrix PRASAR UCS System Manual...
- Page 872 For instructions on customizing the Key Maps, see “Customizing Extended IP Phone Templates using Jeeves”. You can also personalize the key maps for each location, for instructions, see “DSS Key Settings” under “Configuring Matrix SPARSH VP310”. Matrix PRASAR UCS System Manual...
- Page 873 Key Templates. For example, if you have assigned a common Executive Key Template to 12 Extended IP Phones, but you want to reassign some of the keys on two of these Extended IP Phones, PRASAR UCS allows you to selectively personalize the key maps of these two Extended IP Phones.
- Page 874 General Parameters under SIP Extensions. See “Configuring Matrix SPARSH VP310” for instructions. Connecting SPARSH VP310 For detailed instructions to connect SPARSH VP310, see “Connecting SPARSH VP310 as Extended SIP Extension” in SIP Extensions. Matrix PRASAR UCS System Manual...
- Page 875 VP330 delivers a seamless communication experience that is convenient and ready to use in real time, so that you can focus on the task in hand. Once it is registered with the PRASAR UCS, you can start operating the phone.
- Page 876 Wi-Fi network and offers flexibility to work from anywhere in the office. If your installation setup does not meet the requirements of suitable wired Ethernet connectivity due to any reason, then you can connect the compatible Wi-Fi Adapter supplied by Matrix to the USB port to register and use the phone.
- Page 877 Front View Ringer LED LCD Screen Fixed Function Keys DSS (Direct Station Selection) Keys Digit Keys/ Dial pad Keys Volume Up Key/ "+" Key Speaker Key Volume Down Key/ "-" Key Handset Matrix PRASAR UCS System Manual...
- Page 878 USB Port for Wi-Fi Adapter LAN Port for a LAN Switch / Router PC Port for a PC / Computer Power Port for the Power Adapter Left Side View RJ11 Headset Port Headset Port Handset Port Matrix PRASAR UCS System Manual...
- Page 879 SPARSH VP330 Key Template (default) All the key maps of the SPARSH VP330 are the same. Feature Keys and DSS Keys Matrix PRASAR UCS System Manual...
- Page 880 As SPARSH VP330 may be the extension of the Operators and Executives in an enterprise to meet the varied requirements of each user group, these key maps can be customized to match the exact requirement of individual users. For instructions on customizing the Key Maps, see “Customizing Extended IP Phone Templates using Matrix PRASAR UCS System Manual...
- Page 881 SPARSH VP510 features a Vivid LCD Graphical Display, Direct Station Selection (DSS) Keys, 3.5mm Headset connectivity, High Quality speakerphone and high definition audio quality. Engineered to deliver full feature access of PRASAR UCS, SPARSH VP510 acts as face of your communication system covering wide array of business environments.
- Page 882 IP Assignment: Static /DHCP • TCP/DNS-SRV • AEC encryption for config file • IEEE802.1x • 3.5 mm / RJ9 headset port • Dual port 10/100 Mbps Ethernet • Stand with 2 adjustable angles • PoE (IEEE 802.af) class2 Matrix PRASAR UCS System Manual...
- Page 883 The LCD display of the phone is backlit. The LCD backlight can be turned on and off as well as adjusted for contrast and brightness from the Display Settings of the Phone Menu. Ringer LED The Ringer LED will glow in Blue (1 sec ON – 500 msec OFF) to indicate incoming internal and external calls. Matrix PRASAR UCS System Manual...
- Page 884 When there is an incoming call it functions as the Answer Key. • Cancel Key : To Cancel all features set by you or exit the Menu/sub-menu. Feature Keys There are 8 Feature keys assigned to important or frequently accessed features of PRASAR UCS. Assigned Feature icon Programmable Feature...
- Page 885 Direct Station Selection (DSS) Keys These are 16 programmable keys that can be assigned to Stations and Trunks and important or frequently accessed features of PRASAR UCS. For instructions on programming these keys, see “DSS Key Settings”...
- Page 886 LED which glows Blue when pressed to indicate that the Headset mode is turned on and is turned off, when you press it again to indicate that you have exit the headset mode. Matrix PRASAR UCS System Manual...
- Page 887 Key Templates. For example, if you have assigned a common Executive Key Template to 12 Extended IP Phones, but you want to reassign some of the keys on two of these Extended IP Phones, PRASAR UCS allows you to selectively personalize the key maps of these two Extended IP Phones.
- Page 888 During an on-going call, if there is another incoming call, an indication will be provided to you for the waiting call. The call waiting indication depends on the Call Waiting Tone (for SPARSH VP248/VP310/VP510) option you select in General Parameters under SIP Extensions. See “Configuring Matrix SPARSH VP510” for instructions. Matrix PRASAR UCS System Manual...
- Page 889 UC features of the IP Phone. Once it is registered with the PRASAR UCS, you can start operating the IP Phone. Key Features •...
- Page 890 System, calls made will be almost free. • Wi-Fi Support: Supports Wi-Fi (WLAN) connectivity using which the IP Phone provides seamless connectivity to the corporate Wi-Fi network and offers flexibility to work from anywhere in the office. If your Matrix PRASAR UCS System Manual...
- Page 891 IP Phone through the Wi-Fi Network. • Advanced Call Capabilities: Provides access to the features such as Callback, Dial-in Conference, Conversation Recording and many more. Extended SPARSH VP710, Front View Matrix PRASAR UCS System Manual...
- Page 892 Places a call on hold or resumes a held call. Accesses voice mails. Voicemail Key Adjusts the volume of the handset, headset, speaker, ringer or Volume Key media. Keypad Provides the digits and special characters. Provides speaker audio output. Speaker Matrix PRASAR UCS System Manual...
- Page 893 Solid Red When the video call is muted. When the video call is placed on hold. When the Phone is powered off. When the camera is not connected properly. When the camera shutter switch is closed. Matrix PRASAR UCS System Manual...
- Page 894 Matrix VARTA ADR100 is a proprietary SIP (Session Initiation Protocol) based UC Client running on Android Phones/Tablets, delivering full-array of Matrix PRASAR UCS features to the user on-the-go along with an added advantage of video calling. Through tight integration with the enterprise mobility features of the PRASAR UCS, Matrix VARTA ADR100 provides advance call capabilities including Conferencing, Corporate Directory Access (Global Directory), Call Logs and Conversation Recording with one-touch access.
- Page 895 Wi-Fi or 3G network. Considering the case of roaming users, one can register Matrix VARTA ADR100 with the PRASAR UCS using the enterprise Wi-Fi network when working within the office (that is within the organization's dedicated Wi-Fi coverage area). While working out of the office (where Wi-Fi network may not be available), one can register the application using the Mobile Data (3G) network.
- Page 896 Cost Effective Calling: If you are using the enterprise Wi-Fi network to register Matrix VARTA ADR100 with the PRASAR UCS; calls made from the application will be almost free. Even if you are using the application via 3G network during roaming, external calls can be made using the PRASAR UCS trunks and thus reducing mobile calling and roaming charges.
- Page 897 Matrix VARTA AMP100 is a proprietary SIP (Session Initiation Protocol) based UC Client running on iPhones, delivering full-array of Matrix PRASAR UCS features to the user on-the-go along with an added advantage of video calling. Through tight integration with the enterprise mobility features of the PRASAR UCS, Matrix VARTA AMP100 provides advanced call capabilities including Conferencing, Corporate Directory Access (Global Directory), Call Logs and Conversation Recording with one-touch access.
- Page 898 Cost Effective Calling: If you are using the enterprise Wi-Fi network to register Matrix VARTA AMP100 with the PRASAR UCS; calls made from the application will be almost free. Even if you are using the application via 3G network during roaming, external calls can be made using the PRASAR UCS trunks which reduces calling and roaming charges to a significant amount.
- Page 899 “Configuring Matrix VARTA ADR100/AMP100 UC Clients”. Operating VARTA AMP100 Refer to Matrix VARTA AMP100 User Guide for instructions on operating the features of PRASAR UCS. MATRIX VARTA WIN200 MATRIX VARTA WIN200, is a SIP (Session Initiation Protocol) based Unified Communication Client running on Windows OS, delivering full-array of the System features to the user on-the-go along with an added advantage of video calling.
- Page 900 For detailed instructions on how to configure MATRIX VARTA WIN200, see “Configuring Matrix VARTA WIN200 UC Client”. Operating MATRIX VARTA WIN200 Refer to MATRIX VARTA WIN200 User Guide for instructions on operating the features of PRASAR UCS. Matrix PRASAR UCS System Manual...
-
Page 901: Firebase Cloud Messaging (Fcm) Support
“Configuring Matrix VARTA ADR100/AMP100 UC Clients”. Let us see how the notifications will be sent by the server when MATRIX VARTA ADR100 application is registered with the server as a SIP Extension and it is in the background. There is an incoming call or message: •... - Page 902 A connectivity between the system and the FCM Server is required so that the Push notifications can be sent to the clients. To check the FCM connectivity status, • Log into Jeeves. • Click Maintenance. Matrix PRASAR UCS System Manual...
- Page 903 Timeout - if there is no connectivity. If the Connectivity Test of either of the servers (APNS or FCM) with PRASAR UCS is not successful, then Push Notifications will not be sent to the Mobile Clients — MATRIX VARTA ADR100 / AMP100 application.
-
Page 904: Flashing On Trunks (Continued Dialing)
ITSP’s while in speech. To overcome this, PRASAR UCS supports Flashing on Trunks (Continued Dialing), which informs the system about the codes dialed for the features of the ITSP’s on trunks by extension users. -
Page 905: Flexible Numbers
What’s this? PRASAR UCS offers Flexibility to assign a code of your choice to access an extension. This code is called Flexible number. For example, to access first SIP Extension one can dial 2001. It is possible to change this code to any other number of your choice. - Page 906 • Define the range of Station Access Codes (Extension Number/Flexible Number/Access Code) that you wish to assign to the Extension Type you selected in Start Extension Number and End Extension Number. Matrix PRASAR UCS System Manual...
- Page 907 Similarly you can assign the Access Codes (Flexible Numbers) to Department Group or Virtual Extension. The other parameters need to be configured manually on the respective pages of the SIP Extension/ Department Group/ Virtual Extensions. Matrix PRASAR UCS System Manual...
-
Page 908: Floor Service
'38' on the floor service extensions of their respective floors. • Offices that have a centralized floor service, instead of one on each floor. The PRASAR UCS can be programmed to land calls made from all extension phones by dialing '38' on the common floor service extensions. - Page 909 The option is not relevant if the routing group has only one member extension. • If any member extension rejects an incoming call and the system again checks the routing group sequence, you can allow or restrict placing the same call on this extension. Select the When member Matrix PRASAR UCS System Manual...
- Page 910 Click Station Advanced Feature Template to open the page. All extensions are assigned the Advanced Feature Template 01, by default. If the enterprise requires separate floor-service group for each floor, program a separate Station Advanced Feature Template for the extensions of each floor. Matrix PRASAR UCS System Manual...
- Page 911 There are 96 different Routing Groups that can be configured as Floor Service Groups. By default, no Routing Group is assigned to Floor Service in the Template ('00'). Calls from the extension will land on the Floor Service (Routing) Group you have assigned here. • Click Submit. Matrix PRASAR UCS System Manual...
- Page 912 Check with your System Engineer if this access code has been changed and dial the new access code obtained from the System Engineer. For Extended IP Phone Users • Go OFF-Hook. • Press DSS Key assigned to Floor Service (if programmed) • Dial Access Code '38' • Talk • Go ON-Hook Matrix PRASAR UCS System Manual...
-
Page 913: Follow Me
For instructions, see “Class of Service (COS)” “Station Basic Feature Template”. How to use For Extended IP Phone Users To set Follow Me from another extension, • Press ‘Forward’ Key of the other extension. Dial 135. Matrix PRASAR UCS System Manual... - Page 914 • Enter your extension number. • Enter your user password. To cancel Follow me, from your extension, • Press ‘Forward’ Key of your extension phone. • Select ‘Cancel’ Dial 130. Matrix PRASAR UCS System Manual...
-
Page 915: Forced Answer
You can also dial ‘5’, the feature code for Forced Answer, immediately after dialing the desired extension number, instead of dialing it during the Ring Back Tone. This way, you can talk to the desired extension user without waiting for the called extension user to answer your call. Matrix PRASAR UCS System Manual... -
Page 916: Forced Call Disconnection
Selective Port Access, this feature must be enabled in the Class of Service of the extension. For instructions see “Class of Service (COS)” “Station Basic Feature Template”. • Higher Priority assigned than other extensions. See “Priority” for instructions. Matrix PRASAR UCS System Manual... - Page 917 You are advised to restrict access to this feature only to important extension users. Extension Users who are allowed this feature are advised to use it judiciously. 116. Only if you have grabbed this trunk using Selective Port Access. Matrix PRASAR UCS System Manual...
-
Page 918: Gain Settings
To avoid noise or echo during speech, you must set the speech volume levels on the SIP Trunks/Extensions. PRASAR UCS allows you to set the speech volume levels for the SIP Trunks/Extensions. The speech volume levels can be adjusted by increasing or decreasing the Gain Settings provided on the Trunk ports. - Page 919 Valid Range for Tx Gain and Rx Gain: -24dB to +24dB • Click Submit. Assigning the Gain Settings Templates • Assign the SIP Gain Settings Template you configured in the SIP Hardware Template, see “SIP Hardware Template”. Matrix PRASAR UCS System Manual...
-
Page 920: Handover And Handoff
Handoff is when you are back into the Wi-Fi network, you can move the call from the cellular number to the VARTA Mobile UC Client. The call is moved without being disconnected and redialing the number. PRASAR UCS will serve the Handover request only if: •... -
Page 921: Help Desk
The Help Desk extension calls back extension 2016. Also see “Auto Call Back (ACB)”. How to configure You can define an extension as ‘Help Desk’ by selecting the ‘Assign Help Desk function’ check box in its “Station Advanced Feature Template”. Matrix PRASAR UCS System Manual... -
Page 922: Holiday Table
Holiday Table What’s this? The Holiday Table feature of PRASAR UCS enables you to configure incoming call management for holidays. Using the Holiday Table feature of PRASAR UCS you can, • define the landing destination for incoming calls on trunks on holidays. - Page 923 After you have defined the above parameters, this is how the feature Holiday Table works, • On the set date and time, when PRASAR UCS detects a day as a holiday, it checks the configured Time Zone for Holiday and whether Holiday Message is configured.
- Page 924 Working Hours, Non-working Hours or As Per Time Table. Default: As Per Time Table. • If the incoming calls are routed to the VMS Auto Attendant, select the Holiday Message number that you want the system to play to the callers. Default: Auto_Attendant_01. • Click Submit. Matrix PRASAR UCS System Manual...
- Page 925 You can either use the default Holiday messages or customize your messages by recording messages of your preference. To know more about the default Holiday Messages and how to record customized Holiday Messages, see “Recording Voice Messages”. Matrix PRASAR UCS System Manual...
-
Page 926: Hotline
PRASAR UCS plays dial tone and waits for 5 seconds • If A dials a number within the Hotline Timer, PRASAR UCS outdials the number dialed by A. • If A does not dial any digit within this time, PRASAR UCS dials B’s number. - Page 927 Click Extension. • In Select Extension, enter the Number or the Name of the extension on which you want to set this feature. • Click Submit. • The searched extension users details appear on your screen. Matrix PRASAR UCS System Manual...
- Page 928 To cancel Hotline, click the Cancel Hotline button. When you set the Hotline Timer to ‘00’ seconds (for immediate Hotline), you will not be able to dial any digits, not even the feature code to Cancel Hotline. Matrix PRASAR UCS System Manual...
- Page 929 Press DSS key assigned to Hotline • Scroll to select ‘Set Hotline Timer’, press enter key • Enter Hotline Timer:000-255 seconds • Dial 154-seconds (000-255) The default value of Hot Line Timer is 3 seconds. Matrix PRASAR UCS System Manual...
- Page 930 The cancellation code must be dialed from the dial tone. You have to be very quick in dialing the cancellation code, if the delay in the Hotline Timer is set to 1 or 2 seconds. Matrix PRASAR UCS System Manual...
-
Page 931: Incoming Cli Modification
It presents the modified CLI to the extension; stores the modified CLI in the SMDR and in the Call Logs of extension. • When the received CLI is dialed out by the extension user from Call Log, PRASAR UCS dials out the same number. How to configure For this feature to work, Enable Incoming CLI Modification check box in “System Parameters”... - Page 932 Do not enter any prefix for the Country Code. By default it is Blank. • Area Code: Enter the Area Code of the place where the PRASAR UCS is installed. The Area Code helps PRASAR UCS detect whether the Incoming CLI received is a local number. Do not enter any prefix for the Area Code.
- Page 933 Prefix Area Code: If you have enabled the ‘Area Code required to make local calls’ check box in the previous parameter, enter the prefix digits for the area code for local calls in this field. • Click Submit. Matrix PRASAR UCS System Manual...
-
Page 934: Intercom
A can now talk with B. Feature Interactions • Do Not Disturb (DND): If the called extension has set DND, PRASAR UCS will not place the intercom call on the called extension. • Privacy from DND Override: If DND as well as Privacy from DND Override is enabled in the Class of Service of the called extension, PRASAR UCS will reject the Intercom call. - Page 935 Priority: The calling extension must have a higher Priority level than the called extension. When the Intercom call is generated on SIP Extension having multiple call appearance and already a call is present on the SIP Extension then the PRASAR UCS will place the Intercom call as normal call on the SIP Extension.
-
Page 936: Internal Call Restriction
Internal Call Restriction What’s this? Using this feature of PRASAR UCS, the operator will be able to allow/restrict internal calls. The operator has flexibility to allow calls during day time and restrict calls during night time. The operator can allow/restrict internal calls by assigning 'Guest Group' to the desired extensions. - Page 937 Click Extension. • In Select Extension, enter the Number or the Name of the extension on which you want to set this feature. • Click Submit. The searched extension users details appear on your screen. Matrix PRASAR UCS System Manual...
- Page 938 • Click Phone Properties to expand • Assign the desired group number to the extension from the Guest Group. • Click Submit. Matrix PRASAR UCS System Manual...
-
Page 939: Interrupt Request (Ir)
However, it will not work if the conversation is being recorded. • It will not work if the busy signal is due to the user being Off-hook, or in the middle of dialing, or accessing a feature of the PRASAR UCS. • “Call Toggle”: Once A and C comes in speech with each other, A can toggle between B and C using Call... - Page 940 If required you may also change the default value of the Interrupt Request Timer. For instructions see “System Timers and Counts”. How to use For Extended IP Phone Users When dialed extension is busy, • Press DSS Key assigned to Interrupt Request • Dial 3 on Busy Tone Matrix PRASAR UCS System Manual...
-
Page 941: Last Caller Recall
Last Caller Recall What’s this? PRASAR UCS offers a facility—Last Caller Recall— to trace the extension that last made the call to your extension. How it works • A’s extension number is 2001. • A wants to know who made the last call to extension 2001. -
Page 942: Last Number Redial
Dial 7. A List of last 16 external numbers dialed will appear on your phone’s display. • Scroll to select the desired number. • Press Enter key. • The system dials out the external number. Matrix PRASAR UCS System Manual... -
Page 943: Least Cost Routing-Carrier Pre-Selection
“Outgoing Trunk Bundle” and apply the ANT Table number you configured to this OG Trunk Bundle. • Create “OG Trunk Bundle Group” that includes the OG Trunk Bundle you created with Automatic Number Translation as member. Matrix PRASAR UCS System Manual... - Page 944 Assign the OG Trunk Bundle Group (containing the OG Trunk Bundle with ANT) to the extensions for the Time Zones, that is, Working Hours, Non-Working Hours, Break Hours, in the “Station Basic Feature Template” of the extensions. Matrix PRASAR UCS System Manual...
-
Page 945: License Management
2100 SIP Extensions with SPARK200. It enables you to use the PRASAR UCS ENT Application as well as all the licensed features it supports, free of cost for a period of 60 days. In this case, the application starts even if you have not purchased the PRASAR UCS SME/ ENT Application license. - Page 946 If you want to use licensed feature after the expiry of the demo period, you must purchase the license key and activate it in your system. • When you default the PRASAR UCS, the demo period will not be reset. • If you wish to use Redundancy feature during the Demo period, you must restart the system.
- Page 947 A new window opens which displays the features and functionalities that are currently available to you. • Click Close. • Keep your Current License Key and the License Voucher (paper or PDF) ready. • Open a new window on your browser. Matrix PRASAR UCS System Manual...
- Page 948 Enter http://www.matrixcomsec.com/MatrixLicense/ in the address bar. • Click Login to Access. The Login to Access page will open. • Enter your User Name and Password provided by Matrix and click the Login button. Matrix PRASAR UCS System Manual...
- Page 949 As Product Family, select the option SAPEX. • In the Current License Key field, type the current product license key you noted or paste the key you copied from the License Management page of Jeeves. Matrix PRASAR UCS System Manual...
- Page 950 • Click the View button. • The page displays the current License Profile on SPARK200. Click the Next button to continue. The License Activation page opens. Matrix PRASAR UCS System Manual...
- Page 951 In the License PIN field on this page, enter the 16-digit License PIN from the Voucher. • Click Details. The details appear in the fields Product Family, Product Name, Product Variant. Matrix PRASAR UCS System Manual...
- Page 952 On successful activation, the confirmation message will appear on your screen along with the activation date and time. The screens for Current License Profile and the New License Profile may differ according to the licenses purchased by you. Matrix PRASAR UCS System Manual...
- Page 953 A confirmation mail will also be sent to your e-mail ID (registered with Matrix). You may Save, Print, or Email this information for your records, by clicking the relevant button. • Note down or copy the New License Key generated on this page.
- Page 954 • To log off, click the Logout button. If you are unable to use Online Activation of the License Key or have no internet access, contact the Matrix License Support Centre for assistance in generating the new License key. Instructions for Customers To activate your License, you would need the License Voucher containing the 16-digit License PIN.
- Page 955 A new window opens which displays the features and functionalities that are currently available to you. • Click Close. • Send your Current License Key and the License PIN (on the Voucher) to the Matrix License Support Centre. • You will receive a new License Key.
- Page 956 Click the License Management link. • Click Enter License Key. A new window opens. • In Enter License Key, enter the New License Key you obtained from Matrix. • Click Submit. On successful activation, a confirmation message will appear on your screen. Click OK.
- Page 957 Similarly, you can activate all the other licenses available for PRASAR UCS. The current License Key and Service Profile will remain unchanged when the system is set to default or the firmware is upgraded. Matrix PRASAR UCS System Manual...
-
Page 958: Lightweight Directory Access Protocol (Ldap)
Therefore, you do not have to maintain the local directory. The LDAP server differentiates the data in its entries based on specific attributes. PRASAR UCS functions as the LDAP client and once it synchronizes with the LDAP server, it saves the fetched LDAP entries to the Global directory. You can search and dial out the desired contact from the Global directory. - Page 959 Full name surname Last name or family name distinguishedName Unique identifier for each entry Domain component company Company or organization name telephoneNumber Office phone number. mobile mobilephoneNumber Mobile or cellular phone number mail emailid Email address Matrix PRASAR UCS System Manual...
- Page 960 • Enable LDAP: Enable this check box if you wish to synchronize contacts from the LDAP server. When this check box is enabled, PRASAR UCS behaves as the LDAP client. By default, it is disabled. • LDAP Protocol: Displays the LDAP Protocol Version supported. By default, it is Version 3.
- Page 961 Select the desired attribute and enter the — Name, Number or Email-id. • Click the Test button. • If the connection has been successfully established then search results fetched from the LDAP server will be displayed. Matrix PRASAR UCS System Manual...
- Page 962 (if LDAP contacts are required). • Click Submit to save your settings. How to use To make an outgoing call to an LDAP contact from the synchronized Global Directory, refer to “Global Abbreviated Dialing”. Matrix PRASAR UCS System Manual...
-
Page 963: Live Call Supervision
“Station Basic Feature Template” for the required time zones. How to use For Extended IP Phone Users • Press DSS key assigned to Live Call Supervision • Dial 1098. • Enter the Extension number to be supervised Matrix PRASAR UCS System Manual... -
Page 964: Logical Partition
In this way the calling can be restricted as per your requirement. Matrix recommends you to enable the logical partition in order to avoid any toll bypass wherever necessary. Matrix will not be responsible in case of any discrepancy related to this. - Page 965 IP address, 192.168.5.0 here and in the Subnet Mask configure 255.255.255.0 If you want to allow calls from a particular IP only, configure the particular IP address, 192.168.5.0 as the IP Address and configure the Subnet Mask as 255.255.255.255. • Click Submit. Matrix PRASAR UCS System Manual...
-
Page 966: Macros
Extension users often have to dial access codes for specific functions like dialing a feature code, making an internal call, making an external call, etc. PRASAR UCS supports Macros, using which, you can abbreviate long number strings for regularly used functions into macros and assign them to a DSS key on a Extended IP Phone extension. - Page 967 Number Strings and Access Codes can be assigned for features such as Front Desk, Room Service, Voice Guided Alarm, Reservation Desk, Voice Mail System, Retrieve Message. These Macros have to be configured in this page. To know more, see the topic Customer Profile in the PRASAR UCS Hospitality System Manual.
-
Page 968: Meet Me Paging
• While the announcement is being made, • Press the DSS key assigned to Meet Me Paging. 120. This feature is not applicable for UC Clients — Matrix VARTA ADR100, VARTA AMP100 and VARTA WIN200. Matrix PRASAR UCS System Manual... - Page 969 Go ON-Hook and then go OFF-Hook. • Press the DSS key assigned to Meet Me Paging. • Dial 1093. • Dial the number of the paging extension. • You get connected to the Paging extension user. Matrix PRASAR UCS System Manual...
-
Page 970: Message Wait
Message Wait What’s this? The Message Wait feature of PRASAR UCS enables extension users/Operator to set Message Wait on other extensions to deliver important messages. If the extension user has a mailbox assigned, the Message Wait feature indicates to the extension user, the arrival of new messages in the user’s mailbox. - Page 971 Message Wait Indications The system gives Message Wait indication to extensions according to the option selected in the Message Wait Indication for that extension. The type of Message Wait Indication offered by PRASAR UCS are: • Stuttered Dial Tone: This Tone will be played as the Message Wait Notification to the extension user, when s/he goes OFF-Hook.
- Page 972 Select the option ‘Cancel Message Wait’ • Press Enter Key. To retrieve Message Wait: • Press DSS Key assigned to 'Retrieve Message Wait' or the Voice mail Key when the LED glows. • Dial 1077. Matrix PRASAR UCS System Manual...
-
Page 973: Mobility Extension
Mobility Extension What's this? PRASAR UCS offers mobility to its extension users whose nature of work keeps them away from their desks frequently and for longer durations. Using mobility extensions, the extension users of PRASAR UCS can make and receive their calls from their current (remote) location, placing calls through the system, and can access the system just as any other normal extension of PRASAR UCS. - Page 974 'DISA' parameter of the 'Trunk Feature Template'. • Make a list of numbers which the Mobility Extension users will use to access the PRASAR UCS from DISA mode. Configure this list of numbers in the "DISA - CLI Authentication Table".
- Page 975 The Mobility Extension User can access the system features by dialing specific codes after making calls on the DISA enabled trunk of PRASAR UCS, or after answering the calls received on his external number. These codes are listed below. Activity...
- Page 976 Make a call on DISA enabled Trunk from Mobility Extension User. • After receiving dial tone, dial 4. • The call ringing on the station of the same Call Pick up-Group will get connected with Mobility Extension User. Matrix PRASAR UCS System Manual...
- Page 977 Dial 191 after getting feature tone. To rejoin the Multiparty Conference, • Dial #1 to go Off Hook. • Dial 191. To permanently leave the Multiparty Conference, • While in multi-party conference, dial #0 to go Off Hook. Matrix PRASAR UCS System Manual...
- Page 978 • Make a call on DISA enabled Trunk from Mobility Extension User. • After getting Dial Tone, dial 133-TAC-external number. • The system will give confirmation tone. Call Forward-Busy/No Reply To set Call Forward-Busy/No Reply, Matrix PRASAR UCS System Manual...
- Page 979 Operator or by another extension user. • Using “Call Forward-Remote” and by setting “Call Forward-Scheduled” from the SA mode, the extension user/Operator can set Call Forward and Call Forward-Scheduled for any Mobility extension user. Matrix PRASAR UCS System Manual...
-
Page 980: Multi-Stage Dialing
Multi-Stage Dialing What's this? The Multi-Stage Dialing feature of PRASAR UCS is typically used in applications like Calling Card, where extension users are required to dial digits in stages when making a call using the calling card. The Multi-Stage feature enables extension users to directly dial the number they want to call, and the system dials out the number at different stages of the call by suitably modifying the number. - Page 981 Pause Timer to the required values.For instructions on configuring DTMF Out Dial on SIP Trunk, see, “Configuring SIP Trunks”. • If required you may configure the Call Proceeding Tone for Multi-stage Dialing as Network tone, Pseudo Tone, or Silent. For instructions, see “System Parameters”. Matrix PRASAR UCS System Manual...
-
Page 982: Music On Hold (Moh)
The music played to extension users and external callers who are put on hold is called Music on Hold (MoH). How it works PRASAR UCS plays the default MoH to the hold party.No special programming is required for using the default MoH.It is automatically played to the hold party. -
Page 983: Moh Management
To upload the MoH file: • Click Browse button to select the desired MoH file from the local disk on the Computer. • The system displays the name of the MoH File. Click to upload the file. Matrix PRASAR UCS System Manual... - Page 984 • If you are using Mozilla Firefox (version 3.5 recommended), before you save the configuration files, set the Downloads option of your browser as Always ask me where to save files. Matrix PRASAR UCS System Manual...
-
Page 985: Mute
To mute a call during speech: • Press the ‘Mute’ Key to silence outgoing speech. • Press Transfer Key. • Dial 1052 To resume outgoing speech: • Press the ‘Mute’ Key. The LED of the key is turned off. Matrix PRASAR UCS System Manual... - Page 986 • Press Transfer Key. • Dial 1052 Matrix PRASAR UCS System Manual...
-
Page 987: Number Lists
Number Lists What’s this? A ‘Number List’ is a group of number strings. PRASAR UCS uses Number Lists to support different features as Call Duration Control, Call Taping, Call Back on Trunk Ports, Station Message Detail Recording (SMDR). PRASAR UCS supports 16 Number Lists. Each Number List can contain upto 999 number strings. Each number string consist of a maximum of 16 characters. - Page 988 Call Taping allows you to record conversations of incoming and outgoing internal and external calls. When you set Call Taping on an extension for external calls, the PRASAR UCS uses two Lists: Number List - Incoming Calls: this list has the list of numbers of external callers whose conversation is to be recorded.
- Page 989 Take a pen and a paper. Decide which of the above-mentioned seven features are to be used. Number List according to the feature for which it is to be used. Programming Number List using Jeeves • Login as System Engineer. • Under Configuration, click Number List. Matrix PRASAR UCS System Manual...
- Page 990 The location Index 001 to 250 will appear for both lists on the page. • Enter each number string against a Location Index (refer to the list you prepared). • Click Submit. • Assign the Number List you prepared to the relevant feature. Matrix PRASAR UCS System Manual...
-
Page 991: One Touch Transfer
PRASAR UCS will serve the One Touch Transfer request made by a SIP Extension (Matrix Extended IP Phones or Mobile Clients) only. How it works Consider the scenario, wherein you have the following registered as your extensions: VARTA Mobile UC Client is registered as SIP Extension 1 at location 1. - Page 992 • Click One Touch Transfer to expand. • In Transfer to Extension Number, enter the destination extension number on which you want the call to be transferred, when the feature One Touch Transfer is accessed. Matrix PRASAR UCS System Manual...
- Page 993 During an ongoing call, press the DSS Key assigned to One Touch Transfer. • The destination extension number configured for One Touch Transfer starts ringing. • Answer the ringing call. • You will be in speech with the remote party. Matrix PRASAR UCS System Manual...
-
Page 994: Outgoing Trunk Bundle
What’s this? The Outgoing (OG) Trunk Bundle is set of parameters that completely define the grouping of the SIP trunks. These Bundles are further used to form an OGTBG. The PRASAR UCS supports 128 OG Trunk Bundles. Configuring using Jeeves OGTB •... - Page 995 Dialed Numbers and their corresponding Strip Digits and/or Add Prefixes. This table number is assigned to the specific trunk from which the number is to be dialed. Refer chapter “Automatic Number Translation” for more details. • Click Submit. Matrix PRASAR UCS System Manual...
-
Page 996: Og Trunk Bundle Group
Station System waits for Select next cheapest the next action Select next cheapest trunk in the group System waits for from the user trunk in the group the next action from the user Matrix PRASAR UCS System Manual... - Page 997 “Outgoing Trunk Bundle” • Least Cost Routing: If required select the desired method — Time-based LCR, Number based LCR, Time and Number based LCR or Service Provider-based LCR — as per your requirement. For details, “Configuring LCR”. Matrix PRASAR UCS System Manual...
- Page 998 2. When the trunk ports of OG trunk bundle configured in member 1 and member 2 all are busy, the OG trunk bundle member 3 will be used to route the call. Matrix PRASAR UCS System Manual...
- Page 999 None None None None None None None None None None None None None None None None None None Matrix PRASAR UCS System Manual...
-
Page 1000: Paging
When the Paging call is generated in SIP Extension having multiple call appearance and already a call is present on the SIP Extension then the PRASAR UCS will place the Paging call as normal call on the SIP Extension (as headers required in INVITE for paging call and intercom call are same). - Page 1001 On a sheet of paper create a three-column table for each page zone, as shown below. Enter the Type of extension- SIP, and the Software Port number of the extensions you want to include in the page zone. Page Zone 1 SIP Extension Member Number Type of Extension Port Number Matrix PRASAR UCS System Manual...
Need help?
Do you have a question about the PRASAR UCS and is the answer not in the manual?
Questions and answers